Locating the ODBC Database Connection Wizard
The first thing we must do is select the Windows Start Menu
Type ‘ODBC’ and you will see the result of ODBC Data Sources (64 -bit) as a result in the search See Figure 1
Click ODBC Data Sources (64 -bit) to start the creation wizard
Note: In order to connect to a database, a database needs to be installed. SOLIDWORKS Electrical and SQL will need to be installed before performing the steps in this document
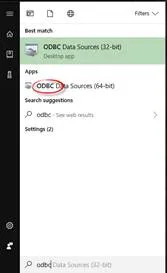
Figure 1
Creating an ODBC Data Source (Connection)
Once in the ODBC Data Source creation wizard, please select a source that you would like to connect to SQL is the data source (database) that SOLIDWORKS Electrical connects to pull its metadata
Please select SQL Server See Figure 2
Select Finish to complete the connection
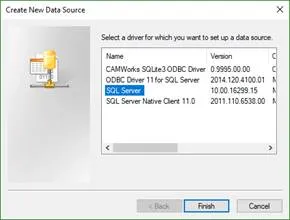
Figure 2
Configure SQL Server DSN Connection
When you create the ODBC Connection, you will automatically be taken to the Configuration screen for that function that is for the server you are connecting to.
You will now be asked to configure the DSN for the SQL server you have selected
Please Type a Name, Description, and select the SQL Server from the drop-down list. See Figure 3
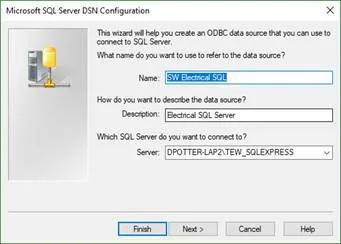
Figure 3
The Name can be anything that you can relate to best.
The Description can be what the function is of the process you are performing.
The database is already installed, so that is pretty much set. Please select your database From the ‘Server:’ drop-down list. The list is populated from the databases that the computer has installed or can see on the connected network. See Figure 4
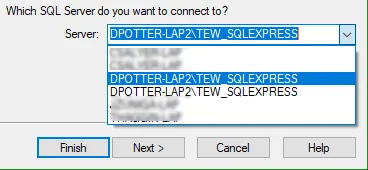
Figure 4
Select Next
The next page will ask you to chose the login method used to login to the instance that you selected on the previous step.
Please select the ‘With SQL Server authentication using a login ID and password entered by the user’
SOLIDWORKS Electrical uses tew as the default user
LoginID: tew
Password: SQLpwd4ew
See Figure 5
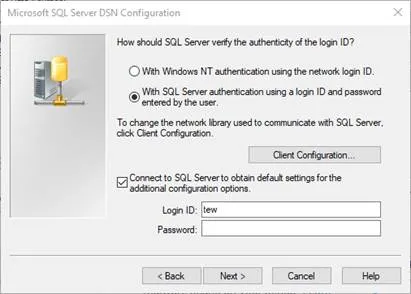
Figure 5
Select Next
Now we can see the configuration from a top view and review any changes before testing the connection
If you are happy with what you see in the configuration, select Test Data Source
See Figure 6
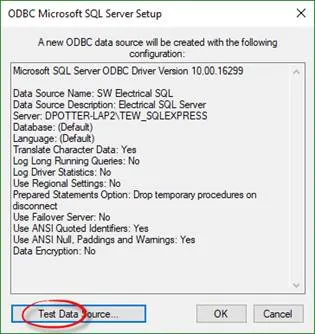
Figure 6
If you have a proper connectin in windows between the computer and the database, you will see that the message TEST COMPLETED SUCCESSFULLY will appear.
See Figure 7
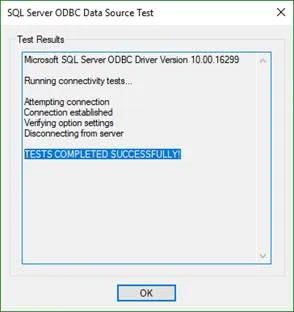
Figure 7
This is confirmation that the computer you are connecting to the database, will in fact connect.
Important: If the connection fails, please consult your IT/IS professional to see what is blocking the connection.


