Jack-O-Lantern Design Using SOLIDWORKS and Visualize
Fall is my favorite season, and October is my favorite month, so I deemed it fitting to create a GoEngineer Jack-O-Lantern in SOLIDWORKS to celebrate my favorite day of the year: Halloween!
Starting in SOLIDWORKS
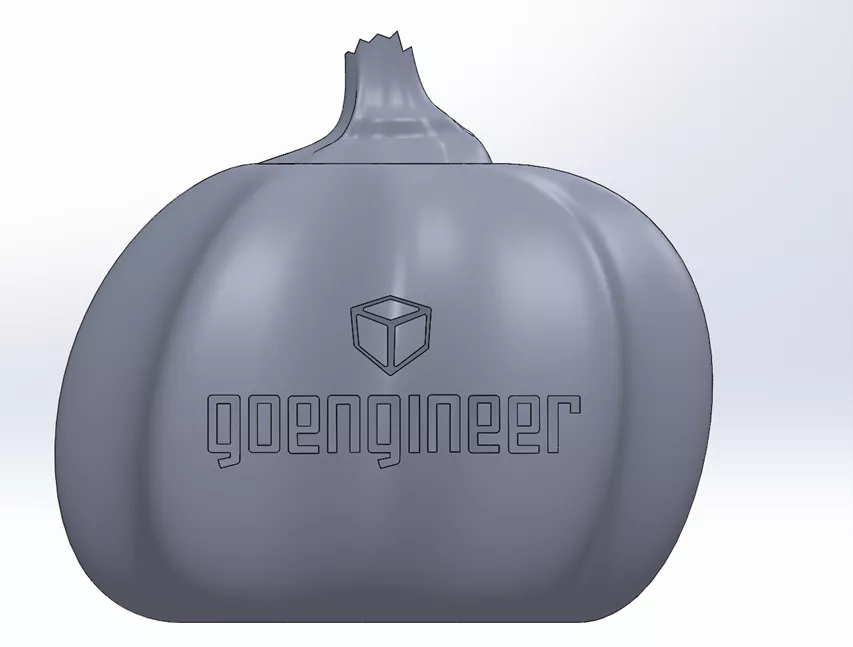
I created a pumpkin in SOLIDWORKS with the combination of a Surface Loft of three profile sketches (here, I used splines to create the organic pumpkin shape), a guide curve, followed by the Thicken command to create the basic framework of the pumpkin.

After completing the initial shape, I chose the GoEngineer logo for my pumpkin carving. I started a sketch on the Right Plane in order to make my carving on the larger side of my pumpkin. I inserted a Sketch Picture by Tools > Sketch Tools > Sketch Picture.
I inserted my picture and used a combination of splines, lines, and rectangles to outline the shape of the logo.
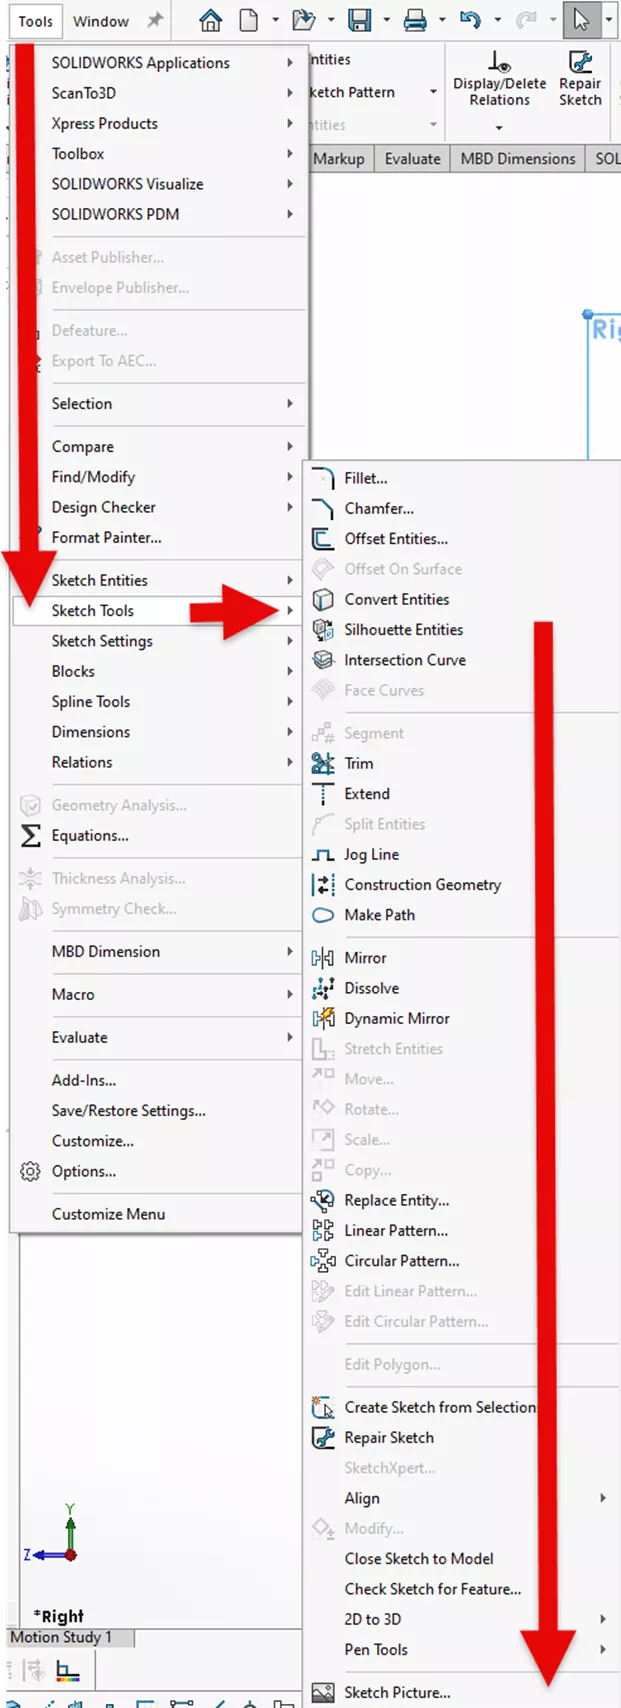
I followed this with an Extrude Cut through one side of the pumpkin to result in a “carved” pumpkin.
![]()
A few splines and a Loft feature later, I had a stem attached to my jack-o-lantern.
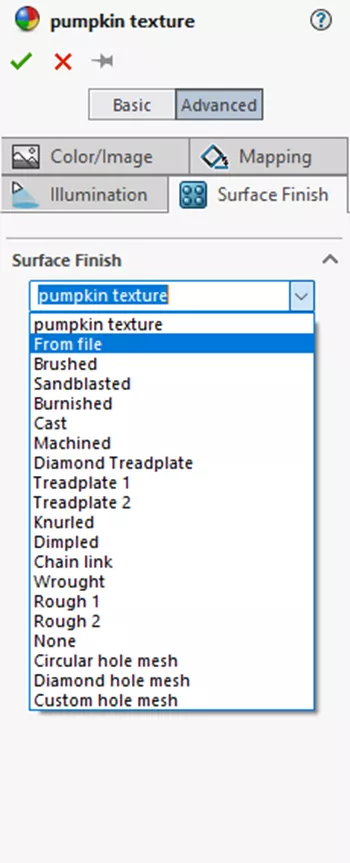
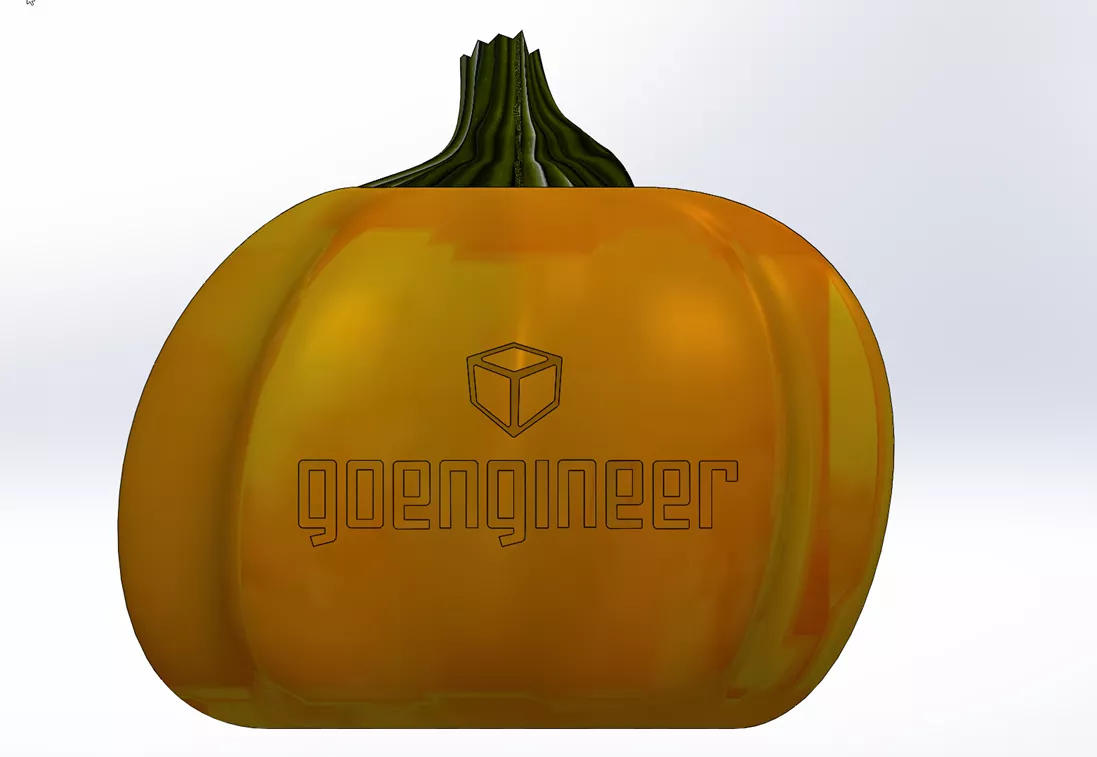
I added a few SOLIDWORKS appearances that I found on a quick Google image search for “pumpkin texture” and “pumpkin stem texture.” I added these as appearances in SOLIDWORKS by right-clicking on the Appearances PropertyManager > Add appearance.
By toggling the Appearance pane from Basic to Advanced, a few more options become available. Specifically, navigate to the Surface Finish tab > select From File > select the appearance you acquired for these purposes. Do this for both the pumpkin, as well as the stem.
I made these textures look “most realistic” by toggling the selections in the Mapping tab until it looked sufficient for my model.
SOLIDWORKS Visualize Lighting and Animations
SOLIDWORKS Visualize became the standard photorealistic rendering software offered by SOLIDWORKS following the retirement of PhotoView360. Starting in 2024, SOLIDWORKS Professional and Premium now include a SOLIDWORKS Visualize Standard seat.
Visualize Standard is the most common version of the tool but let's talk about two Visualize Professional capabilities: animations and light placement. (Compare Visualize Standard and Visualize Professional in our product matrix.)
Now, I’ll walk through creating the effects for my final model below, including fading the light in the background and increasing the light placed within the jack-o-lantern, to rendering the final animation.

SOLIDWORKS Visualize: Lighting and Animation Keyframes
To set up my animation, I toggled the Animation timeline via View > Show Timeline, (alternatively toggle the ‘T’ key on your keyboard). An important step before setting up the animation is determining how long you will want the animation to be. For this, I chose nine seconds. With the yellow flag in the Animation Timeline centered at zero (0:00), I can begin with my initial Keyframes.
Background Fade
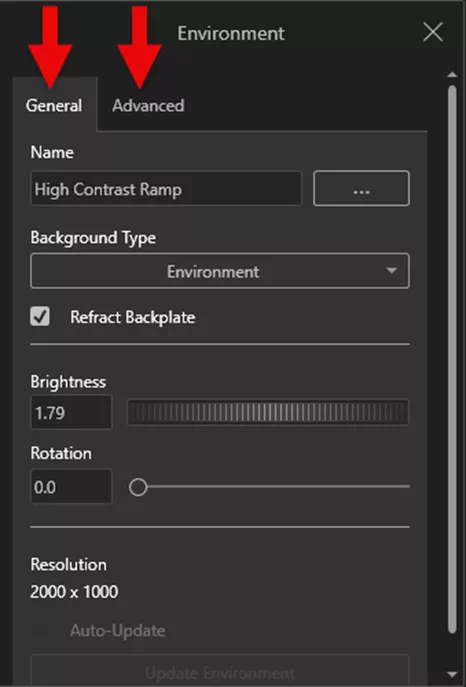
First, I assigned my scene High Contrast Ramp Environment in the Scenes tab on the SOLIDWORKS Visualize pallet on the right side of the User Interface. I right-clicked on the High Contrast Ramp Environment thumbnail preview once this was applied to my scene > Add Keyframe (or ‘K’ on the keyboard). Next, I dragged the yellow flag in the Animation Timeline to my 0:09 stop point.
Right-click anywhere in the Viewport > Properties > Environment.
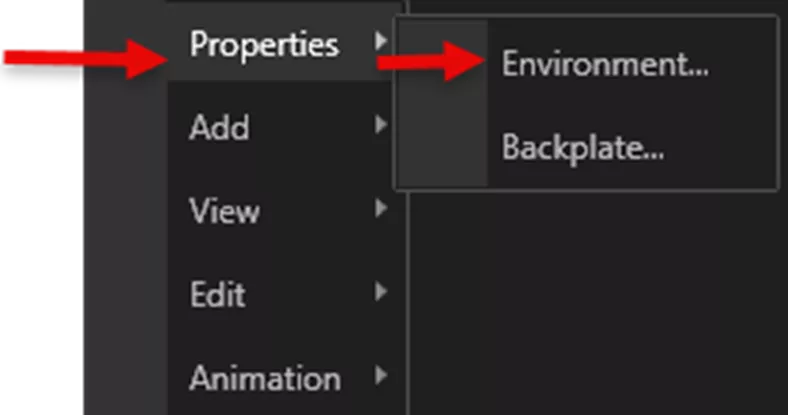
An Environment Properties pop-up box appears where you can change the Brightness and various other settings to darken the scene. Once you have reached a scene you are happy with, you can add a keyframe at your stop time by right-clicking the High Contrast Ramp Environment thumbnail in the Scene tab > Add Keyframe.
Light Placement and Animation
In SOLIDWORKS Visualize Professional, you can customize the lighting and choose locations and targets for your lights.
I placed a light inside the pumpkin to give my jack-o-lantern a “glow” effect as the light fades in the background. First, I navigated to the Scene tab > (+) > New Light > Pick Position. I selected the position within the actual pumpkin by hiding the stem in the Model pane and navigating around Viewport until I found a sufficient placement.
For this particular light, I chose the following options to start. Make sure to ensure your light is “off” at the beginning by setting the Brightness to 0.00.
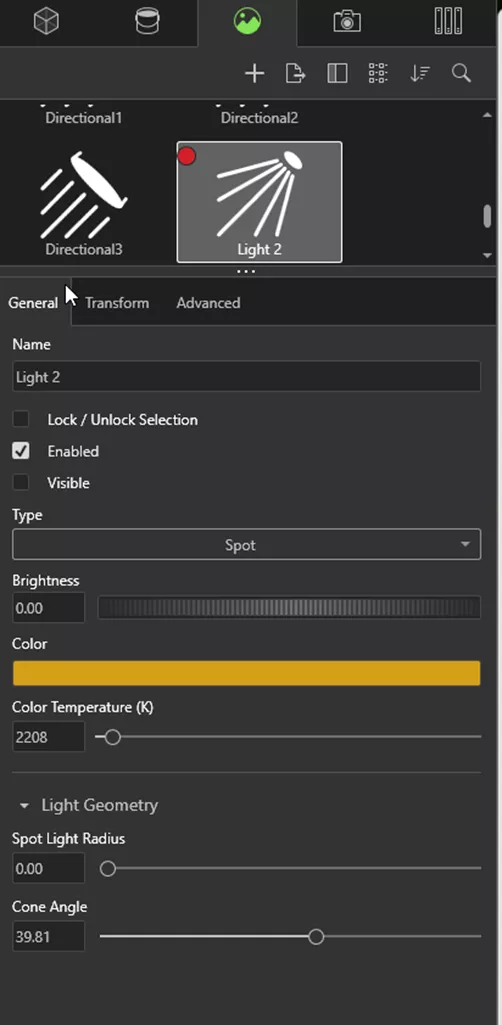
Place your animation flag at the start of your animation again (0:00) > right-click on the Light in the Scene tab > Add Keyframe. Move your animation flag to the end of your animation timeline > change the Brightness of your Light to 1.00 > right-click on the light > Add Keyframe.
Rendering the Jack-O-Lantern Animation
When I was satisfied with how my animation looked by playing through in the Visualize Viewport, I could render my Jack-O-Lantern fade!
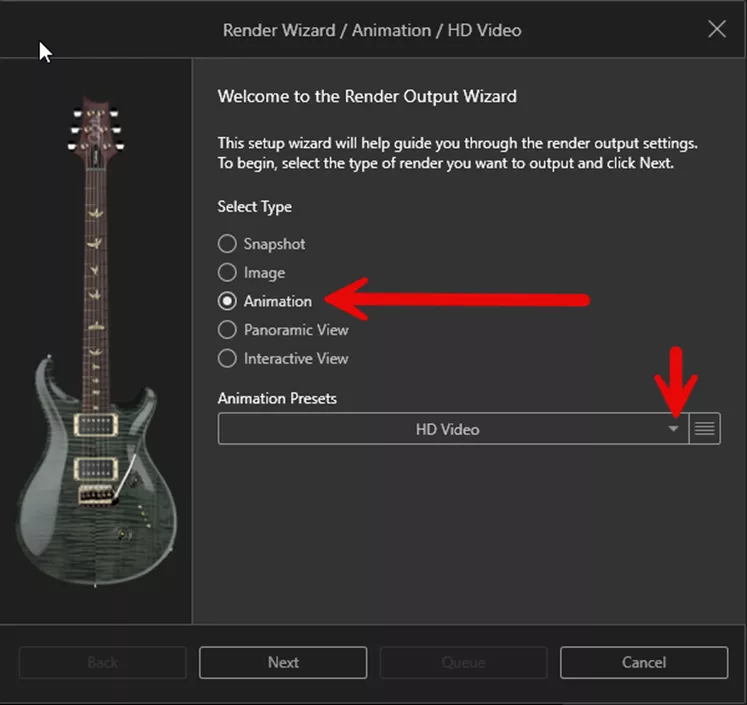
Navigate to the Render Wizard (the rightmost button on the Heads Up Display (HUD) and walk through the process of getting the animation render started:

On the Welcome page, select Animation, and choose an Animation Preset from the drop-down menu. Then click Next.
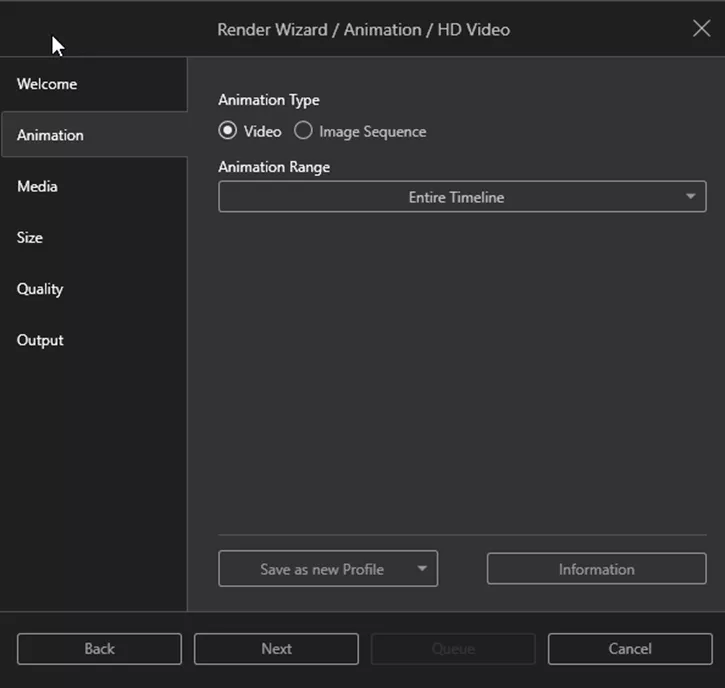
You will arrive next at the Animation Settings screen in the Render Wizard. I personally chose to have Visualize create the video for me rather than getting an Image Sequence that I would have to later stitch together in a video editing software.
For the Animation Range, if you pick Entire Timeline, make sure your red flag in the Animation Timeline is where your last Keyframes are, otherwise, you will have some “wasted” space in your final video.
The selections in the Media, Size, Quality, and Output tabs are left as the user’s choice, as they will dictate your rendering speed, quality, and final output locations.
Happy Halloween and happy designing!

About Camille Johnson
Camille Johnson is a Certified SOLIDWORKS Expert based out of Atlanta, Georgia. She earned her Bachelor of Science in Biomedical Engineering and Master of Science in Mechanical Engineering from the Georgia Institute of Technology in Atlanta, Georgia. She has been with GoEngineer, helping customers with SOLIDWORKS, SOLIDWORKS Visualize, SOLIDWORKS Composer, and DraftSight needs since January of 2024.
Get our wide array of technical resources delivered right to your inbox.
Unsubscribe at any time.