Import Symbols into SOLIDWORKS Electrical from Other Systems
SOLIDWORKS Electrical includes a set of symbols. These symbols might be sufficient for your requirements, or you may need to create your own to meet a specific standard. You can either start from scratch beginning by drawing the image, adding the attributes and connection points, and adjusting the appearance to suit your needs or modify an existing symbol.
If you have a resource that uses SOLIDWORKS Electrical, you could get an archive of the symbol. (This would need to be the same version or higher.)
Another method is to import a symbol from a DWG file that comes from a different software package. If they are available in DWG format, you can import them.
DWG Format
A DWG (from drawing) is a file format used for storing two- and three-dimensional design data and metadata. It is the native format for several CAD packages.
DWG files can be imported into SOLIDWORKS Electrical using the import wizard. The wizard can also be found in the library management tool for 2D Footprint and Title Block.
If the file contains symbols or a title block, the wizard allows you to associate the attributes they may contain with a SOLIDWORKS Electrical title block or symbol.
Here we will focus on importing DWG symbol files from other applications.
Where Do These DWG Files Come From?
The DWG files can come from a variety of other software. SOLIDWORKS provides a library of ANSI and IEC symbols in DWG format. These DWG files can be used in other applications that recognize the format.
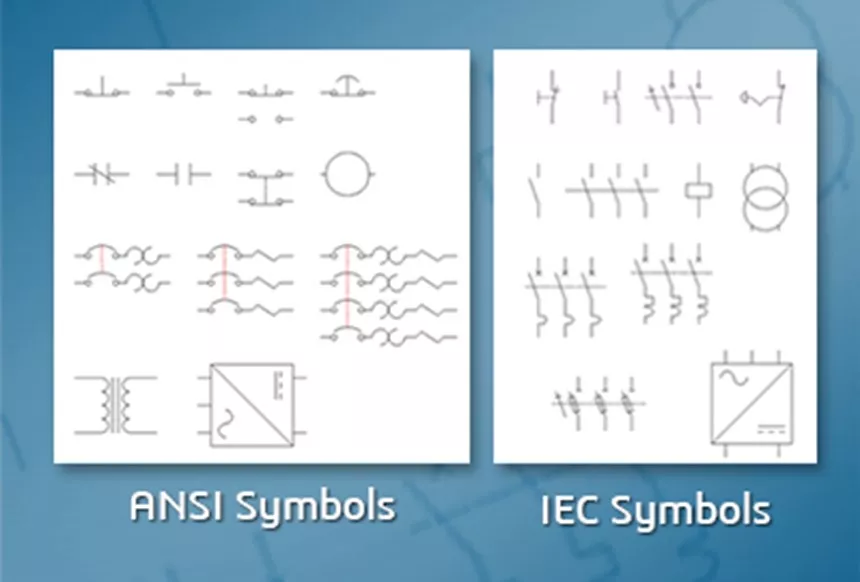
* These will also work with DraftSight and other 2D software.
Download the Complete Library of Symbols for your Electric Schematic Drawings
In this article, we will go through the process of importing DWG files into SOLIDWORKS Electrical and adding them to our SOLIDWORKS Electrical symbol library.
Setting up a Target Library
When importing symbols, I recommend putting them in a separate library, at least initially. Doing this will make it much easier to filter and select when needed. Once satisfied with the imported symbols, you can then include them in your standard libraries.
Creating a library
The Library Management tool allows you to manage all of the application libraries. It is not specific to the current electrical project.
Library management
Menu: Library > Library management
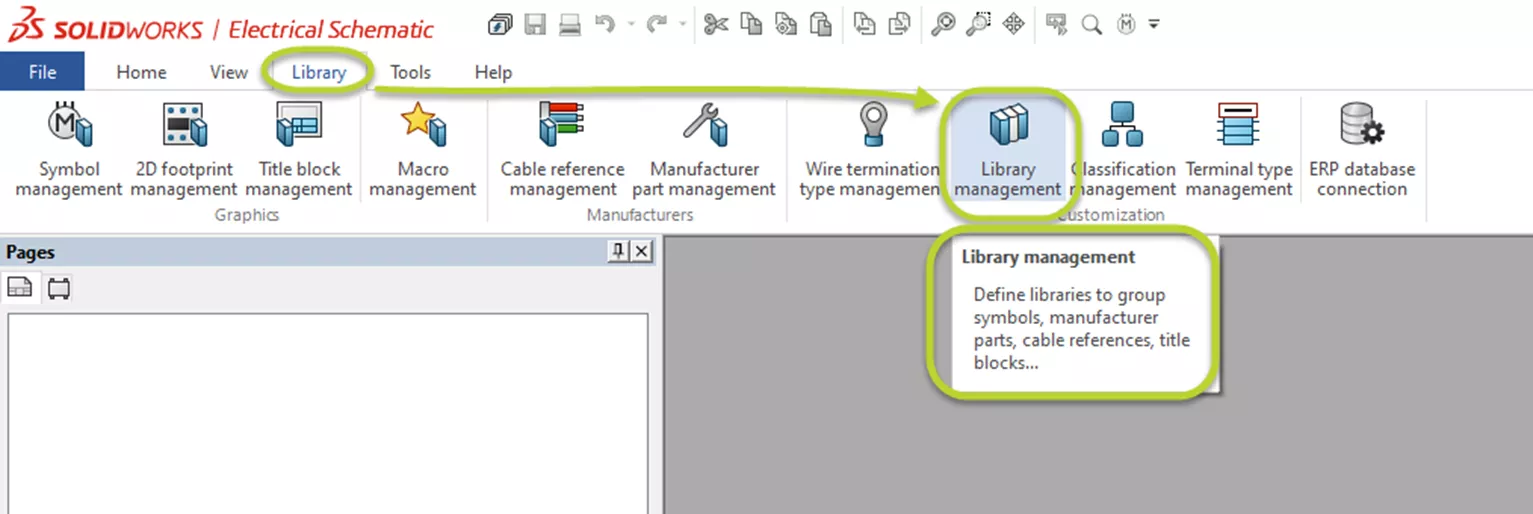
New - Add a new library.
Delete - Select the library you want to delete from the list and click the Delete icon. Only the library is deleted. Its content (symbols, title blocks, and references), is not deleted.
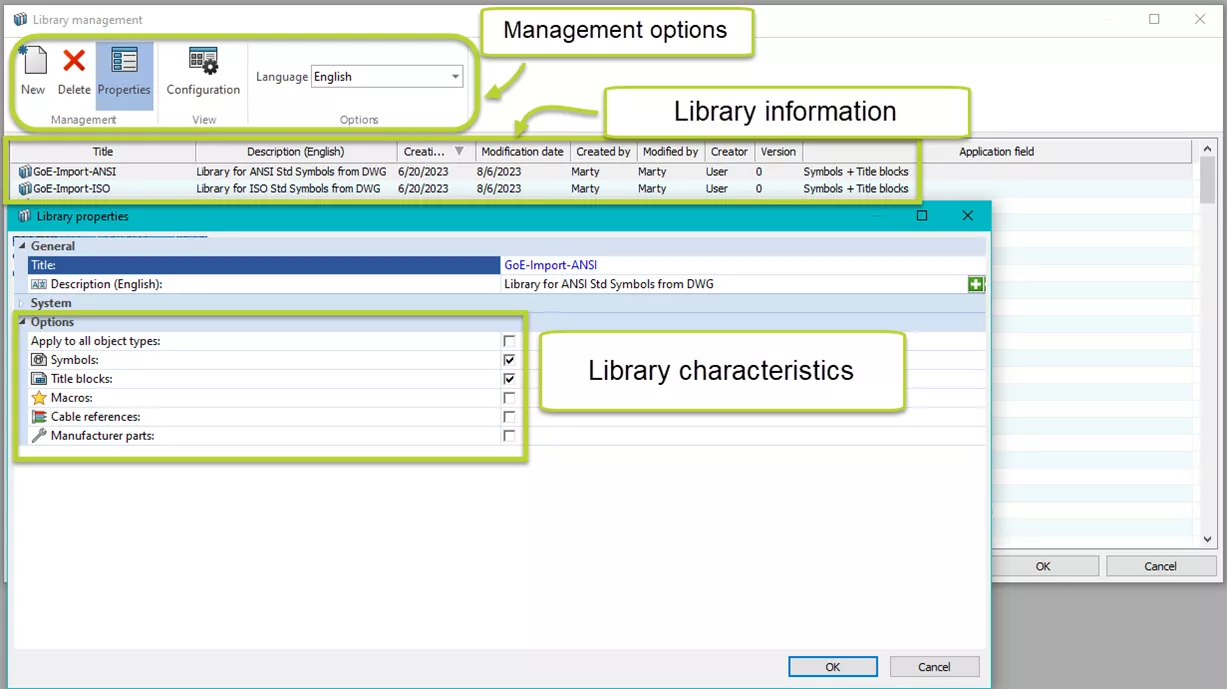
Properties - Edit a library’s name, characteristics, description, and the type of objects it contains.
Configuration - Manage the display settings for items in the dialog box.
Here, I have already created two libraries for my imported symbols. The library can reference several types of objects. This time, I set it to reference both symbols and title blocks.
Symbol Import
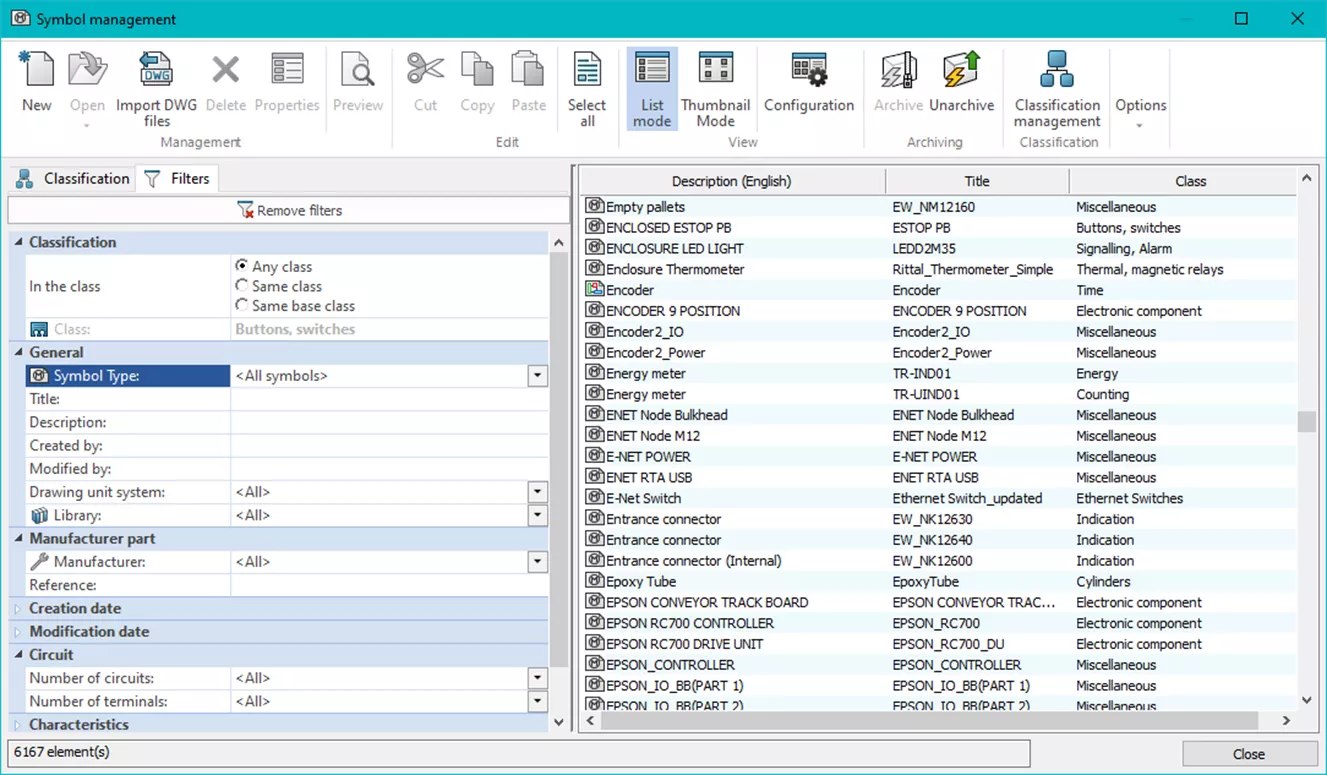
The Symbol Management Library tool groups together all the symbols that can be used to design the scheme. The symbols have filtering criteria that allow classification. The combination of classification and library settings is very useful when trying to locate the desired symbol.
![]() Menu: Library > Symbol management
Menu: Library > Symbol management
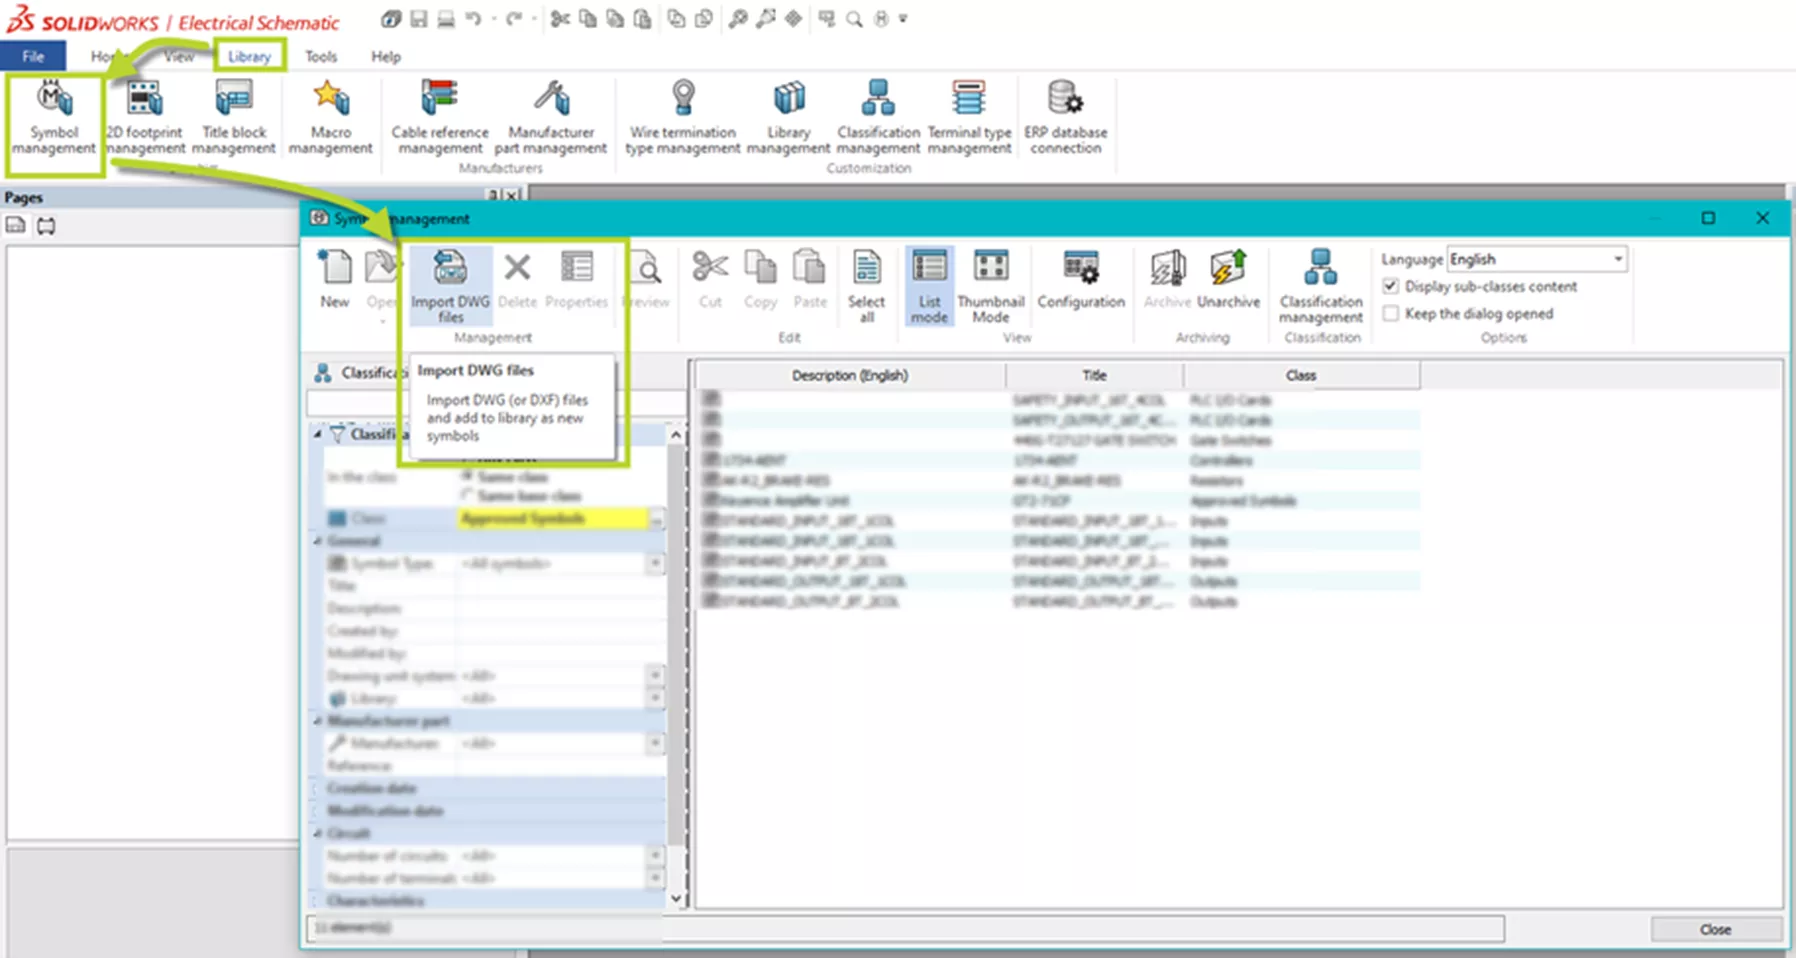
The Symbol management dialog box opens and allows you to add, edit, or delete symbols.
The left-hand side of the Management dialog box has two tabs:
Classification
- This tab displays the symbol classification as a tree.
- The left side of the dialog box shows the symbol classes. The right side shows the symbols in the currently selected class.
- Display sub-classes content: When the box is checked, it displays all the symbols contained in the sub-class of the selected classification.
Filters
- This tab allows you to filter the symbol list. All filter criteria are the same as those present in the symbol properties.
- The right side of the dialog box displays the symbols corresponding to the selected criteria.
- Remove filter: Click this button to remove all filter criteria.
The right-hand side of the Management dialog box displays the symbols corresponding to the selection or search criteria you entered on the left-hand side of the Management dialog box.
You can choose to display the symbols as a list (List mode icon) or as thumbnails (Thumbnail mode icon).
** Some of these features accept the multi-selection, such as Delete or Properties.
Within Symbol management, there are more than a dozen options across the top:
New - Add a new symbol to the library.
Open - Opens the selected symbol in the graphical interface or in DraftSight to modify it.
Import DWG files: - Import a DWG file as a symbol.
Delete -Deletes the selected symbols.
Properties - Opens the Properties dialog box of the selected symbols. If you select several symbols, the Properties dialog box displays only the common properties.
Preview - Opens the symbol in a preview dialog box. This interface does not allow for modifications.
Cut - Places a copy of the selected symbols on the SOLIDWORKS Electrical clipboard and deletes the originals. Optionally, use the shortcut: [Ctrl] + [X]
Copy - Places a copy of the selected symbols on the SOLIDWORKS Electrical clipboard and keeps the originals. Use the Copy command to copy the selected element list to another application such as Excel (List mode only). Optionally, use the shortcut: [Ctrl] + [C]
Paste - Pastes the symbol present on the SOLIDWORKS Electrical clipboard. A new symbol is created. Optionally, use the shortcut: [Ctrl] + [V]
Select all - Select all the symbols displayed on the right-hand side of the Management dialog box.
List mode - Displays symbols in a list (Name, Description, and classification). In this mode, you can copy the list of the selected element to another application, such as Excel.
Thumbnail mode - Displays symbols in the form of thumbnail previews.
Configuration - Manage the display settings for items in the dialog box.
Archive - Select the elements to archive and click the Archive icon. A dialog box opens allowing you to save the archived file.
Unarchive: A file selection dialog box opens where a TEWZIP file can be selected for unarchiving. The Update data wizard will open automatically. Refer to the Archive / Unarchive chapter for more information.
Classification management - Manage the different classes in which the symbols are stored.
Display sub-classes content - When checked, it displays all the objects contained in the sub-class of the selected class.
Keep the dialog opened - When selected, the dialog box does not close when you open an object.
Let’s get to the import wizard.
Import DWG Files Using the Symbol Import Wizard
The symbol import wizard involves the following steps. We’ll walk through them and explore the options.
- Step 1. Symbol (title block) Import Wizard
- Step 2. Symbol (title block) origin
- Step 3. Import new symbols (title blocks)
- Step 4. Convert attributes
- Step 5. Save your settings
Symbol Import Wizard
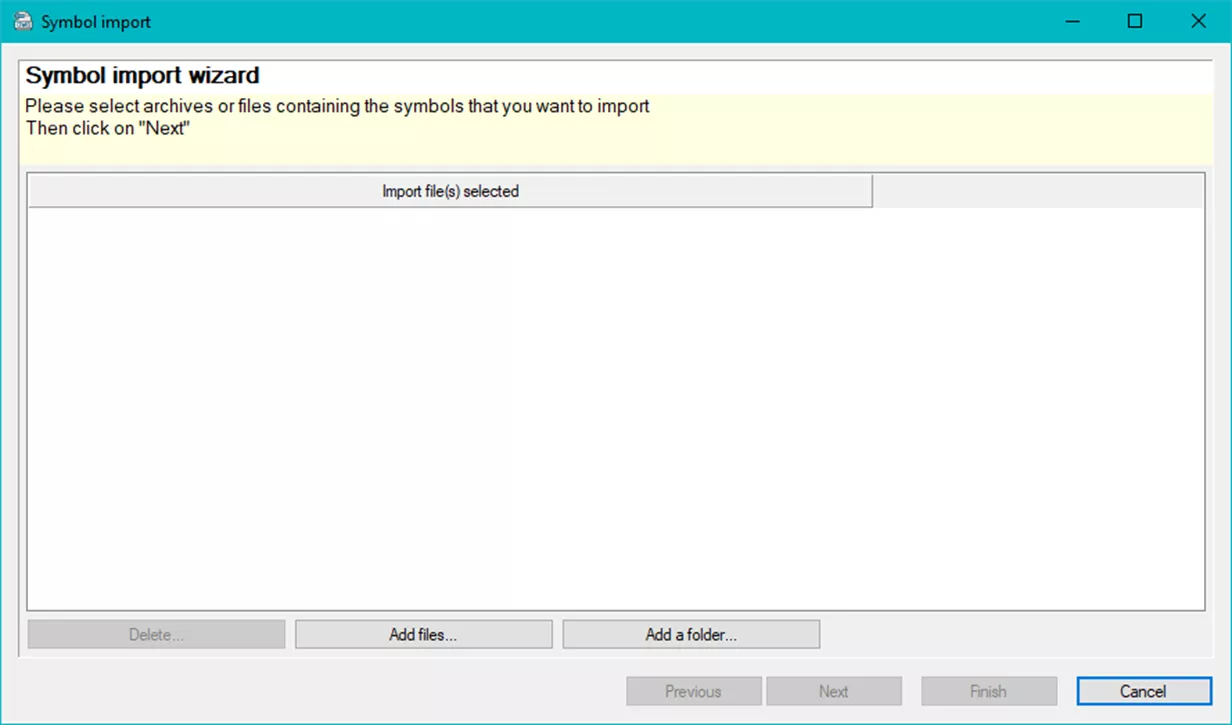
Step 1. Symbol (title block) Import Wizard
Add files - Opens a file selection dialog box. You can select DWG files or archive files (ZIP) containing symbols, title blocks, or 2D footprints.
Add a folder - Opens a directory selection dialog box. All of the DWG files contained in this folder/directory are added to the import assistant.
Delete - Deletes the selected element from the list.
Here I have added only one file for demonstration purposes. You can select multiple files and folders.
Here I have selected one file for demonstration purposes.
You could import multiple files or entire folders.
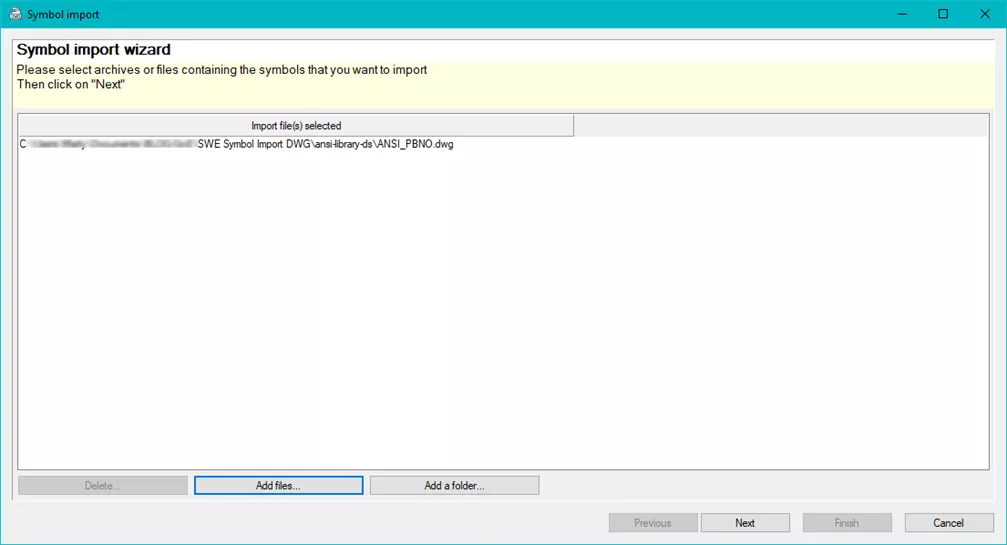
To go to the next step, click Next.
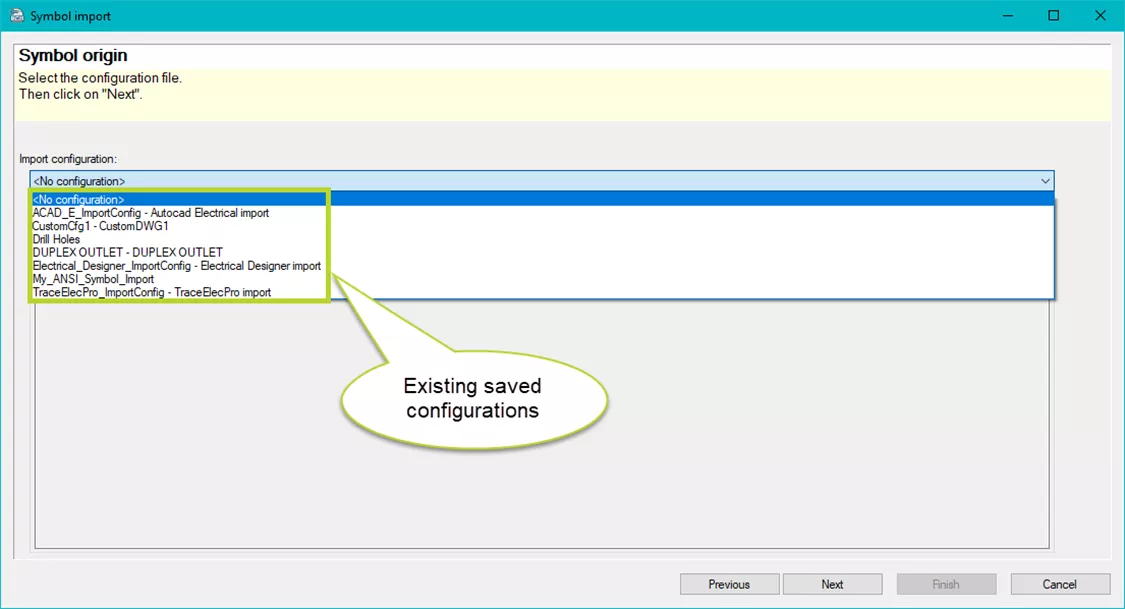
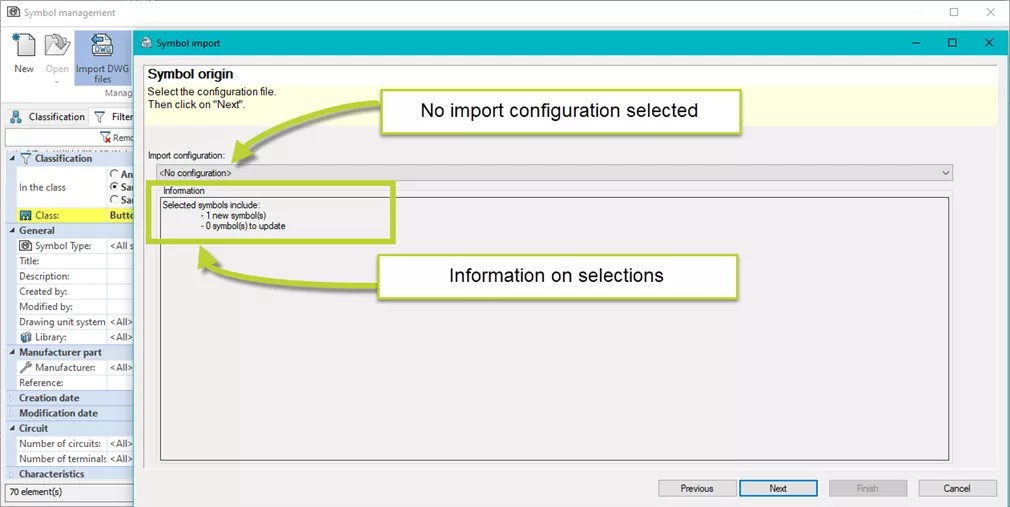
Step 2. Symbol (title block) origin
Import configuration - This lets you select a configuration containing the import parameters. If you do not have one already created, you will have the opportunity to save one at the end of the wizard.
Information
A list is created displaying the elements to be imported. In this example, we selected only one symbol.
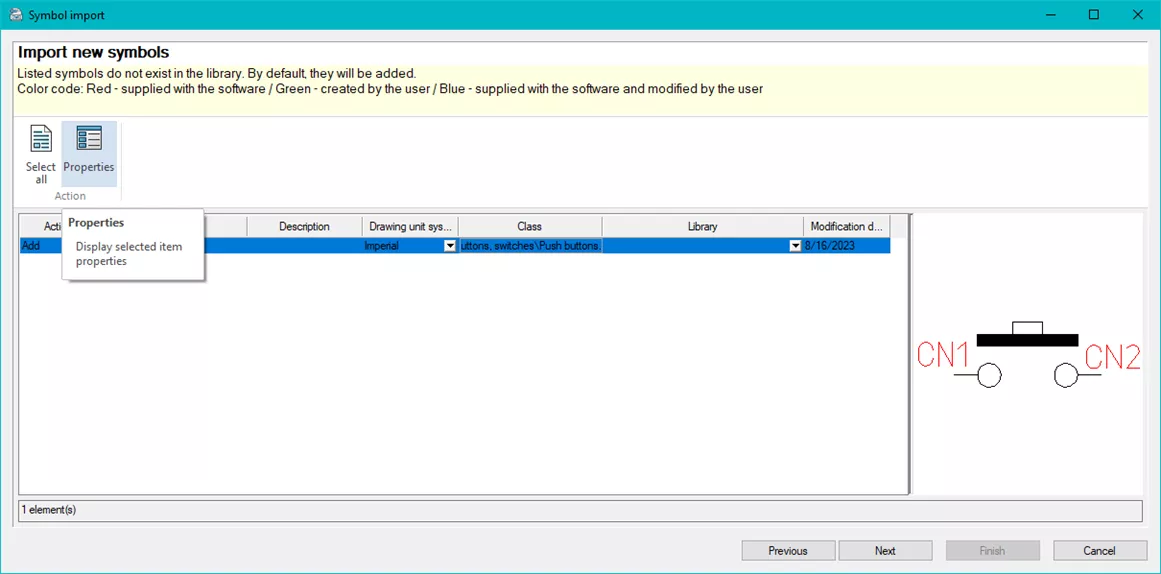
Step 3. Import new symbols
The import assistant displays the list of elements to be imported.
Select all - Select all the symbols displayed in the list.
Properties - Opens the dialog box of the properties of the selected symbols (title blocks). When you select several symbols (title blocks), the dialog box only displays the common properties. The symbol (title block) properties can be edited by double-clicking.
Action - Select (in the list) the action you want to assign to the symbol.
Name - Displays the symbol name.
Description - A description can be added by editing the properties.
Unit system - Select (from the list) the unit system in which the symbol has been drawn.
Class - Associate a class with the selected element.
Library - Select the library in which you want to store the element.
Modification date - Displays the date of the import.
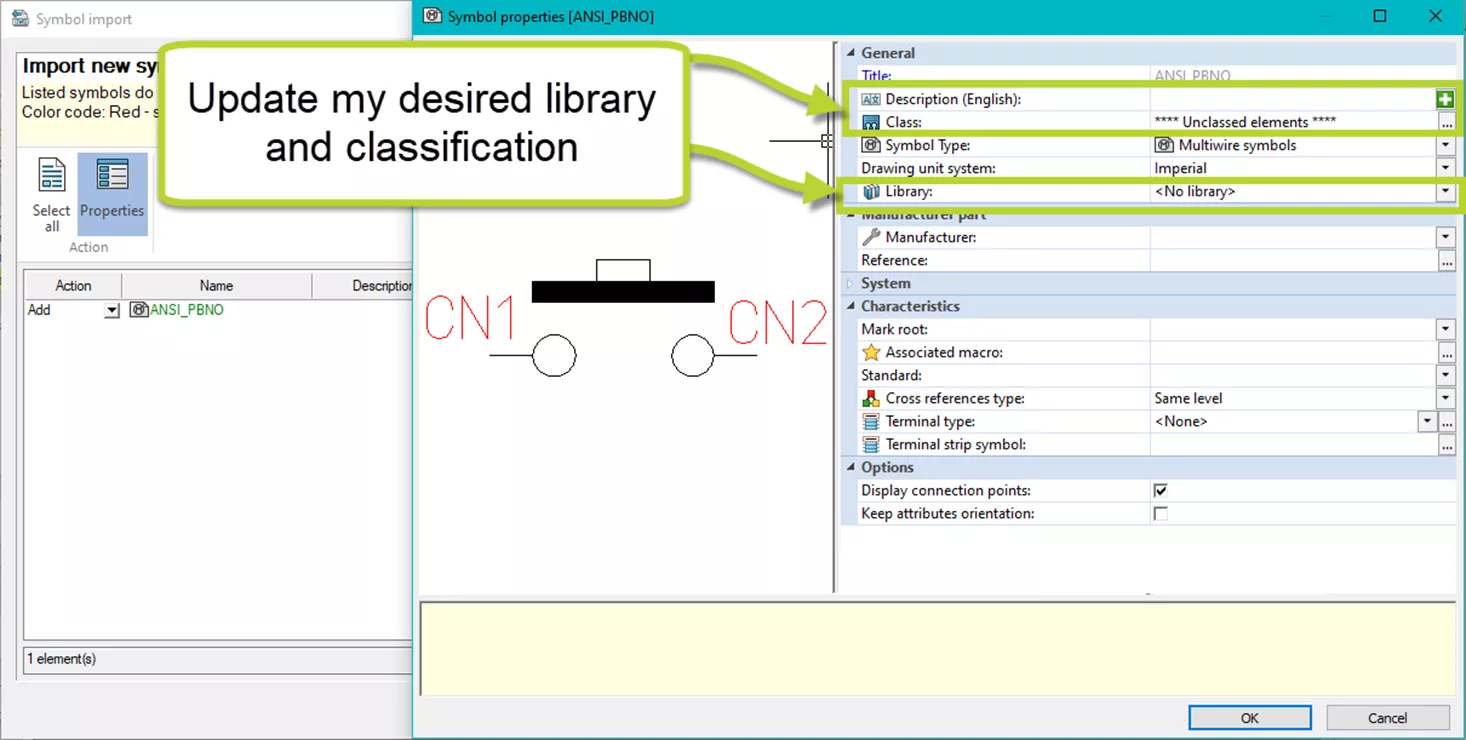
Select the properties button or use the fields and selection lists in the list.
Using the Properties dialog box, I can edit other properties not displayed in the import table dialog.
I’ll update my selection to include a description, class selection, and associated library.

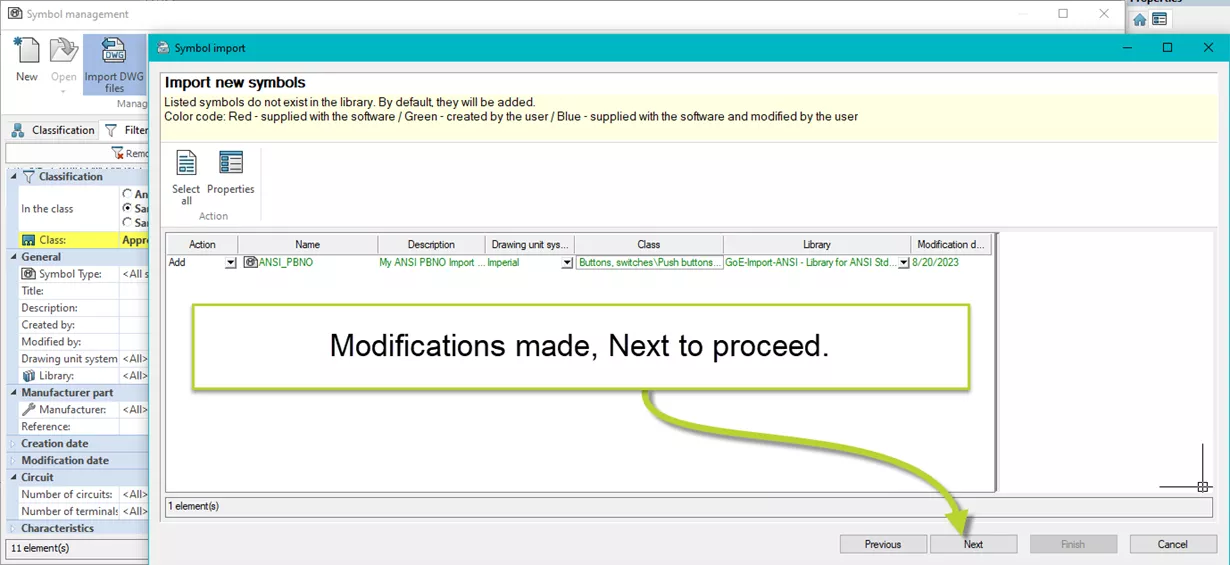
With my modifications made, it’s on to step 4.
Step 4. Convert attributes
The next step involves associating the attributes managed by the software and the attributes that might be present in the imported element.
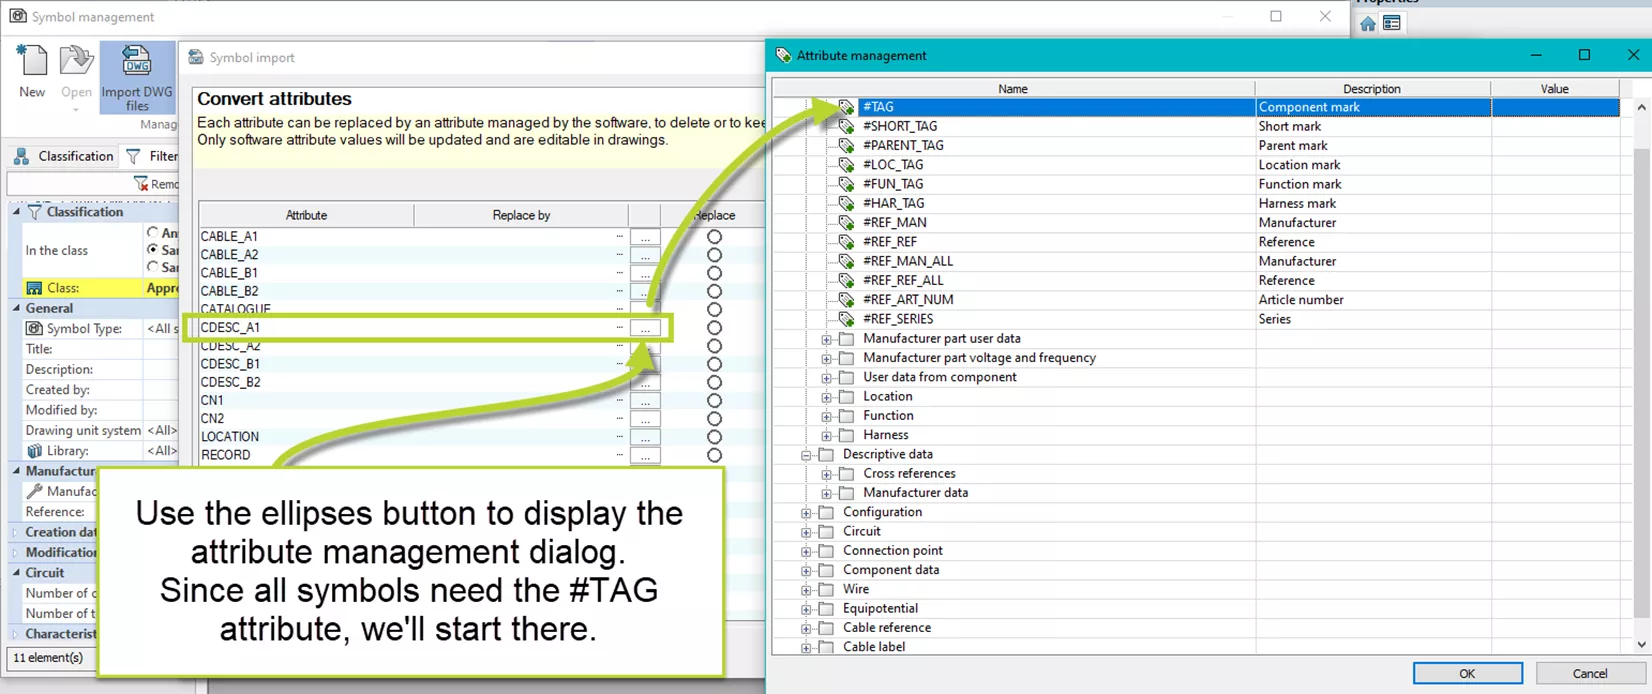
Note: To be recognized as a symbol, you must have the #TAG attribute in the imported symbol.
Replace by - Click the [...] button to select the new attribute.
Action - Select the option (Replace / Delete / Do nothing) you want.
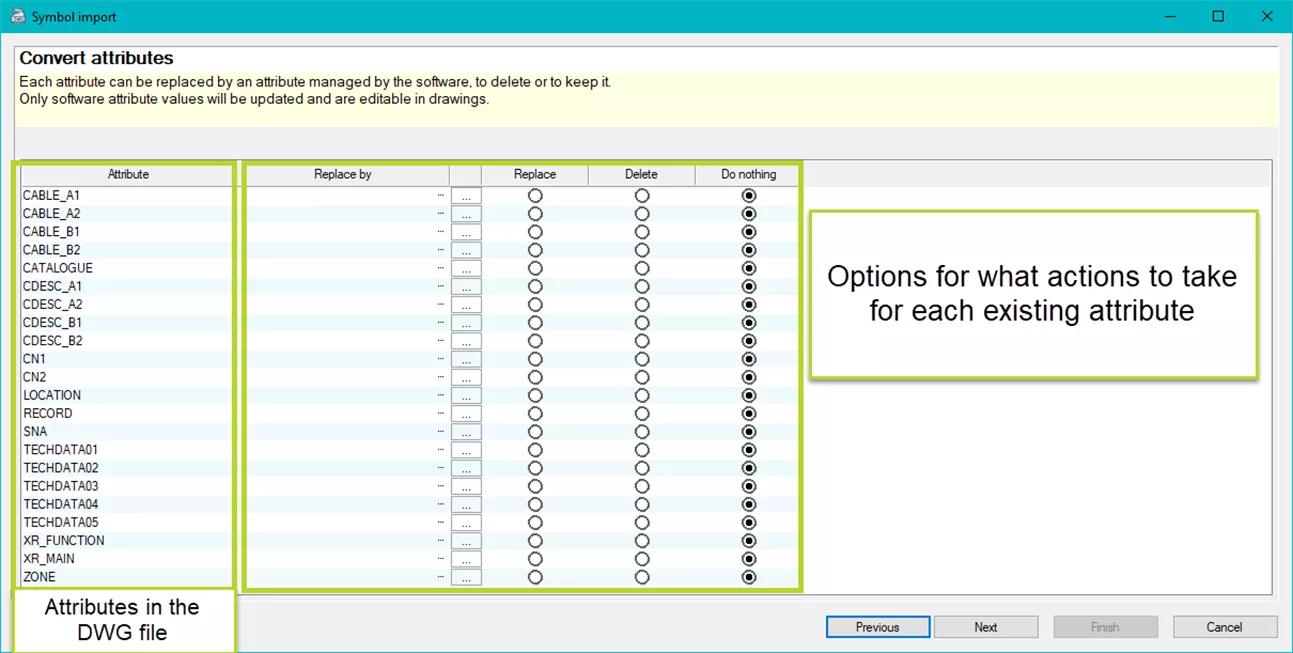
The Convert attributes dialog default is to do nothing with the existing attributes.
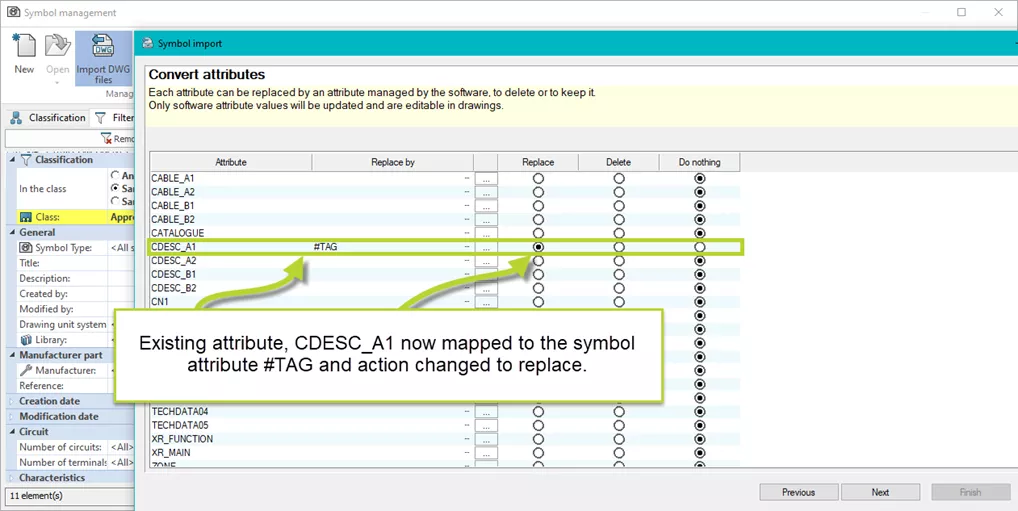
For our purposes I will map a few of them to include at least the #TAG attribute, every symbol needs one, and a few others.
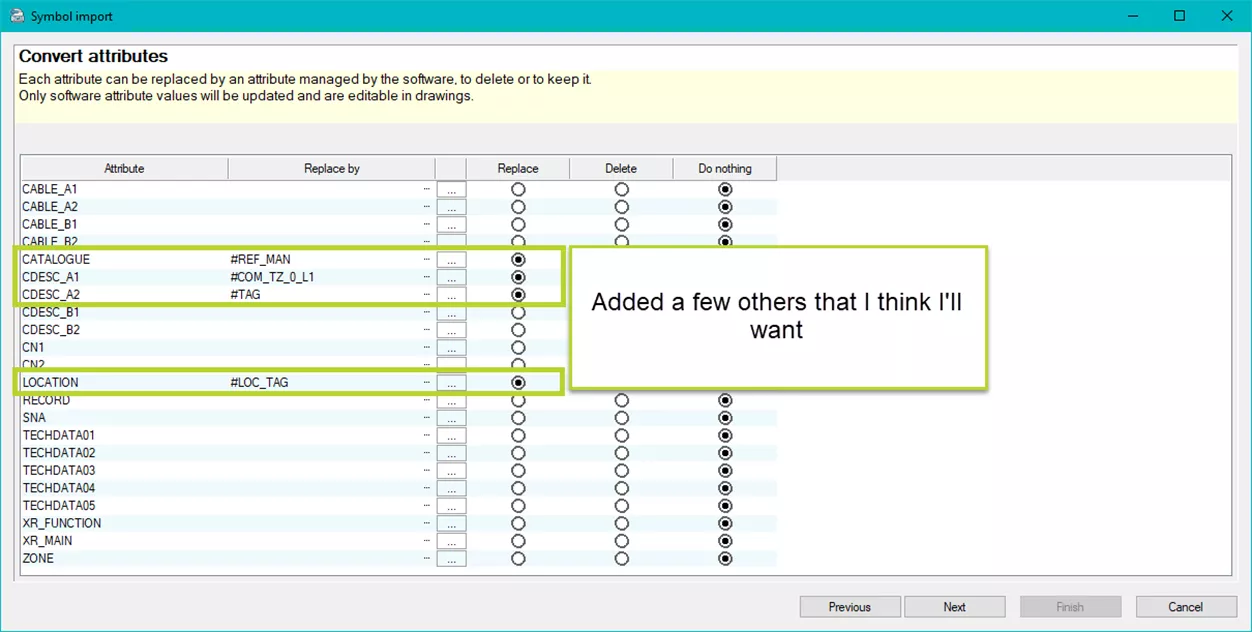
Click Next to continue to the last step.
Step 5. Save your settings
The final step of the assistant allows you to save the various settings you have used for the import. These parameters can be reused for a new import.
Save import configuration.
If you used a configuration file, you could update it. If you did not use a configuration file, you can save your settings in a new configuration file.
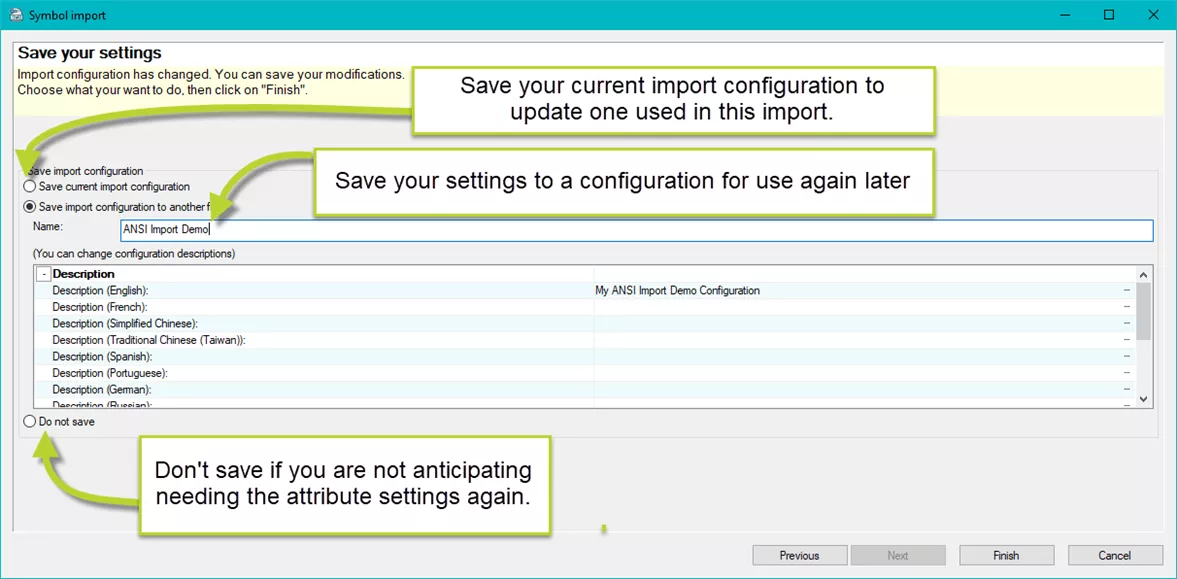
Click Finish to import the elements or Cancel to cancel the import. This is the last dialog box allowing you to cancel the import.
Let’s look at the results.
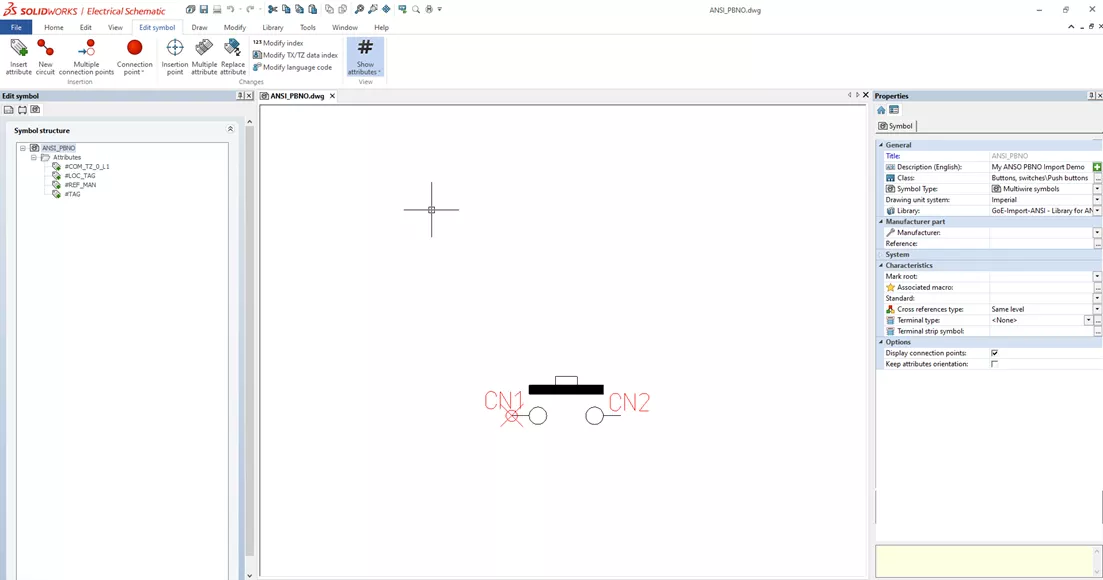
Our Imported Symbol in More Detail
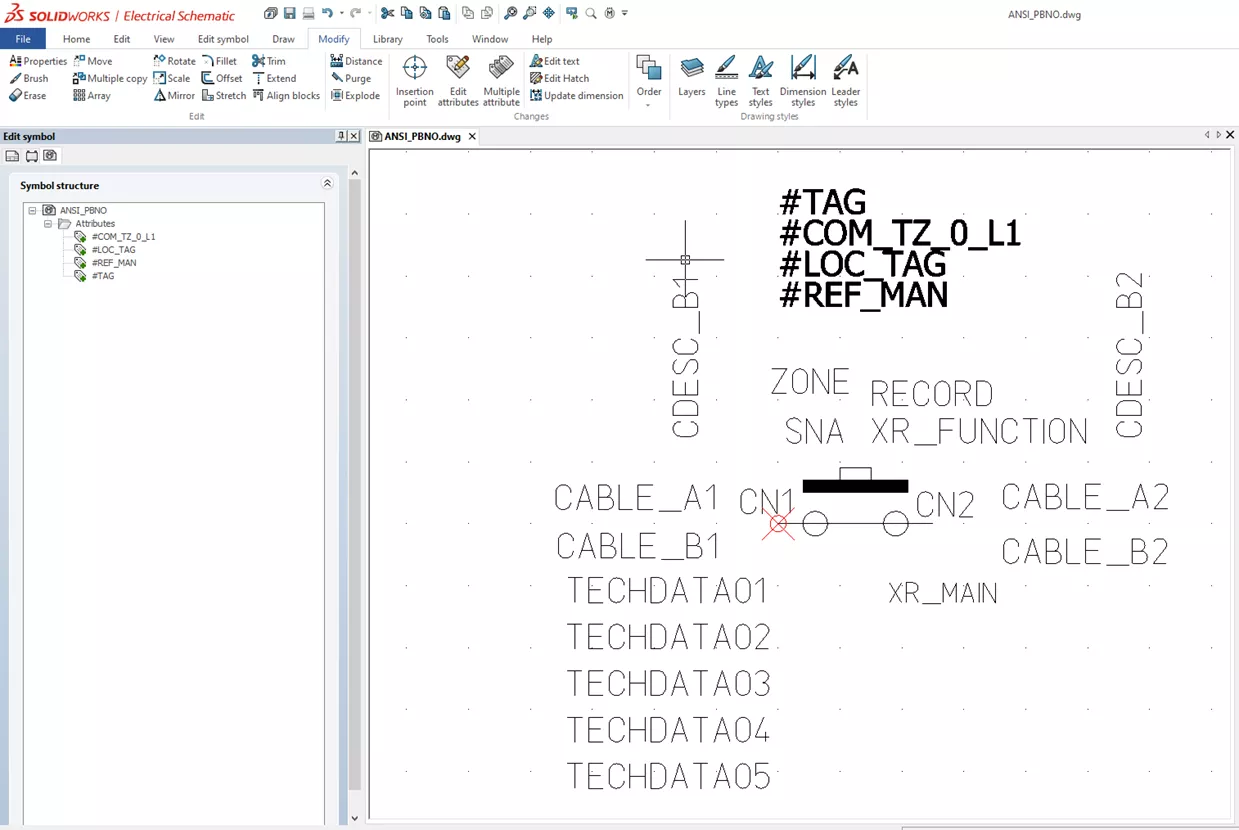
Selecting and opening the newly imported symbol, you can see the graphics that were in the import preview, but none of the modified attributes.
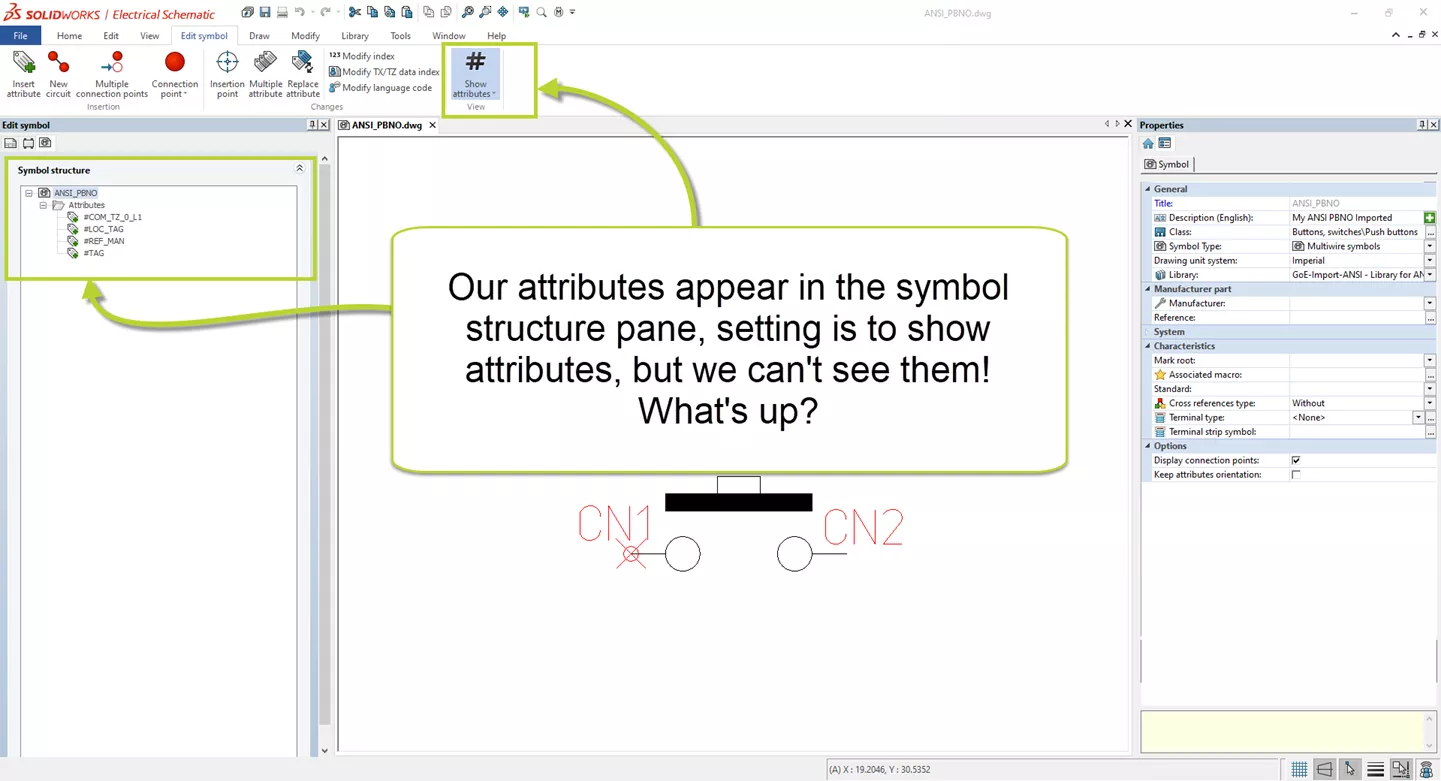
The answer is in the layer mapping for the existing attributes. Let’s investigate the Layer Manager to see what those are set to.
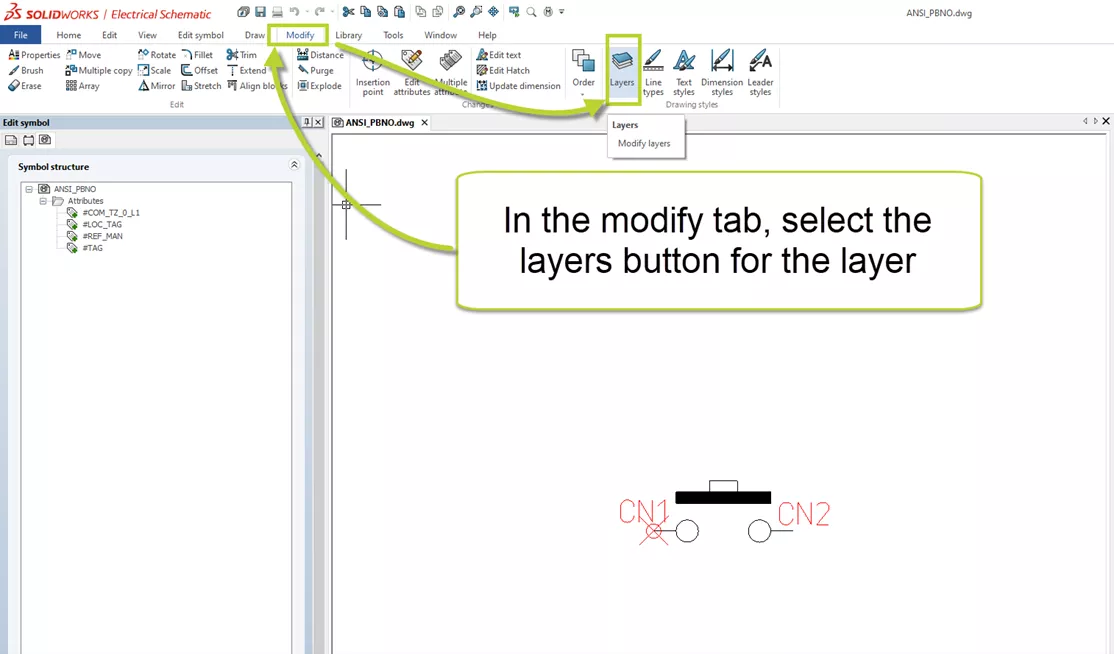
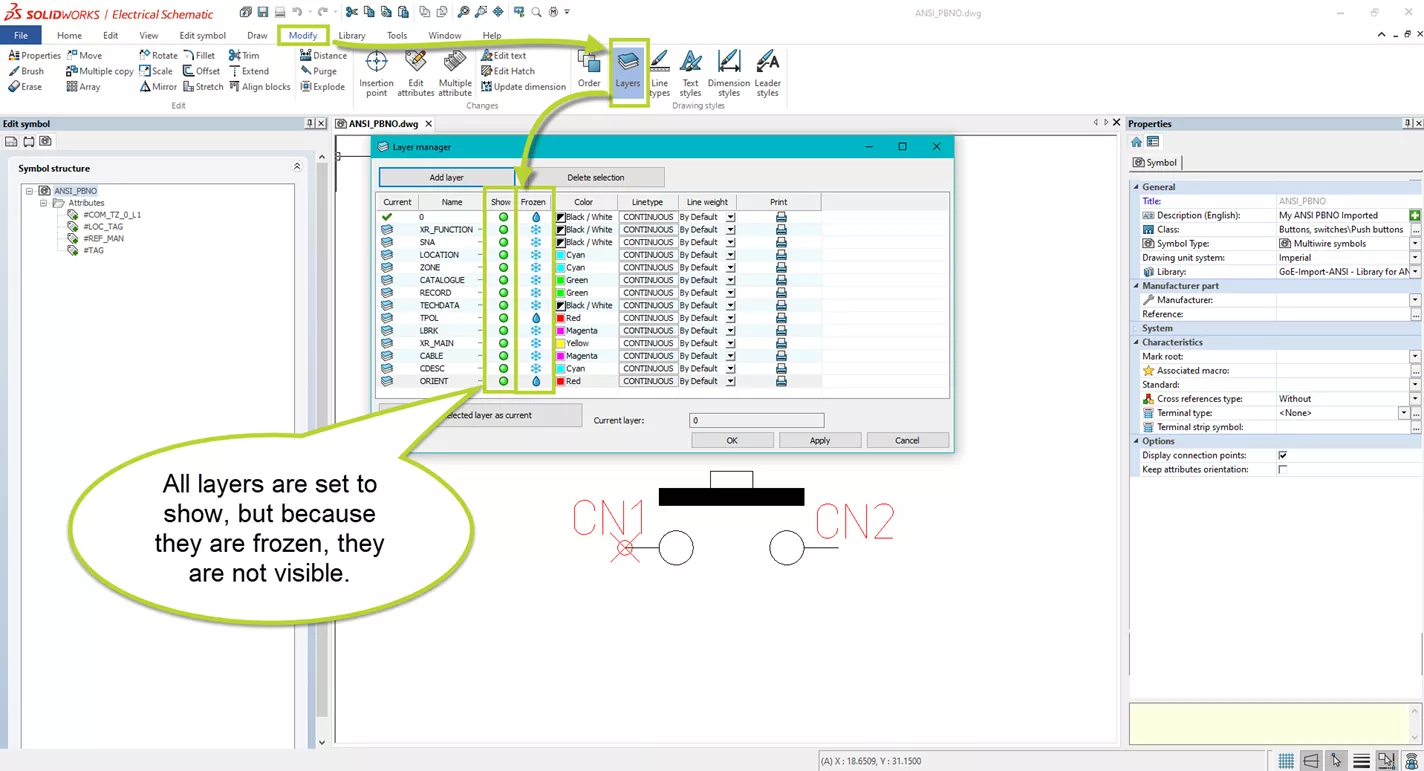
Here, you can see that although all the layers are set to show, many layers are in a frozen state. As a result, they are not shown.
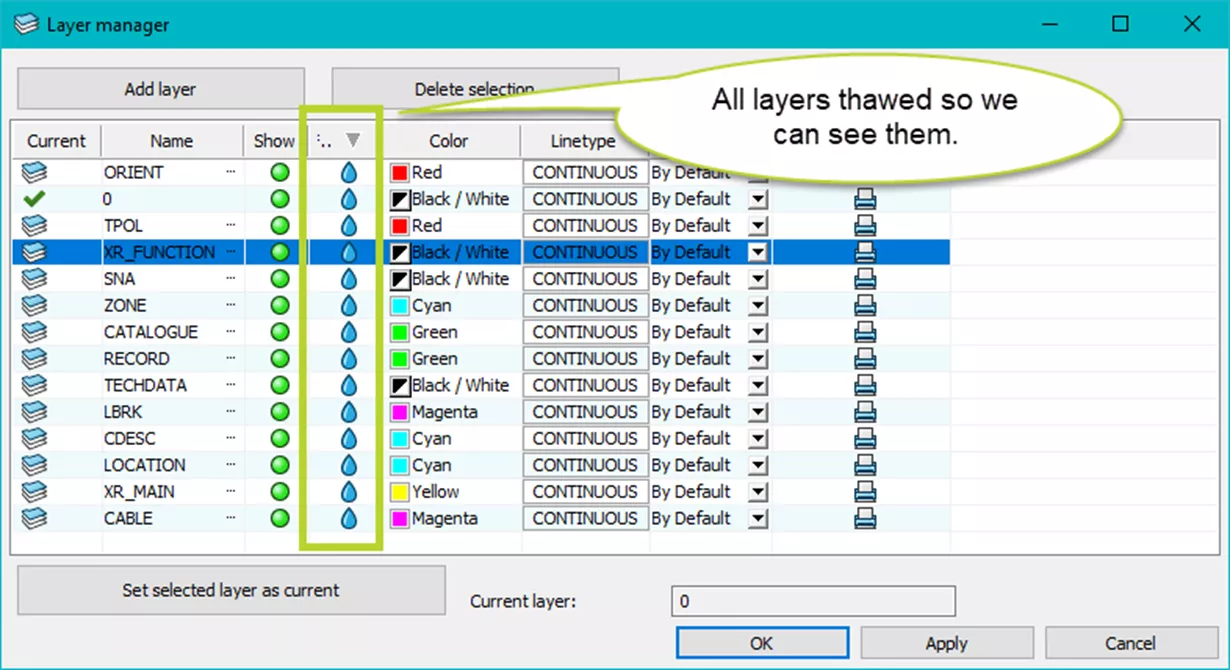
Turn frozen off on all layers to see them and select Apply.
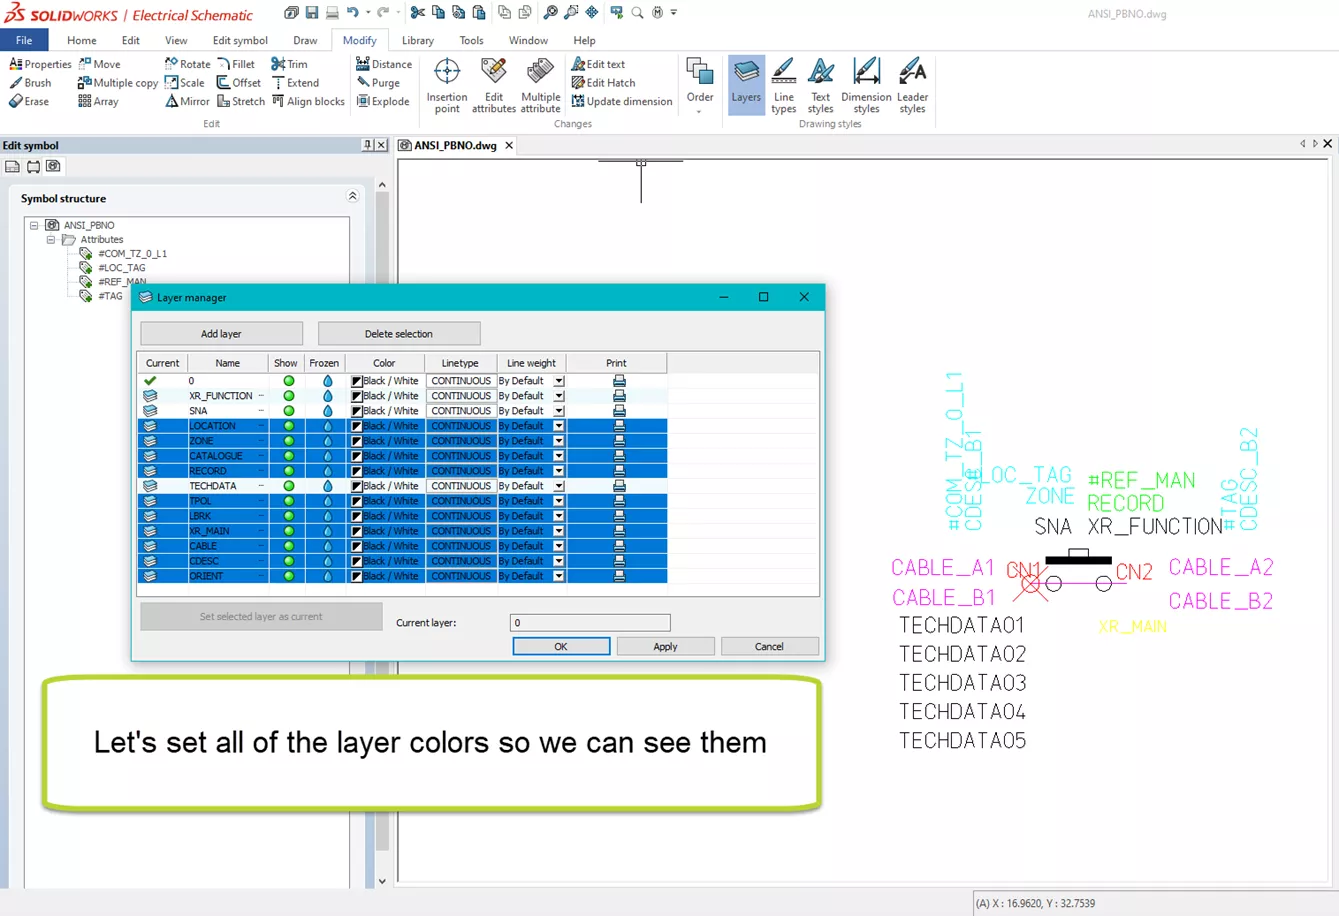
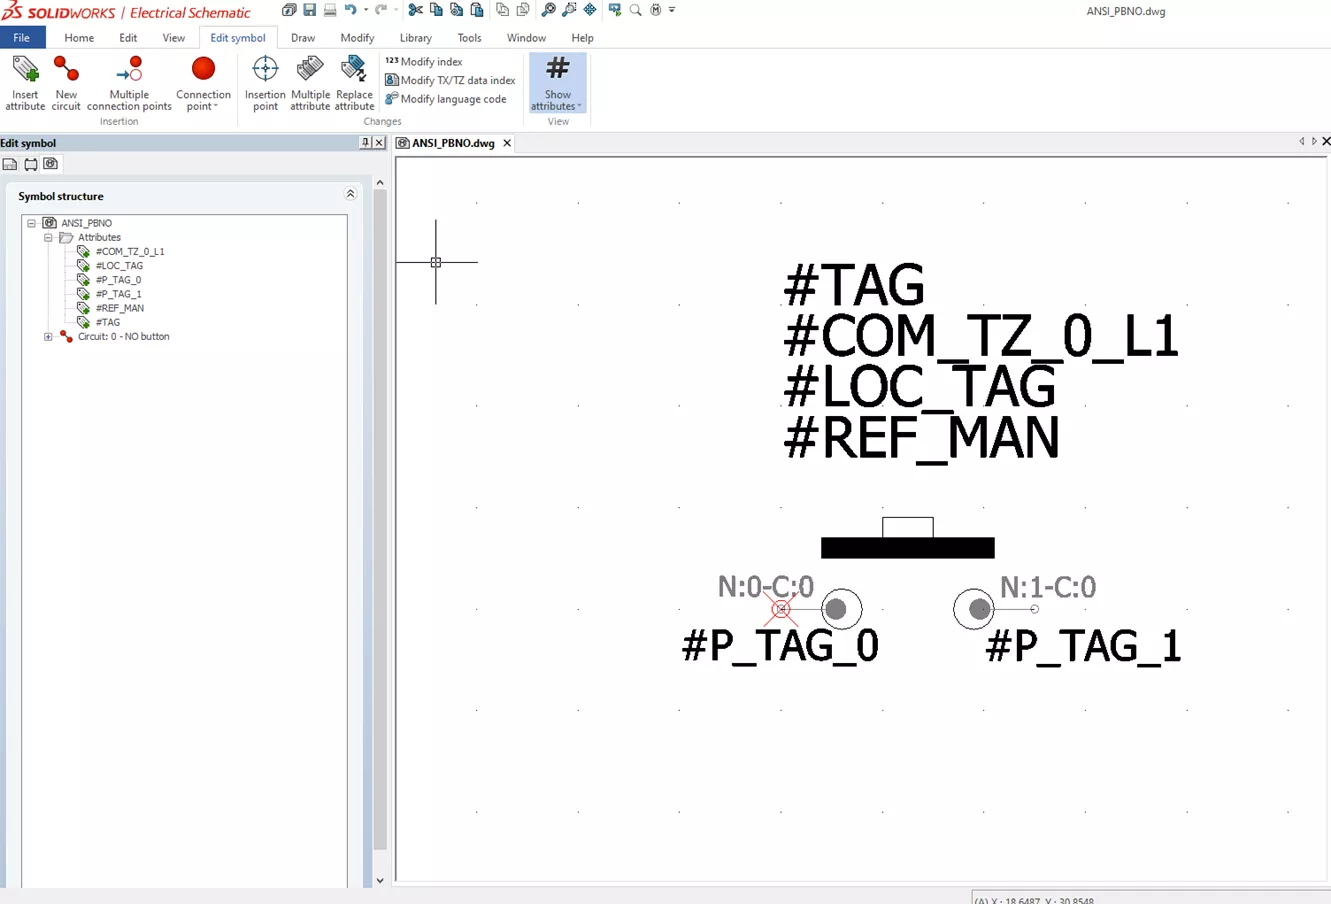
I can now see the attributes but depending on the layer color and interface background color, they can still be hard to distinguish. I’ll get them all the same color. One that is more visible.
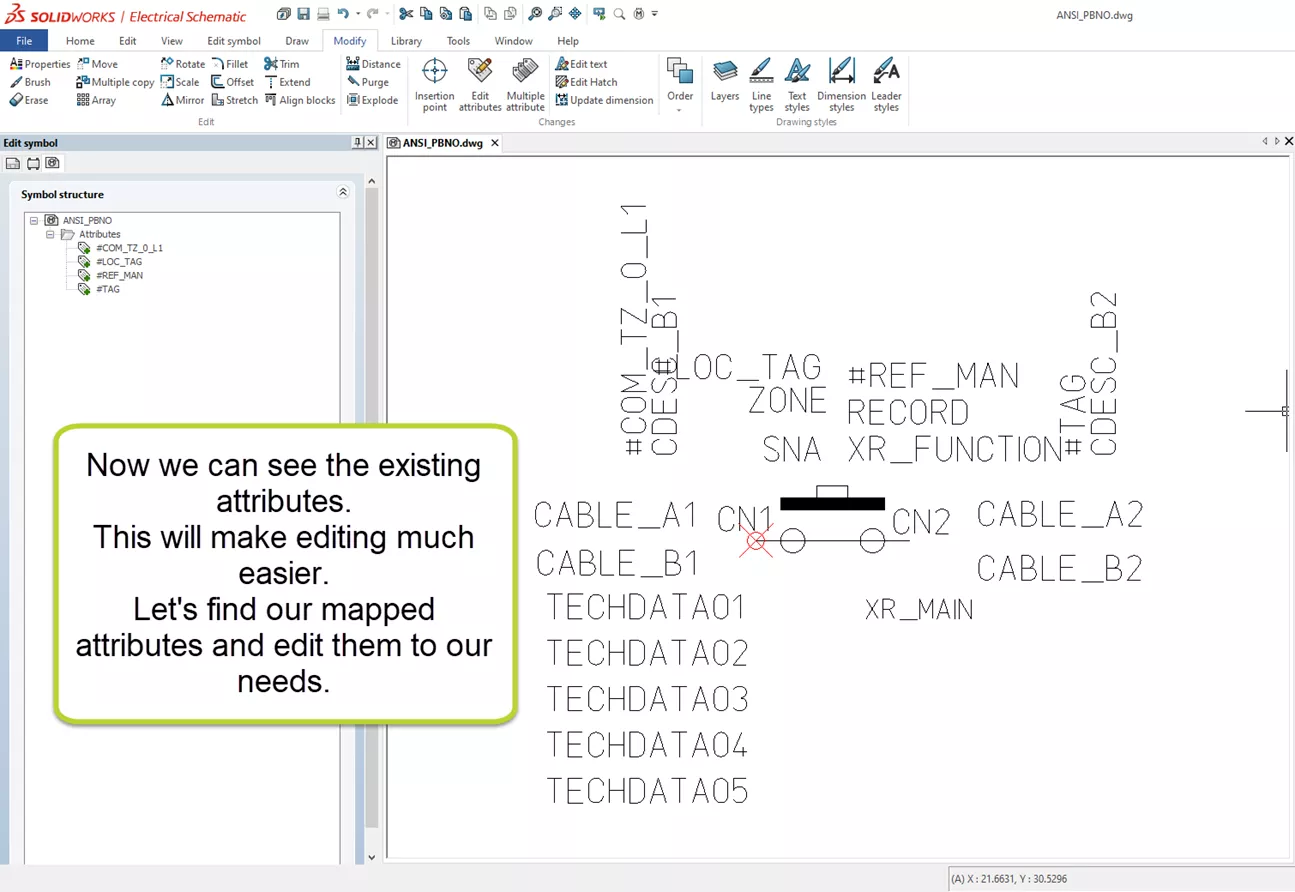
With the attributes I want, edited for my desired properties, I can either freeze the layers and attributes I don’t want to see or delete them. Adding a couple of connection points, I now have my imported symbol ready for use.
Summary
The Symbol Import wizard can be a useful tool for getting a needed symbol from another application without having to create it from scratch. This can also be somewhat easier than the copy and edit method.
Remember, having a library for your imports will save time searching for them later, each imported symbol needs a #TAG attribute, and imported attributes on a frozen layer will not show.
I hope you found this article explaining how to import symbols into SOLIDWORKS Electrical from other systems helpful Check out more SOLIDWORKS Electrical tips and tricks below. Additionally, join the GoEngineer Community to participate in the conversation, create forum posts, and answer questions from other SOLIDWORKS users.
Related Articles
Saving Your SOLIDWORKS Electrical Environment
Wrapping Attribute Text in SOLIDWORKS Electrical
How to Delete or Replace a Cable in SOLIDWORKS Electrical
Component Marks in SOLIDWORKS Electrical
Removing Combs from SOLIDWORKS Electrical PLCs
SOLIDWORKS Electrical 2D: Changing the Automatic Root Value for Symbols
Get our wide array of technical resources delivered right to your inbox.
Unsubscribe at any time.