How to Install the SOLIDWORKS PDM Server
Whether setting up a server for the first time or moving to new hardware, setting up your SOLIDWORKS PDM Server correctly is crucial. In this guide, we’ll walk you through the process with step-by-step instructions. Please review all of the documentation prior to installation to ensure a smooth installation. The steps are simple, but it’s very important to not miss any pieces of the puzzle.
All systems that host a PDM Server or Client installation must use the same major (year) version of SOLIDWORKS PDM. You can, however, mix and match service packs. So, SOLIDWORKS PDM 2023 SP5 will work with PDM 2023 SP2 without issue.
You also have SOLIDWORKS CAD integration compatibility up to two major versions prior. So, with PDM 2023 you can integrate with SOLIDWORKS CAD 2023, 2022, and 2021. Be sure to install the correct PDM version on all workstations.
Installation Steps
Before Installation:
- Read the Installation Guide for installing SOLIDWORKS PDM.
- Check the System Requirements.
- Download the file set for your desired version of the SOLIDWORKS products.
- Install the SQL Database product.
PDM Installation:
- Install the SolidNetWork License Manager and the PDM server components.
- Create your vault.
- Set up Web2, if you plan to use web-based vault access.
- Install the PDM Client(s).
SOLIDWORKS Administrative Guides
This guide provides links to documents for complex steps. It is advised to also review the documentation provided by SOLIDWORKS. Below is a link to the SOLIDWORKS Administration guides:
Note: You can select the desired version from the drop-down at the top.
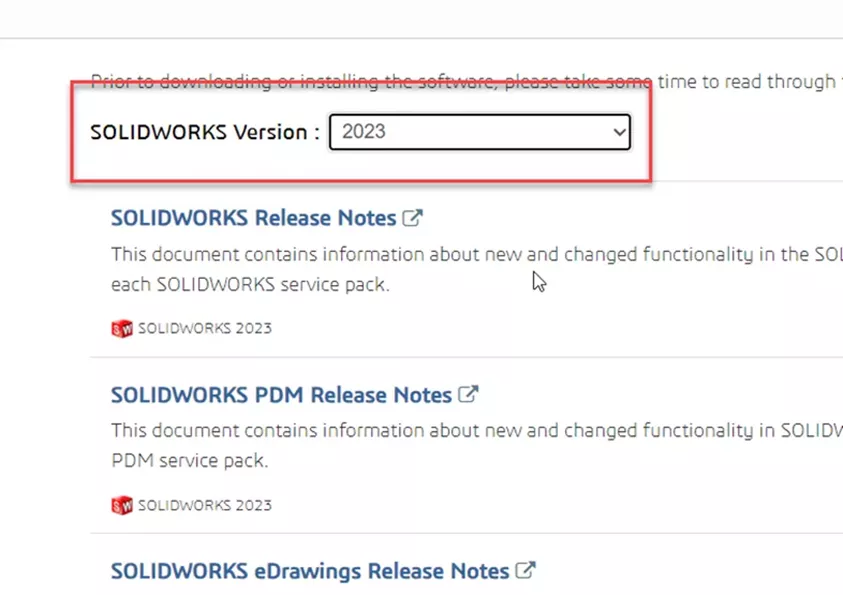
You’ll want to look at these guides specifically:
- What’s New for SOLIDWORKS PDM
- SOLIDWORKS PDM Installation Guide
Check System Requirements
Below are links to the system requirements from SOLIDWORKS. Use these to verify your system matches the requirements of the version you are installing:
Special Notes for SQL Requirements:
SOLIDWORKS PDM Professional requires SQL Server Standard or Enterprise, which must be purchased by your company. Plan on this expense when planning your installation. SOLIDWORKS PDM Standard requires SQL Server Express (only), which is free to download from Microsoft’s website.
SQL Server 2019 requires Cumulative Update 4 or later. Cumulative Update is the SQL equivalent of a service pack. Please download the latest from the internet. You can access the latest CU here: SQL Server 2019 Latest Cumulative Update.
Download the Installation File Set
Start with the SOLIDWORKS Installation Manager and download the installation setup from SOLIDWORKS directly or download the full file set from GoEngineer.
Note: If using the installation media from GoEngineer, please use 7-zip to unzip the package. Windows’ built-in tools will block the .html files, and the installer won’t work as expected.
Install the SolidNetWork License Manager
Licenses and Activation:
- Open the SolidNetwork License Manager Server from the Windows Start Menu.
- Windows 10: Start Menu > SolidNetwork License Manager Client.
- Windows 11: Start Menu > All Apps > SolidNetwork License Manager Client.
- In either case, it may be in another subfolder, SOLIDWORKS Tools 20XX.
- You will usually be prompted to activate your license(s).
- If you do not receive a prompt:
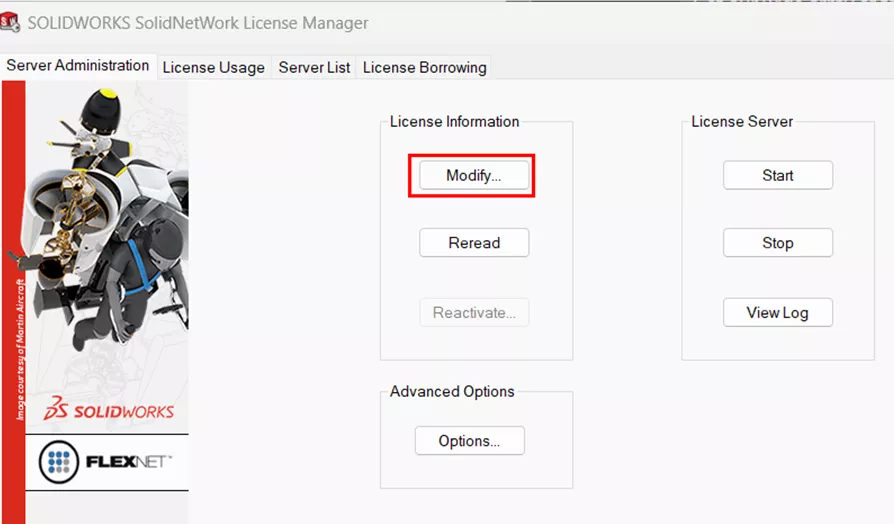
- On the Administration tab, select Modify, and then choose Activate or Reactivate.
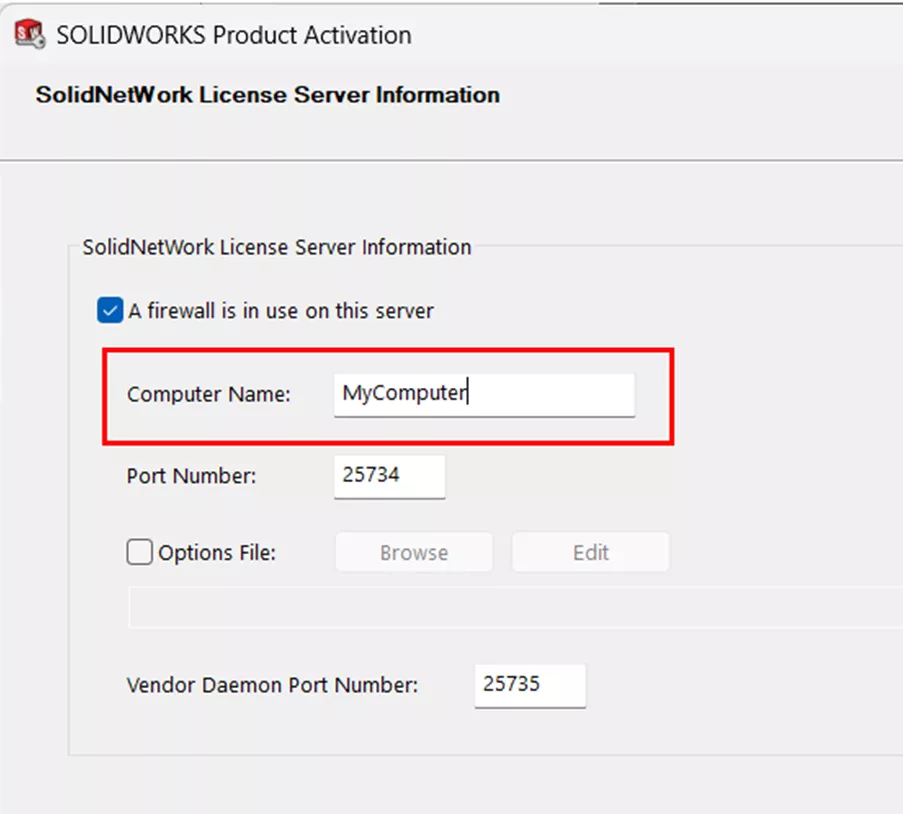
- Keep A firewall is in use on this server checked and fill in the Computer Name field with the name of the machine hosting the SNL if it’s not already. Click Next.
- The next page is the Activation page.
- For versions 2023 and newer, the serial numbers are added at this point. Click Add to open the input window and add one serial number per line. Then accept the change.
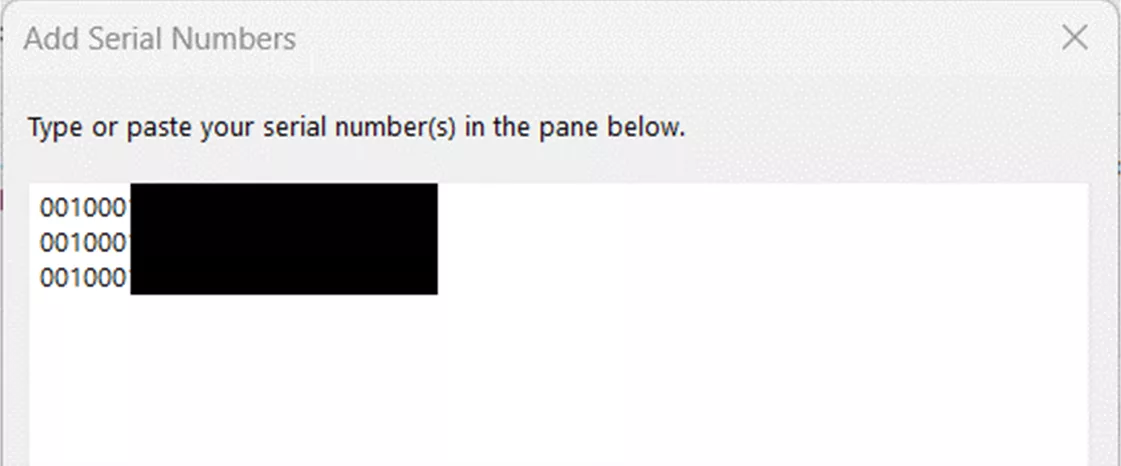
- For versions 2023 and newer, the serial numbers are added at this point. Click Add to open the input window and add one serial number per line. Then accept the change.
- Click Select All, choose Automatically Over the Internet, include your email, and click Next.
- Click Finish once the activation is complete.
Install the SQL Server
The SQL Server products can be installed on the same or a separate machine from the PDM components as you desire. The first setup of the SQL Server Database is simple enough, but it’s important to not miss any steps. The instructions can be found in the Installing and Configuring SQL Server section of the PDM Installation Guide.
Installing the SQL Server Database Engine:
- Close all Windows applications, including Windows File Explorer.
- Download the SQL Server installation media from the Microsoft SQL Server Downloads page.
- Right-click > Run as Administrator the Setup.exe file you just downloaded.
- On the left, choose Installation > New SQL Server stand-alone installation or add features to an existing installation.

- Enter your license key if you have one.
- Read and accept the license agreement, and then click Next.
- The installer will run a check.
- If no problems are reported, click Next.
- If a problem is reported:
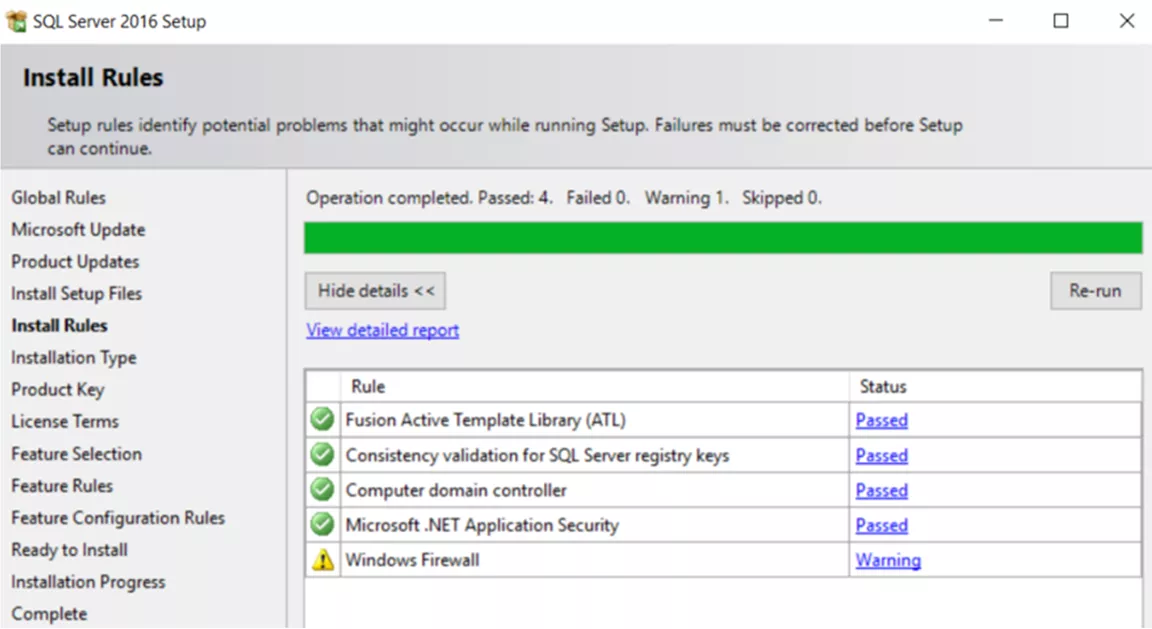
- Click Show details to list the components that failed or prompted a warning.
- Click Cancel to stop the installation and correct the issues.
- For Feature Selection:
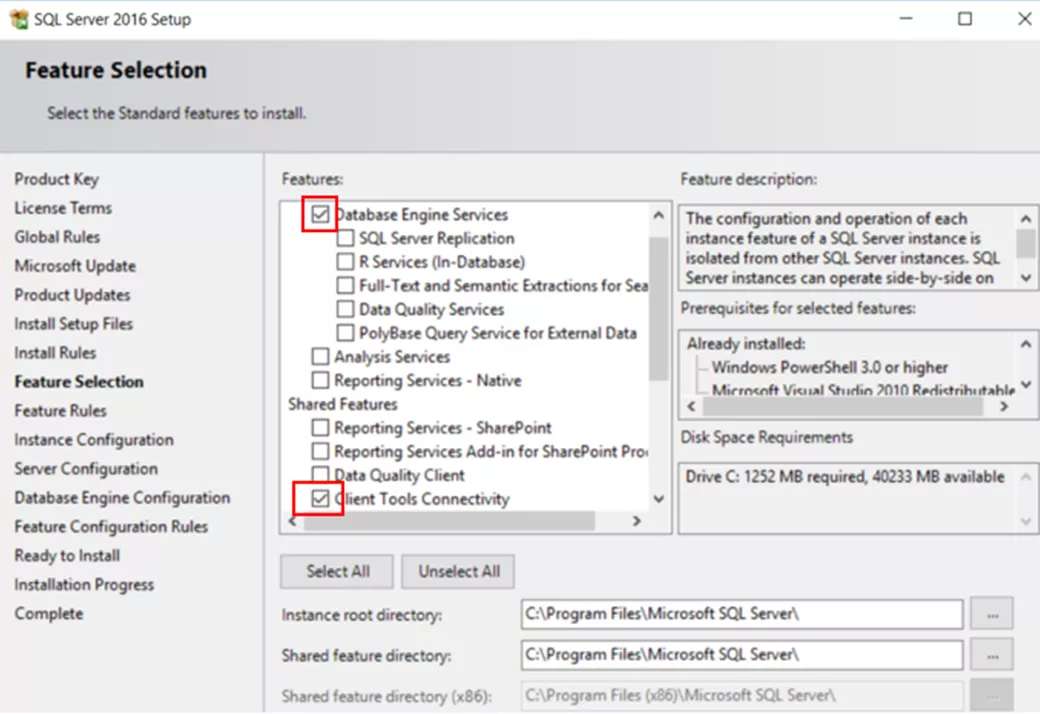
- Under Instance Features, choose Database Engine Services.
- Under Shared Features, select Client Tools Connectivity, Integration Services, Client Tools Backward Compatibility, and Documentation Components. Then, click Next.
- If installing SQL Server 2022, only choose Integration Services under Shared Features.
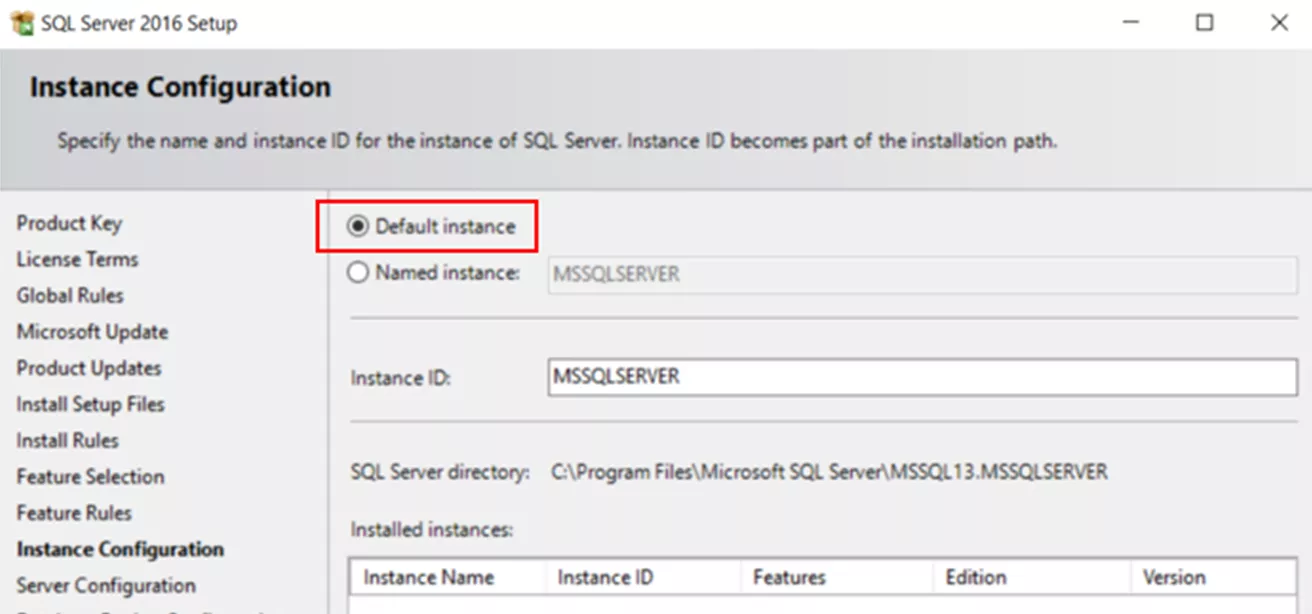
- For Instance Configuration, select Default Instance and click Next.
- For Server Configuration:
- Service Accounts tab:
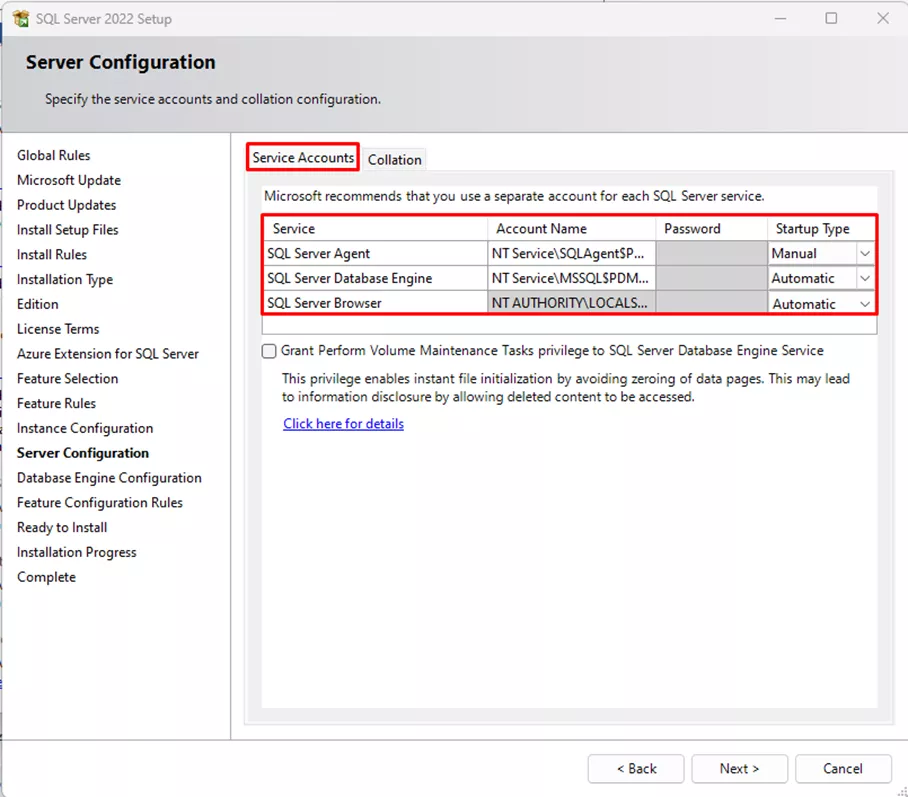
- SQL Server Database Engine:
- Account Name: NT Service\MSSQLINSTANCENAME
- Startup Type: Automatic
- SQL Server Database Engine:
- Collation tab:
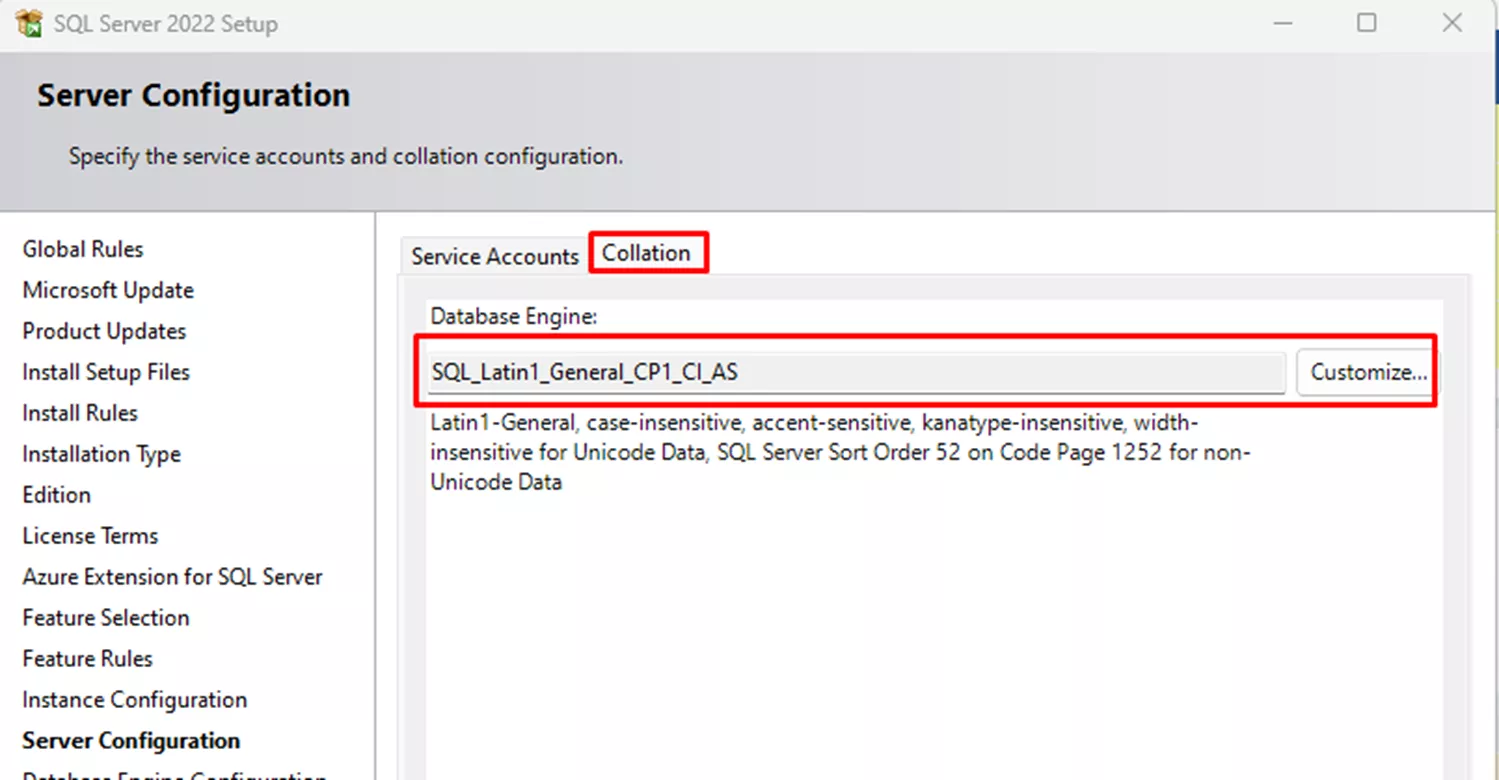
- Keep the default value SQL_Latin1_General_CP1_CI_AS.
- Note: You cannot use SOLIDWORKS PDM Standard on a server using binary settings.
- Keep the default value SQL_Latin1_General_CP1_CI_AS.
- Service Accounts tab:
- For Database Engine Configuration:
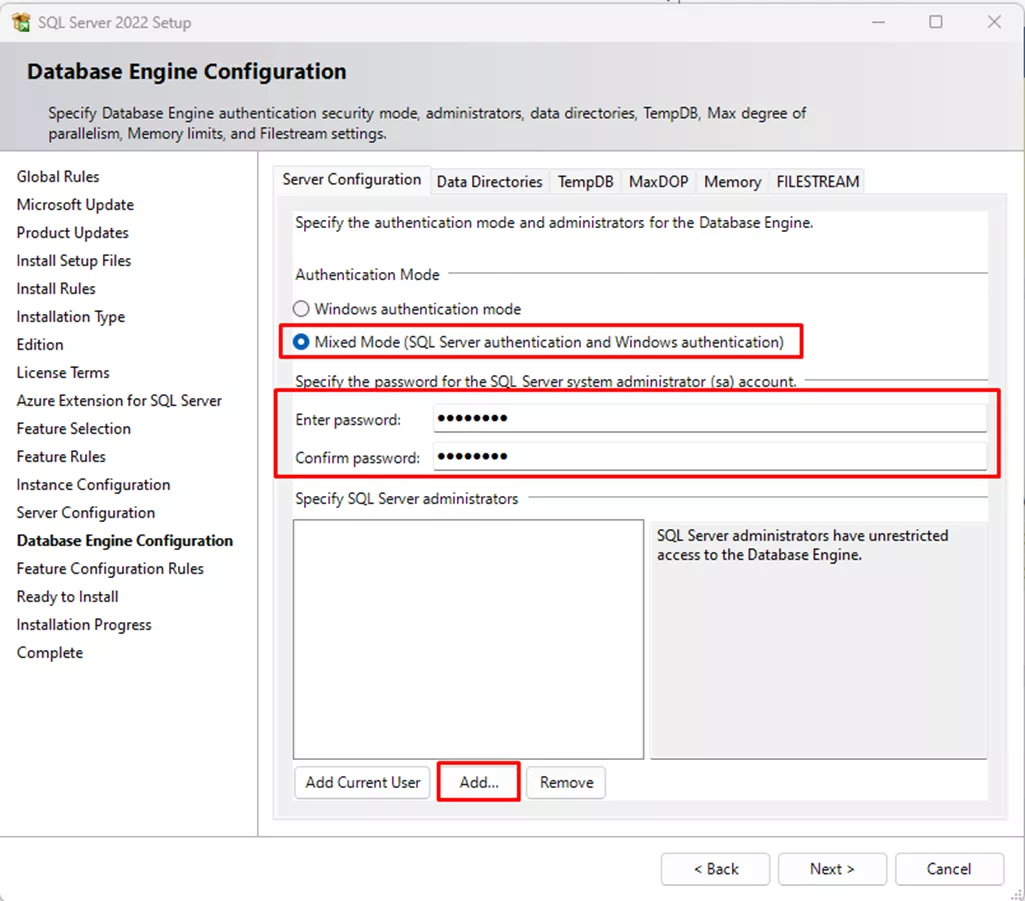
- Server Configuration Tab:
- Select Mixed Mode (SQL Server Authentication and Windows Authentication).
- Type a strong password for the SQL Database System Admin account. Do not leave the password blank! You’ll need to fill it in twice.
- To see the password requirements, click Help.
- Remember to save this password somewhere safe. You will need it to connect SQL to PDM later.
- Under Specify SQL Server administrators, click Add.
- In the Select Users/Computers/Groups dialog, enter the name of the local administrator of the system, or the local or domain Administrators group. These are users you want to have access to SQL should you ever lose the SA password. When done, click Next.
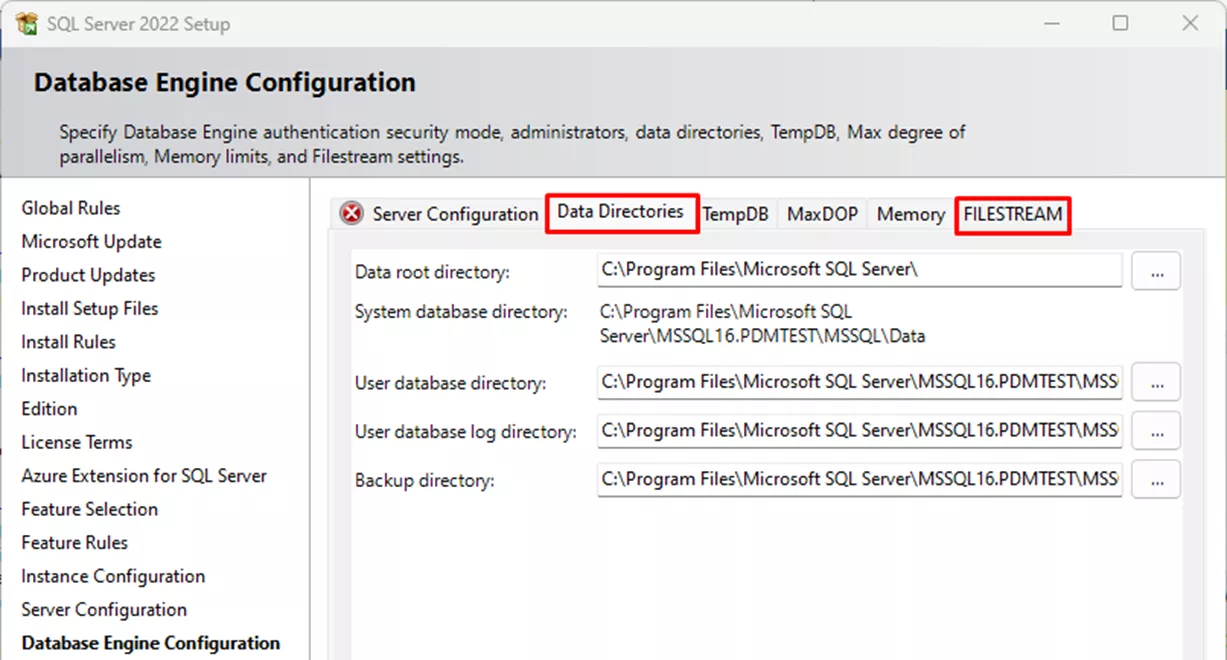
- On the Data Directories tab, it is optional to set the remaining paths. However, keep the default settings for the FILESTREAM. Then click Next.
- Server Configuration Tab:
- Click Install to begin the installation. This will take some time. When the success notice pops up, click Next and then Close.
- If an automatic restart does not occur, restart the machine.
- If there are any cumulative updates or hotfixes needed for your chosen SQL version, apply those now.
SQL Server Management Studio:
After the reboot, you’ll need to download and install Microsoft SQL Server Management Studio. The newest version will work, as it is backward compatible.
Enabling SQL Server Remote Access:
- Open SQL Server Management Studio (SSMS).

- Login to your SQL Instance.
- Select the SQL instance you want to connect to under Server Name (usually this will be the server name, but if you chose a named instance for PDM you’ll need to type the server name followed by \InstanceName. Ie. ServerName\InstanceName).
- Set the Authentication type to SQL Server Authentication. Enter the SA credentials you designated earlier.
- Be sure to check the Trust server certificate box any time you log in to SSMS.
- Leave all other options the same.
- Click Conect.
- In the Object Explorer on the left side, right-click the server name and choose Properties.
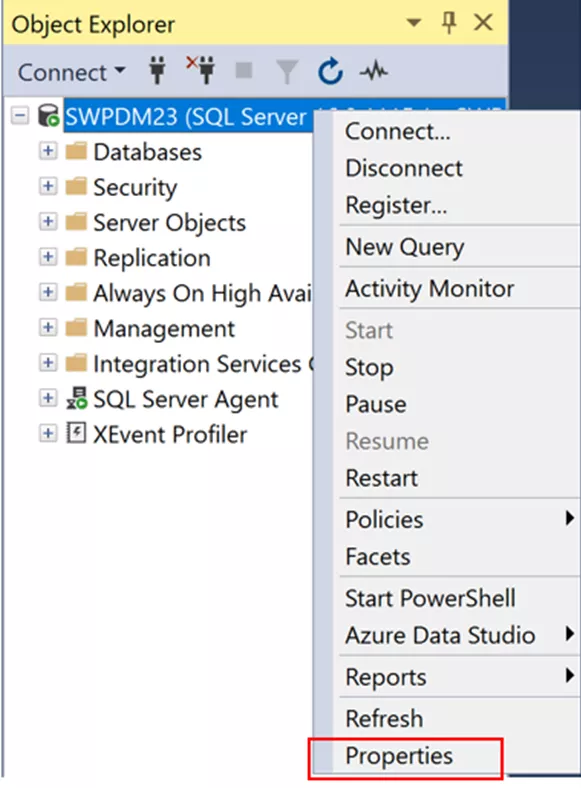
- In the Server Properties dialog box, click Connections.
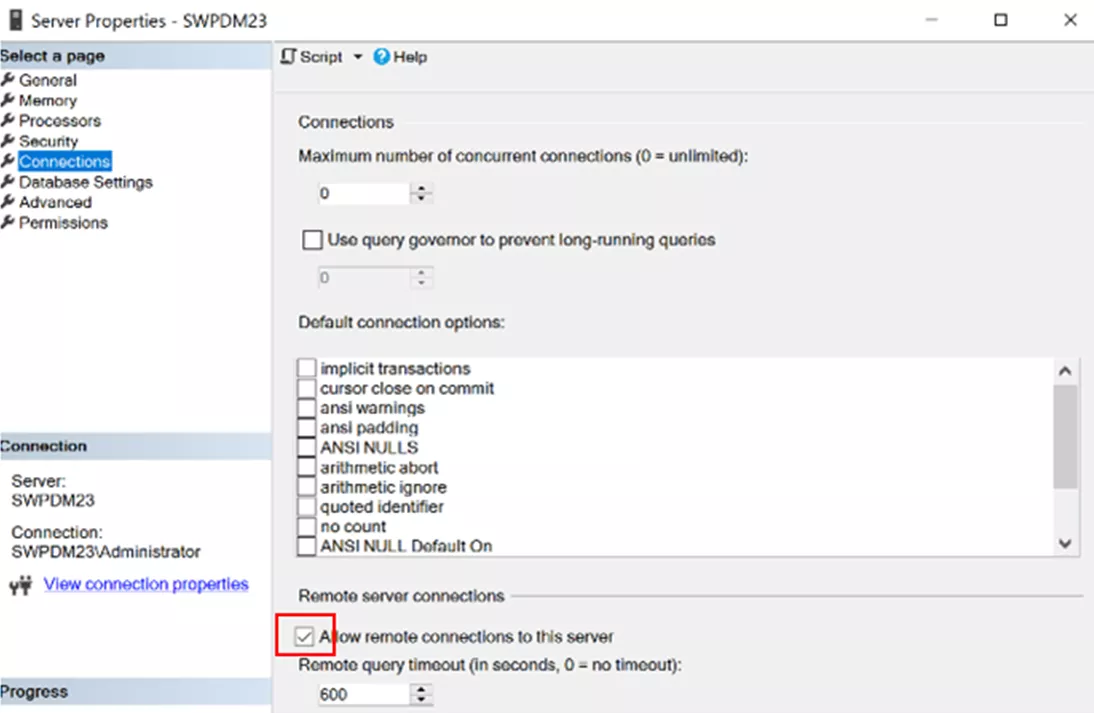
- In the right pane, under Remote server connections, verify Allow remote connections to this server is checked and click OK.
- Exit Microsoft SQL Server Management Studio.
Enabling the SQL protocols:
- From the Windows Start menu, click Microsoft SQL Server version > SQL Server version Configuration Manager.
- In the left pane, expand SQL Server Network Configuration and click Protocols for MSSQLSERVER.
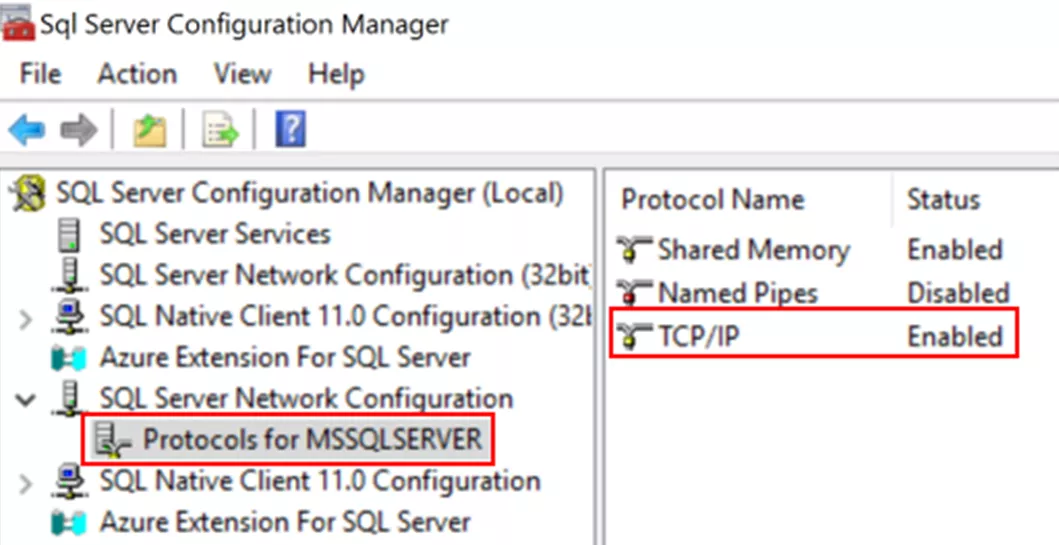
- In the right pane, verify that all three protocols are enabled. If any are disabled, right-click it and select Enable.
Configuring the SQL Instance to Listen on a Fixed TCP Port
By default, SQL is set up to listen to a dynamic port. However, it is difficult to configure port exceptions in this case, assuming a firewall or other security product is in place.
- Right-click TCP/IP and select the IP Addresses tab.
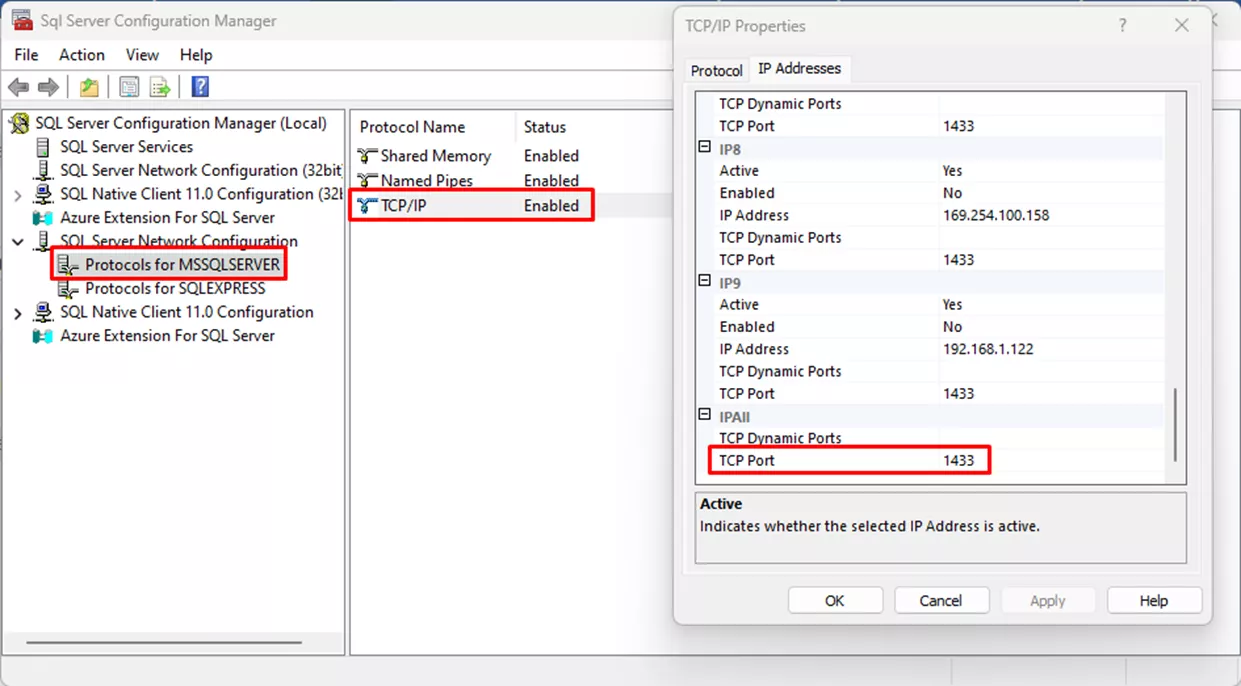
- At the bottom of this screen, under IPAll, clear the value in TCP Dynamic Ports.
- Set the TCP Port to 1433.
- If you would like to use a port other than 1433, we recommend reaching out to technical support before doing so to discuss.
- In the left pane, select SQL Server Services.
- Right-click SQL Server (MSSQLSERVER)> Restart.
- Double-click SQL Server Browser and select the Service tab.
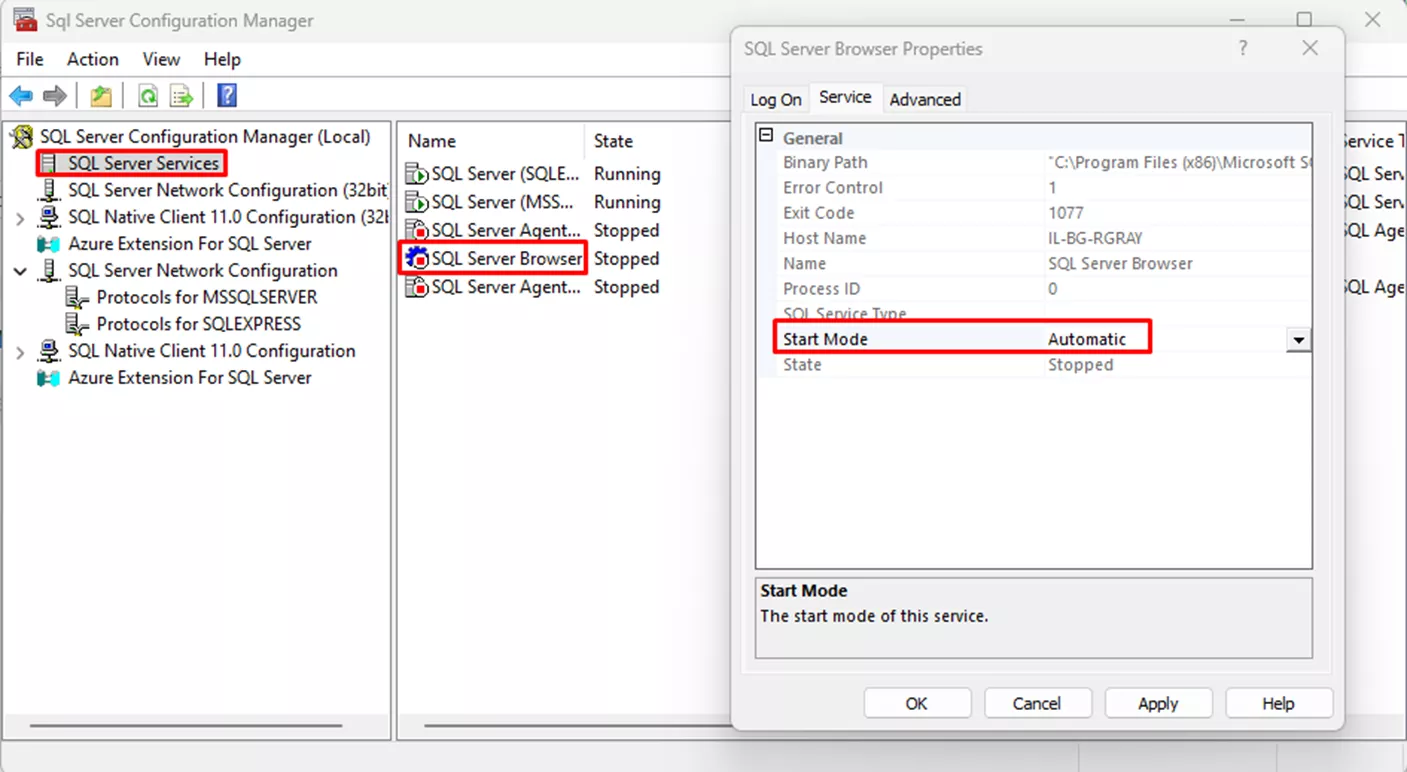
- Set the Start Mode to Automatic and click OK.
- Right-click SQL Server Browser and start the service if it is not running.
Install the PDM and License Server Components
Now that the SQL Server is all setup, we can move on to the PDM server setup.
- Right-click > Run as Administrator on the ‘setup.exe’ file found in the root folder of your installation media.
- If a reboot warning appears, you can click OK past this message. You don’t actually need to reboot.
- On the Welcome page, choose Install server components. Then select:
- Install SolidNetwork License Manager
- Your SolidNetWork License Manager (SNL) can be installed on a separate machine from your PDM or SQL components if you wish. To successfully install the SNL, you will need a reliable internet connection, and your 24-digit serial numbers provided by your VAR.
- Install SOLIDWORKS PDM Server
- Click Next.
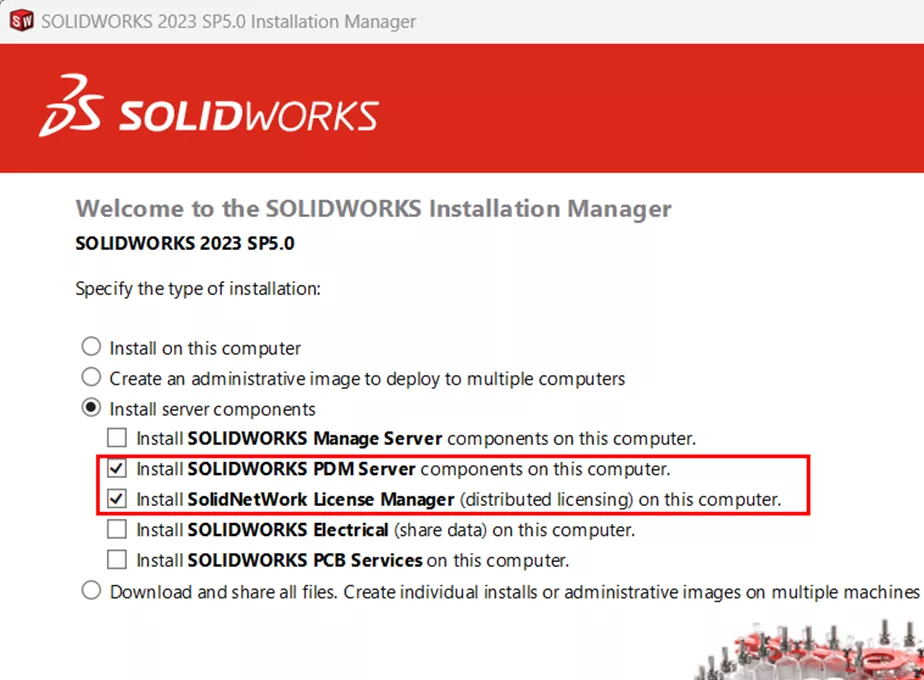
- Install SolidNetwork License Manager
- On the Summary page, choose Change for the SOLIDWORKS PDM Server settings.
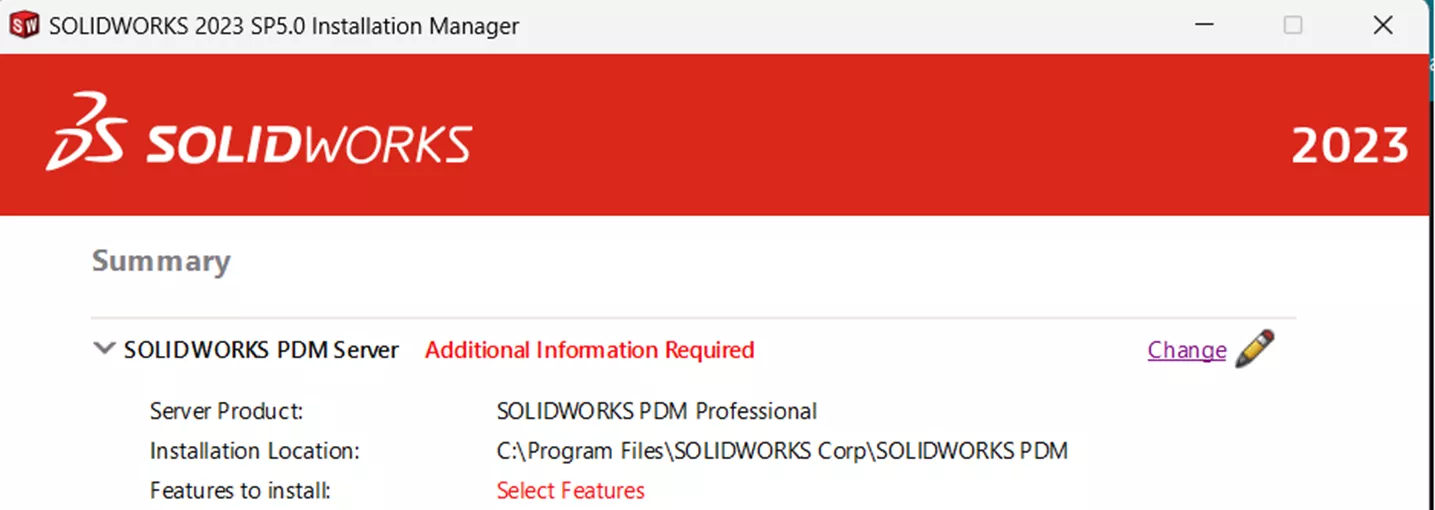
- Make sure to choose the correct version for your serial number: PDM Professional or PDM Standard. Check the box for the Archive Server, the Database Server, and the Client.
- If you plan to use the Web2 options available for PDM Professional, check that box as well. This option will not be available for PDM Standard licenses.
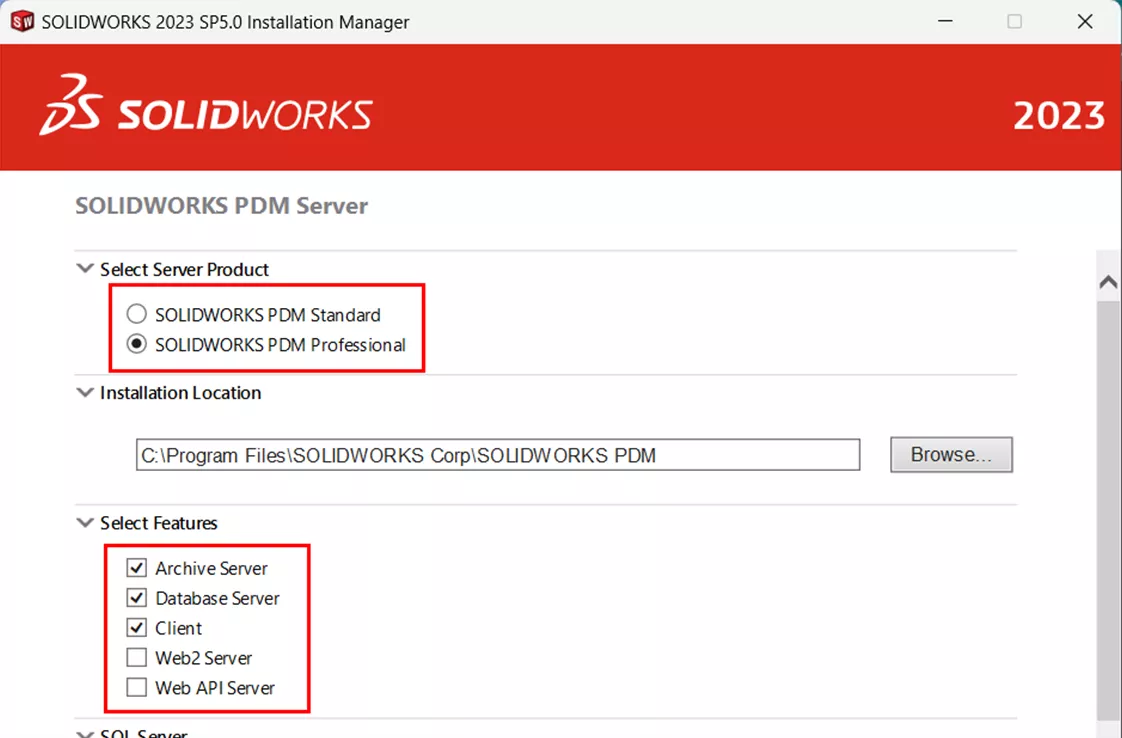
- If you plan to use the Web2 options available for PDM Professional, check that box as well. This option will not be available for PDM Standard licenses.
- Scroll down to the SQL Server section.
- Change the Name section to match that of your SQL Server name (and instance, if applicable). Do not leave this as ‘localhost’.
- Fill out the SA credentials you created earlier. Then click Back to Summary.
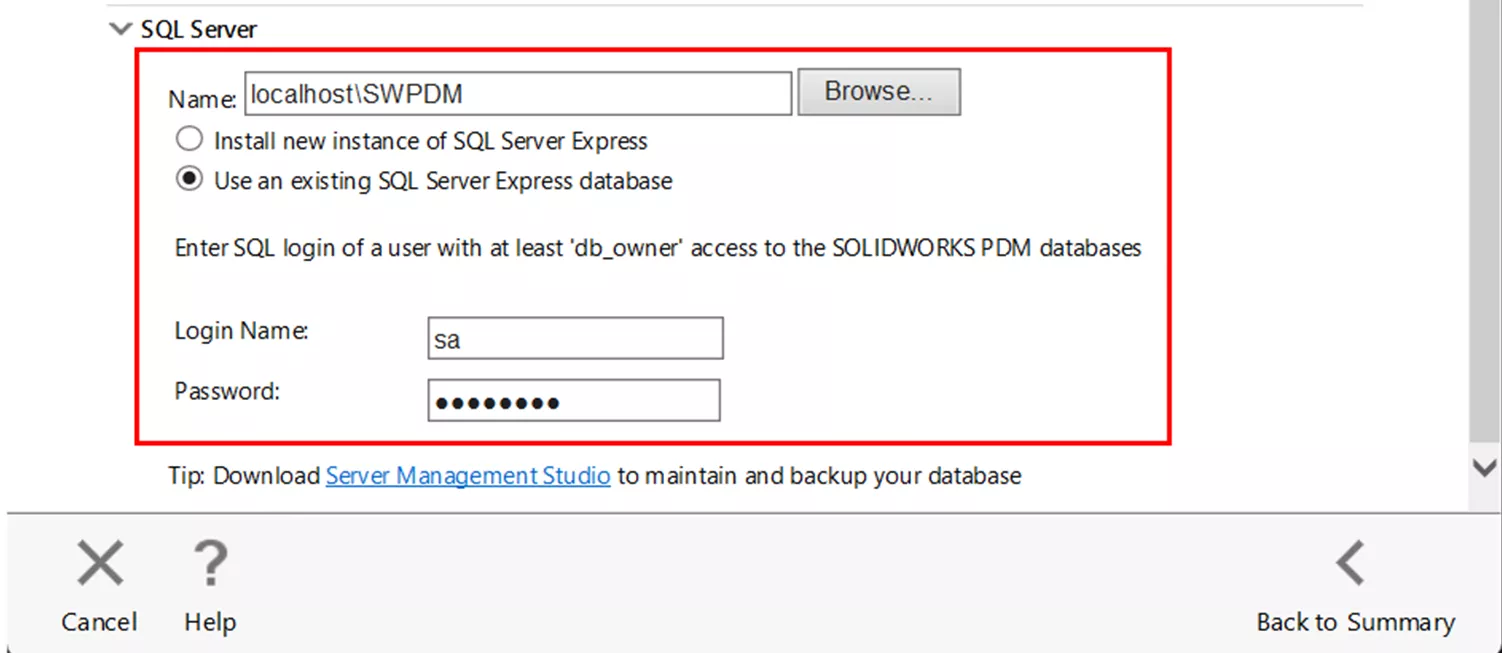
- Accept the license terms and click Install Now.
Configure Your Archive and Create Your Vault
With the PDM components in place, you can now move forward to setting up the Vault. This will start as soon as the installation is complete.
Archive server configuration:
- Click Next to start the wizard.
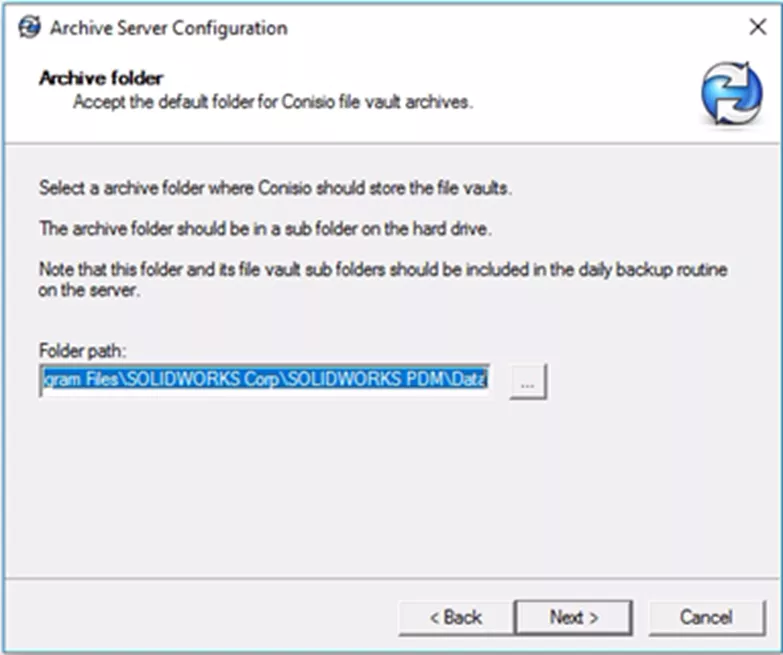
- On the Archive folder page, choose the location for the system to store the files you’ll be adding to the vault. When done, click Next.
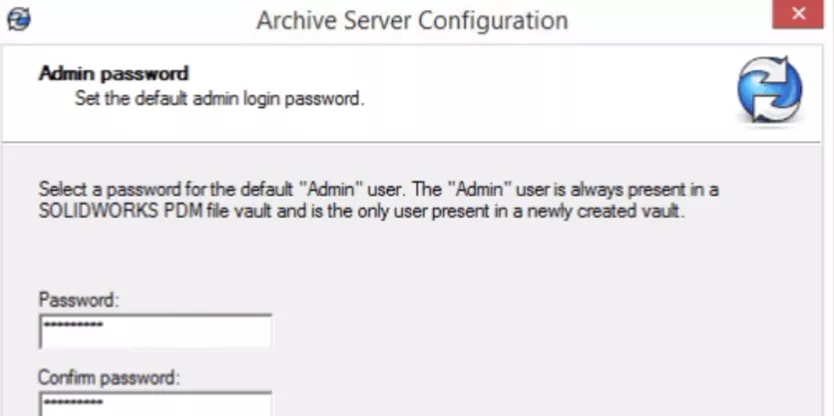
- On the Admin Password page, choose a password for the server default admin user. Click Next.
- This is the built-in Administrator for your PDM environment. Each vault you create can have a unique admin password, or you can have a set server default password for all of them.
- This is the built-in Administrator for your PDM environment. Each vault you create can have a unique admin password, or you can have a set server default password for all of them.
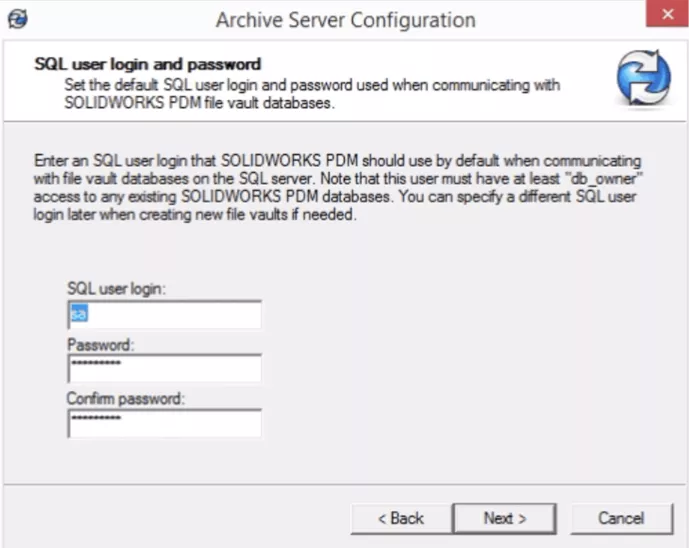
- On the SQL user login page, enter the credentials for the ‘sa’ password you set up earlier for SQL. Click Next.
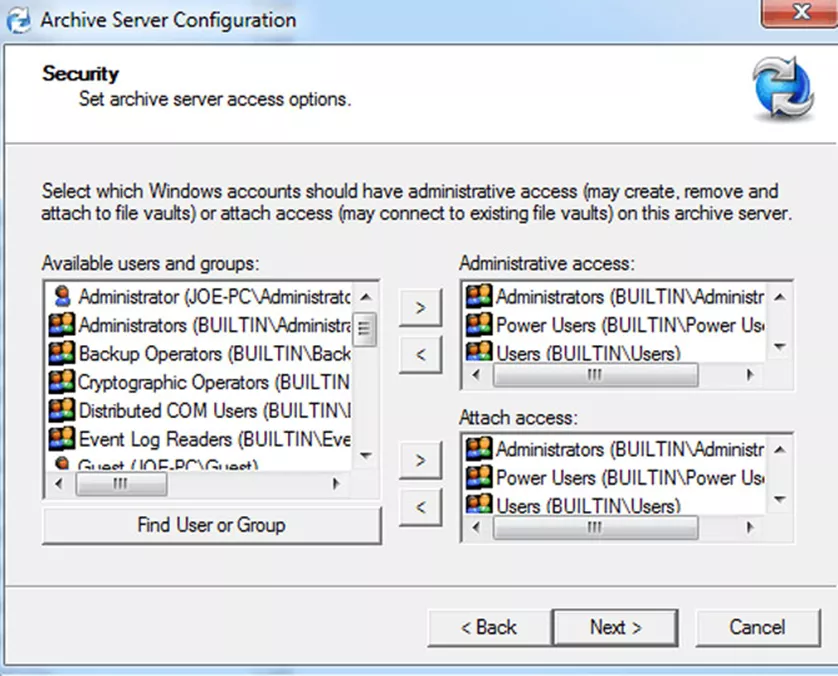
- On the Security tab, you’ll need to add any users or groups you want to have administrative access (administrative access here being who can create or delete vaults) to the archive and attach access (for creating vault views on client machines).
- Note: These are Windows profiles that are checked when trying to create or delete vaults, or create vaults views. These are not PDM users and have no bearing on who can login to or access vaults otherwise.
- Note: These are Windows profiles that are checked when trying to create or delete vaults, or create vaults views. These are not PDM users and have no bearing on who can login to or access vaults otherwise.
Create Your First Vault:
Now, you need to create a vault to store and manage the files you’ll be entering into PDM.
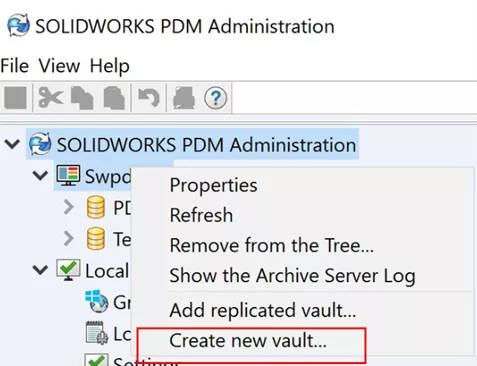
- Open the PDM Administration tool, right-click the server name from the list on the left, and choose Create New Vault.
- Click Next to begin the wizard.
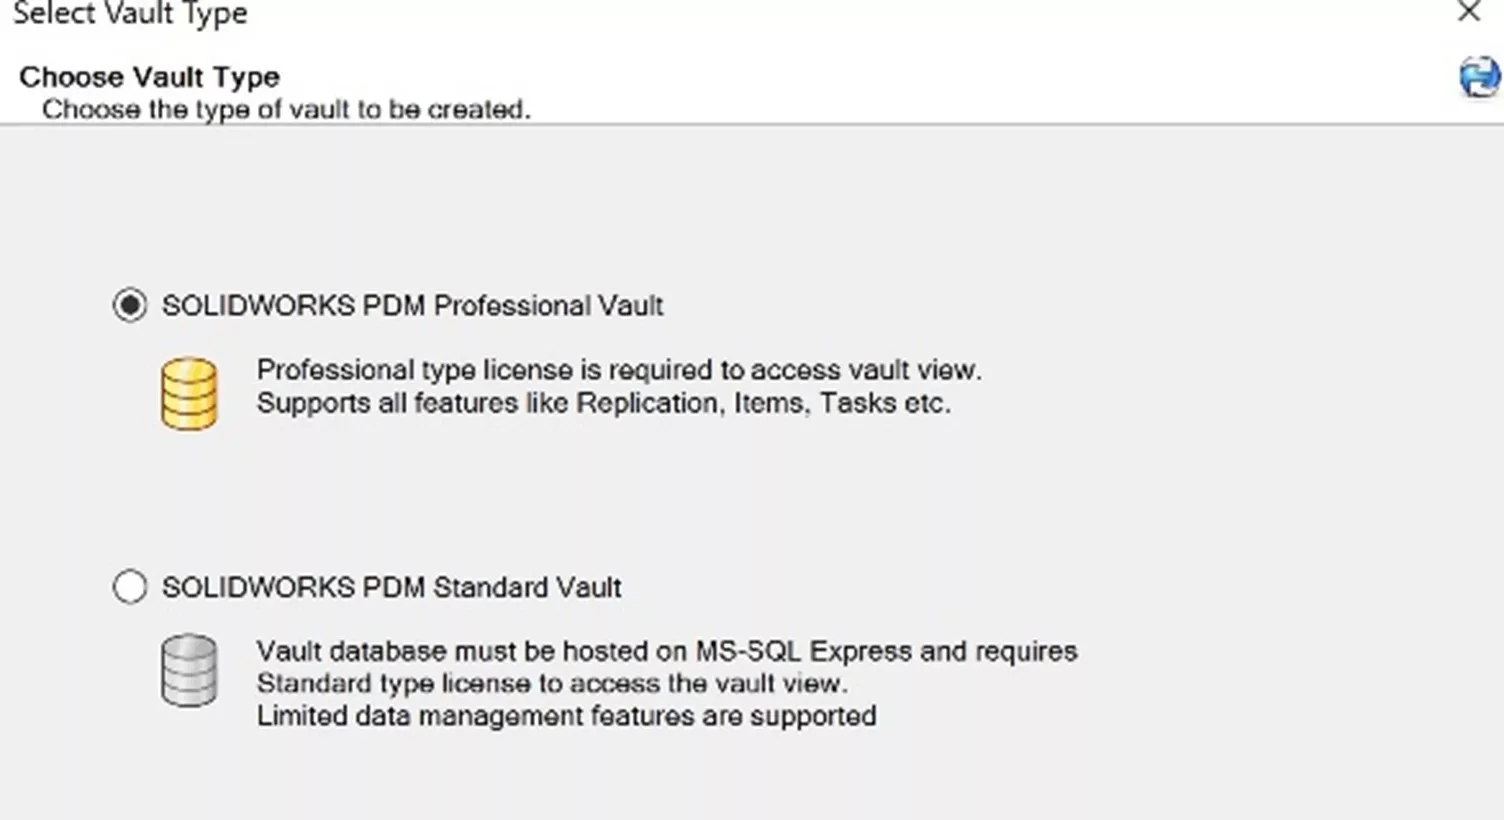
- Choose either the Professional or Standard PDM option based on your license. Then click Next.
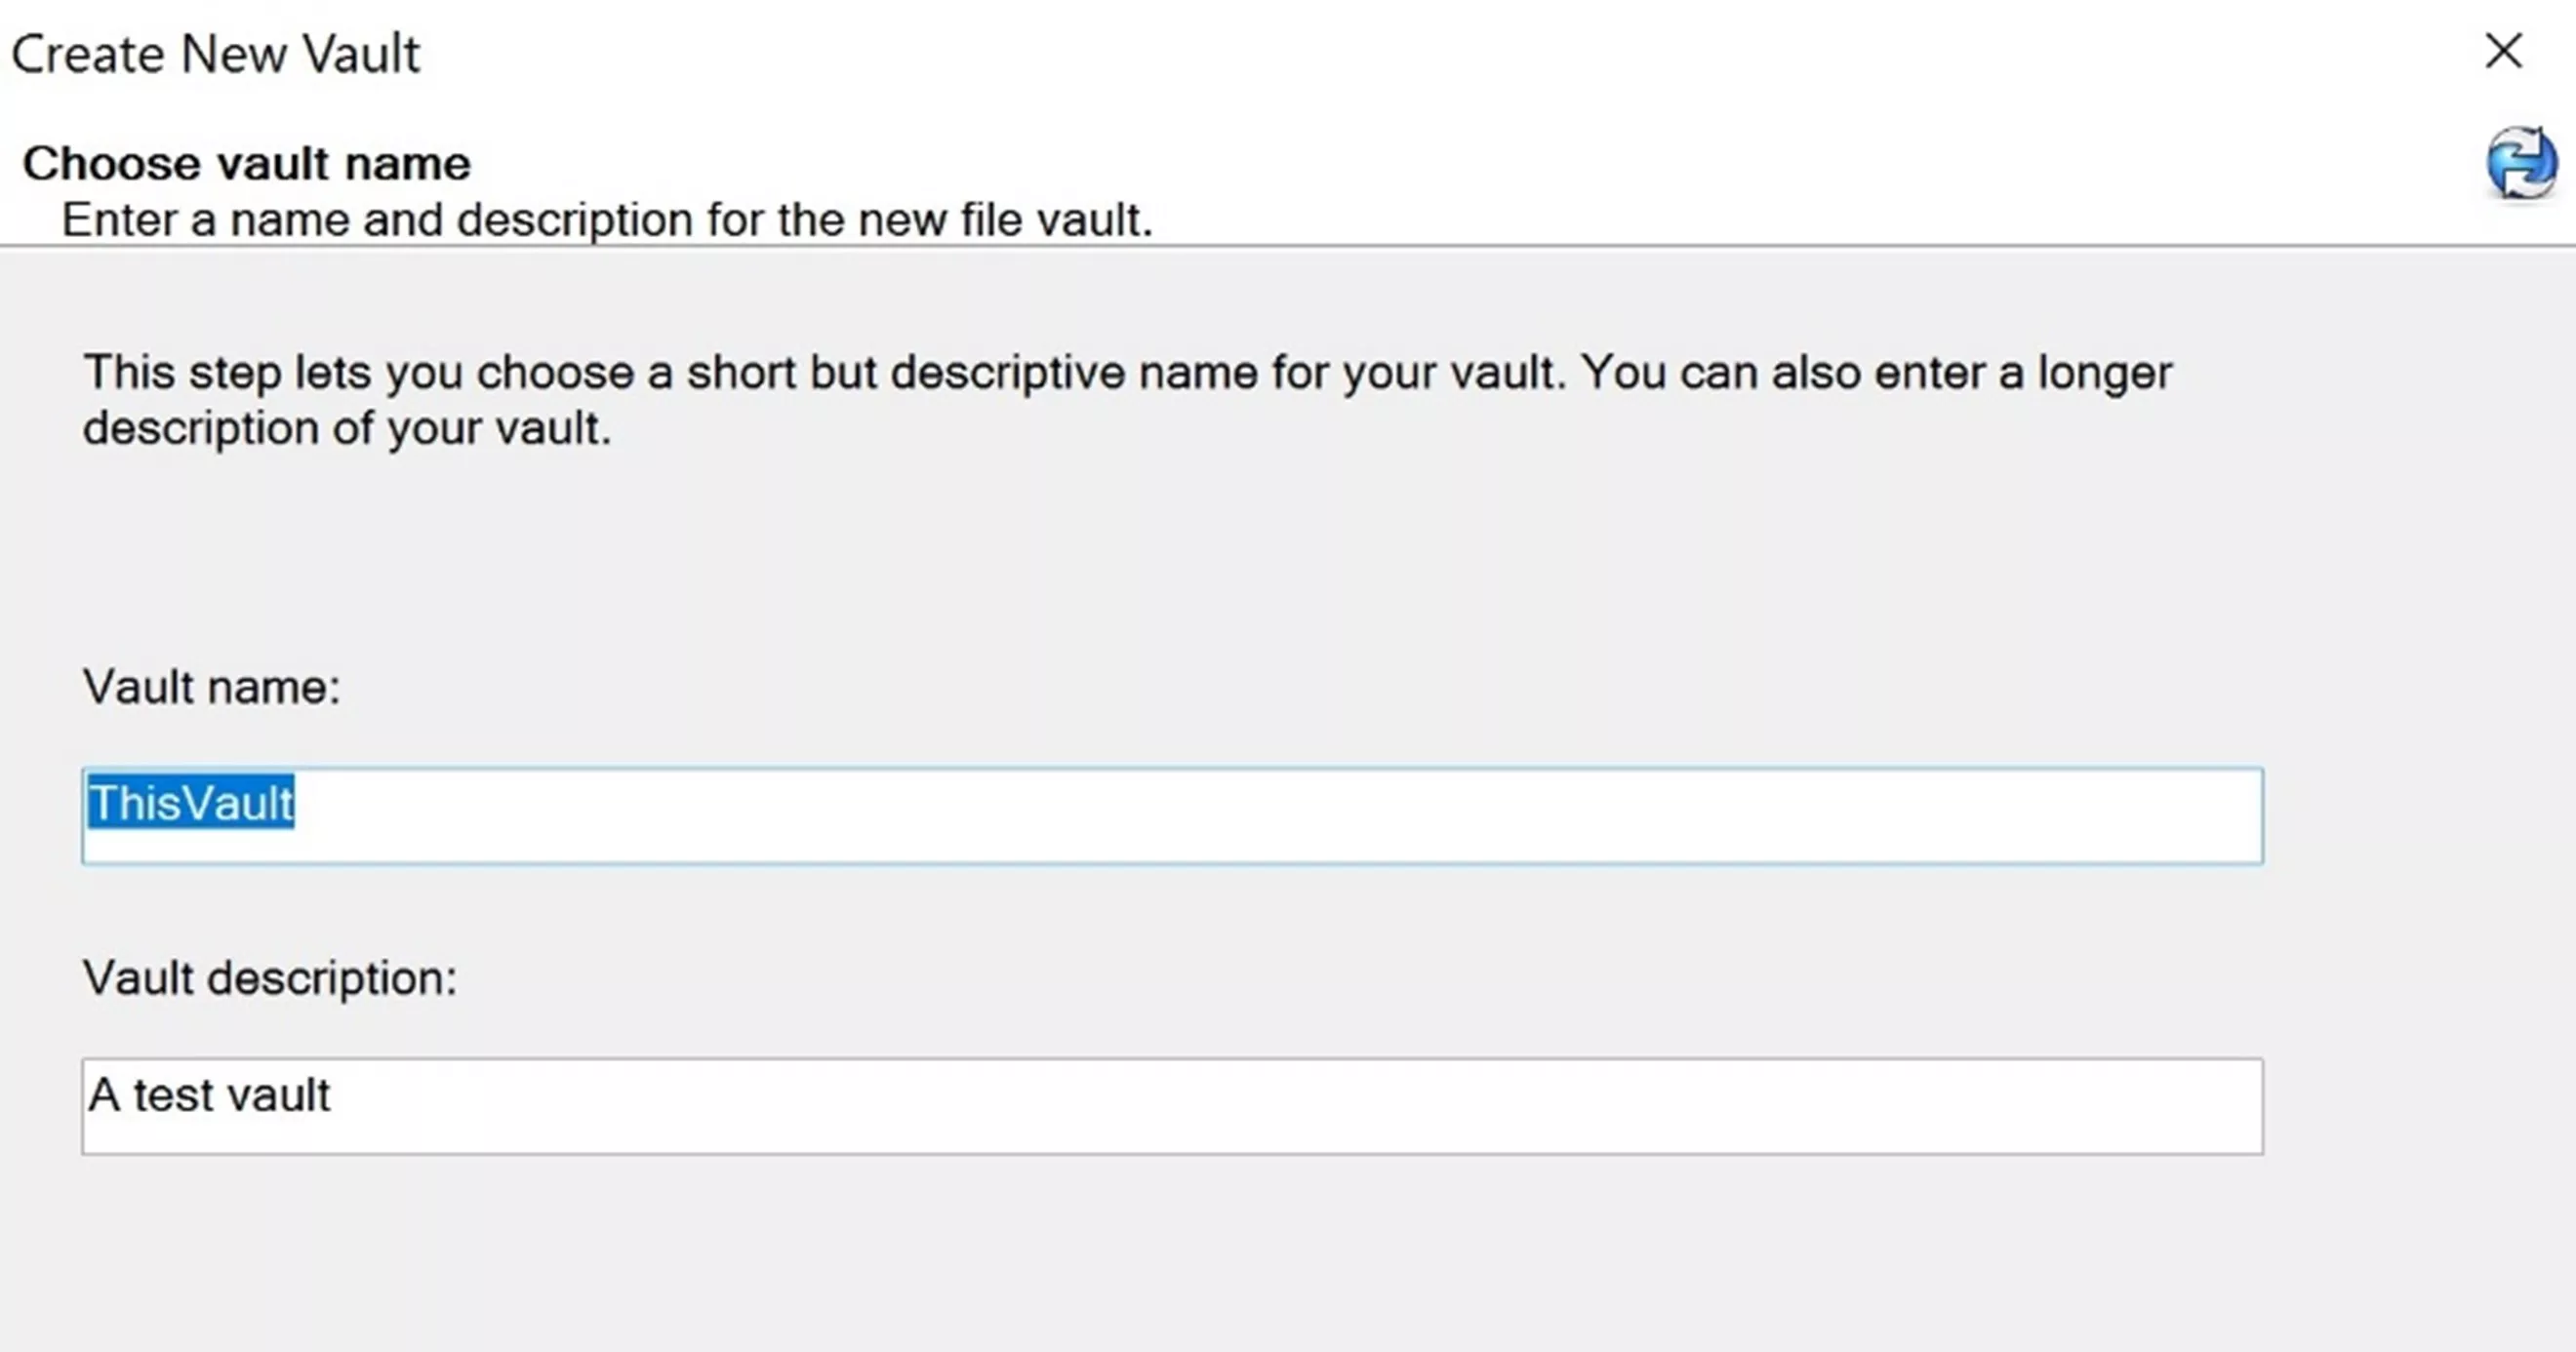
- Enter the desired name of the vault and an optional description. Click Next.
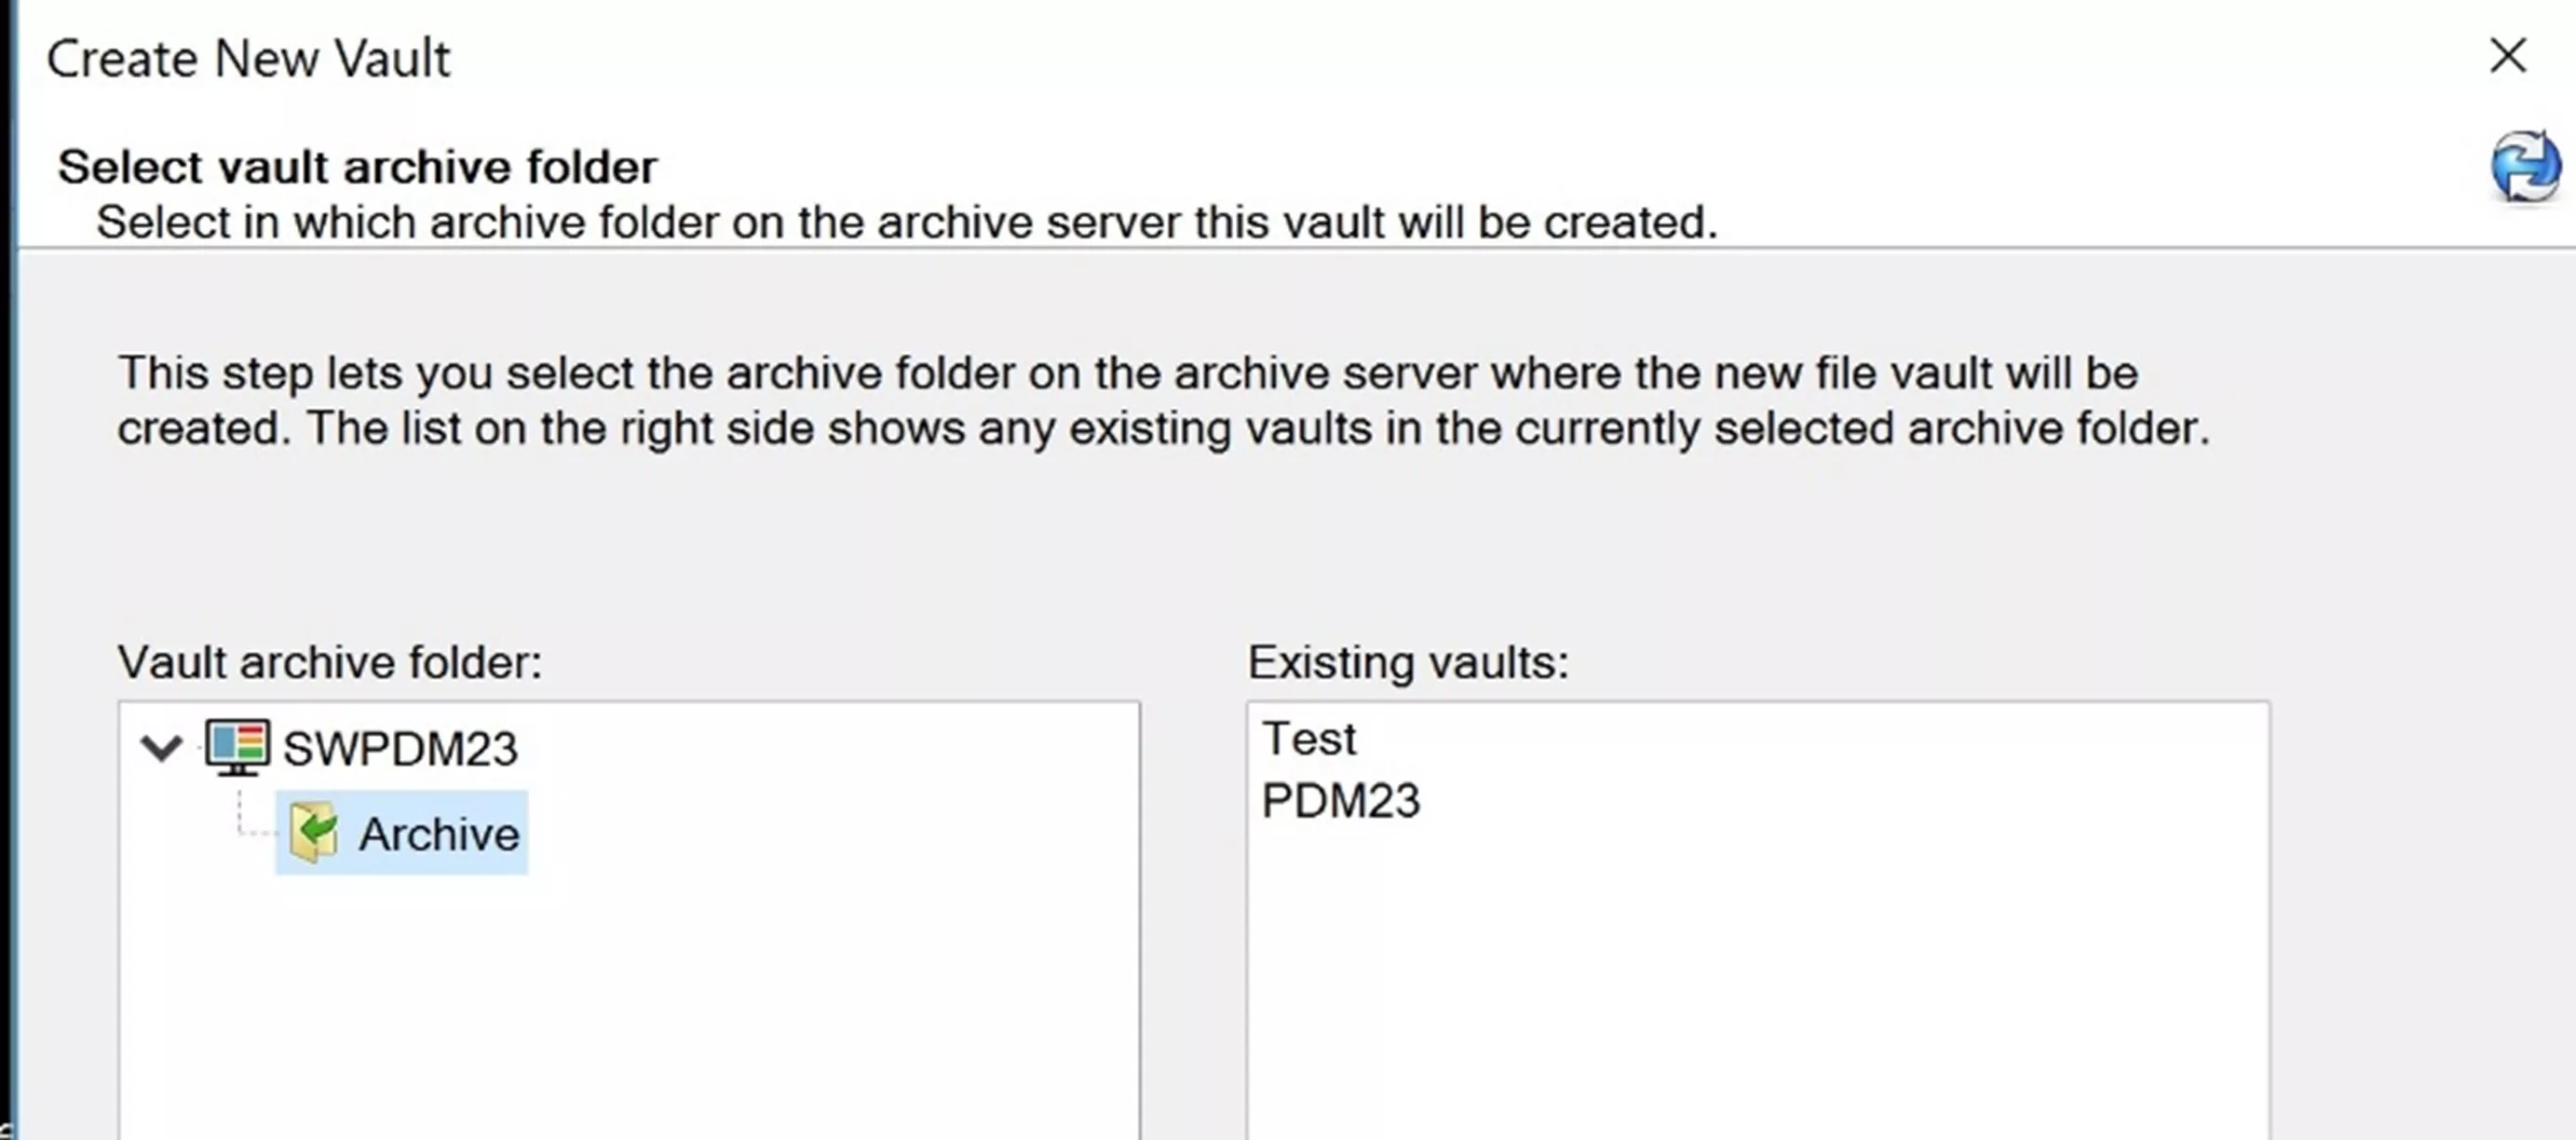
- Select Archive on the left and click Next.
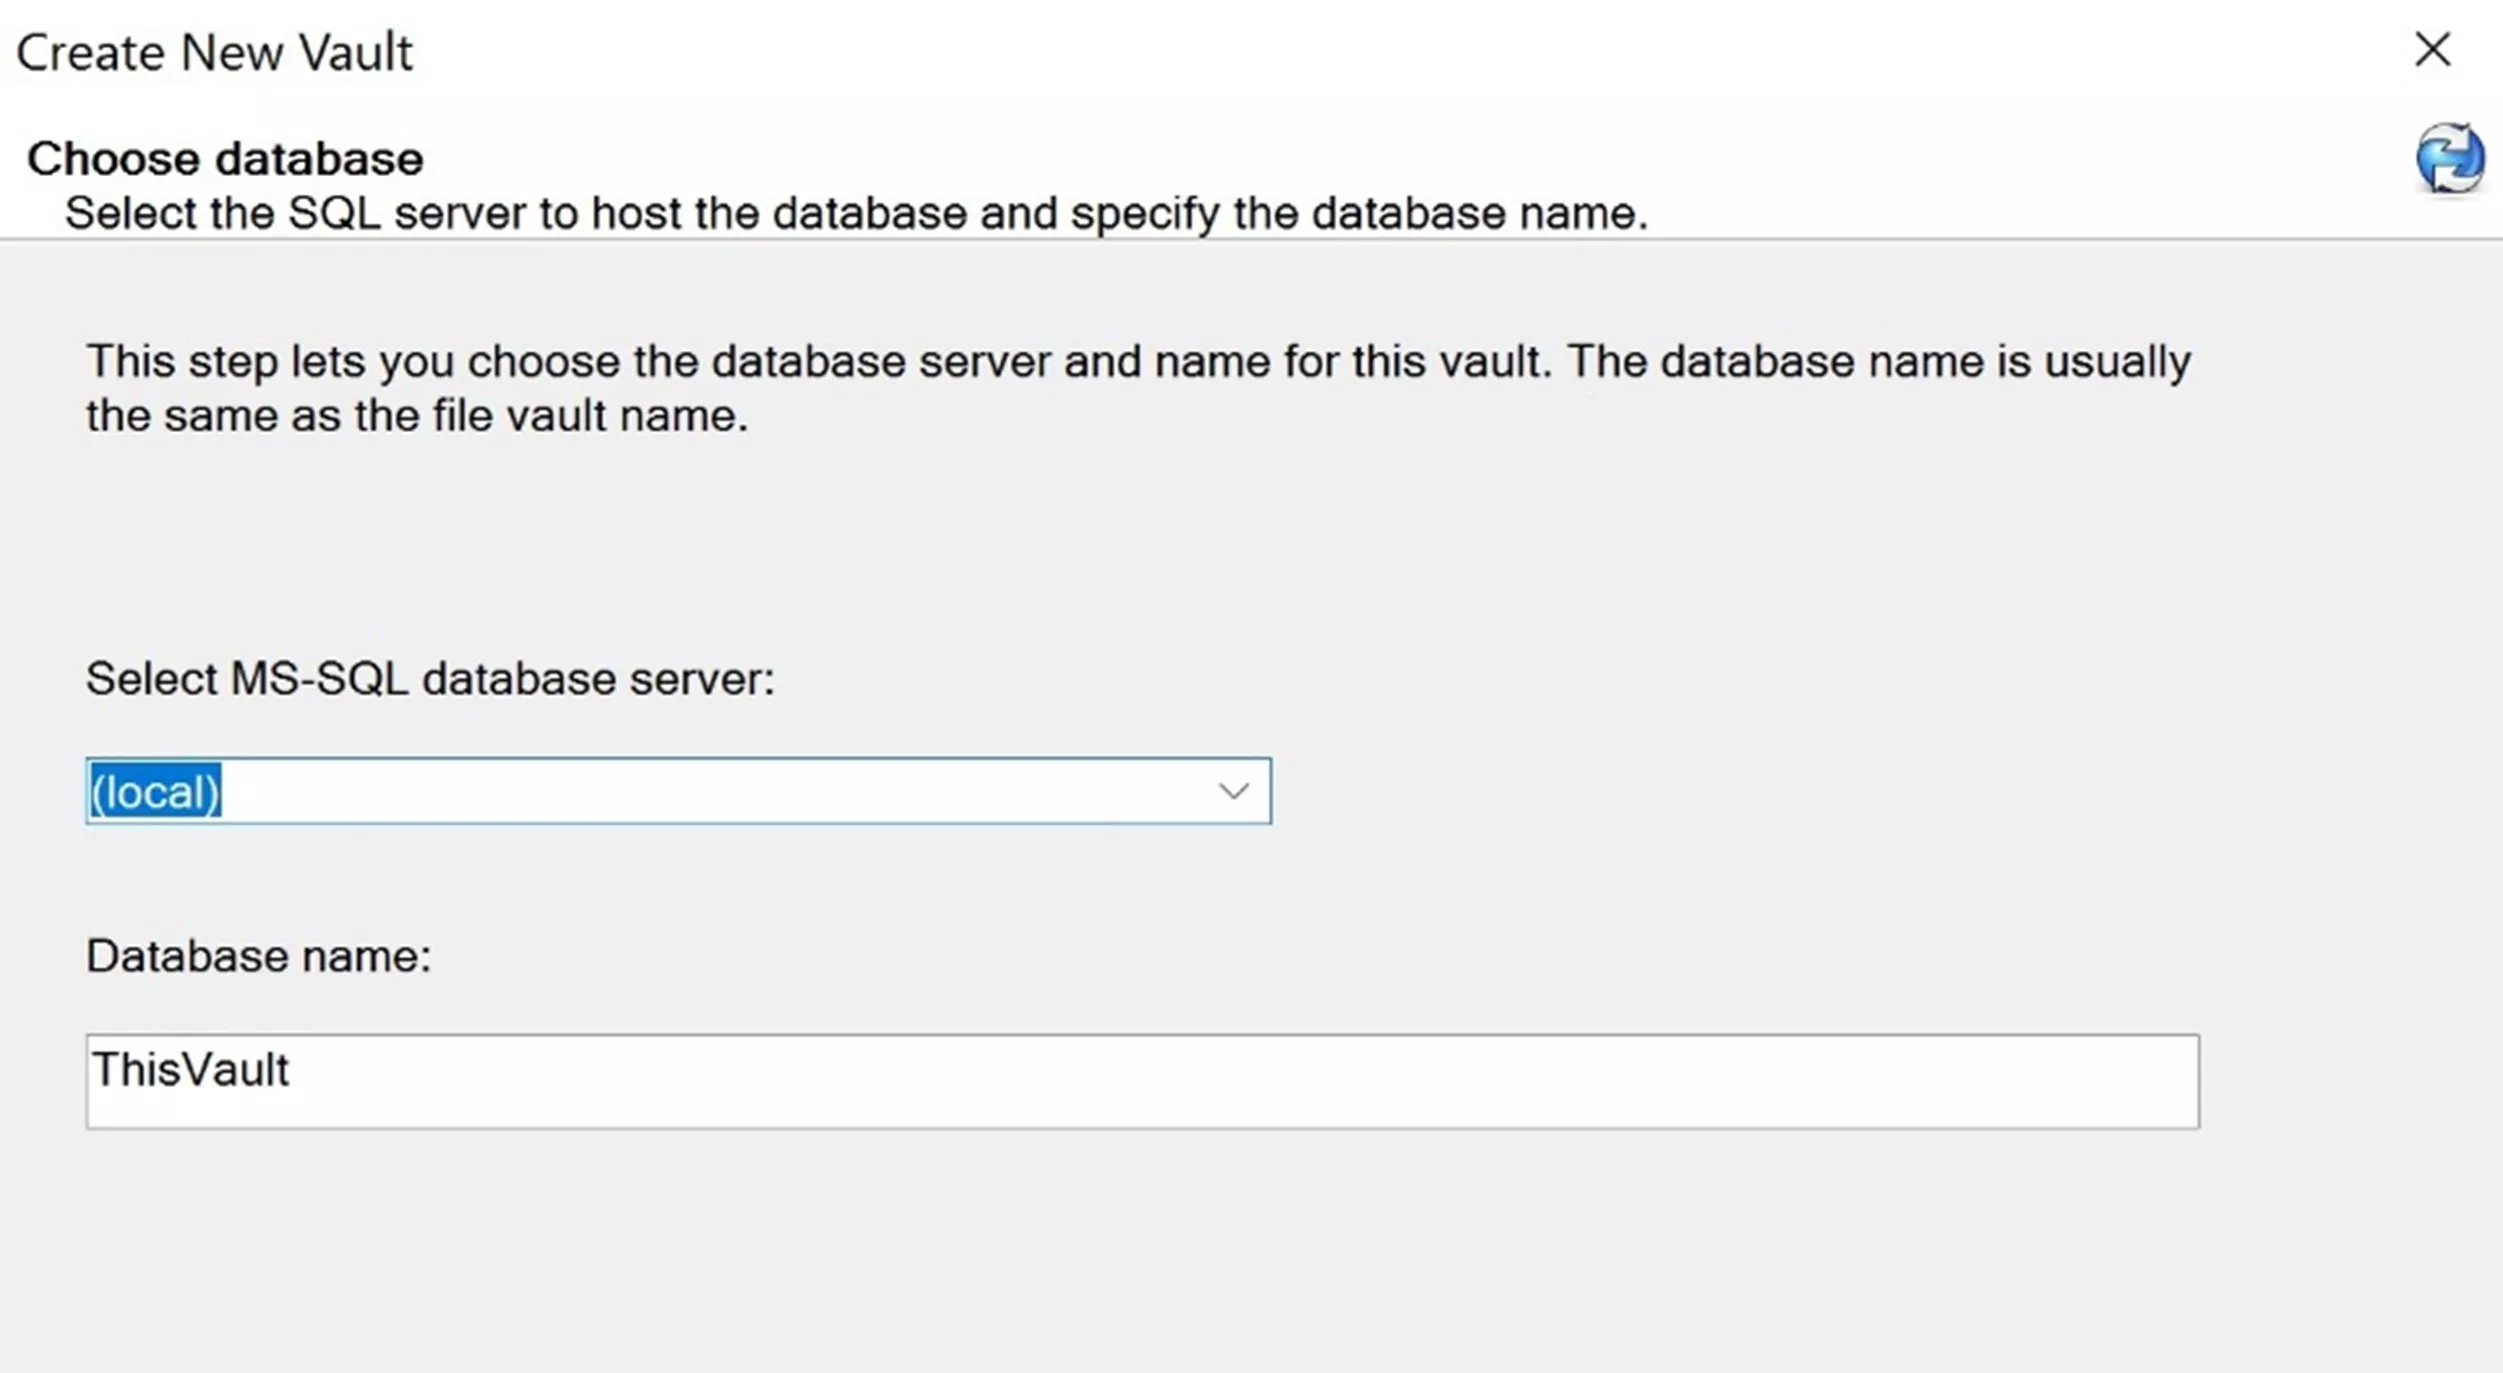
- Type in the name (and instance name, if applicable) of your SQL server. Do not use the dropdown list. Click Next.
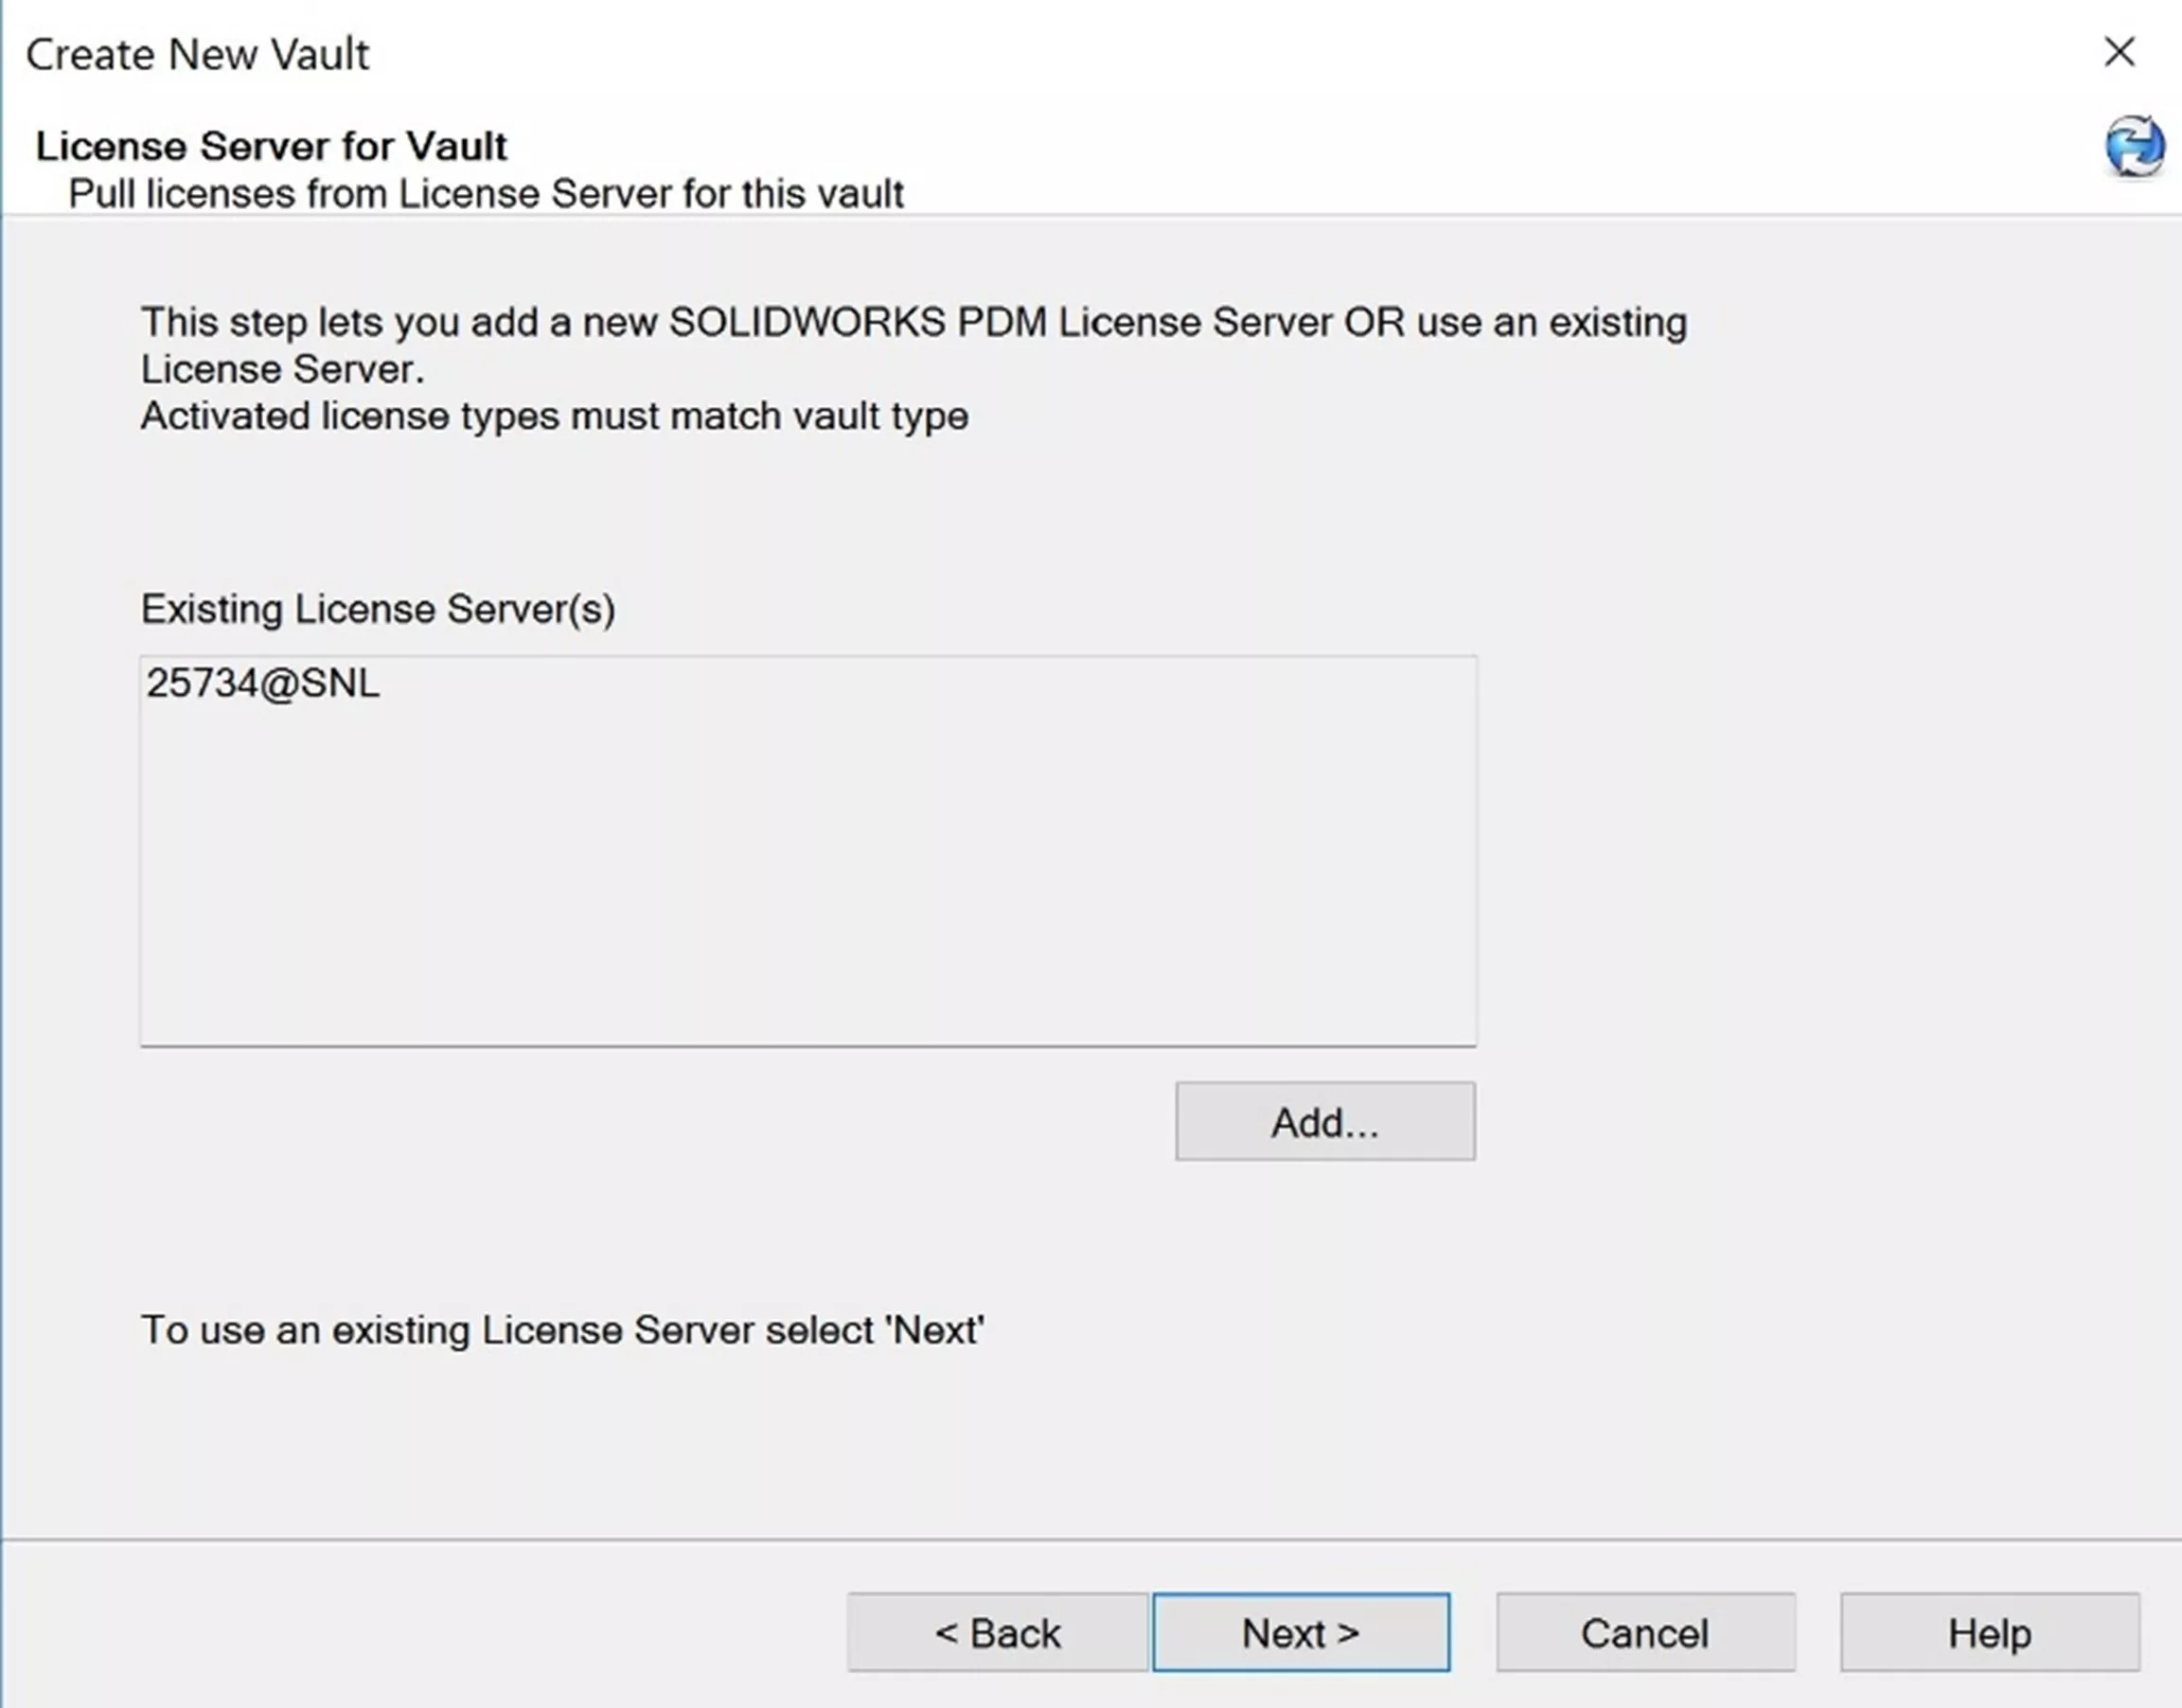
- Verify or Add the License Server information. The format should be 25734@SERVERNAME, where SERVERNAME is the name of the machine hosting the SolidNetWork License Manager. Then click Next.
- Choose your desired language and date format, and click Next.
- This can be changed later if needed, but try to choose the best-fitting option for you initially, as there are some repercussions to changing it later.
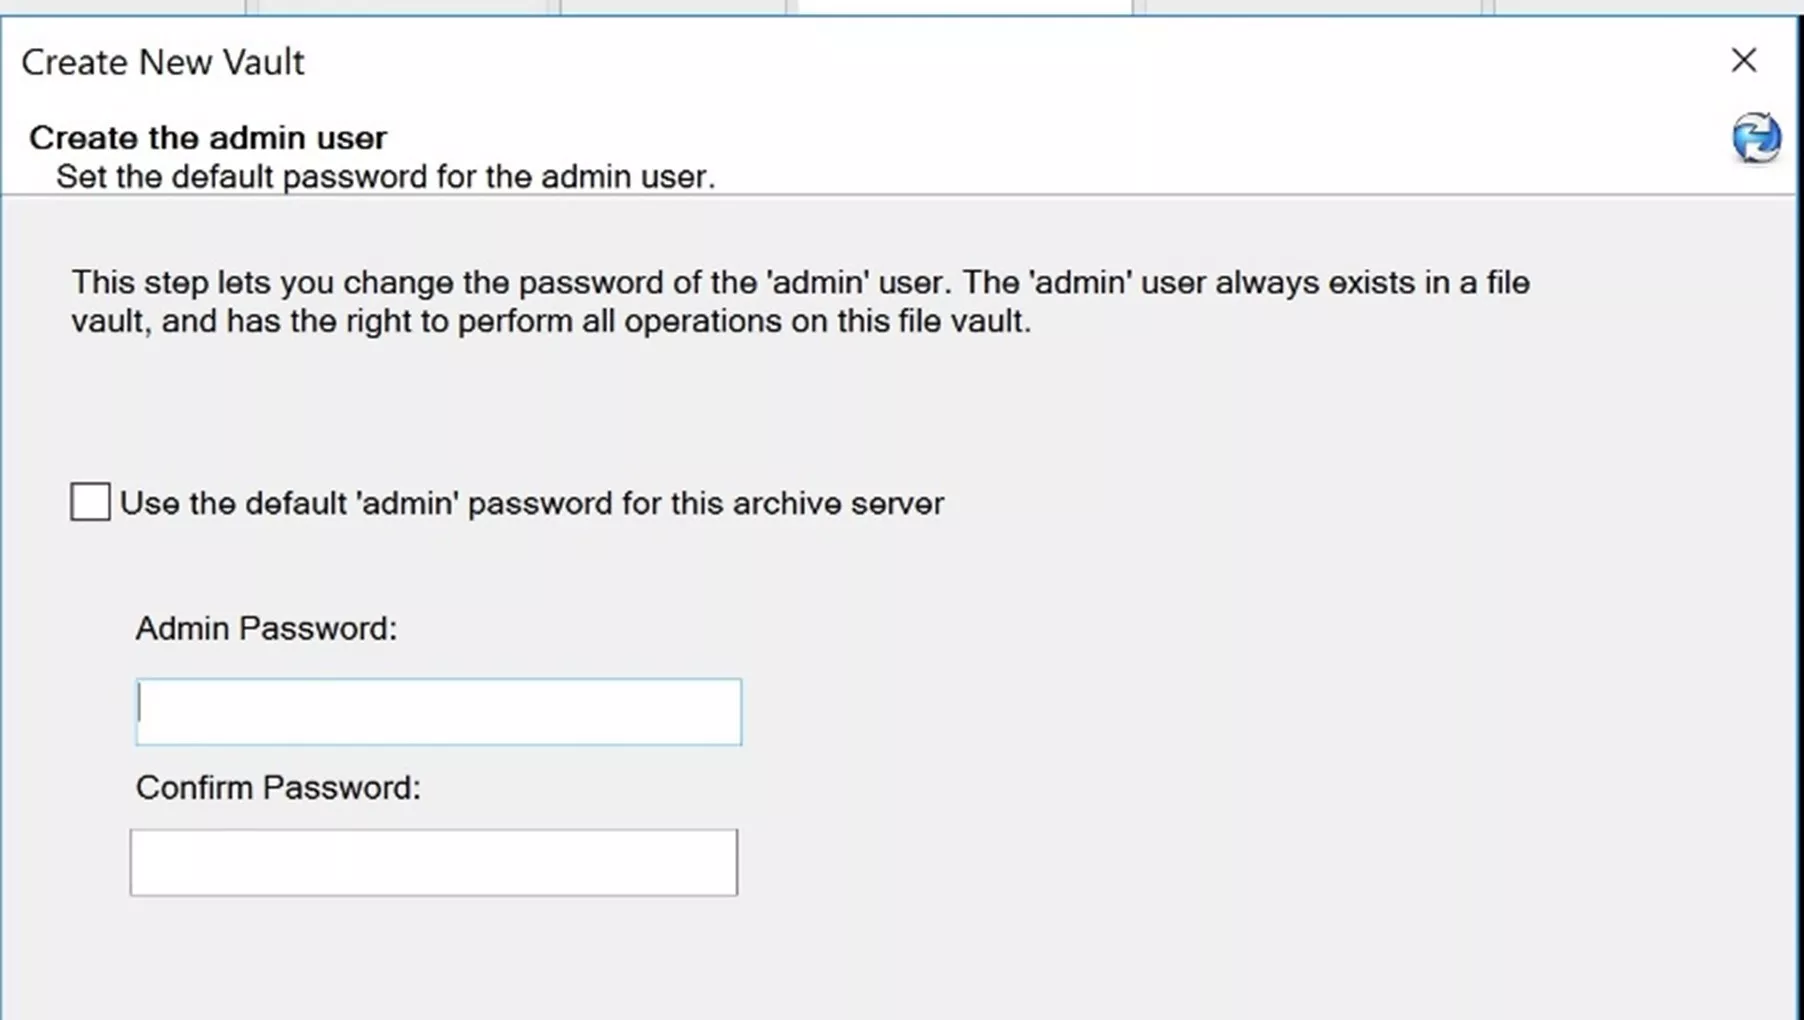
- Choose to use the default Admin password you created earlier, or create a vault-specific Admin password. This will be the password for the built-in ‘admin’ user in your vault.
- Choose the configuration you'd like to use.
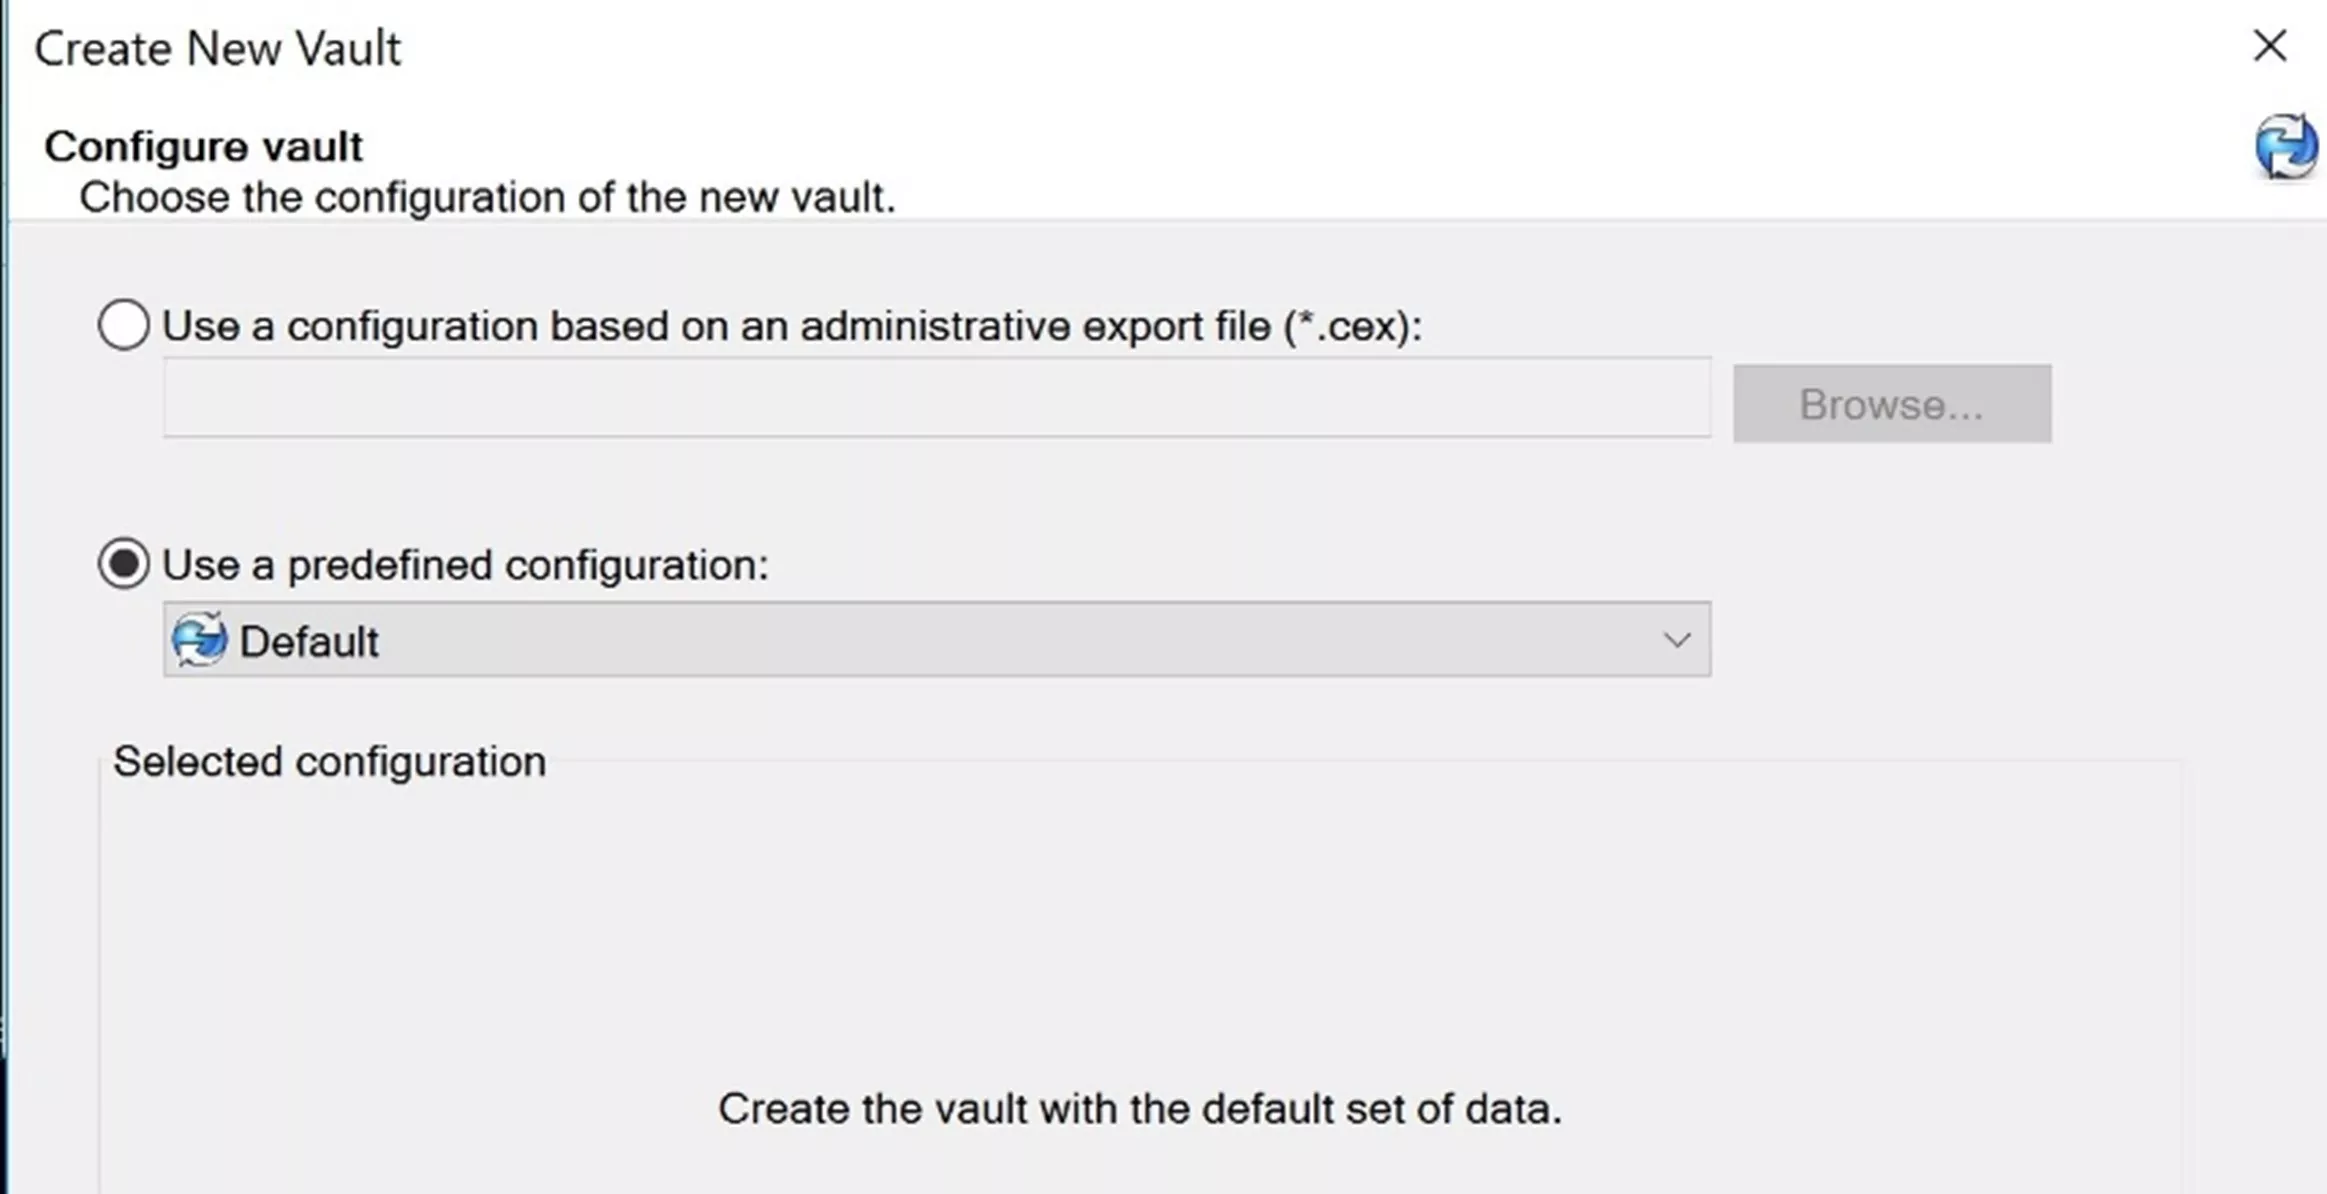
- Default: A vault with the default set of data (recommended).
- Quick Start: A vault with a minimum set of required data for SOLIDWORKS users.
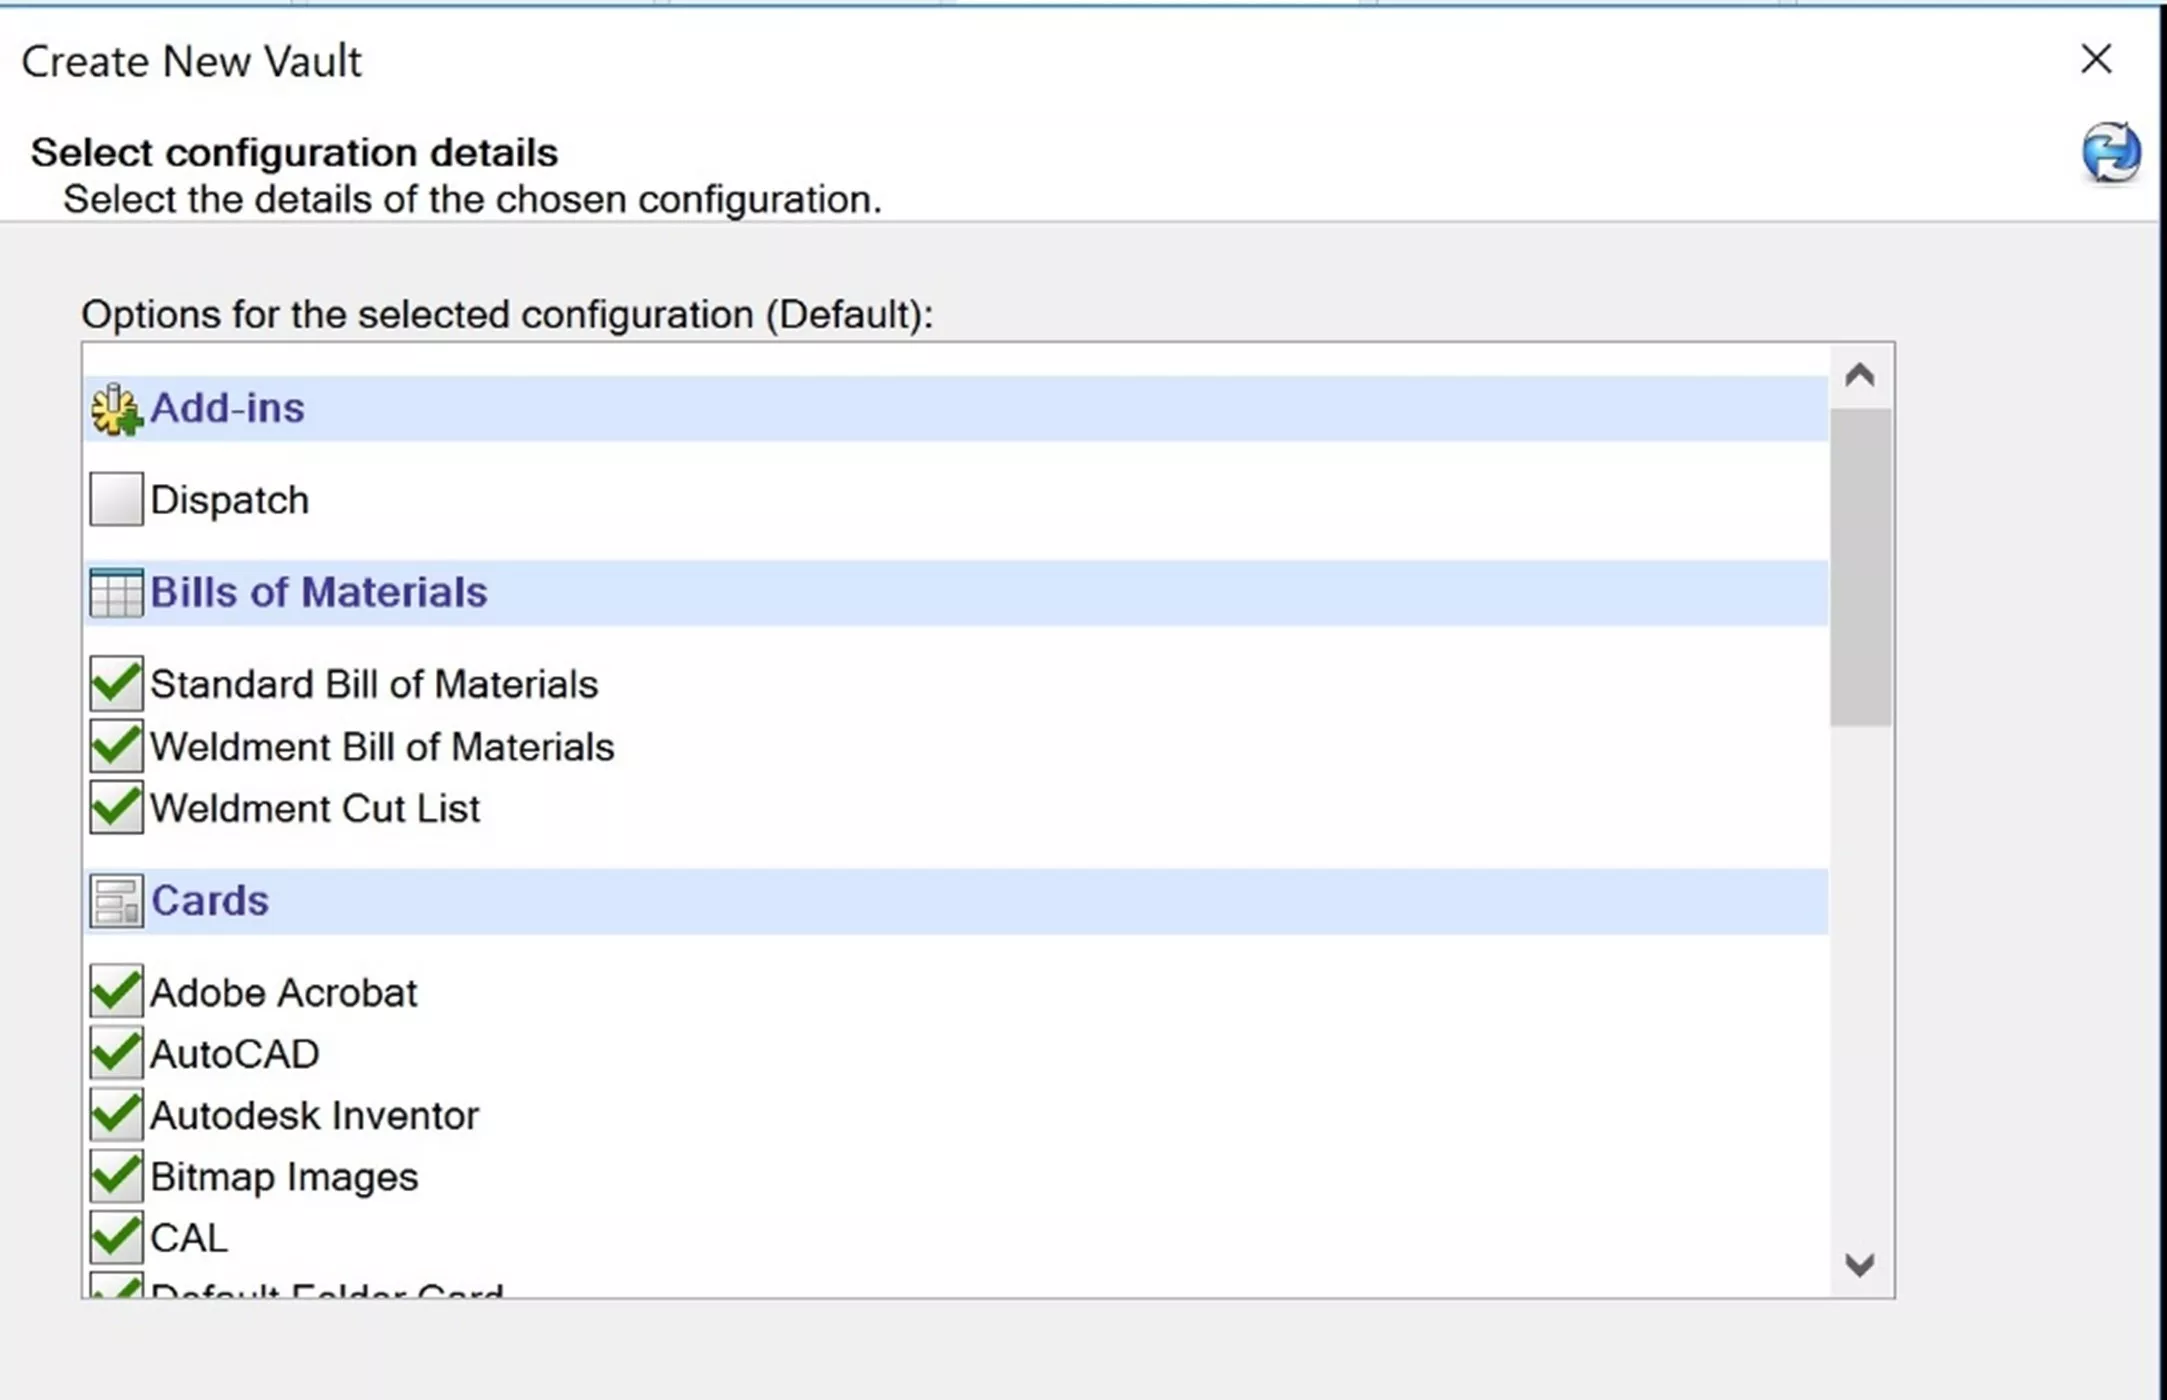
- Choose the features you want to add to your vault. We recommend checking all available options and not excluding anything. If you miss something, however, all of these can be added later.
- Review your choices and click Finish.
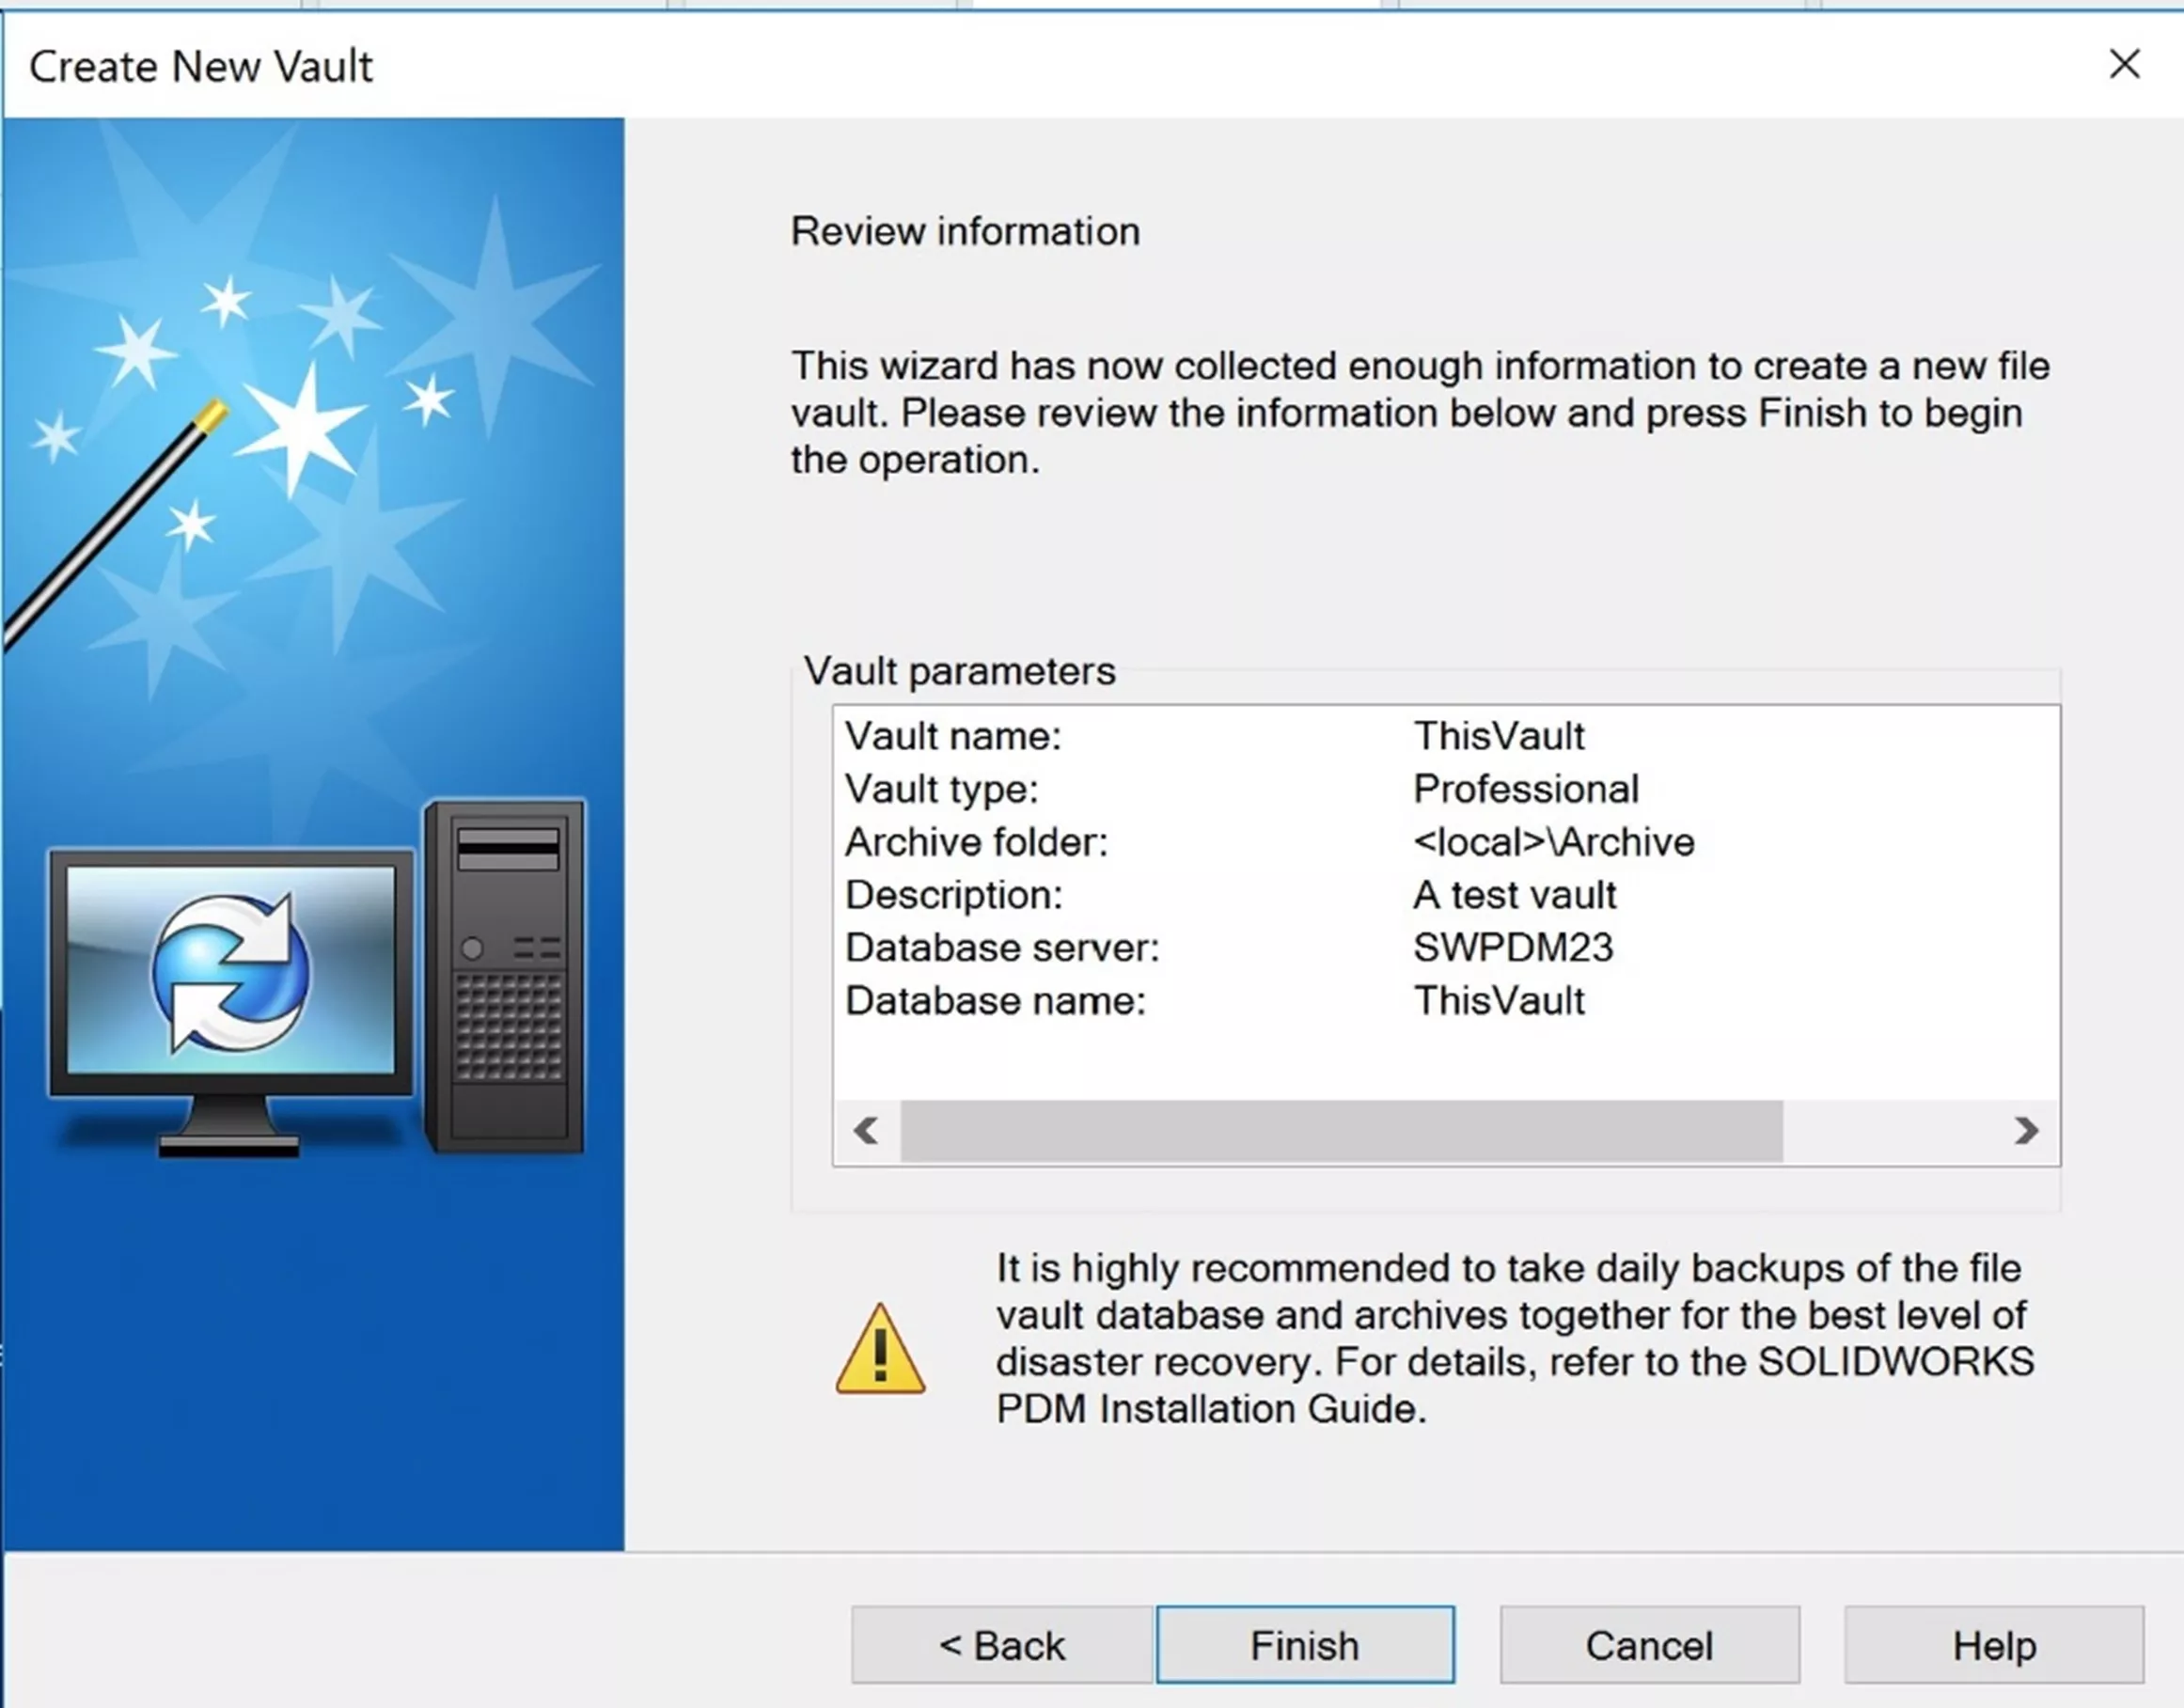
- Once you’ve finished the wizard, a SQL Database will be created by PDM to match your new vault.
Creating the Local Vault View on the Server:
- In the Administration tool, right-click the name of your new vault > Create local view.
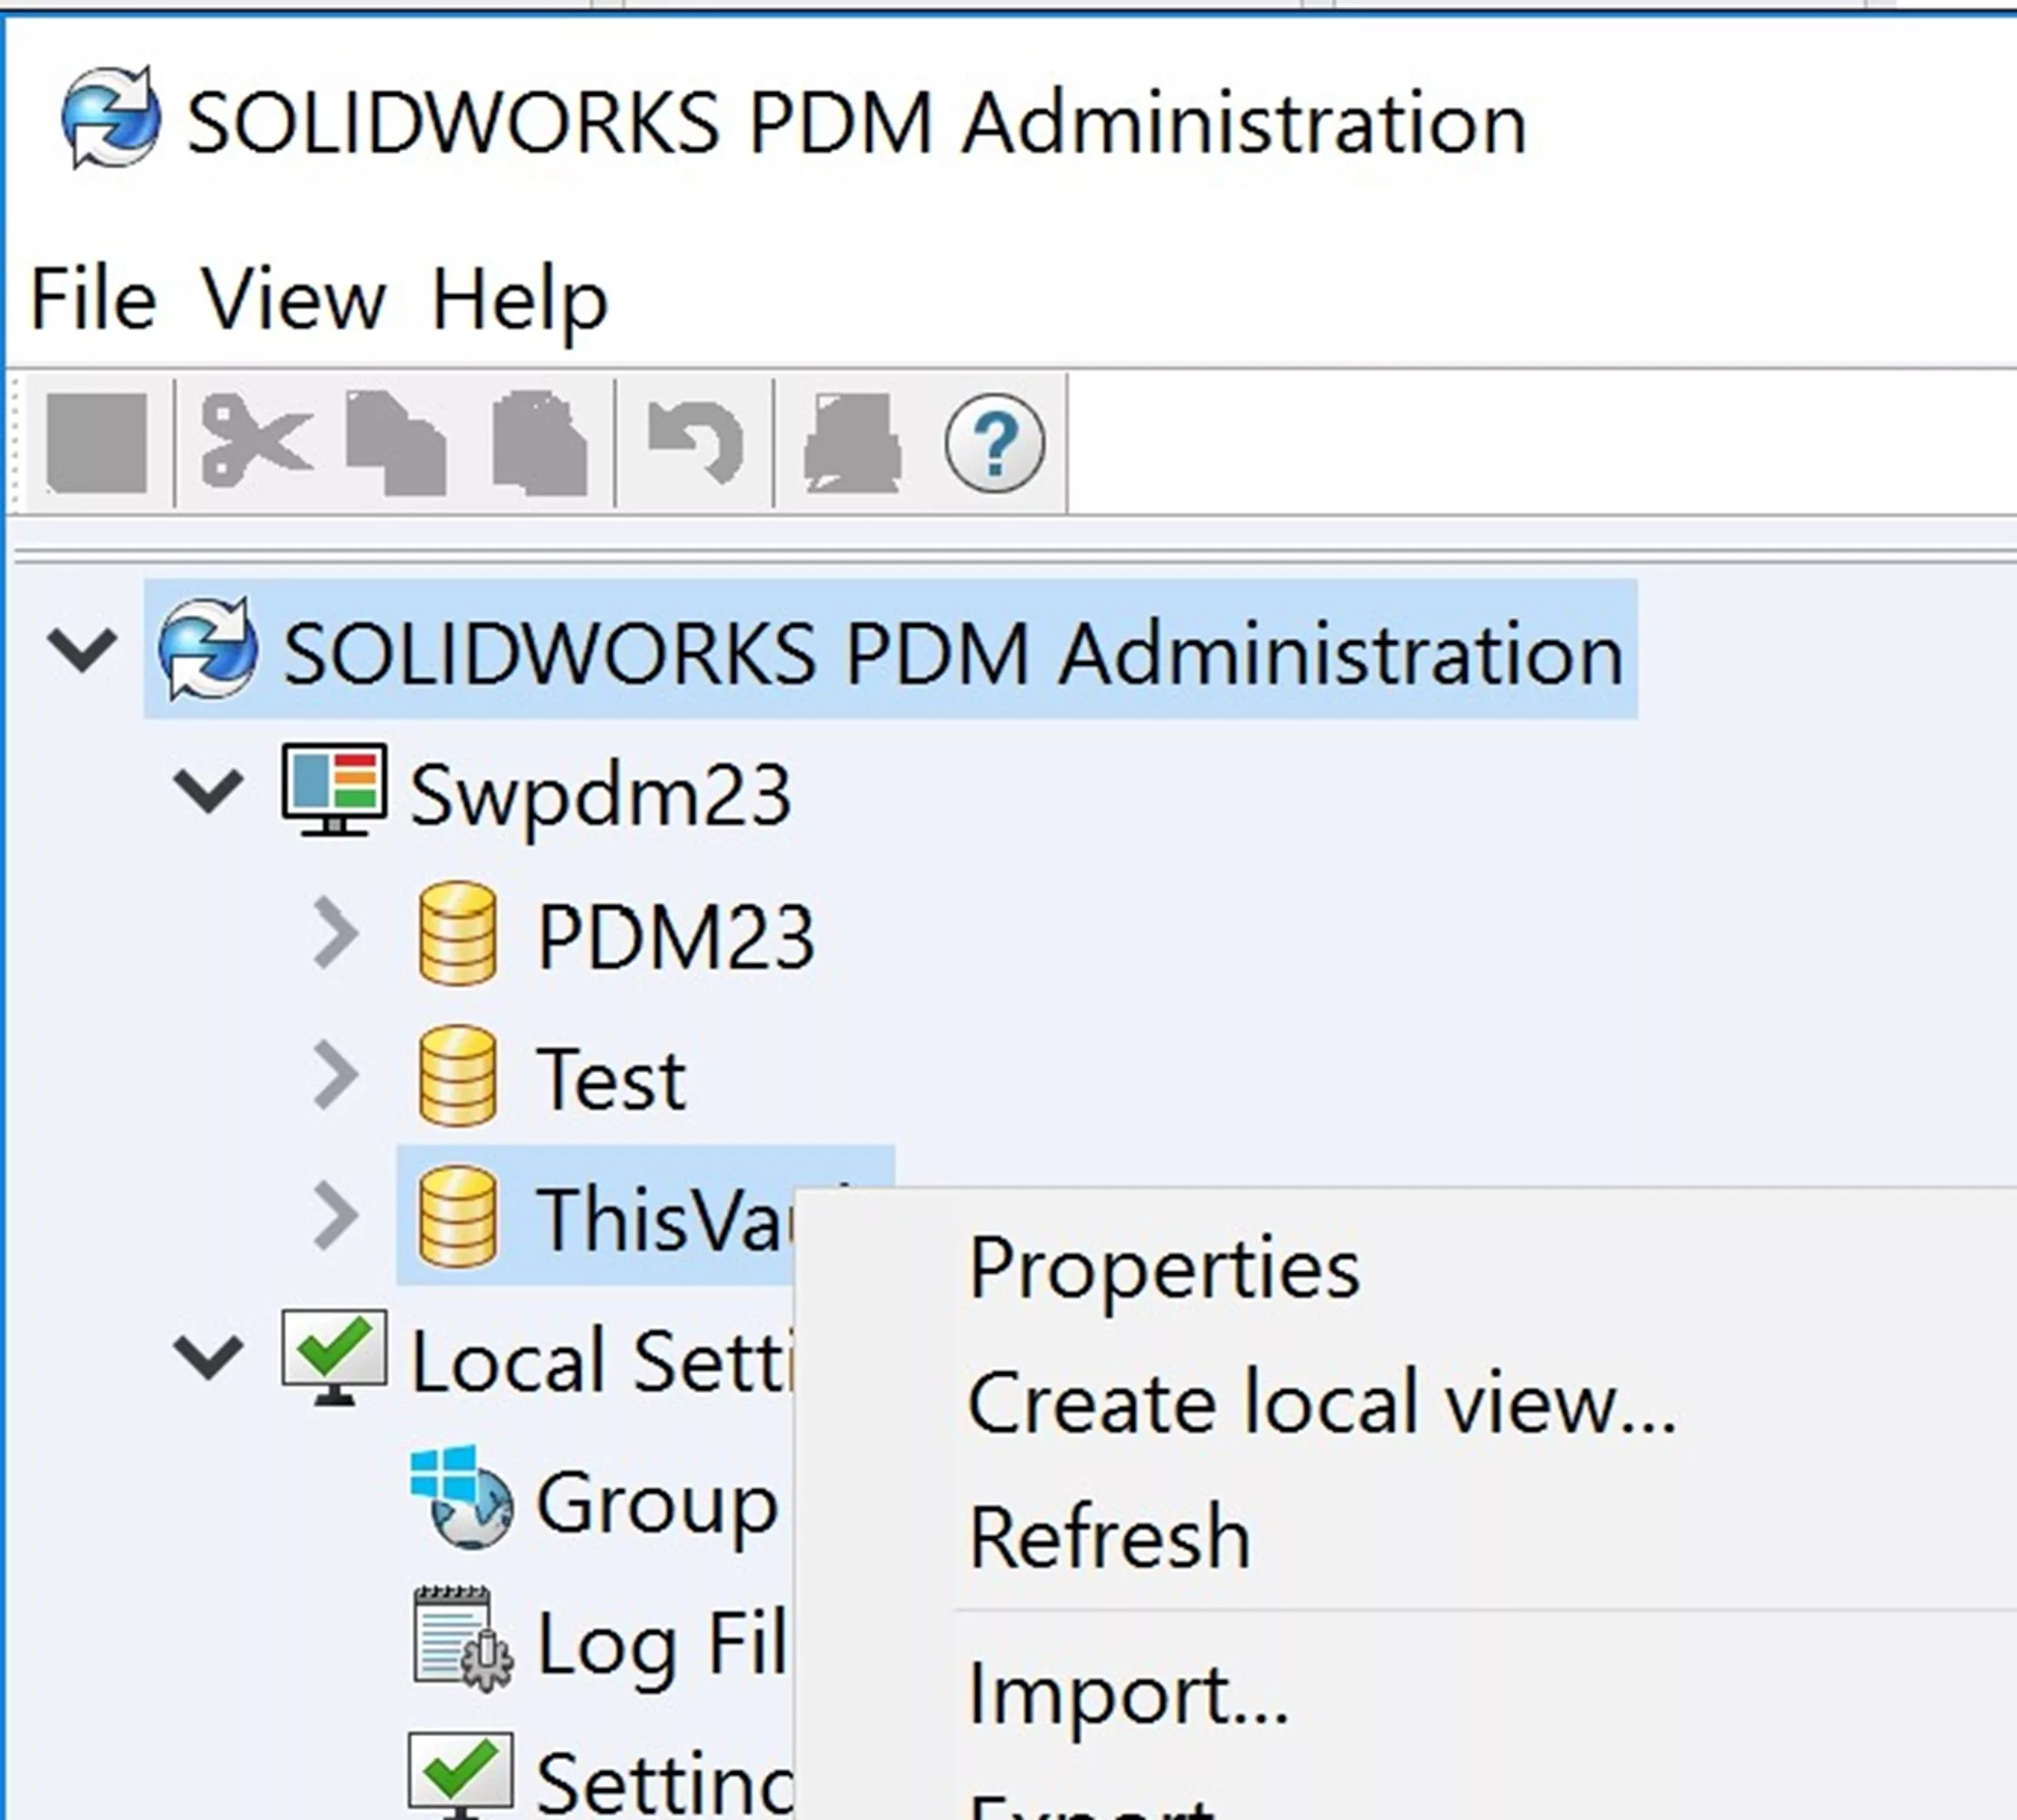
- You may be prompted to log in. Use the admin credentials user you created for this vault.
- Choose the drive you want to store the view on. It is recommended to put it at the root of a drive, like the C:\ drive.
- You’ll be prompted to log in again. Use the admin credentials once more.
Set Up WEB2
SOLIDWORKS PDM Professional offers an option to use web-based access on devices without a PDM Client. The instructions to install this are found here:
Install PDM Clients
The last step is setting your users up with PDM Client installations and vault views. Depending on whether you have SOLIDWORKS installed already, or if you only need SOLIDWORKS PDM, you’ll want to choose the corresponding guide:
- Installing SOLIDWORKS and PDM at the same time
- Installing PDM on an existing install of SOLIDWORKS
- Installing PDM without SOLIDWORKS
And that’s all there is to it! Setting up PDM can be a daunting task if you’re unfamiliar with the process. GoEngineer offers PDM Services where our Application Engineers will set up your PDM server for you, and this often includes some training and configuration of the system. Otherwise, if GoEnginer is your VAR, Technical Support can offer documentation, answer preliminary questions, or step in if you run into technical issues while going through the process of setting up a new PDM server on your own.
I hope you found this guide explaining how to set up your SOLIDWORKS PDM server helpful. Learn more about by checking out the additional PDM articles below.
Related Articles
Configuration Properties in SOLIDWORKS PDM Data Cards
How to Create Dynamic Lists in SOLIDWORKS PDM Standard Data Cards
SOLIDWORKS PDM - Implement Working Revisions
How to Hide a Variable in a SOLIDWORKS PDM Data Card, But Keep it Searchable

About Danielle Irish
Danielle Irish is a SOLIDWORKS PDM Support Engineer based out of metro Detroit. She has a degree from OCC in CAD Design and Engineering. Danielle has extensive experience in customer service as well as a 10 year adventure in Automotive Engineering. Danielle enjoys challenges and puzzles, and is an avid gamer and fiber artist.
Get our wide array of technical resources delivered right to your inbox.
Unsubscribe at any time.
