How to Create Dynamic Lists in SOLIDWORKS PDM Standard Data Cards
Dynamic Lists are a feature in SOLIDWORKS PDM Professional data cards that allow the choices on one list to be determined by the choices on another list. While Dynamic Lists are exclusive to PDM Professional, similar functionality can be achieved in PDM Standard by using Control Logic and strategic formatting.
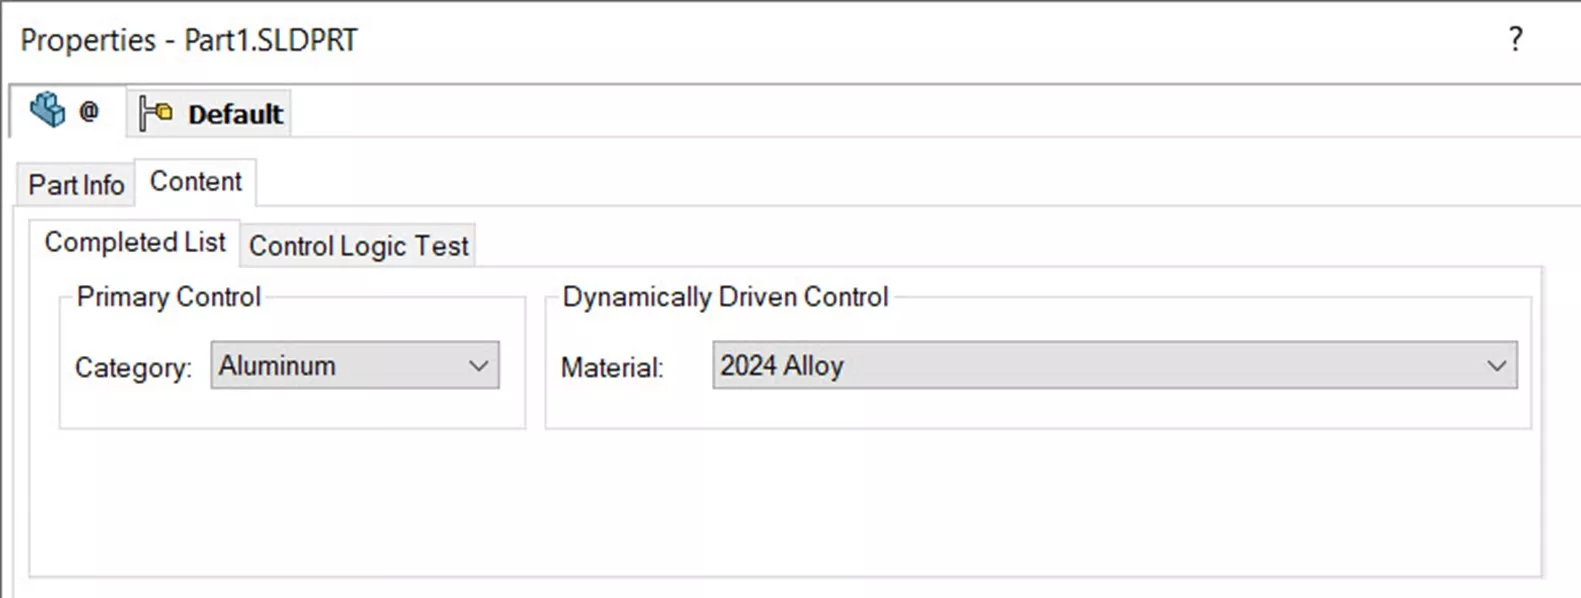
Figure 1: Full Data Card
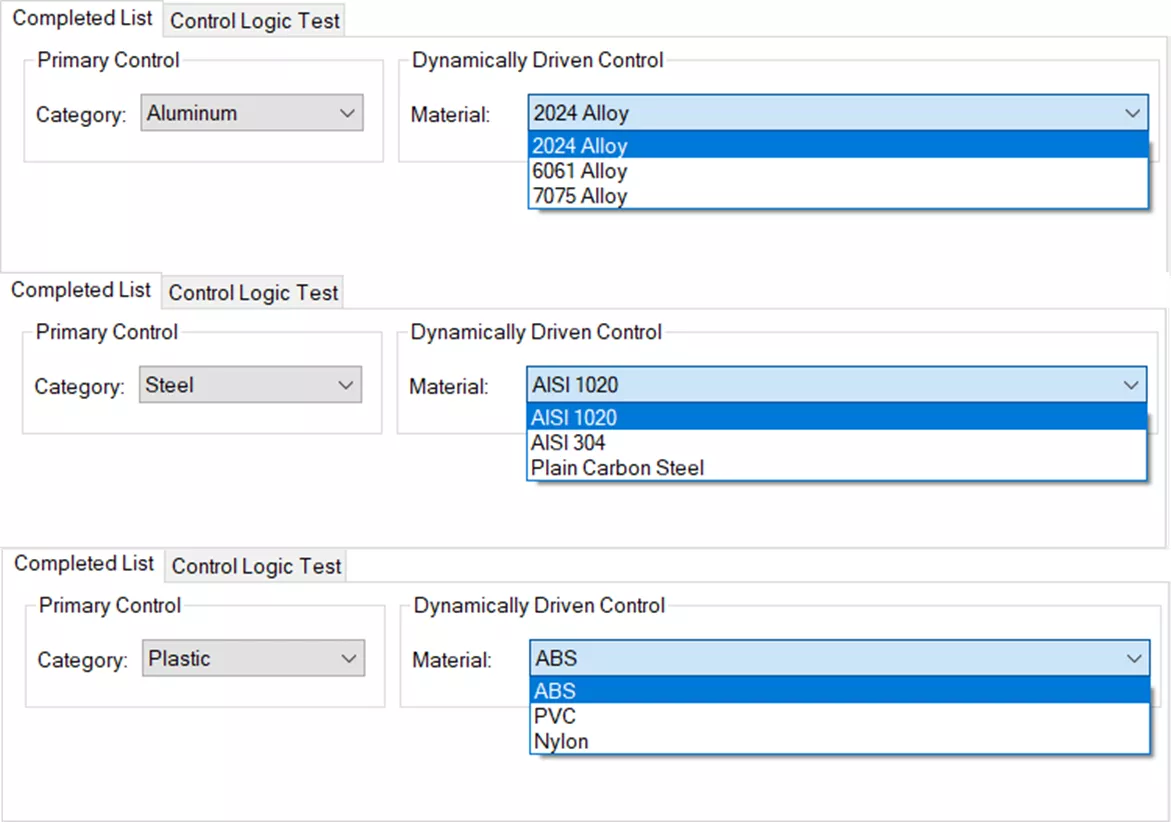
Figure 2: List Showcase
For example, below is a custom list of materials. Depending on the Material category selected, the user should then be presented with a more detailed choice for the property Material.
Example List:
- Aluminum (MaterialCategory)
- 2024 Alloy (Material)
- 6061 Alloy (Material)
- 7075 Alloy (Material)
- Steel
- AISI 1020
- AISI 304
- Plain Carbon Steel
- Plastic
- ABS
- PVC
- Nylon
Procedure
- Log in to the Administration Tool and Local View with admin privileges.
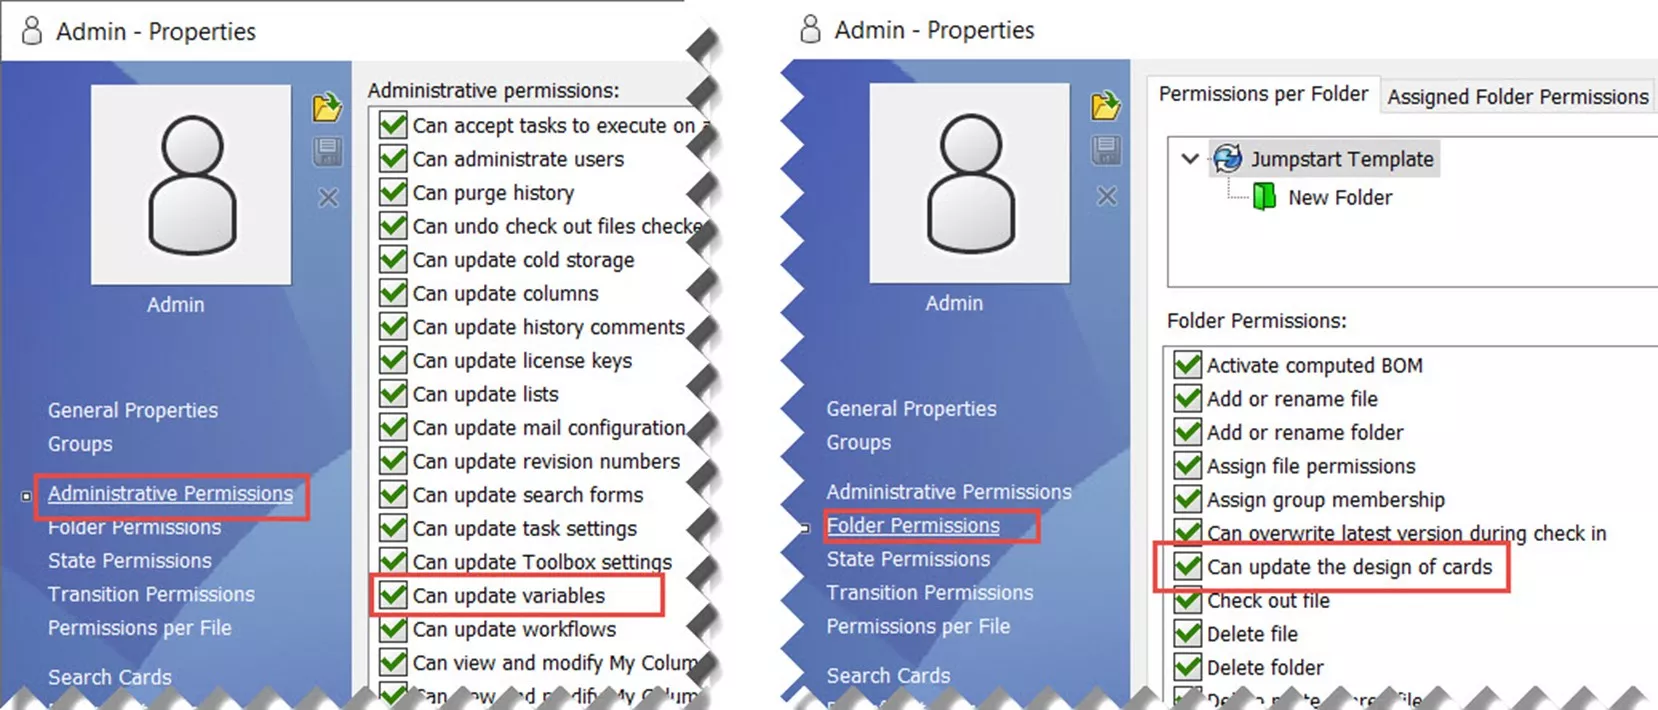
Figure 3: Admin Permissions
- At minimum, you must be logged into a user account with the following:
- Administrative Permission Can Update Variables
- Folder Permission Can Update Data Card
- At minimum, you must be logged into a user account with the following:
- Go to the Variables node and right-click > New Variable to create variables for the initial list (MaterialCategory) and dynamically-driven list (Material) controls.
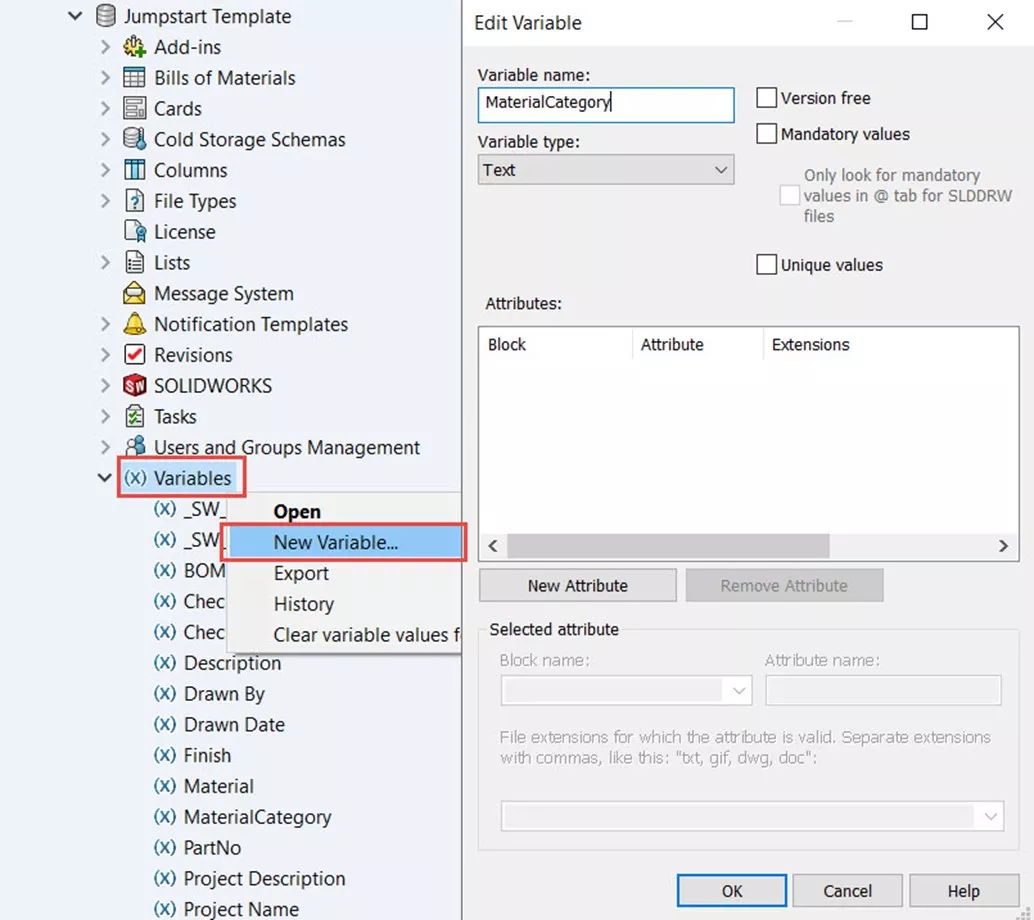
Figure 4: MaterialCategory Variable
- The variable MaterialCategory will be the initial list
- This value on the data card is only used to determine which secondary list to show on the data card and thus does not require property mapping to a file.
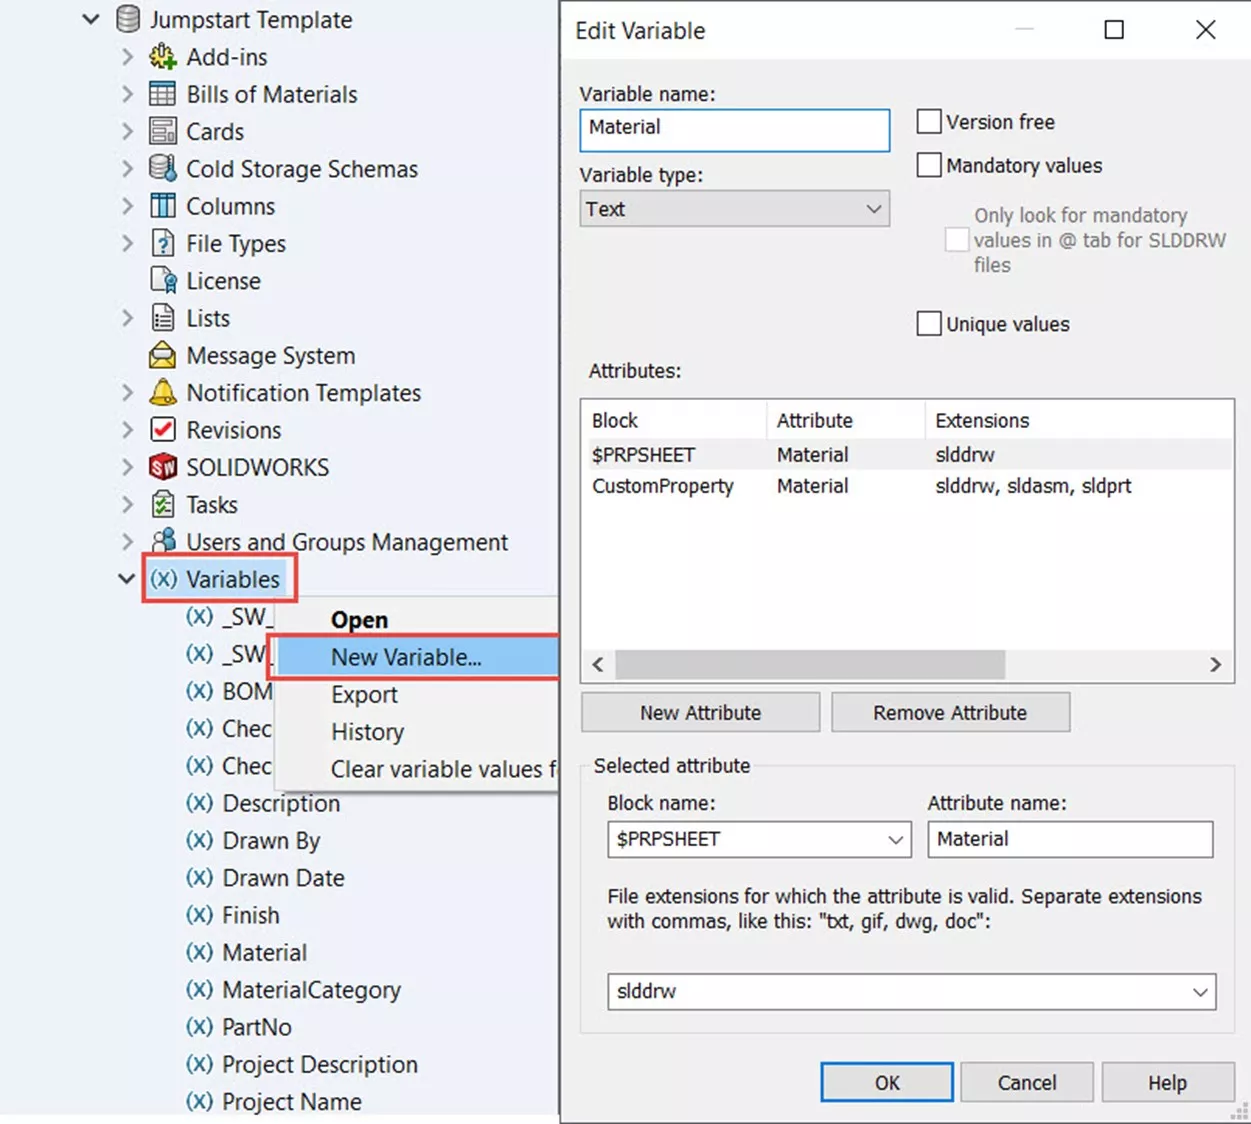
Figure 5: Material Variable
- This value on the data card is only used to determine which secondary list to show on the data card and thus does not require property mapping to a file.
- The variable Material is the desired output
- Add CustomProperty mapping as desired. In this example, Material is a property used extensively at the drawing level in the notes and title block.
- Add CustomProperty mapping as desired. In this example, Material is a property used extensively at the drawing level in the notes and title block.
- The variable MaterialCategory will be the initial list
- Assign Data Card controls.
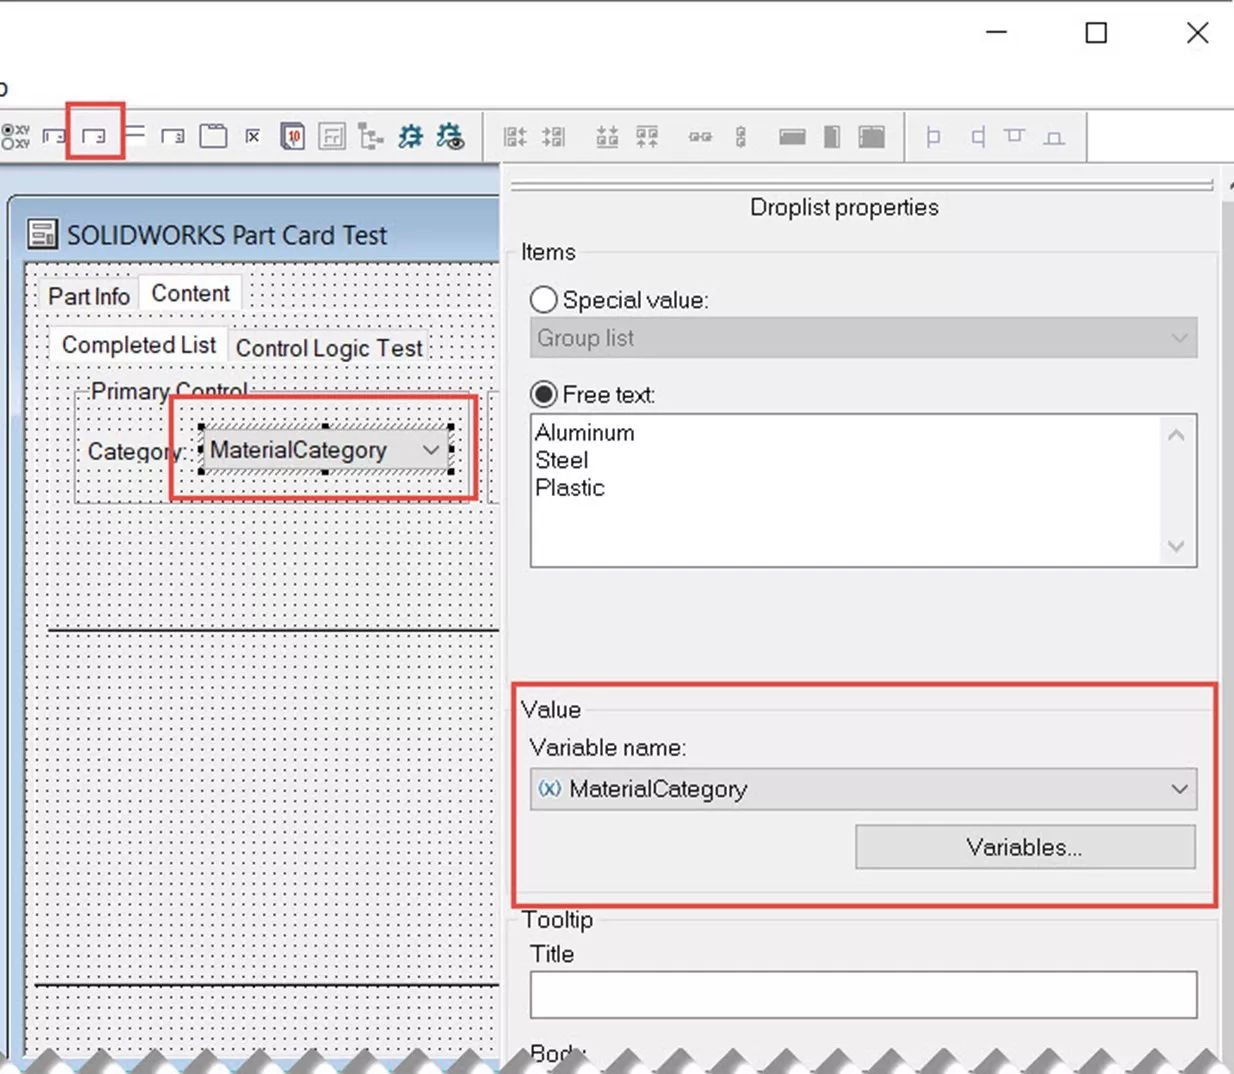
Figure 6: Drop List Control Creation
- Create a Droplist control for the initial list and assign it to
- Note: A Droplist is preferred over a Dropdown control because you need specific known outputs from this control to create Control Logic later.
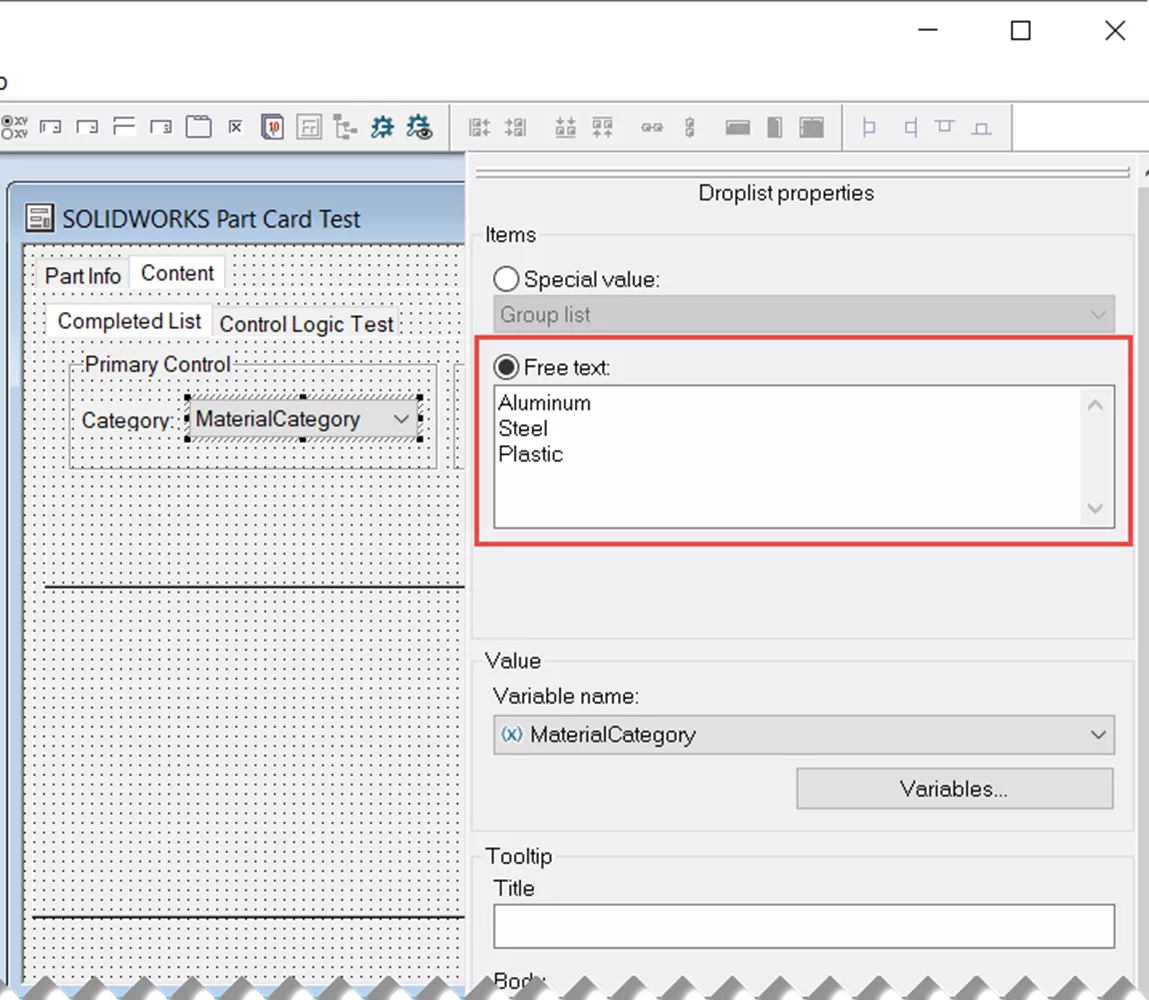
Figure 7: Material Categories Free Text
- Note: A Droplist is preferred over a Dropdown control because you need specific known outputs from this control to create Control Logic later.
- Use the Free Text Option to add the desired number of overall categories.
- Create a Droplist control for the initial list and assign it to
- Assign Data Card controls for the first category.
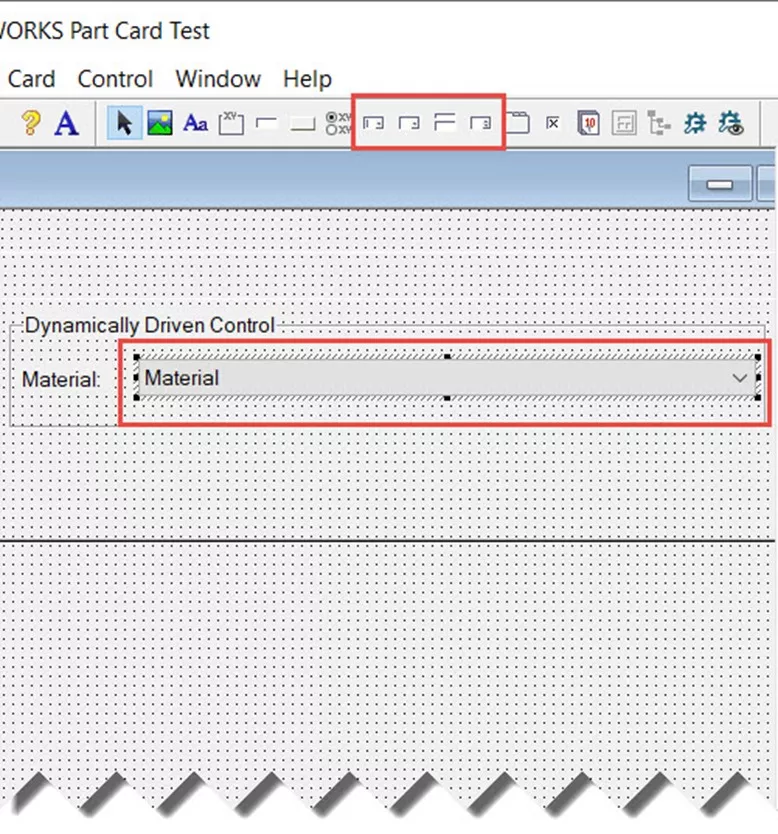
Figure 8: Create first Material Control
- Use any list option (Dropdown, Droplist, Combobox, etc.) for the secondary list. For this example, another droplist will also be used.
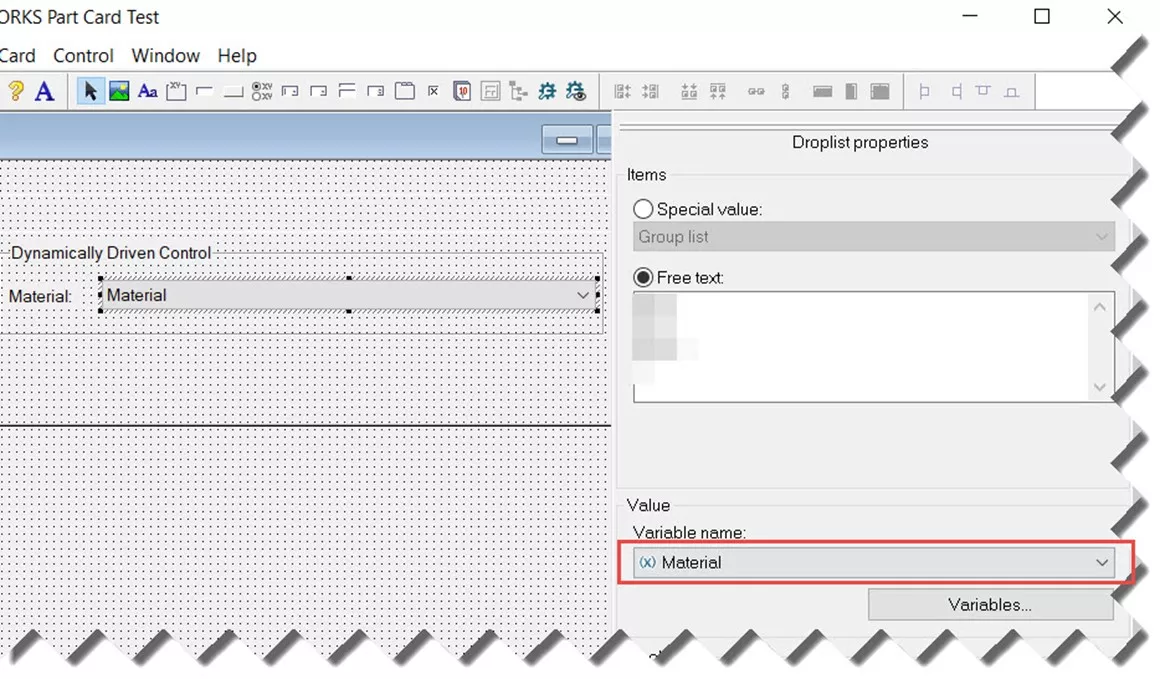
Figure 9: Assign Material Variable - Assign the Material variable to the list control with the variable dropdown.

Figure 10: Material Free Text] - Using the free text option, list the values of the first category list (e.g., Aluminum).
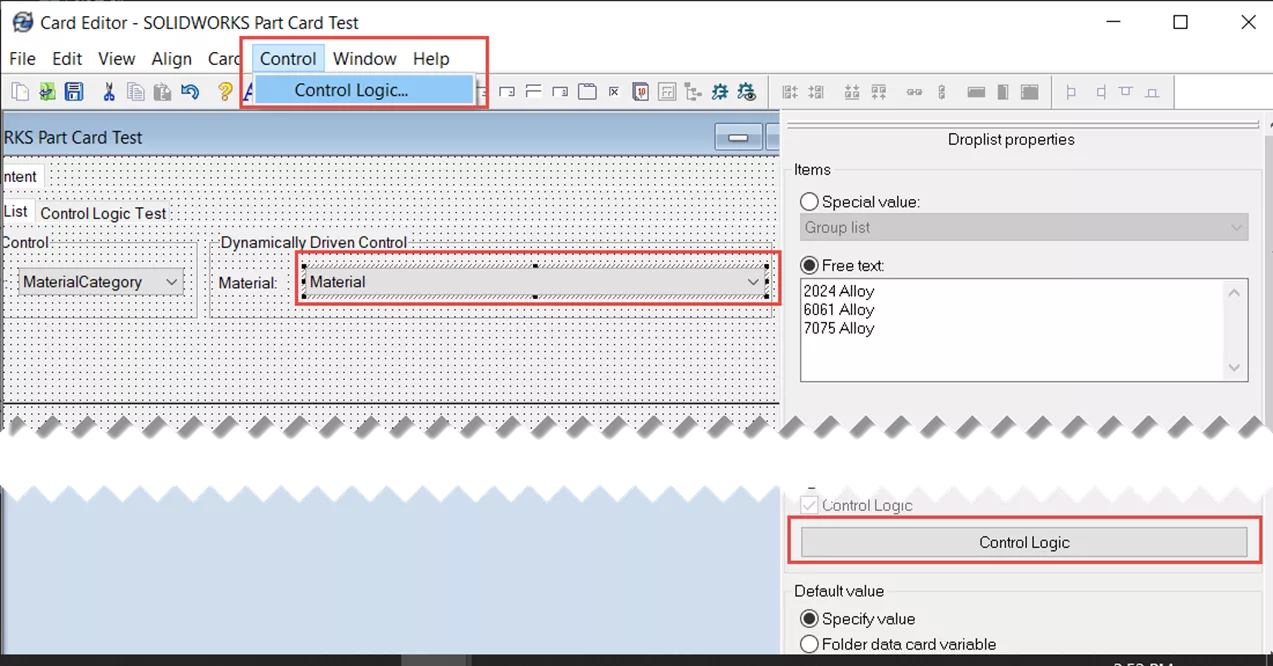
Figure 11: Open Control Logic - Select the Material control and then select Control Logic from either the Menu bar or in the control’s properties.
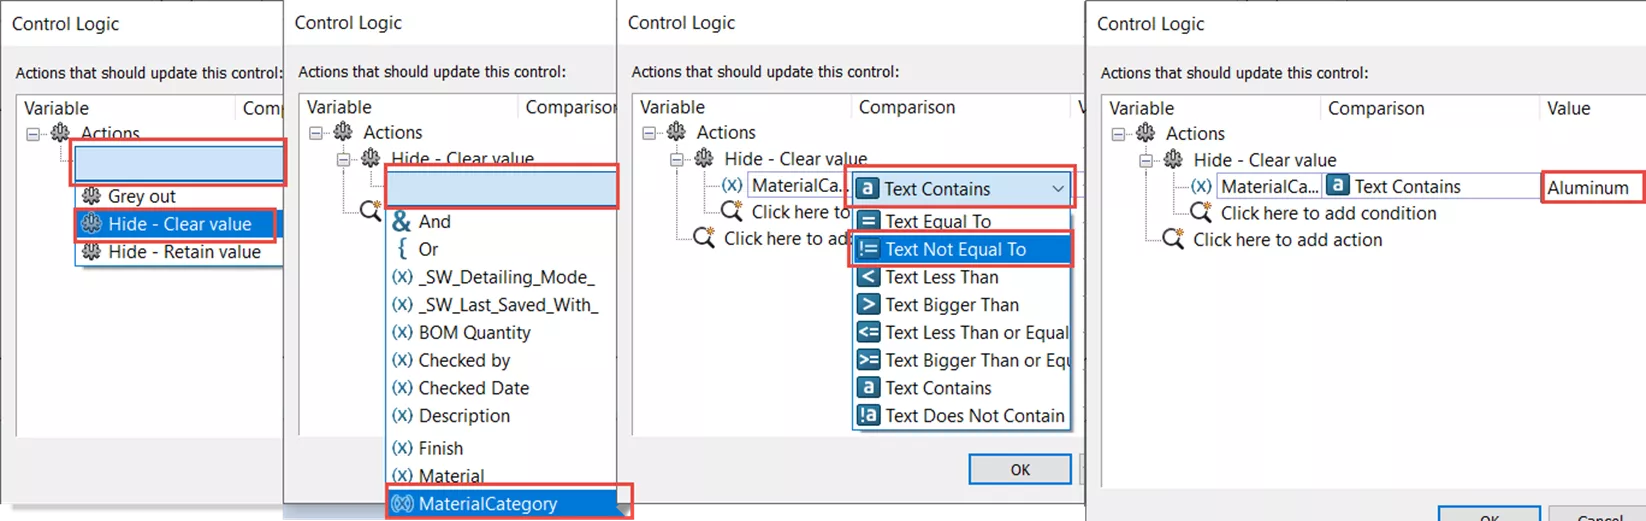
Figure 12: Control Logic Setup - Select Hide for the Action type.
- Select MaterialCategory as the Variable for Comparison.
- Select Text Not Equal To for the Comparison.
- For the Value use the first option in the MaterialCategory list (e.g., Aluminum).
- Select OK to confirm the Control Logic. Note: This logic makes it so that unless the user selects Aluminum for the Material Category first, this field will be invisible to the user.
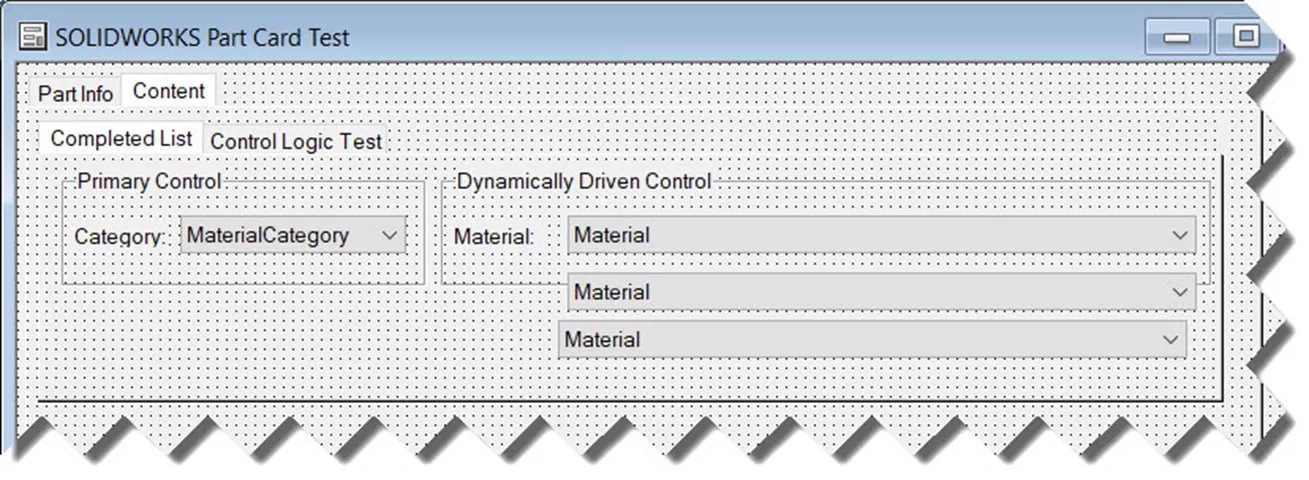
Figure 13: Copy and Paste
- Use any list option (Dropdown, Droplist, Combobox, etc.) for the secondary list. For this example, another droplist will also be used.
- Select (left-click), Copy (Ctrl+C), and Paste (Ctrl+V) the completed control for however many categories specified in the initial MaterialCategory control or repeat Steps 3 and 4.
- Select each new control and update the following properties:
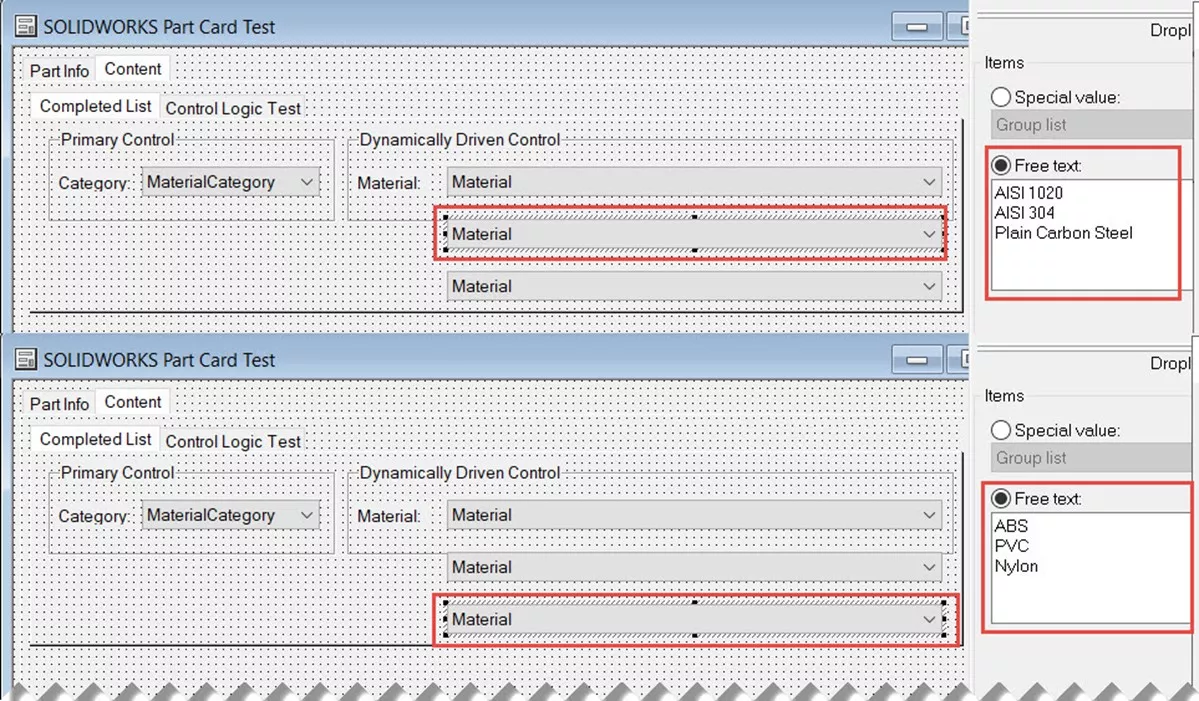
Figure 14: Update Free Text Lists
- Update the Free Text List for each copied control.
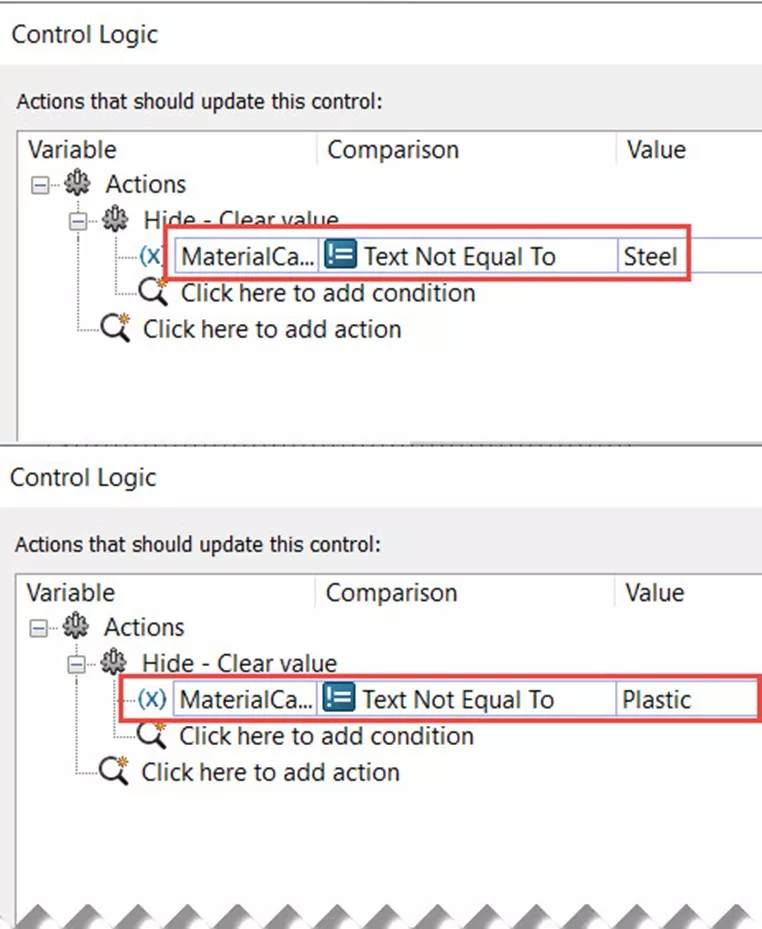
Figure 15: Update Control Logic - For Control Logic, keep all parameters the same except for the Value. Update this field for the next material Category for the list it’s for (e.g., Steel, Plastic).
- Update the Free Text List for each copied control.
- Test the dynamic lists.

Figure 16: Arrange Controls
- Arrange the list controls so that they are easily visible for now and save your changes.
- For added clarity, some labels have been added in this example to help keep track of which control is which and will be removed during cleanup.
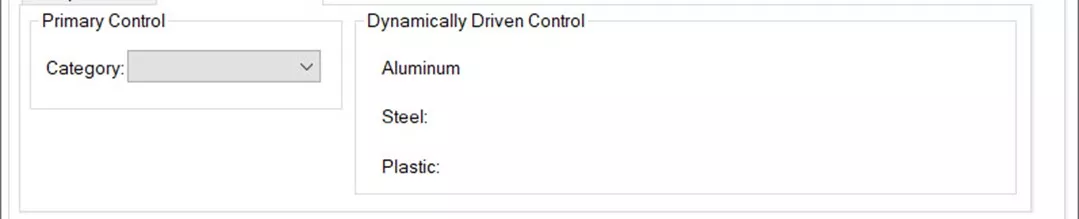
Figure 17: Dummy SWx File
- For added clarity, some labels have been added in this example to help keep track of which control is which and will be removed during cleanup.
- Create a dummy file corresponding to the data card that has the dynamic list.

Figure 18: Cycle Through Options - Cycle through the options of the primary list. It should behave as shown.
- If something is wrong and the wrong fields are disappearing/not disappearing, check the syntax of the control’s control logic and try again.
- If something is wrong and the wrong fields are disappearing/not disappearing, check the syntax of the control’s control logic and try again.
- Arrange the list controls so that they are easily visible for now and save your changes.
- Clean up the controls and create an illusion.
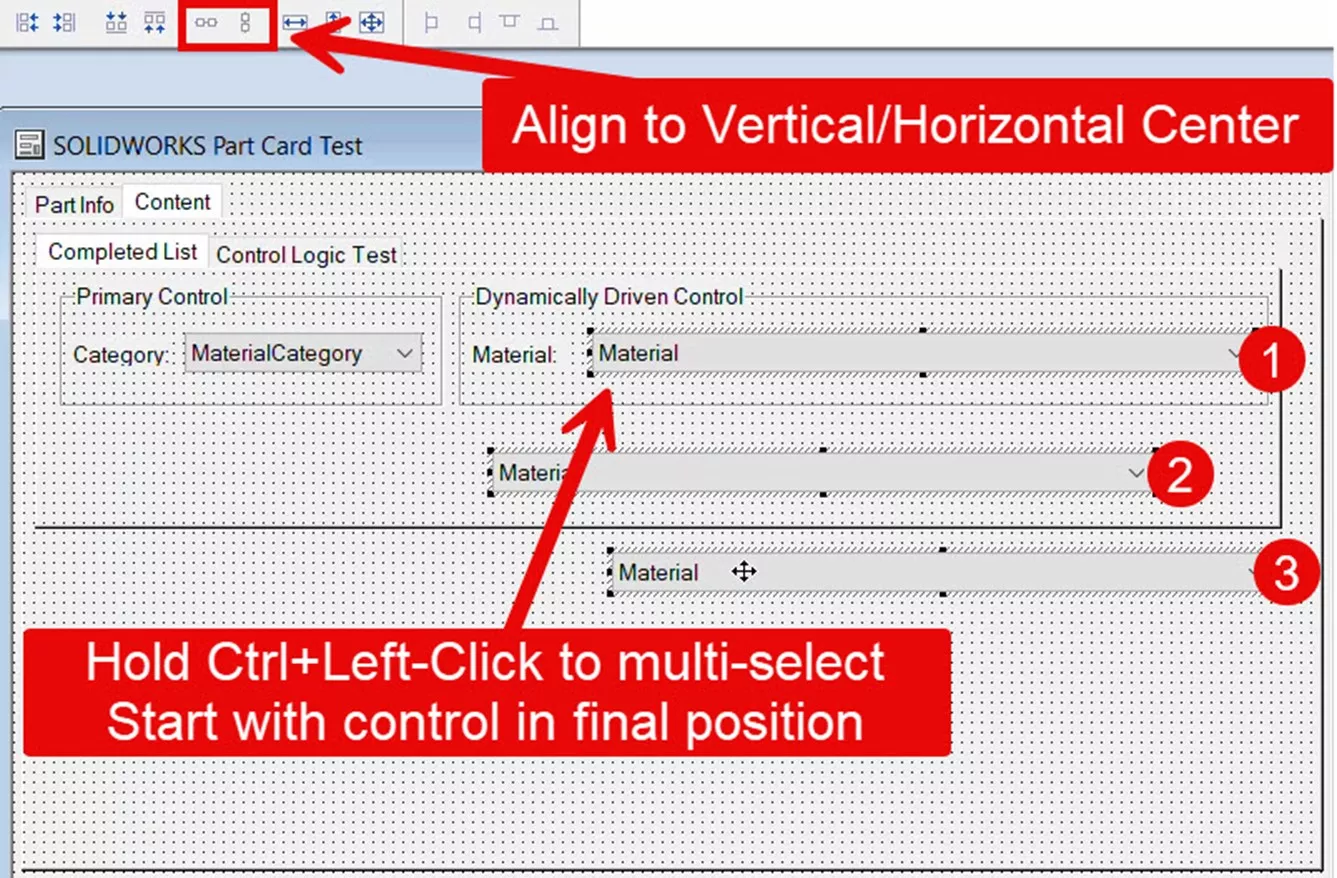
Figure 19: Positional Control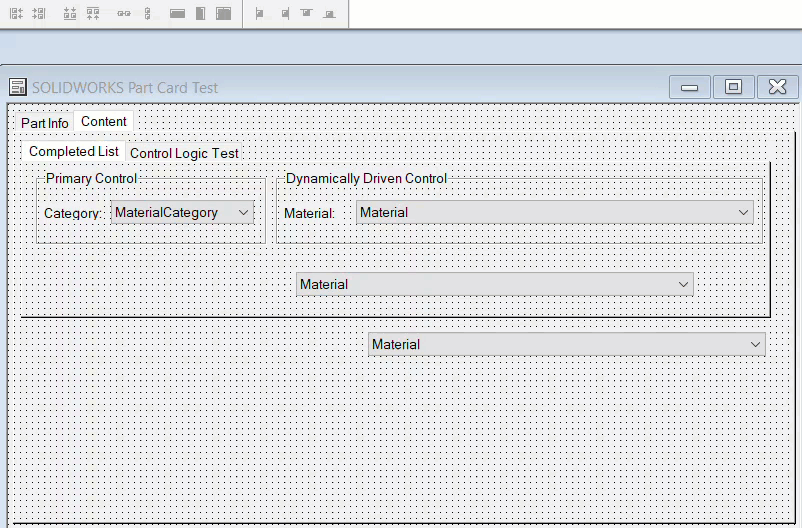
Figure 20: Multi-Select
- Position one of the “Material” controls in the desired final location of the dynamic list.
- Hold CTRL and multi-select the other list controls.
- Use the glue control to make them all equal size and equal positions.
- All controls will now appear to be “sitting” on each other as a single list.
Considerations
The main downside of this method is that since the Free Text option was used for the “Material” lists, there is no way to mass-update all the controls or update lists across all data cards utilizing this method. The list controls also need to be individually dragged off to the side one by one to be selectable for any updates. While this method does work very cleanly in the end, it is painful in comparison to the native tools in SOLIDWORKS PDM Professional.
Card Lists create easy-to-manage lists of values that are centrally managed from a single source list and are endlessly reusable in multiple data cards. Unlike the method described in this article, once the card list feature is updated with new information, all uses of the card list across multiple data cards are updated automatically.
The Controlled by Variable option for list controls makes it easy to tie lists together without having to configure multiple controls and their control logic. This blog, by Jim Ward, demonstrates how to set dynamically-controlled lists in SOLIDWORKS PDM Professional.
Learn More About SOLIDWORKS PDM
SOLIDWORKS PDM - Implement Working Revisions
How to Hide a Variable in a SOLIDWORKS PDM Data Card, But Keep it Searchable
SOLIDWORKS PDM Data Card Find User Button Control
SOLIDWORKS PDM: Create and Deploy a Local View File

About Miguel de Villa
Miguel de Villa is a SOLIDWORKS Elite Applications Engineer with a B.S. in Mechanical Engineering from the University of California, San Diego. He’s been working at GoEngineer since 2017 helping customers with all their SOLIDWORKS, Simulation and PDM needs. In his free time he enjoys working with his 3D printer, playing video games and building model kits.
Get our wide array of technical resources delivered right to your inbox.
Unsubscribe at any time.