SOLIDWORKS PDM Variable Mapping Tips & Tricks: Mass Properties, File Properties, Model Dimensions, & More
In SOLIDWORKS PDM, it’s common to have the PDM data card display metadata describing the model beyond its basic geometry—Description, Part Number, Revision, and many more are popular and useful pieces of information to track about a file. It’s often the data card itself that is the driving force behind the formatting of this type of data entry into the destination file; however, thanks to the magic of Variable Mapping, this behavior is a two-way street between the file and SOLIDWORKS PDM.
As is the case in many file migration scenarios, existing values within the correspondingly mapped custom property of the file are automatically inherited into the PDM file data card. Thanks to this property, we can accomplish some neat tricks with our data card, even in SOLIDWORKS PDM Standard, that aren’t possible within the standard capabilities of a given card control’s flags or default properties.
Mass Properties
Applying a SOLIDWORKS Material is a critical part of being able to get accurate mass estimates for parts and assemblies. We can easily transfer a selected material into the PDM data card by linking it to a custom property.
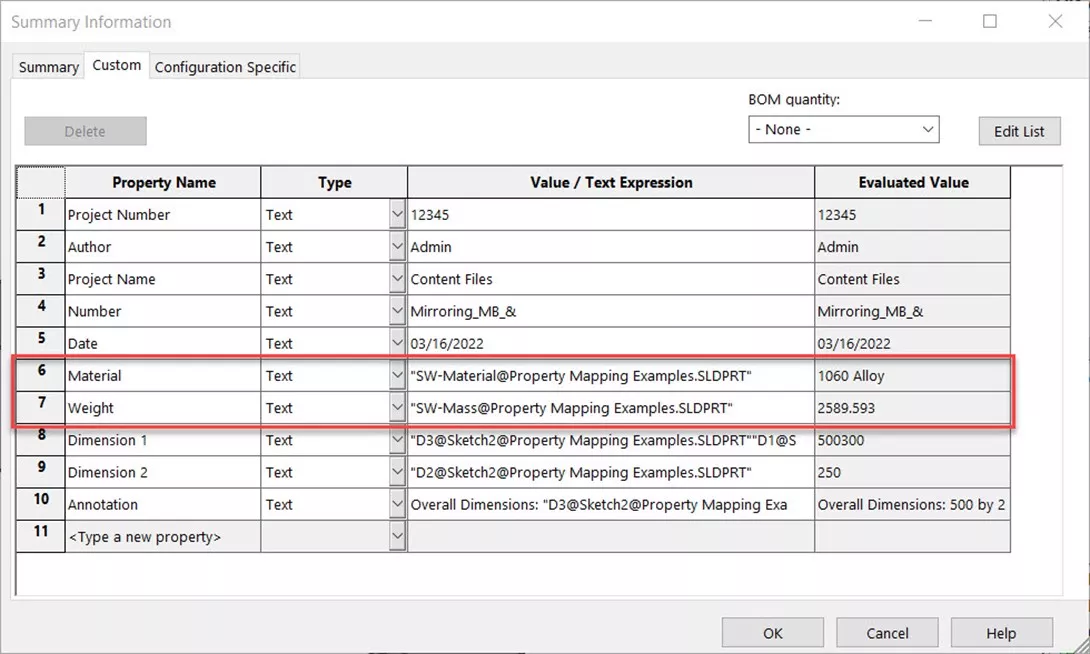
In the Custom Properties of the part, all you need to do for the desired Material Custom Property is open the dropdown menu under the properties column and select Material from the dropdown list.
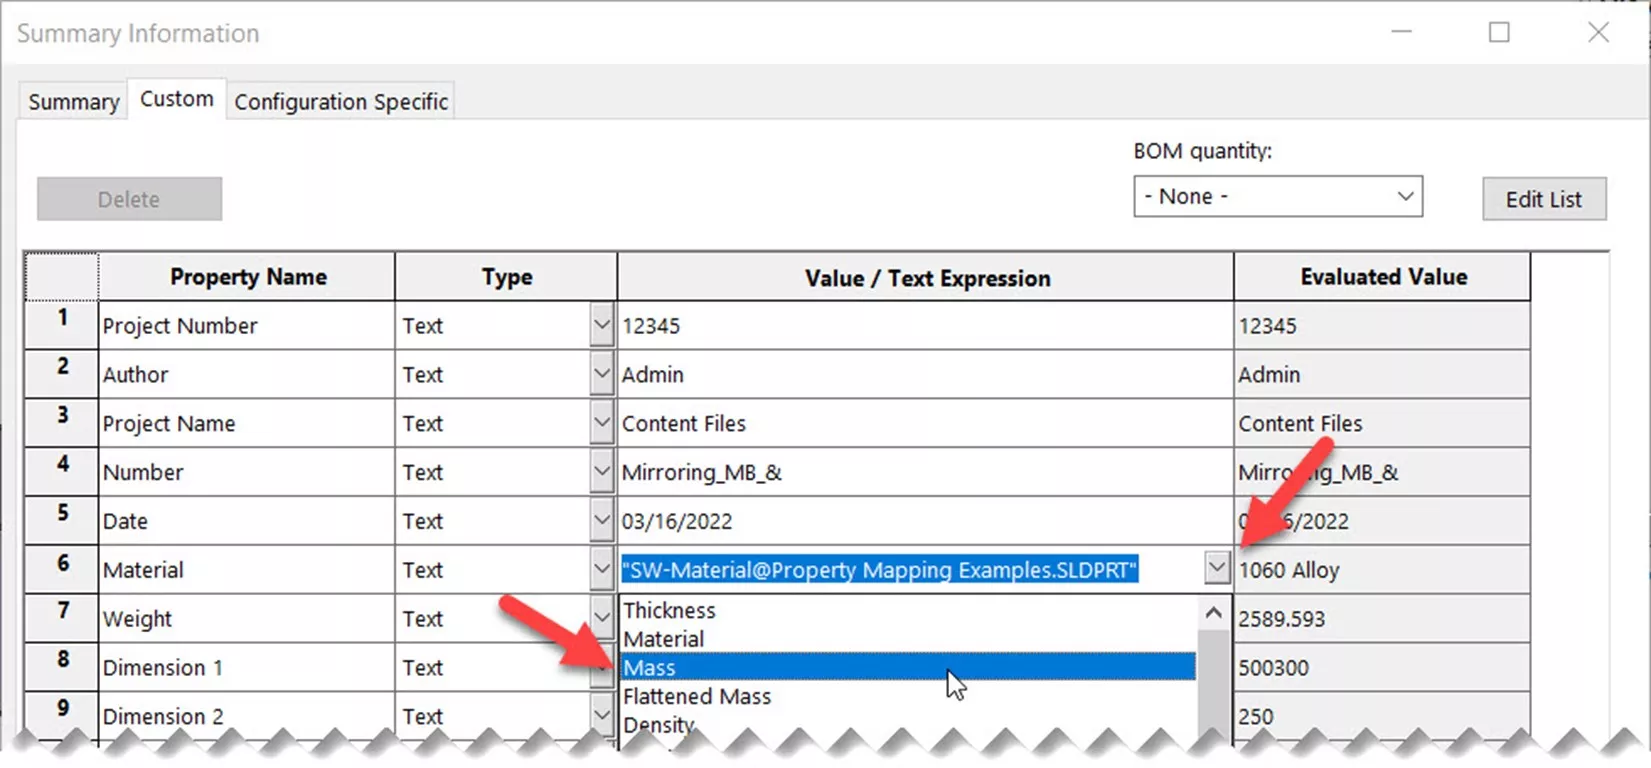
This takes the Syntax of “SW-Material@Filename.SLDPRT”, which finally evaluates to the material model applied to the part as seen in the right-hand column. To change this value, we need to change.
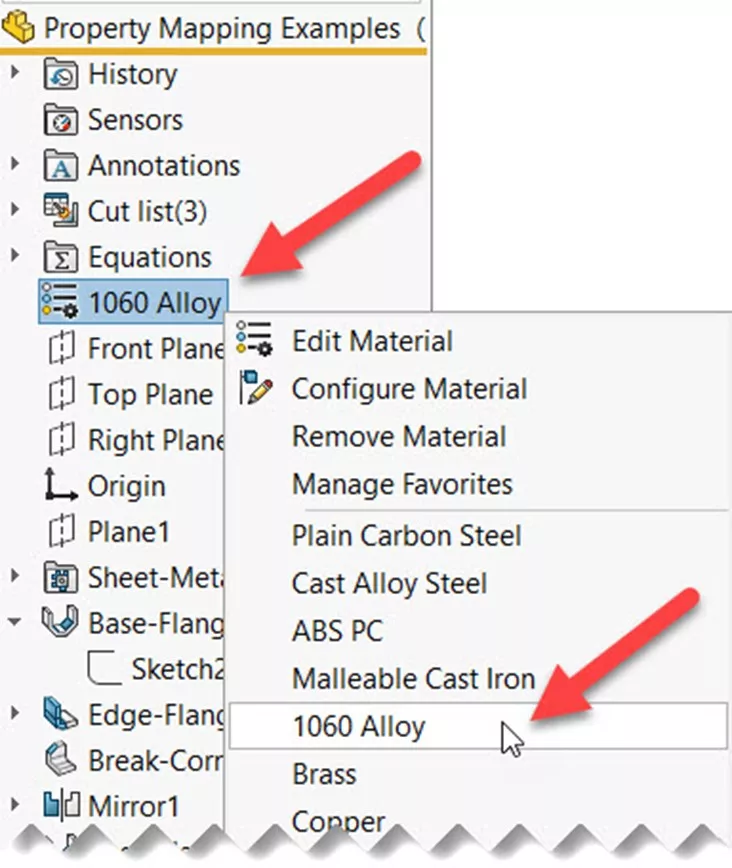
You can do this for weight as well using the Mass option, but this only evaluates to the numerical value of weight which is not inclusive of the corresponding document units.
It’s worth noting that a data card on its own cannot apply the syntax for this mass property linking into a file that does not have it, so the use of a SOLIDWORKS File template to guarantee the existence of this mapping into files moving forward is recommended.
File Properties
These property mappings follow the $PRP format, meaning they are derived from the properties of the file itself. Normally we would see these on a drawing when using annotation property linking on a given model view, but you can also use the same syntax within the variable attribute mappings of PDM as well. Anything that we might find on the Summary tab of our custom properties is fair game here as well.
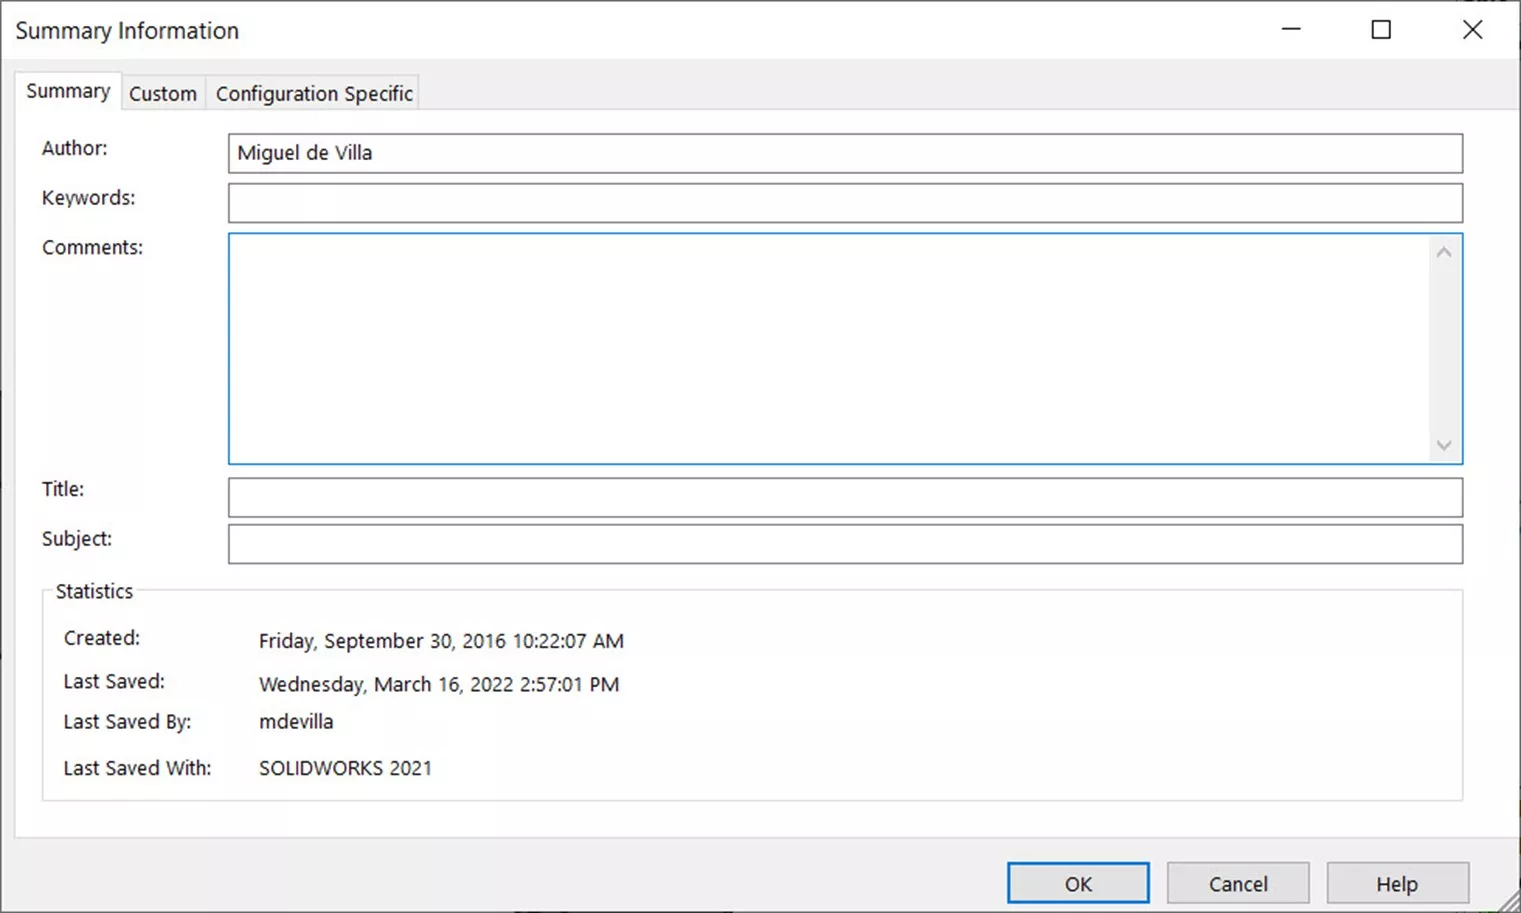
Here’s the syntax used for SOLIDWORKS File Properties/Summary Information as given on page 467 of the PDM Administration Guide.
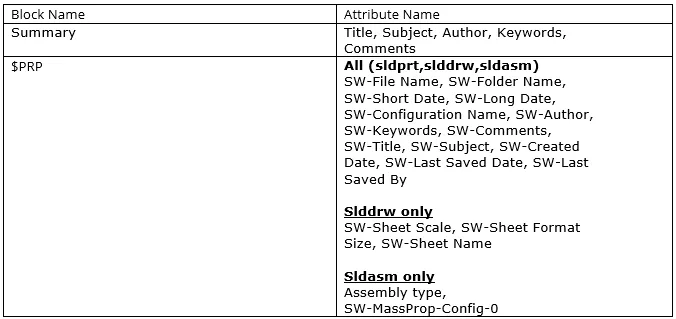
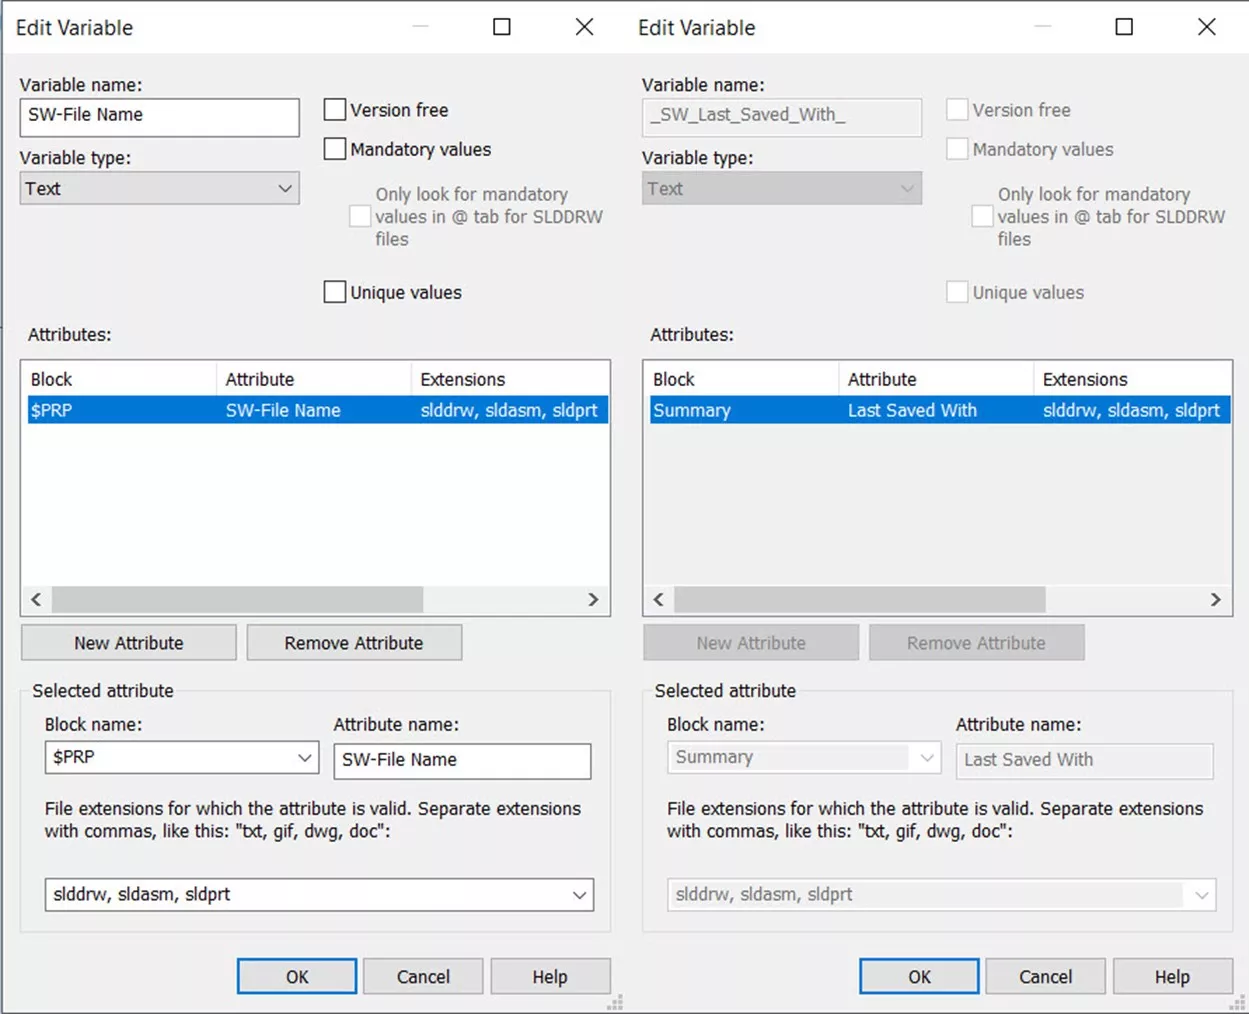
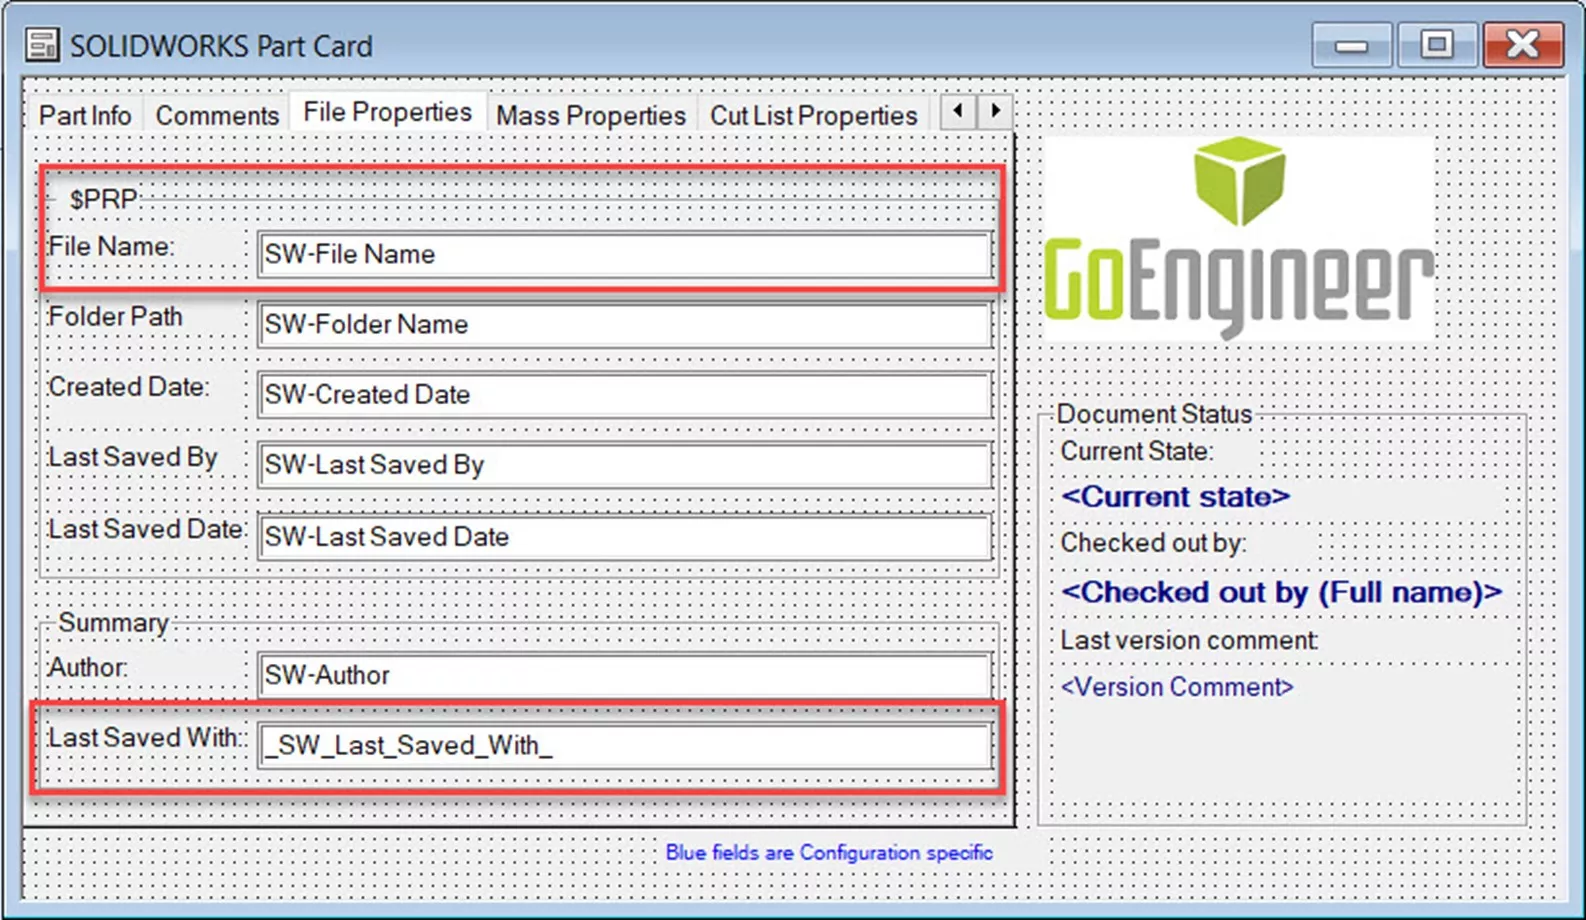
As shown above, these properties must have a variable with the corresponding variable mapping to the type of File Property/Summary Information desired. Then, these variables must be attached to a data card control on the data card corresponding to the SOLIDWORKS file in question.
Below is a before and after example of these properties in action as the file name changes.
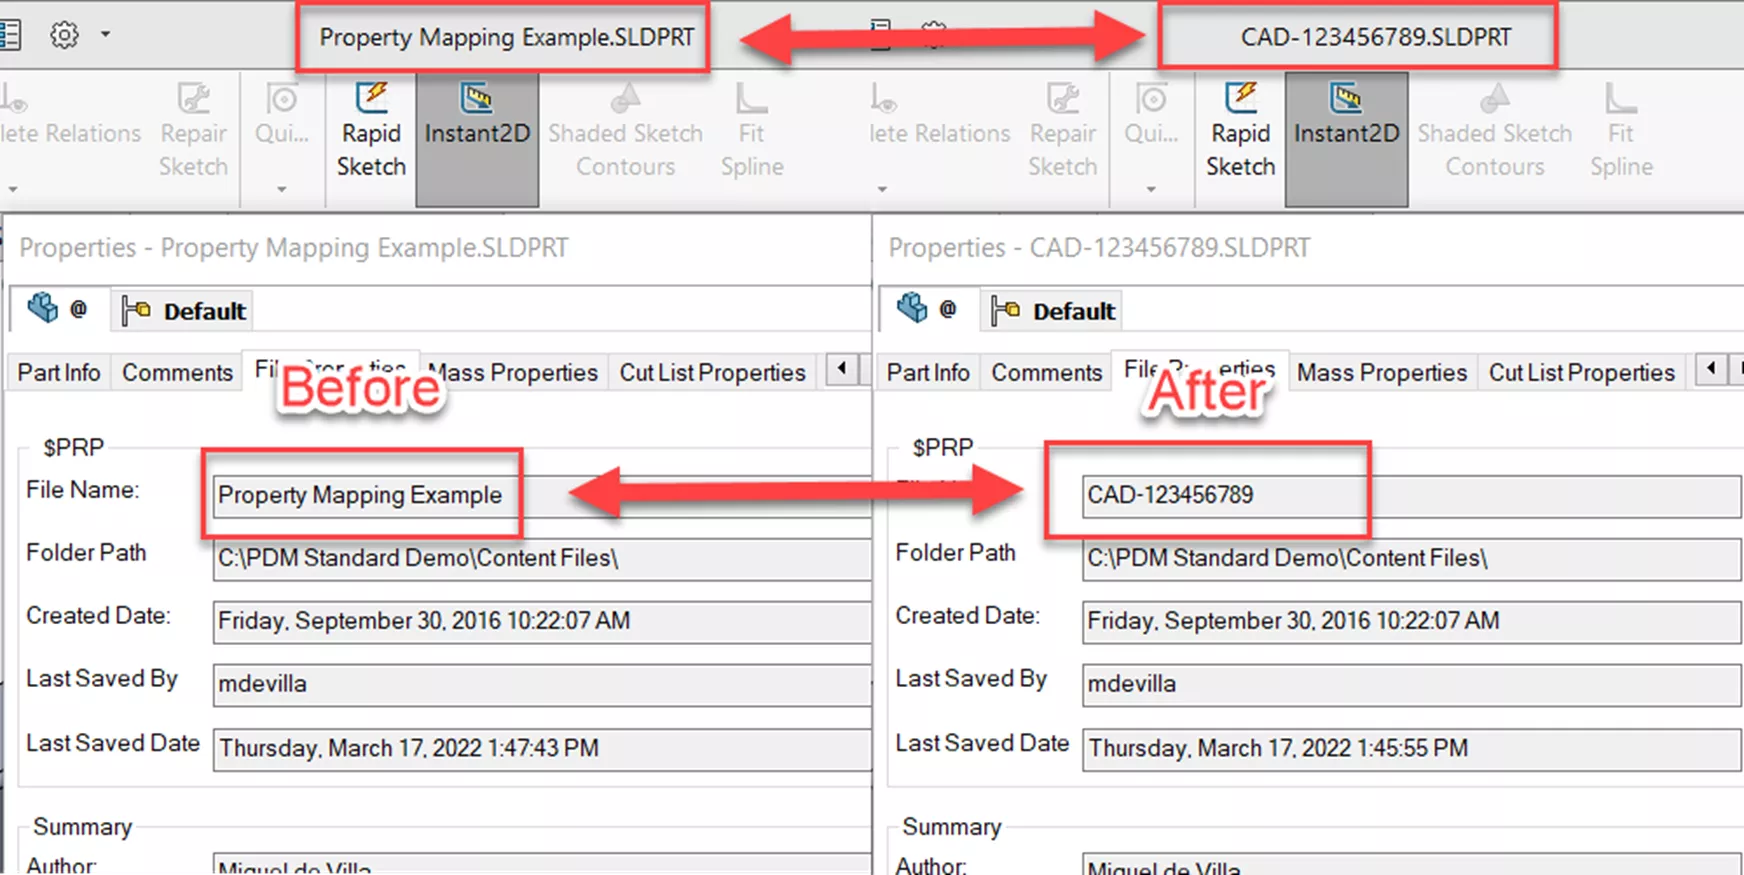
One thing to remember is that for any $PRP mappings, these are fundamentally read-only attributes, so make sure to flag these fields as read-only for good measure. Additionally, while these fields may be read-only, they are a given in any SOLIDWORKS file so the application of a template to create a custom property is unnecessary.
A limitation of this variable mapping style that must be considered is that file properties like these are regenerated when the SOLIDWORKS file in question is opened and resaved in SOLIDWORKS. For example, if a user renamed the file manually in the File Explorer view, this field will not update until it is rebuilt and saved in SOLIDWORKS again.
Model Dimensions
Equations are an incredibly useful tool when modeling parts and assemblies in SOLIDWORKS. The same syntax can be used in a Custom Property as well which results in each model dimension displaying in the data card of the file or even as a dynamic annotation.
No special variable mapping is necessary for this step, just have normal CustomProperty mapping in the variable as well as a control on the data card of the file. The heavy lifting of this feature is actually done within the SOLIDWORKS File itself, we just need to make sure that PDM is ready to read and accept this value on the data card.
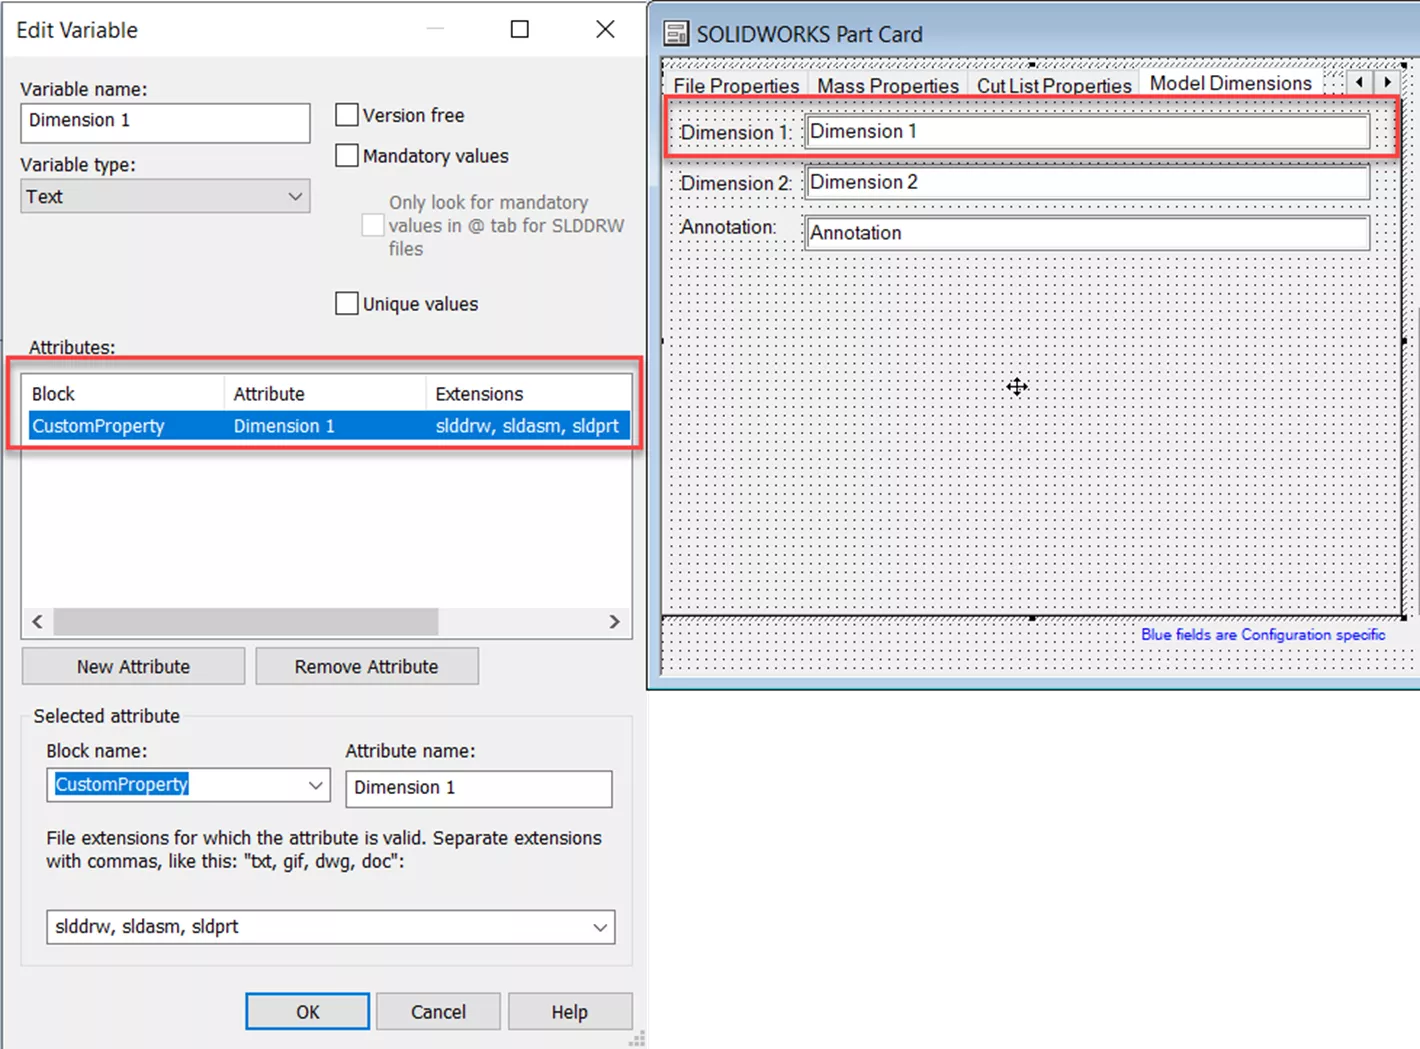
In the SOLIDWORKS file itself, we need an empty custom property of the given attribute name ready to accept our parameter callout. This callout typically takes the form of “dimensionname@featurename@filename”. For example:
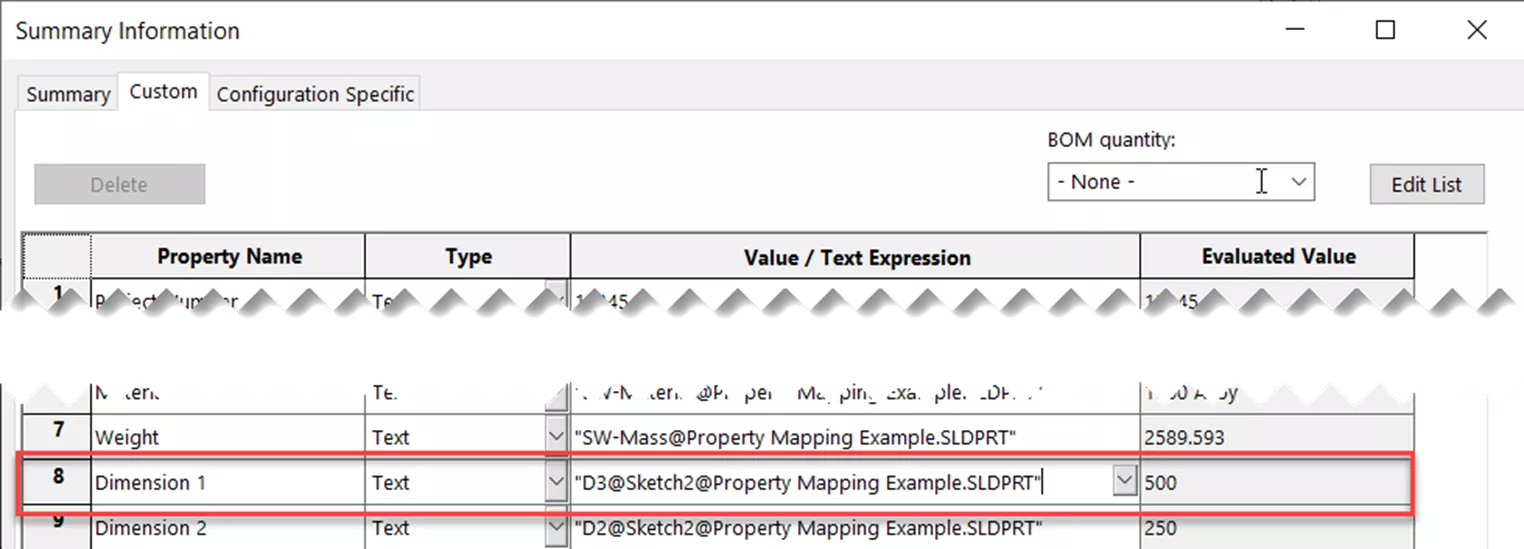
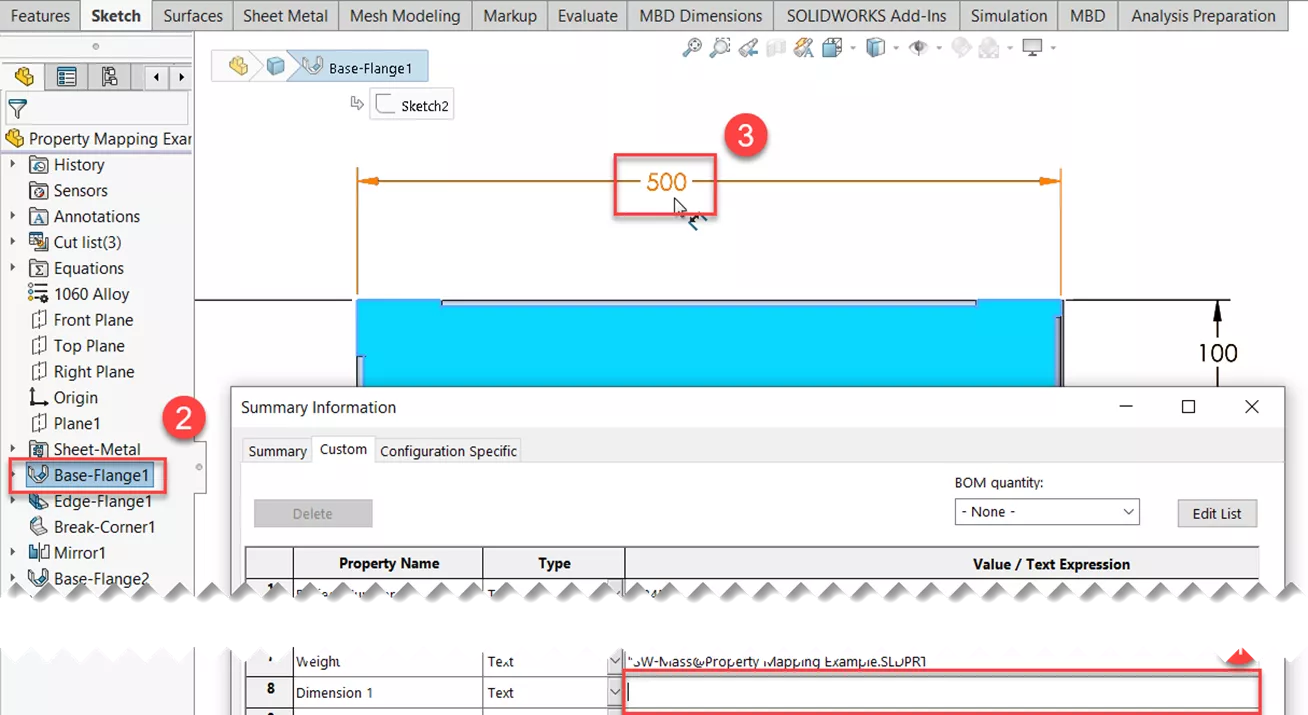
A shortcut to finding this syntax is to open the Custom Properties tab and click in the empty Value/Text Expression field of the desired property, double-click the desired feature in the FeatureManager Design Tree, and finally double-click on the now visible dimension. This will type out the syntax for you just like it does while working with SOLIDWORKS variables and equations.
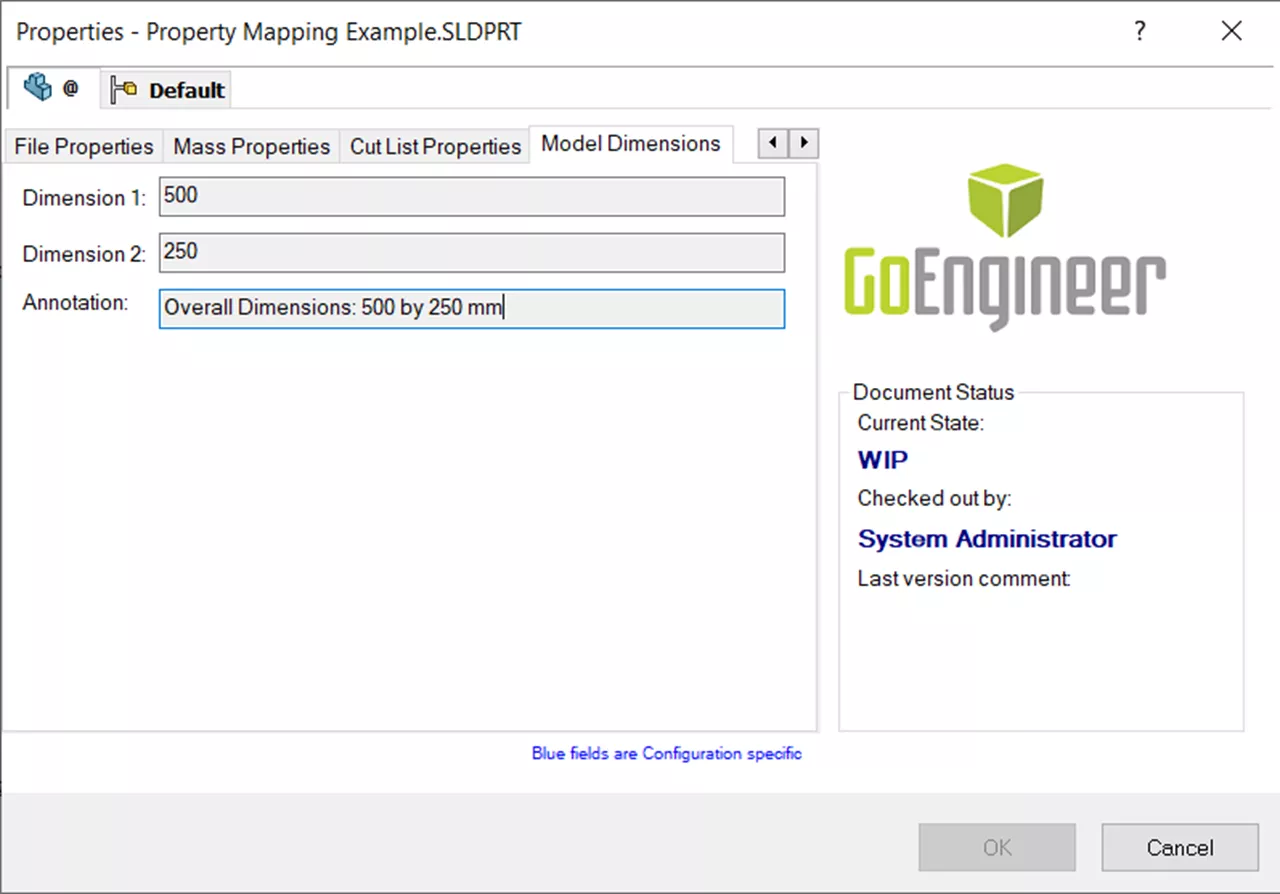
Furthermore, just like with annotations in a drawing, you can combine terms together alongside static text to make intelligent descriptions. Here I have an expression that gives me the overall dimensions of my part automatically, built off of two dimension callouts and some static text.

Best practices with this method are to name desired parameters and features with a unique descriptive name to make the overall callout easy to remember and locate later. The data card should also have the corresponding controls set to read-only so that they are not accidentally replaced with plain text by the user.
Cut List Properties
For users that deal with sheet metal and weldment-based designs, Cut List properties are an extremely useful tool in detailing SOLIDWORKS Drawings with a Weldment Cut List Table. We can get similar behavior in the PDM BOM using the Weldment BOM or Cut List BOM types if we apply the same principles of variable mapping and controls on the data card.
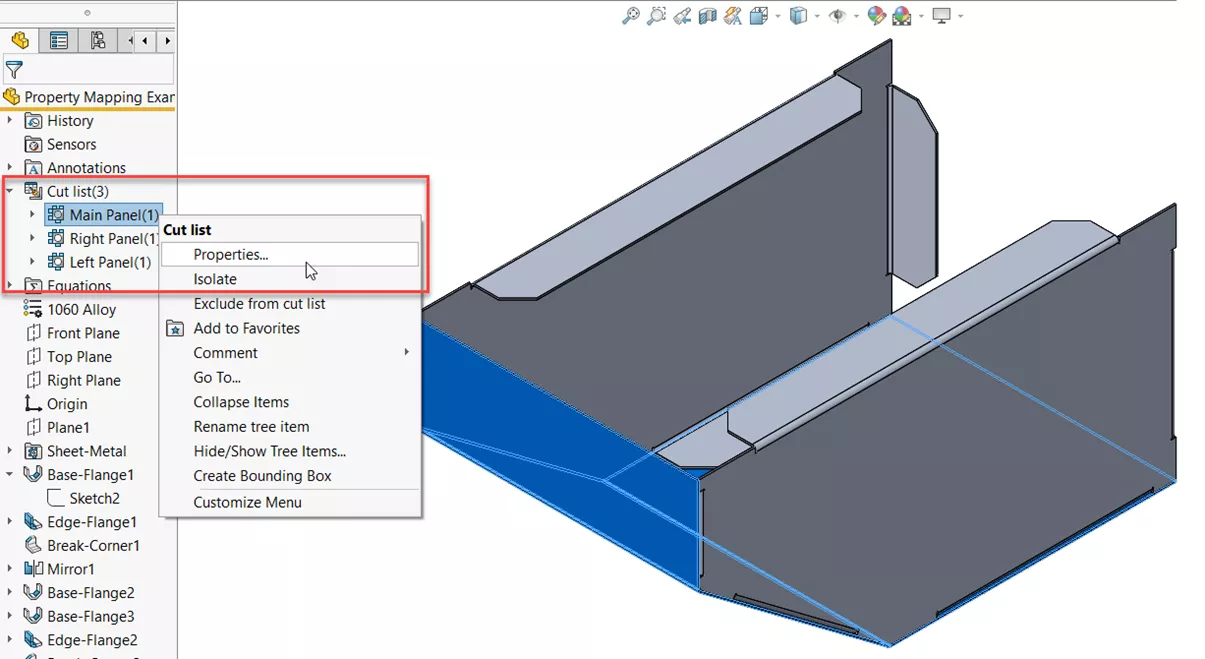
To start with, know that Sheet Metal and Weldment Body Cut List Properties already exist by default with the appropriate syntax for dimensional callouts in any model that uses them, so chances are you won’t need to create a new property in the SOLIDWORKS file itself unless it was custom cut list property.
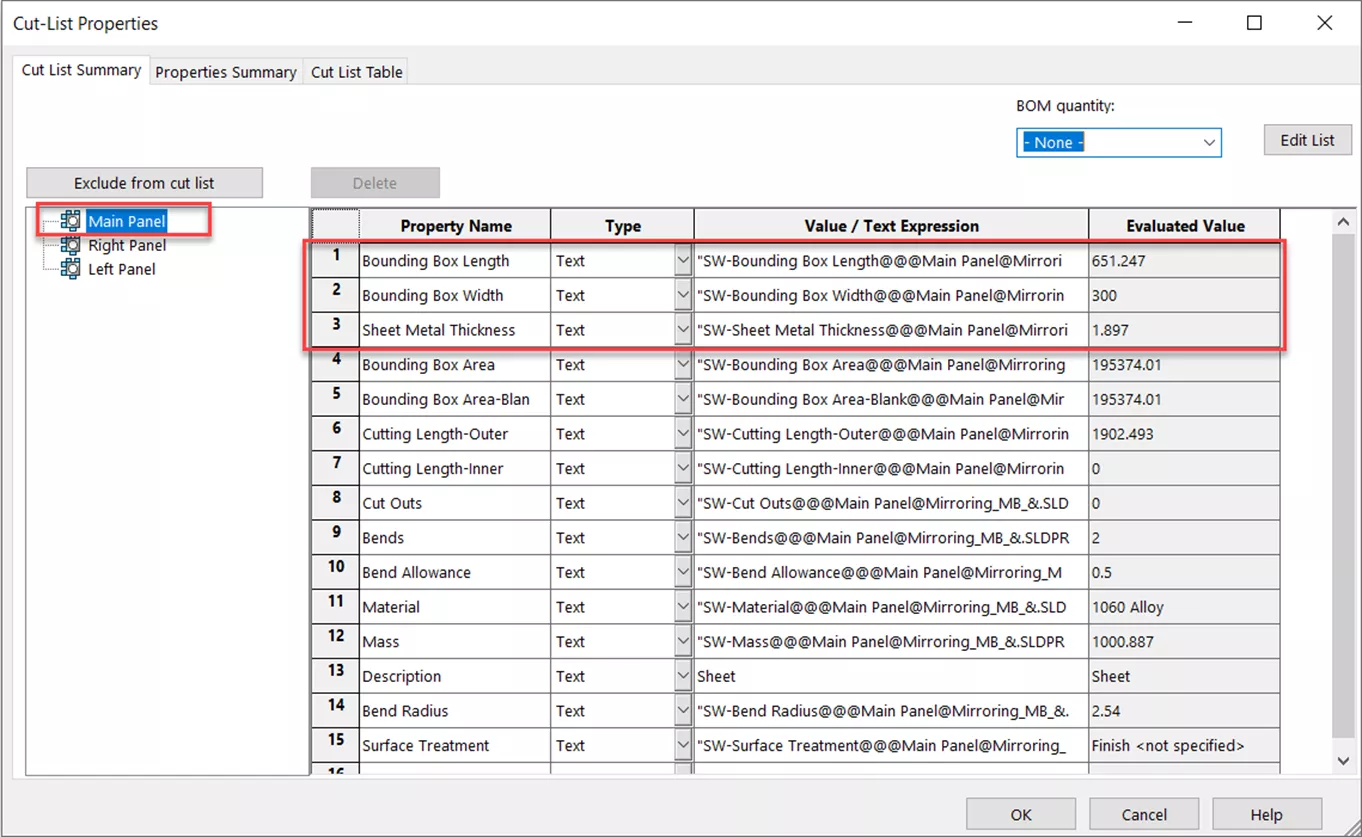
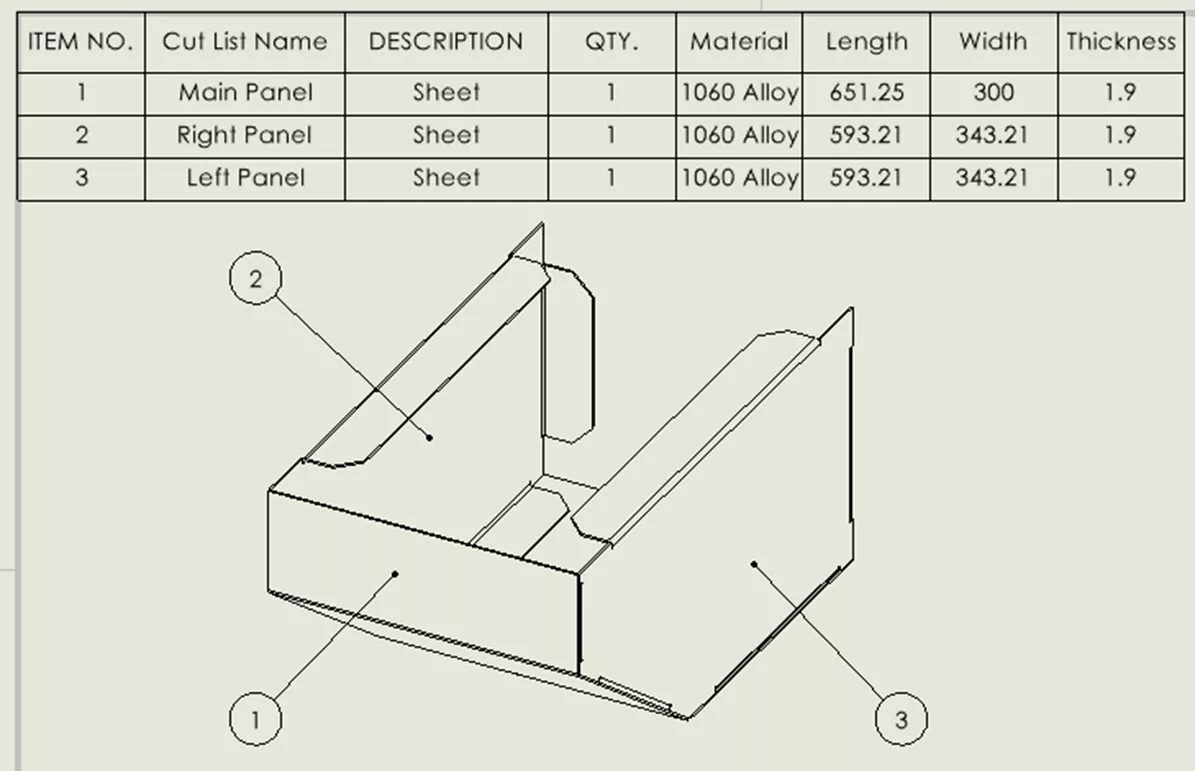
In this example, we want to have a Weldment Cut List BOM display each body’s Thickness, Bounding Box Length, and Width in addition to the default Cut List Item name and Description for a given sheet metal part. See the example below of the Cut List Table found in the drawing of this part that we want to emulate in PDM.
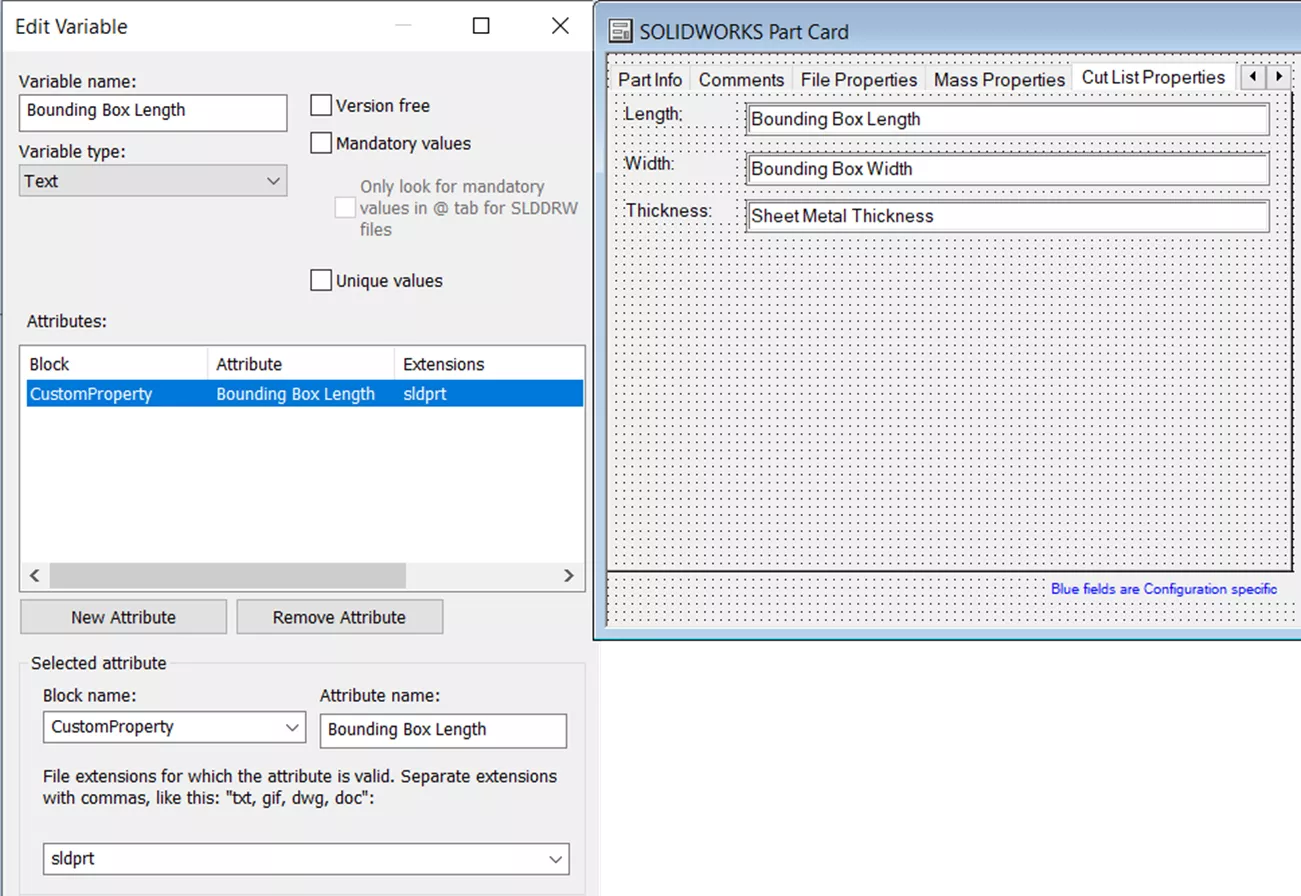
Similarly to the previous examples, we need to have variables with the appropriate variable mapping linked to the control of the associated file card. In terms of the variable mapping itself, we can continue to use the CustomProperty block we normally use, just make sure that the attribute has a corresponding Cut List property.
Next, we need to call out the variables in question within a Weldment Cut List BOM as a column mapped to the variable created above. See the example below of an edit to an existing SOLIDWORKS PDM BOM with a new column.
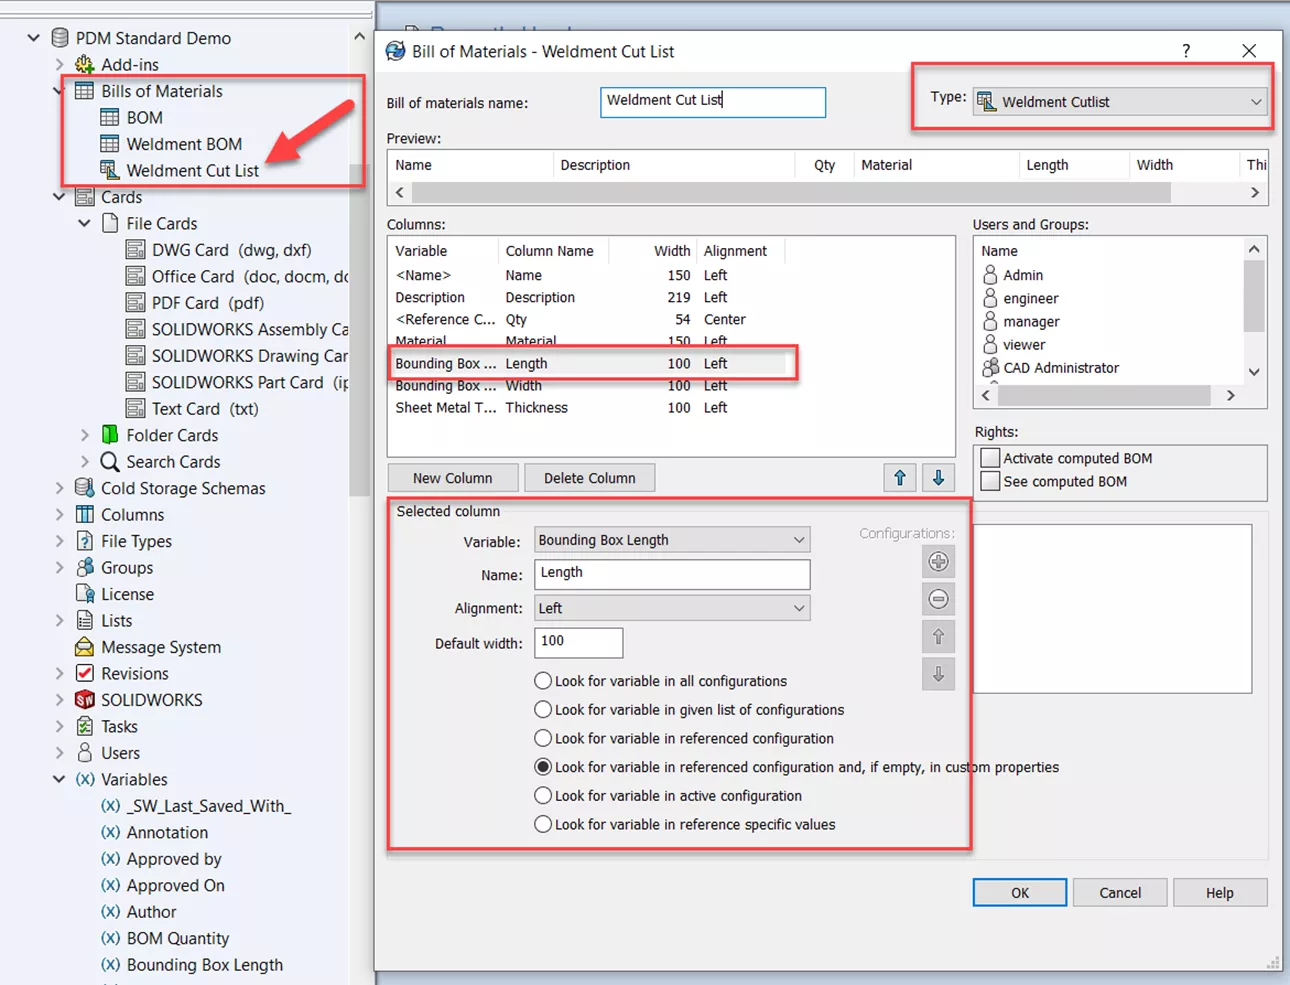
And with that, we’re done! Now these properties will automatically fill and update as the model changes as seen below.

This method does have its share of limitations that need to be considered in an implementation scenario.
The first is that while these cut list properties are live and constantly refreshing as the model itself changes, the Weldment and Cut List BOMs are still a type of Computed BOM and only update with new references and property information when the file is checked in. Therefore, while a file is actively being worked on and checked out, there can potentially be some disconnect between the values seen in the PDM Bill of Materials Tab and the properties of the model itself. However, the Cut List Table on the drawing will always be correct.
The second is that Cut List properties are not true Custom Properties and there is no direct one-to-one mapping between a Cut List property of an individual body to the custom property of the file as a whole. As a result, even when successfully using this mapping, the associated data card field will always remain blank.

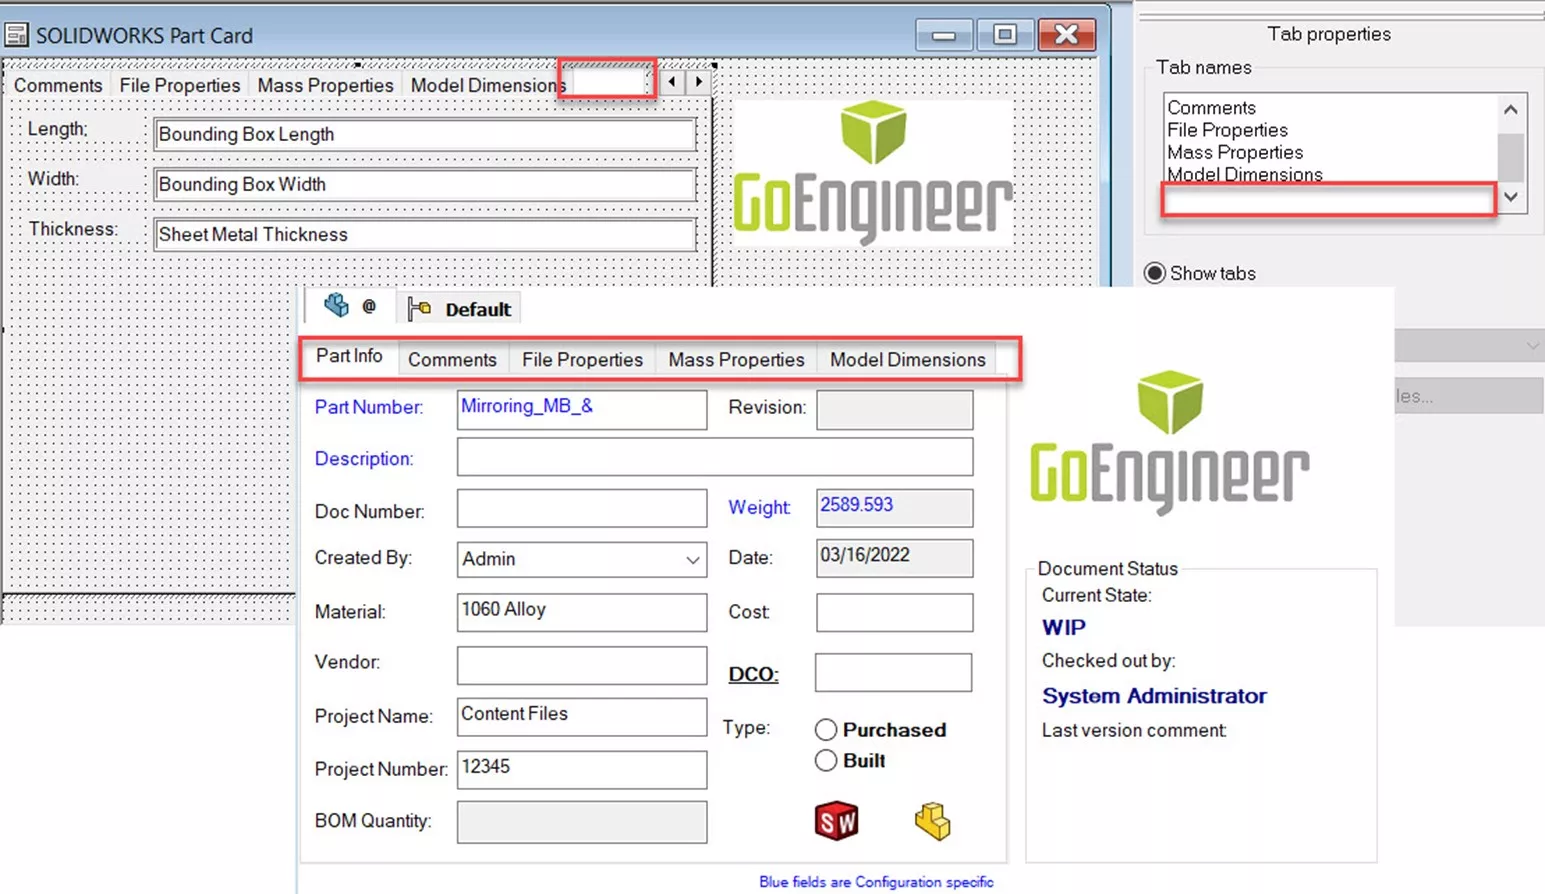
Because these fields still need to exist for this mapping to work, it’s best to “hide” these fields from the user either by applying card control logic to them or by hiding them on a tab control with a tab name with no name/empty new line. See the example below for an example of this technique.
Summary
In conclusion, there are many ways we can transfer properties inherent to our SOLIDWORKS models directly into PDM using variable mapping. This confers several advantages, with the main one being that many of these file properties automatically update when the model itself changes with no need for intervention from the user other than to open and resave the file.
It’s worth remembering then why we as administrators flesh out the data card to this extent beyond serving as a formatted data entry mechanism. Variables lay the foundation for automation and ease of use in SOLIDWORKS PDM as they either directly interact with or can be called out by the following types of PDM features:
- BOM Column Sets (Computed BOM, Weldment BOM, Cut-List BOM)
- Dispatch Scripts
- File and Folder Templates
- File Explorer Columns
- Logic conditions (Categories, Workflows, Transitions)
- PDM Search parameters
- Tasks
- Workflow Transition Actions
Being able to then source information immediately from the model without from the user can make an automation feature more robust while minimizing the possibility of user error.
More SOLIDWORKS PDM Articles
How To Set Up Barcodes in SOLIDWORKS PDM Data Cards
SOLIDWORKS PDM Preview Tab Mismatch
Always Show SOLIDWORKS PDM Icon (Blueberry)
Feature Feud: SOLIDWORKS PDM Rollback vs Checking in a Previous Version

About Miguel de Villa
Miguel de Villa is a SOLIDWORKS Elite Applications Engineer with a B.S. in Mechanical Engineering from the University of California, San Diego. He’s been working at GoEngineer since 2017 helping customers with all their SOLIDWORKS, Simulation and PDM needs. In his free time he enjoys working with his 3D printer, playing video games and building model kits.
Get our wide array of technical resources delivered right to your inbox.
Unsubscribe at any time.