Link SOLIDWORKS File Custom Properties to Variables in PDM
So, you’re set up with SOLIDWORKS PDM, and you’d like to start the pass-through of data from your CAD files’ custom properties into the PDM data card (or vice versa). You can create a link between the PDM data card and your SOLIDWORKS files’ custom properties using variable mappings.
Variable mappings are fully two-way linked. When the variable value is updated in the file data card, the mapped property value is updated in the file. When the value in a mapped custom property in a file is updated, it will show up in the data card once the file is saved and checked in.
In this guide, we’ll cover the process of creating that link. With SOLIDWORKS PDM variable mapping properly set up, you can take advantage of many automation features in your PDM workflow.
Prepping the Variable & Mapping
A default PDM vault comes with several prepopulated variables based on commonly used data points. You can utilize these pre-existing variables or create new ones as needed. All pre-existing variables can be found in the PDM Administration tool under the Variables node.
Creating the Variable
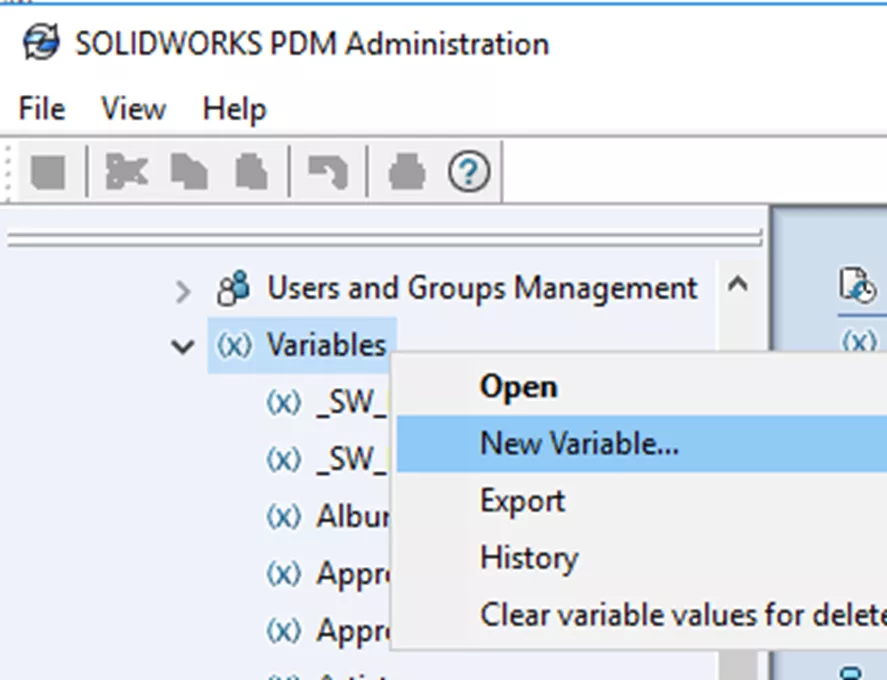
Open the Administration Tool and log into the vault as ‘admin’ or a user with administrative permissions.
For a new variable, right-click Variables from the vault menu and select New Variable. For an existing variable, double-click the desired variable from the list, or right-click the variable and choose Open.
You’ll be presented with the variable editing screen, where there are numerous options to customize to your needs.
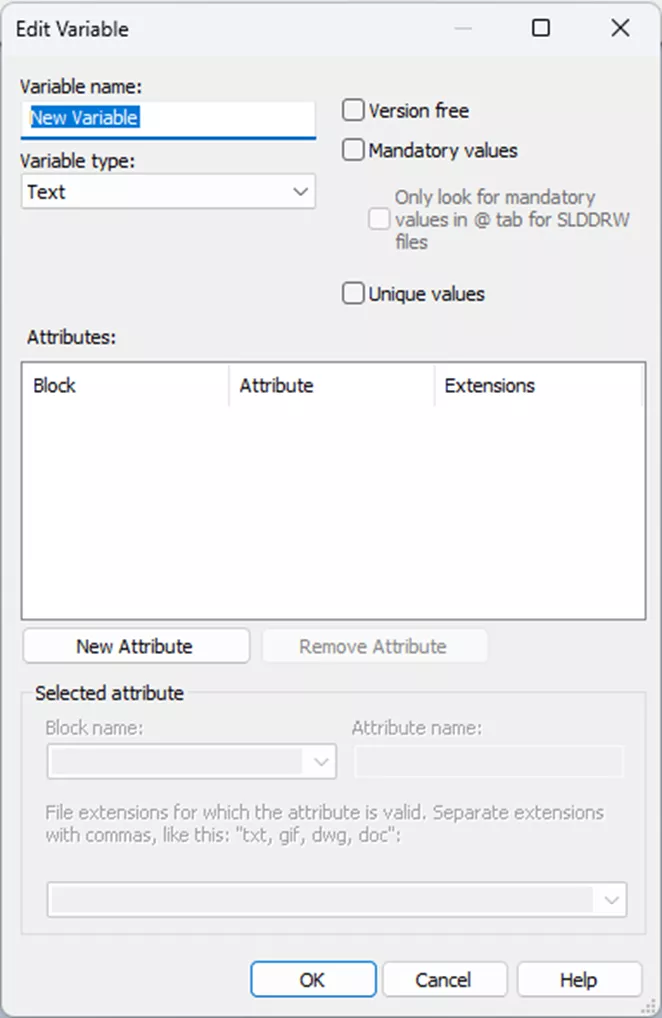
The Variable name in PDM doesn’t have to match the exact custom property name in the file, but it’s always good to keep them as close as possible for organizational purposes. For this example, I'll be creating a “Description” variable.
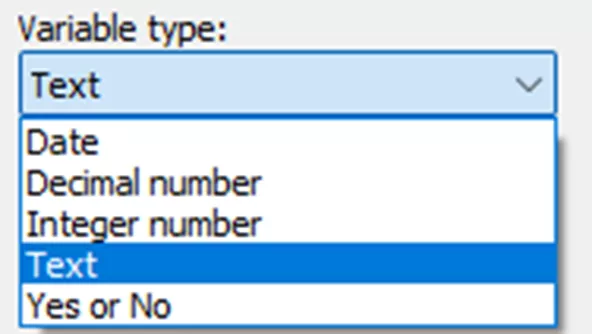
Variable type defines what kinds of data are allowed in that variable. For this example, I will be working with a text variable since it’s the most common type, but the other types are as follows:
- Date: Only properly formatted date values (i.e., 11/18/2008)
- Decimal number: Only decimal numbers
- Integer number: Only integer (whole) numbers
- Text: Most types of character strings
- Yes or No: Only a binary yes (1) or no (0) value
Checking the Version free box makes it so that you can update the corresponding field on a data card for a file without having to check the file out and increment the version of the file when you check it back in. This lets you update variables that change over time, such as cost, while the file itself may not change. Additionally, you can change the variable even if the file is in a state where you do not have permission to check it out so long as you have permission to do so.
Checking the Mandatory values box makes it so that data card controls using the variable cannot be left empty when updating card values or checking in files. If they are, a warning describes the missing variable value. You cannot set a variable to mandatory if file or folder cards use that variable and the vault already contains files or folders with empty variable values.
Checking the Unique values box makes it so that data card controls using the variable must contain a unique value when updating card values or checking in files. If they do not, a warning describes the missing variable value. Copying files whose file data cards contain unique variables forces the values to be cleared in the destination file. You cannot set a variable to unique if the vault contains files or folders with duplicate values.
Variable Attributes
The Attributes box on the variable is where any “links” created to specific custom properties or other field types can be added. A variable can contain many sets of attribute mappings so that one variable can be used for many different data cards.
Note: You never want to have more than one of the same block type mapped to the same file extension(s). To clarify, you never want to have two Custom Property blocks mapped to two different Attributes for .slddrw files. The match should always be 1-to-1 to prevent data conflicts and mapping issues.

You must fill out each of the following:
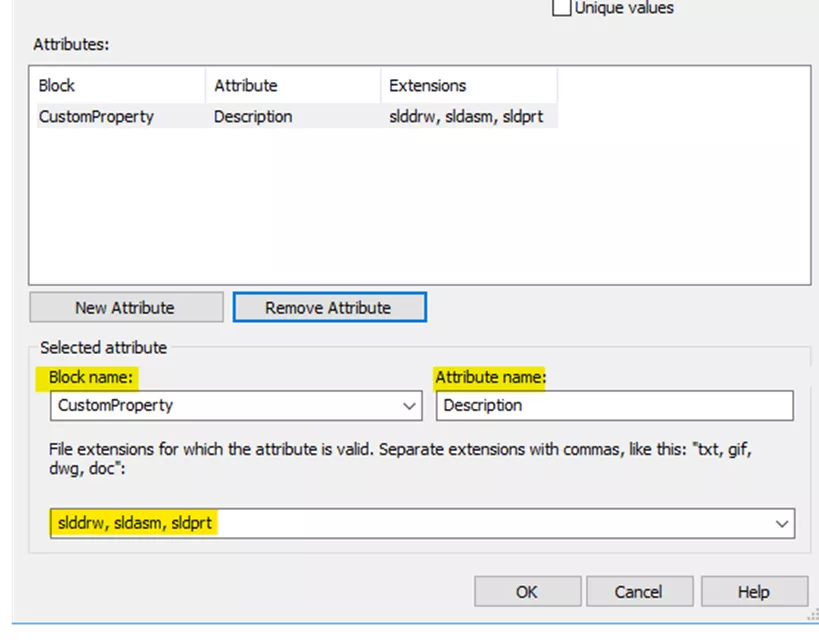
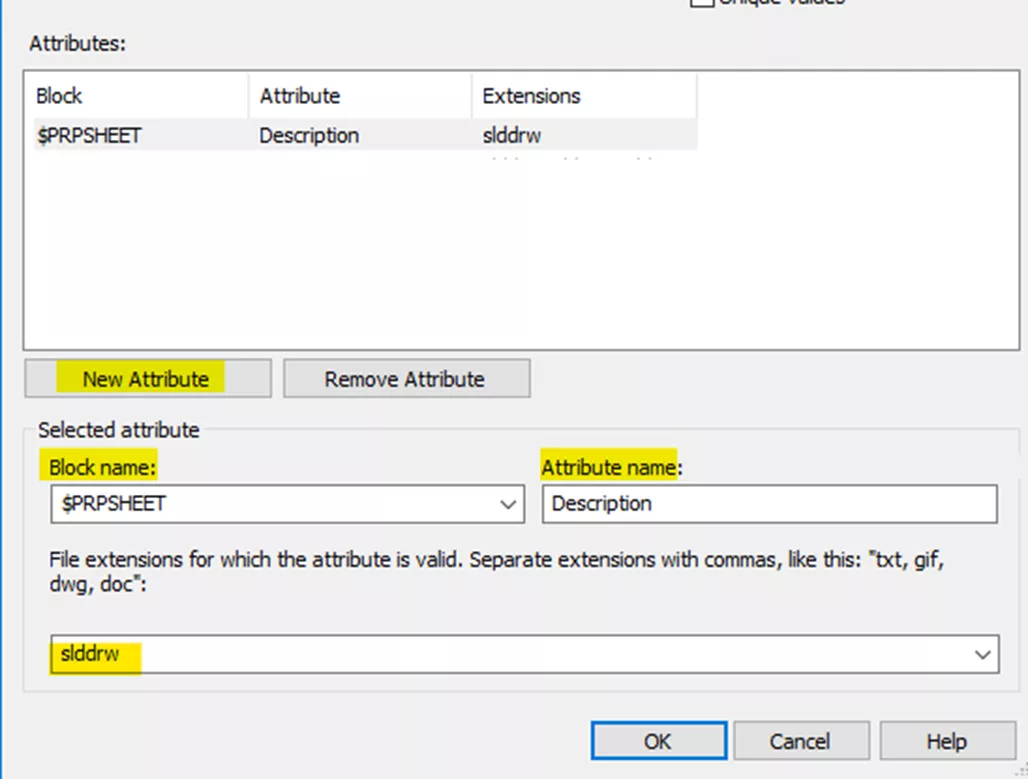
Block name - the file section that contains the properties/metadata (that is, attributes). Enter a new block name or select from existing block names in the vault. Different file types have different block names. For example, most custom properties in SOLIDWORKS files are found in the CustomProperty block, though there are also the Summary or $PRPSHEET blocks. Depending on file type, some block names are pre-defined and others are custom.
Attribute name - identifies the part of the specified block that contains the property value. For example in a SOLIDWORKS Part or Assembly file, the title property value is stored in the attribute Title, which is in the block Summary.
File extensions - defines which file type(s) this mapping applies to. A single variable can have many different applicable file types. You can select the desired types from the prepopulated dropdown list, or enter the extensions of files manually. Separate file extensions with commas (e.g., doc, xls, ppt).
Creating a Mapping
Click the New Attribute button and fill in the information at the bottom of the page. For this example, I'm going to create a link to the Description custom property on my model and drawing files, as well as create a link to the title block for my drawings.
To link to the custom properties of your CAD files:
- Click New Attribute.
- Select CustomProperty for the block name.
- Enter the attribute name exactly as it appears in the custom properties on the file. Casing and spacing must be exact for the link to work.
- Choose the file types it should apply to from the drop-down menu. In this case I'll have slddrw, as well as sldasm and sldprt.
To link to the title block of your drawings:
- Click New Attribute.
- Select $PRPSHEET as the Block Name.
- Enter the attribute name exactly as it appears in the custom properties on the file. Casing and spacing must be exact for the link to work.
- Choose the file types it should apply to from the drop-down menu. $PRP and $PRPSHEET mappings generally only apply to .slddrw.
Once you’re done mapping attributes, click OK to commit the changes.
Prepping the File Data Card
Now, we need to edit the file card in the Administration tool to add the variable to that data card. Each SOLIDWORKS file has a data card in PDM; that data card holds all of the metadata. You need to make a space for it on the file card so it is visible in your PDM File Vault View data card tab.
To Add a Variable to the Data Card
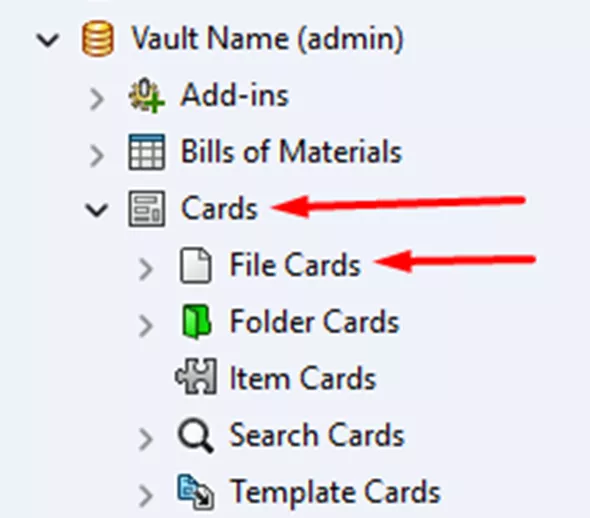
In the PDM Administration tool, expand Cards > File Cards.
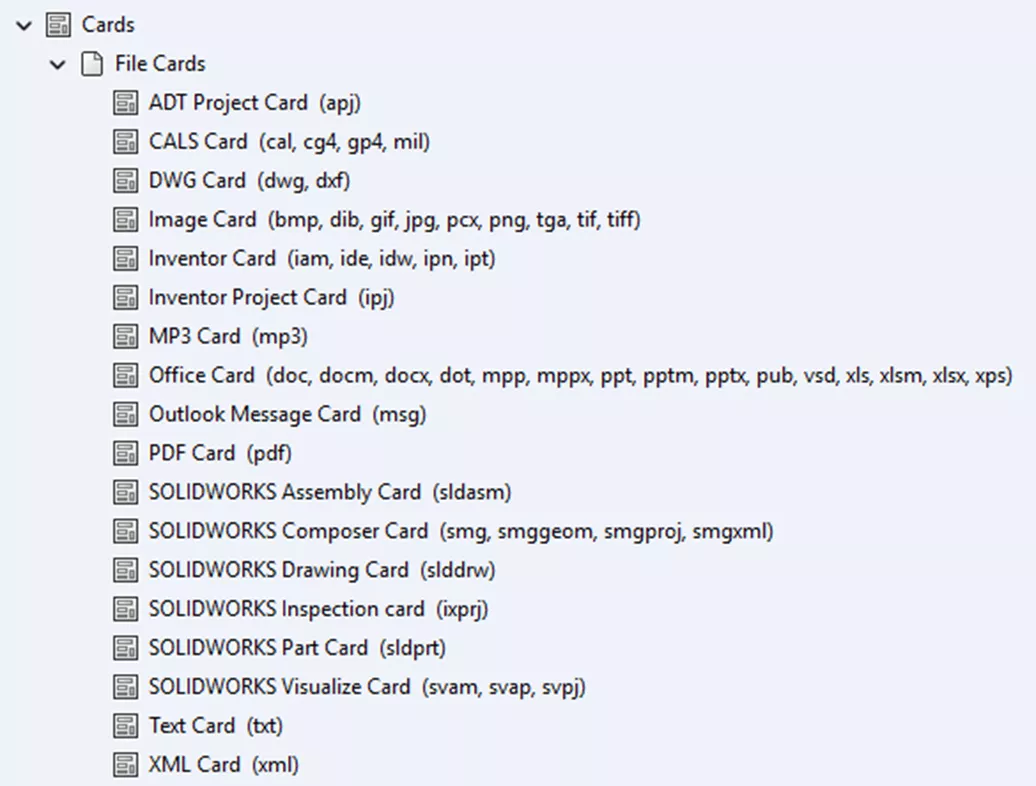
Double-click the applicable card to open the Card Editor. You can identify what files a card should apply to by looking at the file extensions and folder locations that are listed to the right of the card name.
If you don’t already have a spot for your variable, you’ll need to add a control to link to the variable. This article will cover the specifics of a Description variable mapping. For more specific steps on modifying the data card, check out our video on data card changes.
Choose a Control box and place it on the card. It works like creating a text box. Click in some empty space, hold, and drag to the size you want. Then choose a variable from the drop-down list in the Edit-Box Properties to the right.
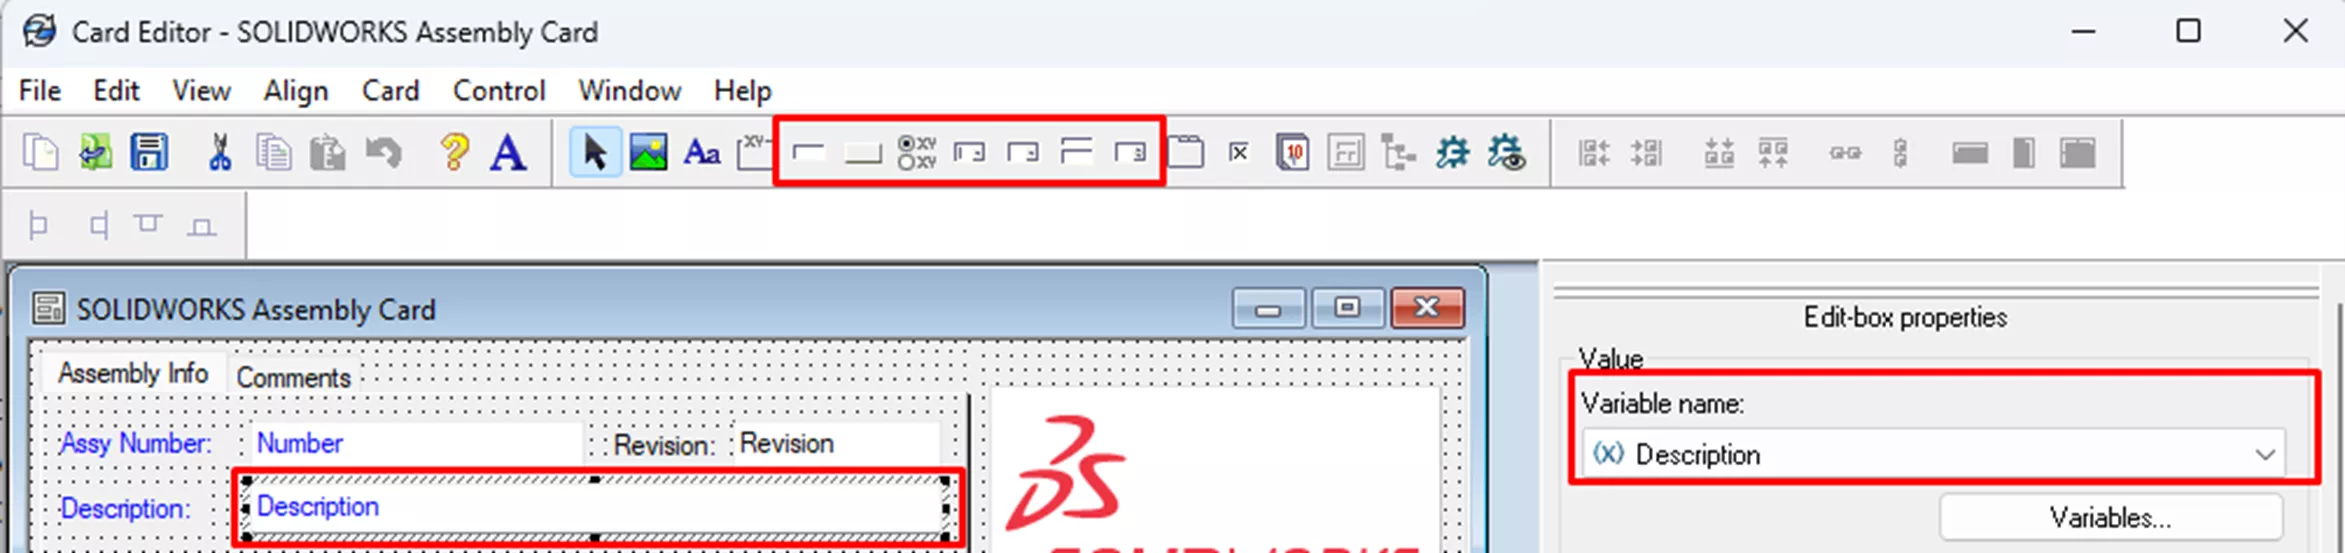
When finished, hit the Save button (the blue floppy disk) in the upper left corner.
Conclusion
With the mapping setup for the variable itself and the variable added as a control to the data card, you’re just about ready to get going. There are a few items that are important to keep in mind with variable mapping to ensure you don’t get caught up, however:
- We can never stress this enough – always be sure you only have one of each block type per file extension in your variable mapping. Having two of the same block type for a file can cause data conflicts, and you’ll likely end up with bad data. You may even end up with no data at all if things go particularly sideways.
- The changes made to variables and data cards are non-retroactive. This means that any files already housed in your vault won’t populate the new variable field on their data card automatically. To populate those fields, you’d need to check out, save, and check back in the file to see the data card populate. Any new files added to your vault after the mapping is set up should populate automatically, however.
- If you have a mapping set up to a custom property that doesn’t yet exist on your file, the property will automatically be created if the field on the data card has a value in it. Meaning, if you have a Description variable on your file’s data card with the value “123” in it, your file will automatically populate a Description custom property with the same “123” value once it’s added to the vault. A custom property won’t be created if the field remains empty.
- There are settings on data cards and in workflows (like setting a field to “read only” or having a “default value”) that may prevent the standard back-and-forth flow of data between your SOLIDWORKS files and your PDM data card. We didn’t cover the specifics of these settings here, but if you ever notice things aren’t flowing like you expect and the mapping seems correct, that may be why.
If you have questions on anything mentioned in this process and GoEngineer is your VAR, please feel free to contact Technical Support via phone or email or through the MyGoEngineer customer portal.
More SOLIDWORKS PDM Articles
Update Convert Task Add-In (SWTaskAddIn) in SOLIDWORKS PDM
SOLIDWORKS PDM Network Communication Troubleshooting
Resolve Invalid Class Error for eDrawings and PDM Preview
Changing SOLIDWORKS PDM License Types
Link Configuration-Specific Information to a SOLIDWORKS PDM Data Card

About Danielle Irish
Danielle Irish is a SOLIDWORKS PDM Support Engineer based out of metro Detroit. She has a degree from OCC in CAD Design and Engineering. Danielle has extensive experience in customer service as well as a 10 year adventure in Automotive Engineering. Danielle enjoys challenges and puzzles, and is an avid gamer and fiber artist.
Get our wide array of technical resources delivered right to your inbox.
Unsubscribe at any time.