Troubleshooting SOLIDWORKS Electrical Install Issues
Installing SOLIDWORKS Electrical
SOLIDWORKS has an amazing program called SOLIDWORKS Electrical Schematic, which is single or multi-user software, built for the creation of embedded electrical systems for equipment and other products. This additional setup can add some pitfalls to look out for when installing SOLIDWORKS products. In this guide, we are going to discuss various issues that might pop up during the install process.
Before the install
Before installing SOLIDWORKS Electrical Schematic, whether this is a single user instance or multi-user instance, there are some items that should be looked into beforehand to ensure everything goes smoothly.
The first item, like with all other SOLIDWORKS products, is to temporarily disable the anti-virus. Anti-viruses have been known to prevent .dlls and other key parts of a program from being registered properly. With SOLIDWORKS Electrical relying on an SQL database and possibly a collaborative database this is even more important.
The second item to take into account before installing SOLIDWORKS Electrical is only applicable for multi-user environments where you will be installing software components on a server. SOLIDWORKS has two programs that use SQL: PDM and Electrical. If you are installing Electrical on the same server as PDM, they must have separate SQL instances.
During the install
During the installation, there is frequently a message that pops up stating a reboot is pending. If this message pops and you have not rebooted your computer recently, close the installation manager and do so. If you have rebooted your computer and the message still appears, this is because the registry key responsible for this message needs to be manually deleted. In order to delete this key, we will need to go into the registry editor by going to the Windows start menu and typing ‘regedit’. From there, you will go to this location and delete the key listed below.
- Go to: HKEY_LOCAL_MACHINE\SYSTEM\CurrentControlSet\Control\SessionManager
- Delete the key: ‘PendingFileRenameOperations’
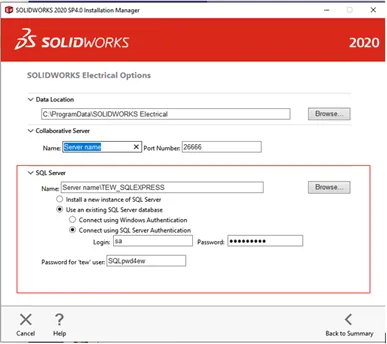
Once this is done you will proceed through the installation until you get to the summary page, click on ‘Electrical options’. Here we will look at the various information we must enter.
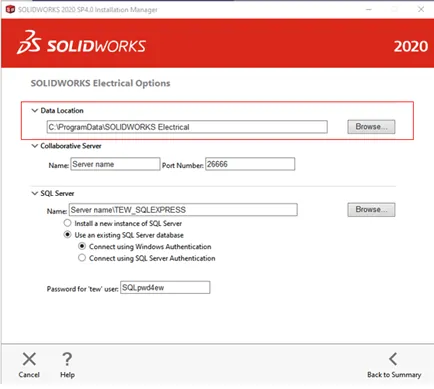
The first piece of information is the Data location. This is the shared folder that all users will need read/write access to. If you are only installing the client-side and the server-side is already installed, make sure that the folder is shared and the client is pointing at it. It is important that the location is listed using either the UNC path or the IP address of the server. Mapped drive locations CANNOT be used in this setting.
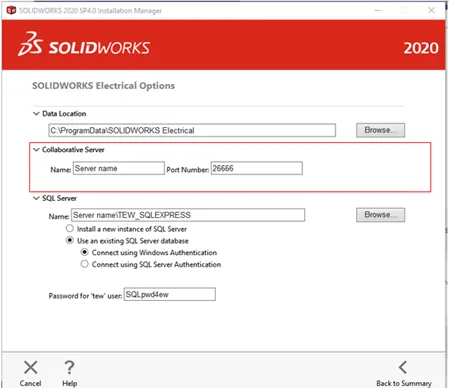
The second piece of information will we will need to enter is for the collaborative server. Here you will enter the name of the server that it is installed on. This is also the same server that the SQL instance is installed on. As for the ‘Port Number’, keep it set to the default: 26666.
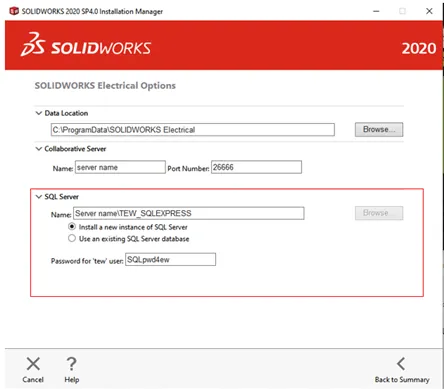
Lastly, we will enter the SQL server information. First enter the server name which should include the instance name using this format: <Servername\Instance name>.
Do this even if the SQL instance is the same name as the Server. If not named in this format, there can be connection issues especially if there are other SQL instances on the same Server. While mostly for single-user environments, or brand new installs, if you are installing a new instance of SQL select the ‘Install a new instance of SQL Server’.
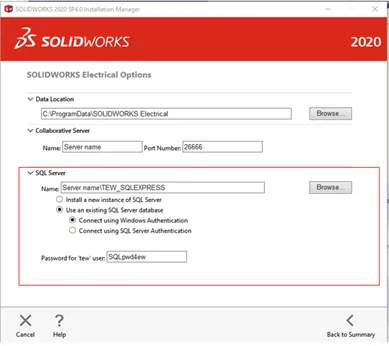
If the server software is already installed, you will need to select the other option 'Use an existing SQL Server Database' and select a way to connect to it. If you choose ‘Connect using Windows Authentication’ you will use your Windows log-in to access the SQL instance.
If you choose ‘ Connect using SQL Server Authentication’ you will need to enter a login and password. Unless changed, the default login will be ‘SA’ and the password will be the same as the new password. One thing to take note of is password requirements. Some systems require a password with a certain number of characters. Keep note of this password as it could be needed for any future troubleshooting or upgrades.
After the install
Once the install is complete with no errors, there are two final items to look at. First is the ODBC connections for SQL. Use this guide to ensure there are no connection issues between the client-side and the server-side SQL.
Lastly, we need to make sure the needed ports are open on both the client-side and the server-side firewalls. There are three ports that need to be opened: 26666, 1433, and 1434. These need to be opened for both TCP and UDP as well as for in and out communications. With these in place, you should have no issues with your SOLIDWORKS Electrical install.
Learn More About SOLIDWORKS Electrical
Common SOLIDWORKS Electrical Installation Errors
Easy Way to Add Watermarks in SOLIDWORKS Electrical
Schematics on the Road: SOLIDWORKS Electrical
Why Won't My Wires Route in SOLIDWORKS Electrical Part 1 & Part 2
About Nathen Blas
Nathen Blas is a SOLIDWORKS Technical Support Engineer based out of our Headquarters in Salt Lake City, Utah. He earned his Bachelor’s degree in Mechanical Engineering at the University of Utah in 2018 and joined the GoEngineer family that same year.
Get our wide array of technical resources delivered right to your inbox.
Unsubscribe at any time.