SOLIDWORKS Motion Analysis Motor Torque & Power
Within SOLIDWORKS Simulation, a motion analysis can be created to allow ease-of-use in using motors to drive moving components. This application also allows users to plot results that are very similar to today’s hand calculations. This guide demonstrates how to use SOLIDWORKS Motion and how to set up a simple motor analysis. We'll compare our study to hand calculations to show the similarities between SOLIDWORKS and the real world.
The Objective of the Study
The goal is to subject a motor to accelerate to a constant velocity, and we want to find out how much torque and power is required. The list of specifications include:
- Accelerate from 0 to 100 RPM
- A total of 10 revolutions
- Friction is neglected
The motor will be made of aluminum that will be mounted to a frame.
Initial Hand Calculations
Before we start, it’s a good idea to perform the hand calculations in order to solve for the known values. The list of values we can obtain are:
- Inertia of the cyliner: ( Ι = ½ MR 2 , M is Mass and R is radius of cylinder)
- Angular Velocity ω: ( 1 RPM = 0.1047198 rad/s = 6 deg/s )
- Angular Acceleration α: ( ω 2 ⁄ 2θ )
θ i s equal to the total rotation. 10 revolutions = 62.83 rad = 3600deg
- Time: ( ω ⁄ α )
Given this, the values we obtained are:
- Inertia = 83.9 kg/m 2
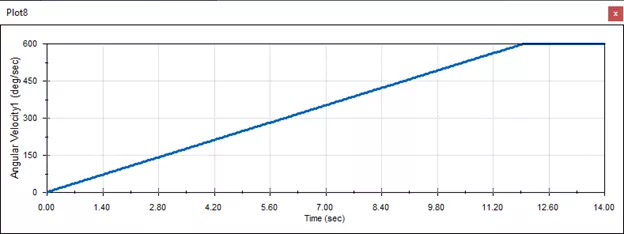
- Angular Velocity = 10.47 rad/s = 600 deg/s
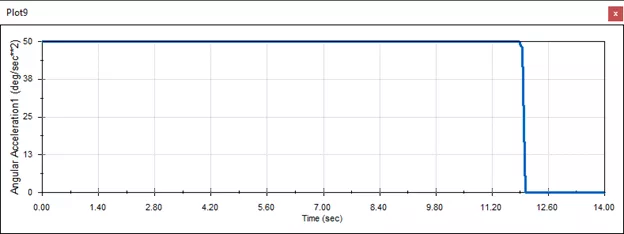
- Angular Acceleration = 872 rad/s 2 = 50 deg/s 2
- Time = 12 seconds
The torque and power can now be evaluated from the above-known information:
- Torque = I * α = 83.9 kg/m 2 * 0.872 rad/s 2 = 73.2 N-m
- Power = T * ω = 73.2 N-m * 10.47 rad/s = 766 Watts
Setting up a Motion Analysis in SOLIDWORKS
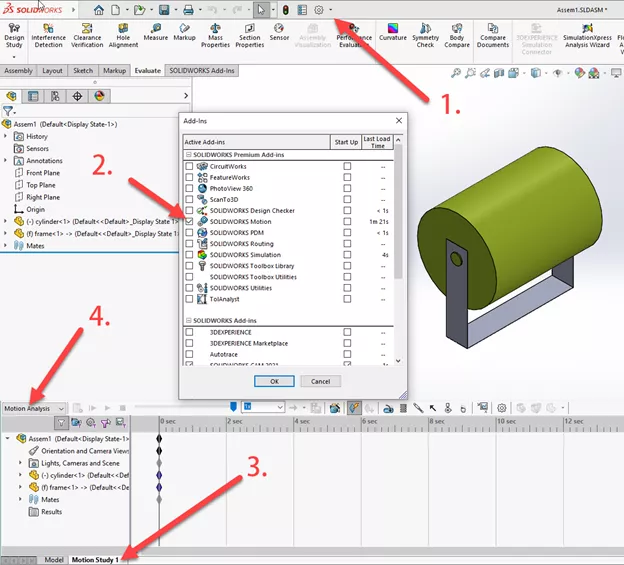
We’ve created the assembly ahead of time which is required to run a motion analysis. To start, we’ll want to first enable the motion add-in inside SOLIDWORKS and a new motion study tab will appear at the bottom-left. The motion timeline which stays at the bottom half of the screen is where we can then enable the motion analysis type from the dropdown.
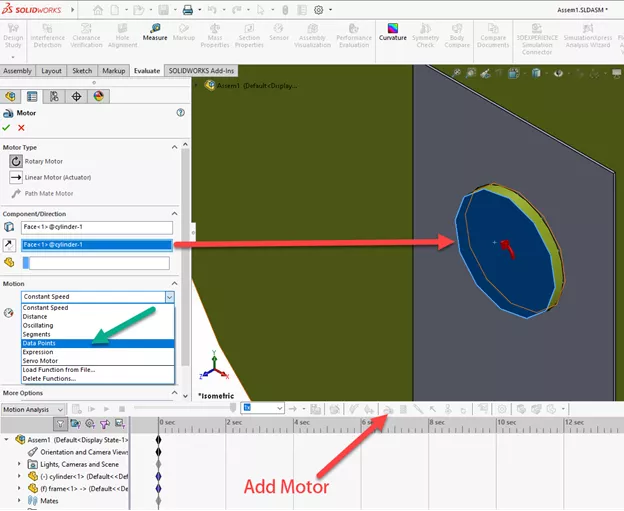
We’ll then set up a motor on the face which gives it rotation. Because we want the motor to be constantly accelerating, we’ll use the data point to define the speed and time it takes to ramp up.
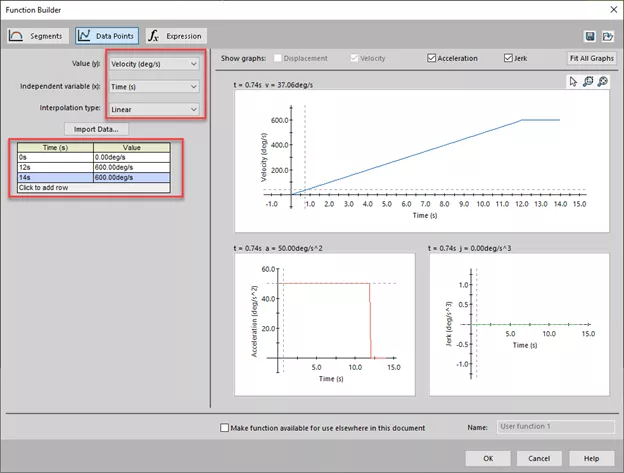
A function builder window appears, and we can then input our 600 deg/s velocity at 12 seconds to give us the angular acceleration. We can then add data points to keep them constant. A graph on the right will show us that the acceleration already matches our hand calculation.
The final step is to move the timeline to 14 seconds based on our data points and press calculate to run the motion analysis. Once this is finished, we can now go back up to the top to prepare our results by selecting the results and plots option.

Gathering Results
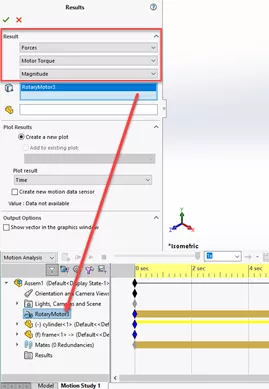
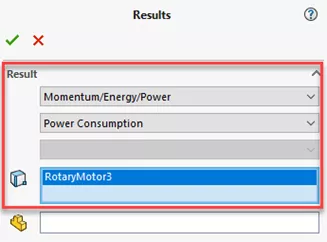
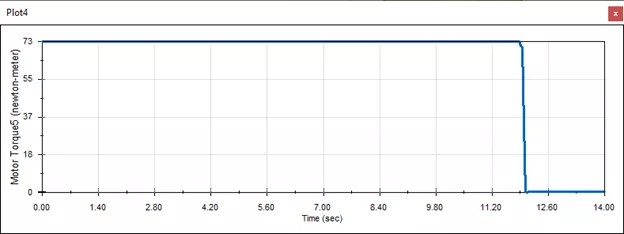
The final steps are now to create plots for both the torque and power. The motor torque will be part of the forces while power consumption will be under the momentum/energy/power selection. In both instances, we’ll need to select the motor we created from the motion analysis.
Torque
Power
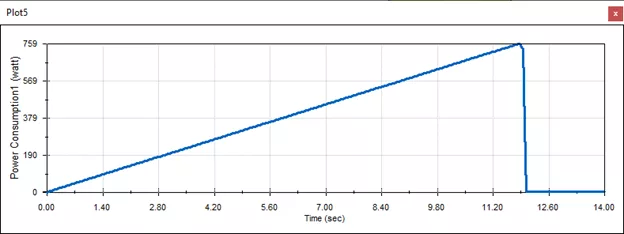
The values of 73 N-m and 759 watts fall within the range of our hand calculations.
In addition to finding torque and power, we can also plot for the angular velocity and acceleration under the displacement/velocity/acceleration section to verify our previous hand calculations for these.
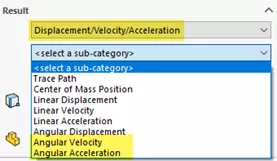
Angular Velocity
Angular Acceleration
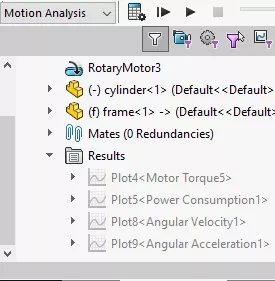
With everything obtained, the results can be accessed from the results folder.
SOLIDWORKS Motion Motor Torque and Power Video
More SOLIDWORKS Motion Tutorials
SOLIDWORKS Motion Study Analysis and Setup Tutorial
Understanding the Rattleback Mystery with SOLIDWORKS Motion
SOLIDWORKS Motion: A Tip for Handling Performance Hogs
SOLIDWORKS Motion Utilizing Design Studies to Evaluate 'What-if' Scenarios

About Jackie Yip
Jackie Yip is a Technical Support Engineer at GoEngineer. When Jackie isn’t assisting customers or teaching a SOLIDWORKS Essentials class, he enjoys road biking and keeping up on the latest tech trends.
Get our wide array of technical resources delivered right to your inbox.
Unsubscribe at any time.