How to Restore SOLIDWORKS PDM from Backups
The nature of our current technological landscape is such that when it comes to server crashes, outages, and security breaches – it’s a matter of “when” it happens, and not “if” anymore. This makes it all the more important that you and your team understand how to recover your SOLIDWORKS PDM environment from backups if something goes wrong.
This guide is not exhaustive and does not cover every possible scenario that can be performed for this task. However, it is based on typical server setups found while supporting our customers. Therefore, should you come up with questions after reading this guide, contact us, and let’s clear things up for you before you attempt to restore any SOLIDWORKS PDM component. Be sure to read through the entire guide and ensure you have access to everything you need before starting. Missing steps or not having needed credentials or Windows rights can cause disastrous delays or even lost data.
A successful restore requires valid PDM backups, consisting of:
- The Archive Folders – a set of 16 folders (a-f and 0-9) containing your vault’s hard copy file backups.
- The SQL Databases (these will be .bak files):
- ConisioMasterDb – every SOLIDWORKS PDM environment has one of these, regardless of how many vaults are present. While important, this can theoretically be recreated if you’re missing it.
- The vault database – this is likely going to be named the same or very close to the same as your actual vault name.
- The Archive Settings backup (backup.dat) file – there will only be one file, regardless of the number of vaults. It’s usually located in the root folder of your archives. This is not strictly necessary, and you can still restore without it, but we always recommend setting this up so the restore process goes more smoothly.
If you’re missing any of these (aside from the archive settings backup) or if your backups aren’t recent (within the last week or so) - please contact Technical Support before proceeding. The process for a restore will vastly differ based on what all is missing.
Please also be sure to check out our Backup Master List guide for PDM. This covers basic info on each of these backup components and steps for taking backups.
Before You Restore
Before beginning to restore any components of your PDM server there are a few things that need to be completed to help ensure the process is as smooth as possible.
- Ensure you have your backup files as listed above. Place them somewhere accessible (preferably directly onto the new server where PDM will be hosted).
- Ensure that the new server meets SOLIDWORKS minimum system requirements. You want to ensure the new server meets the requirements for hardware and software so your vault is hosted in a fully supported environment and functions optimally.
- Have the necessary software downloaded and ready to install.
- For both PDM Professional and PDM Standard you can access our hosted installation media sets. The SOLIDWORKS download contains all components needed.
- For SQL Standard or Enterprise, you will need to reach out to your reseller to get the proper installation media or license keys.
- For SQL Express, you can find the 2022 (or most current at the time) download directly from Microsoft’s site. No license is required.
- Have your serial numbers ready to enter into the License Manager. This includes all network/”floating” serial numbers.
- If you’re unsure of these numbers (learn how to find your SOLIDWORKS Serial Number) or have issues with activation, reach out to your support team.
- Ensure you have a Windows account with administrative access on the new server.
- Ensure the server and network have communication rules in place on the firewall and any other devices to allow for proper port communication:
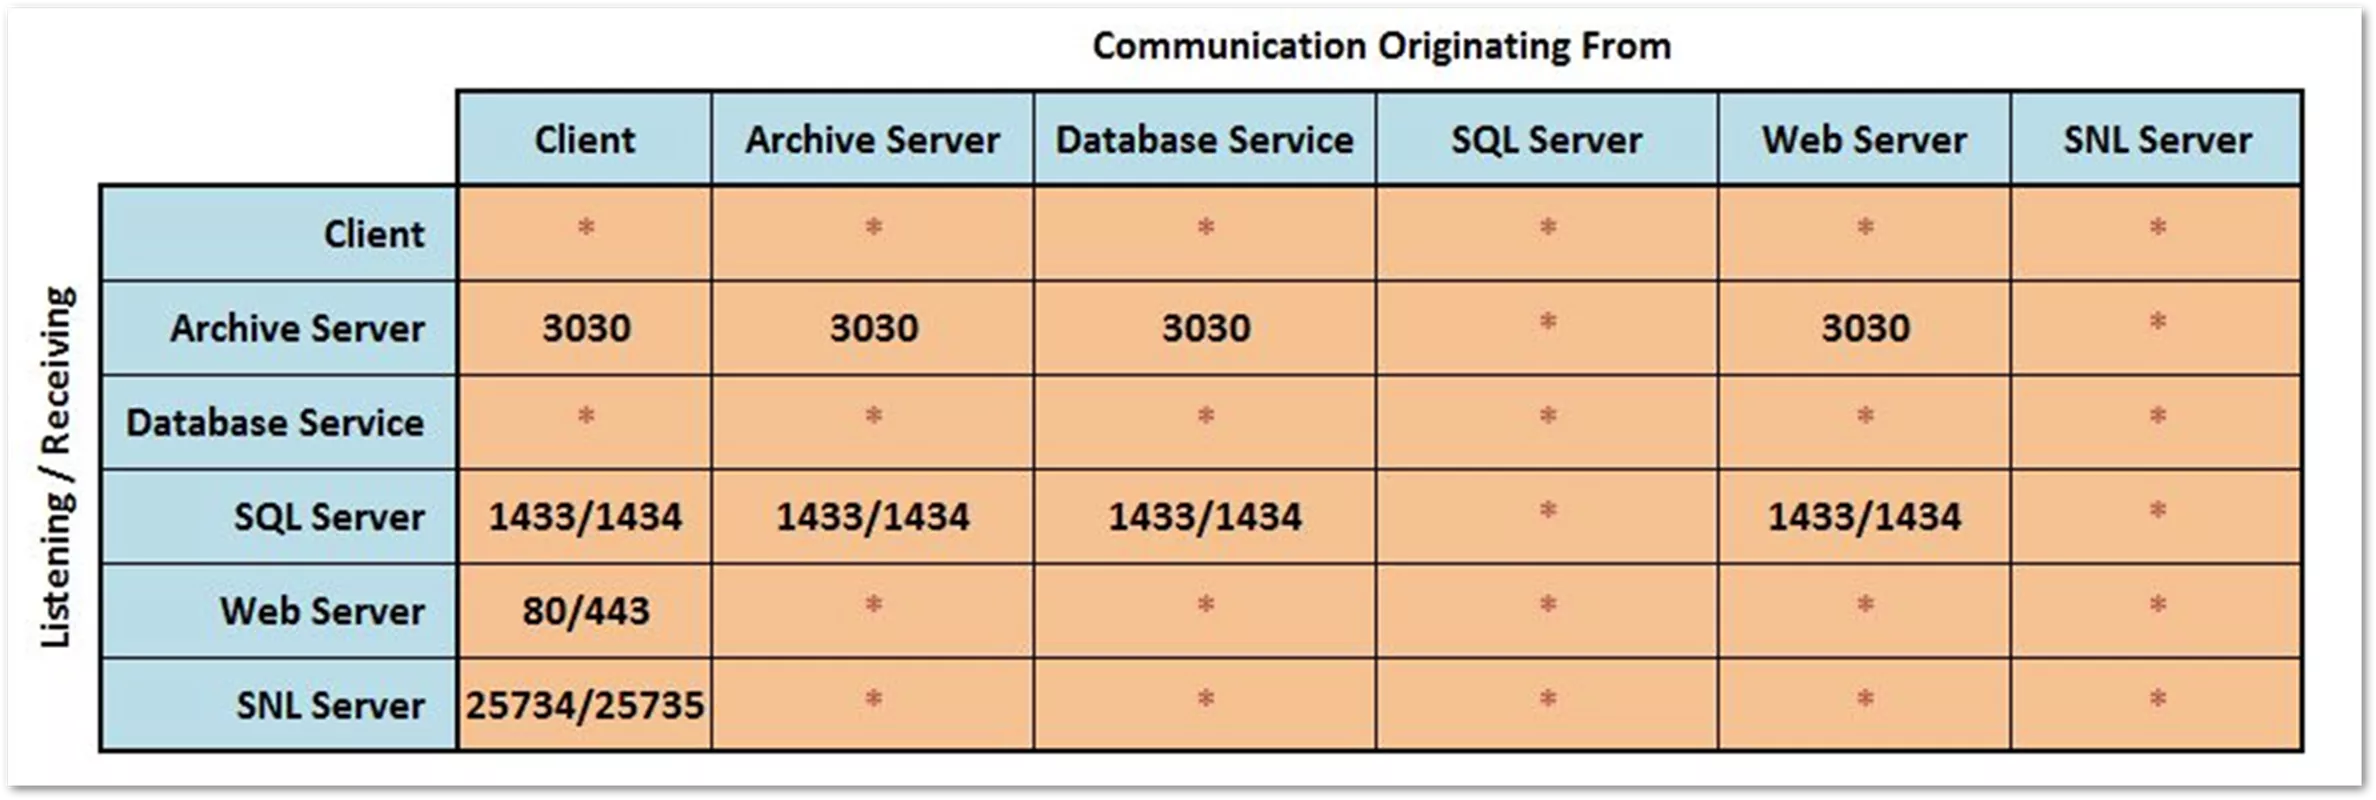
Once you’ve confirmed the points above, you’re ready to get started!
Installing the Server Components
Before you can restore any of your backups, you’ll first need to install the PDM server software on the new server hosting your data. For detailed steps on how to install and configure specific versions of SQL to use with PDM, refer to our How to Install the SOLIDWORKS PDM Server guide. However, you will want to stop at the Create New Vault section, as we’re looking to restore an existing vault rather than make a new one.
Note: Be sure to take note of the instance name during installation! This is extremely important for several steps later on. You can also find it by logging into SQL Server Management Studio and looking at the top of Object Explorer. This lists your server name and instance name (if you used a named instance, you will see it following a backslash after the server name, like “server\instance”. This whole value is how PDM recognizes your database server, so be sure to have it handy).
The Restoration Process
Once the software has been installed, you’ve got the PDM infrastructure upon which can begin the actual restoration process.
This will consist of:
- Restoring the Databases
- Restoring the Archive Settings (depending on what files you have available)
- Manually using the Create Archive from DB tool
- Automatically using the backup.dat file
- Restoring the Archive Folders
- Updating Clients to point to the restored server
Restoring the Databases
- Open and log into Microsoft SQL Server Management Studio on the server, confirm your server name (and instance if applicable), enter your SA credentials, and click Connect.
- If you’re using a newer version of SQL, check the Trust server certificate box as well.
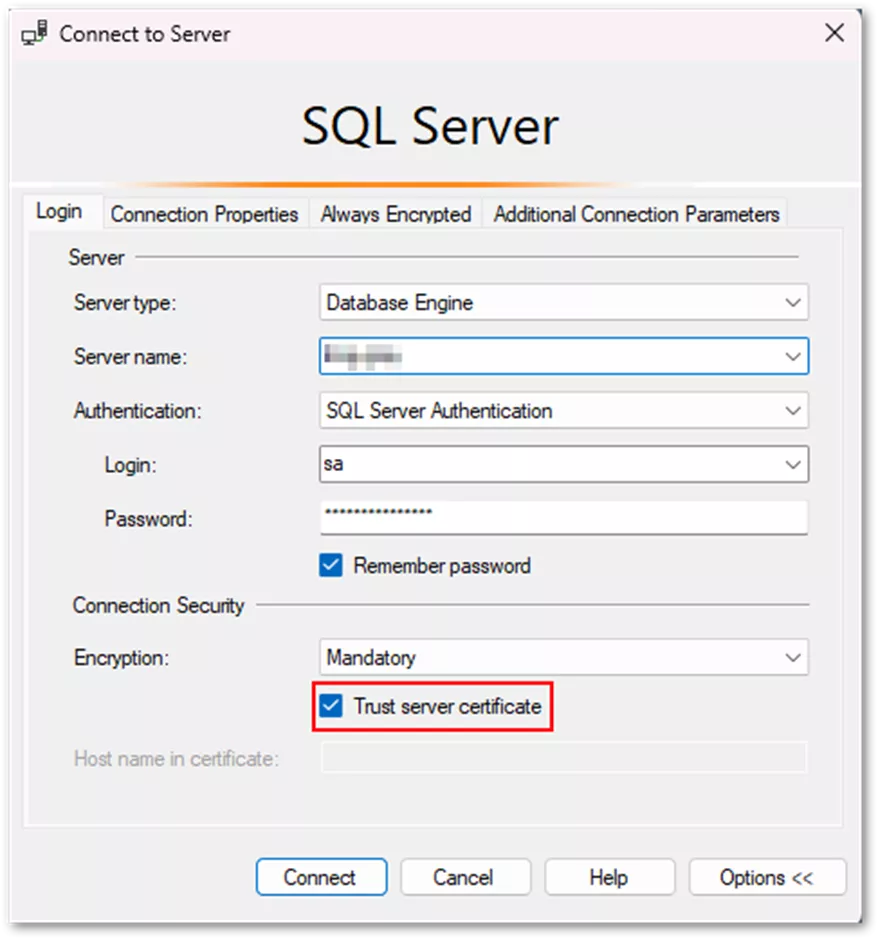
- If you’re using a newer version of SQL, check the Trust server certificate box as well.
- Right-click Databases from Object Explorer and select Restore Database…
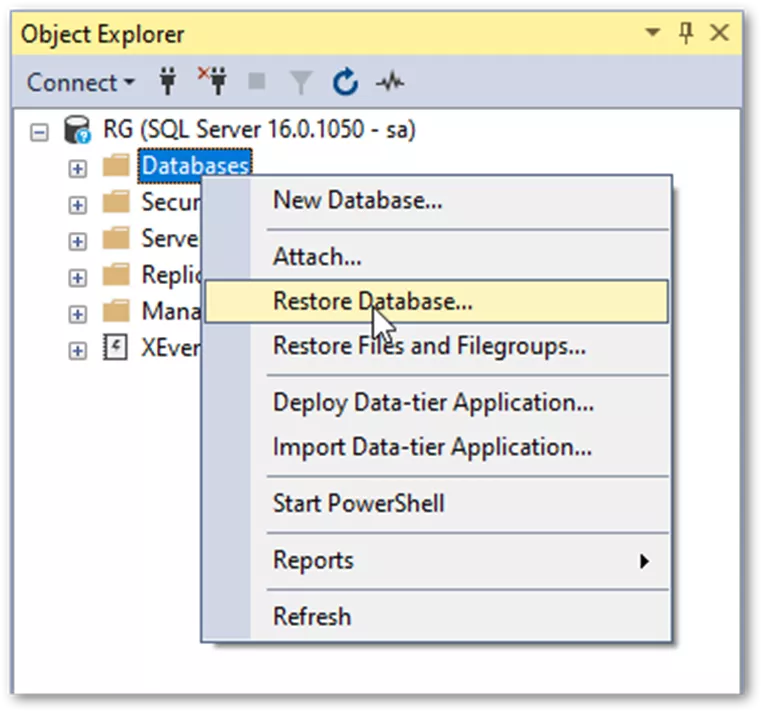
- In the Restore Database window, switch the Source to Device. Then click the … button to the right.
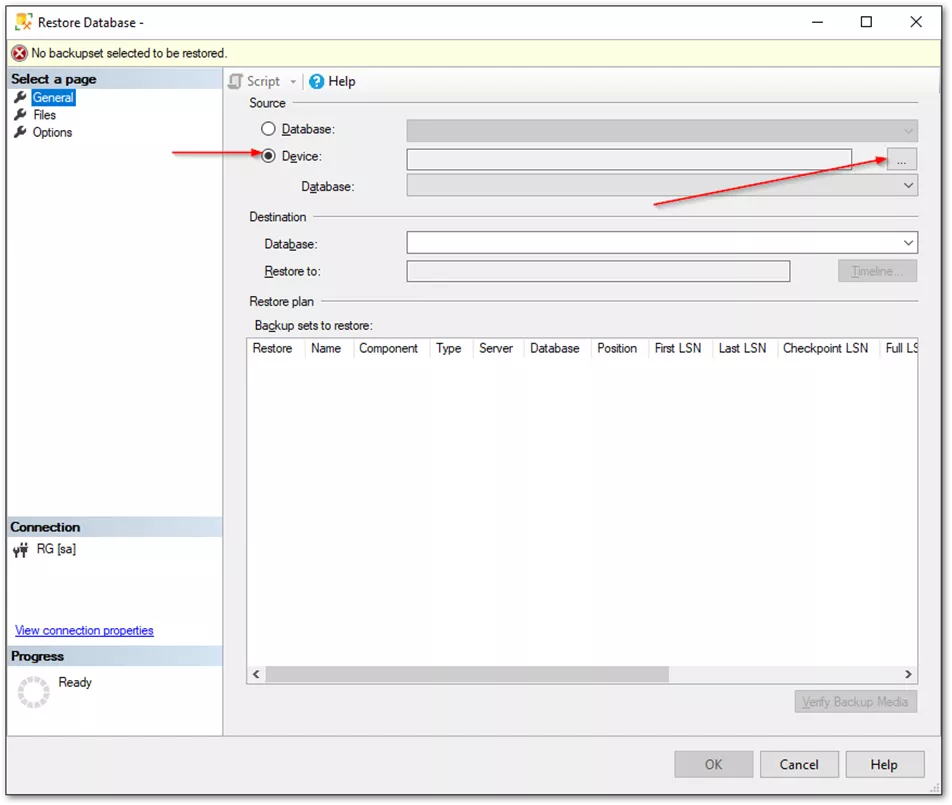
- In the Select backup devices screen, click Add and select one of the .bak database backup files (order doesn’t matter).
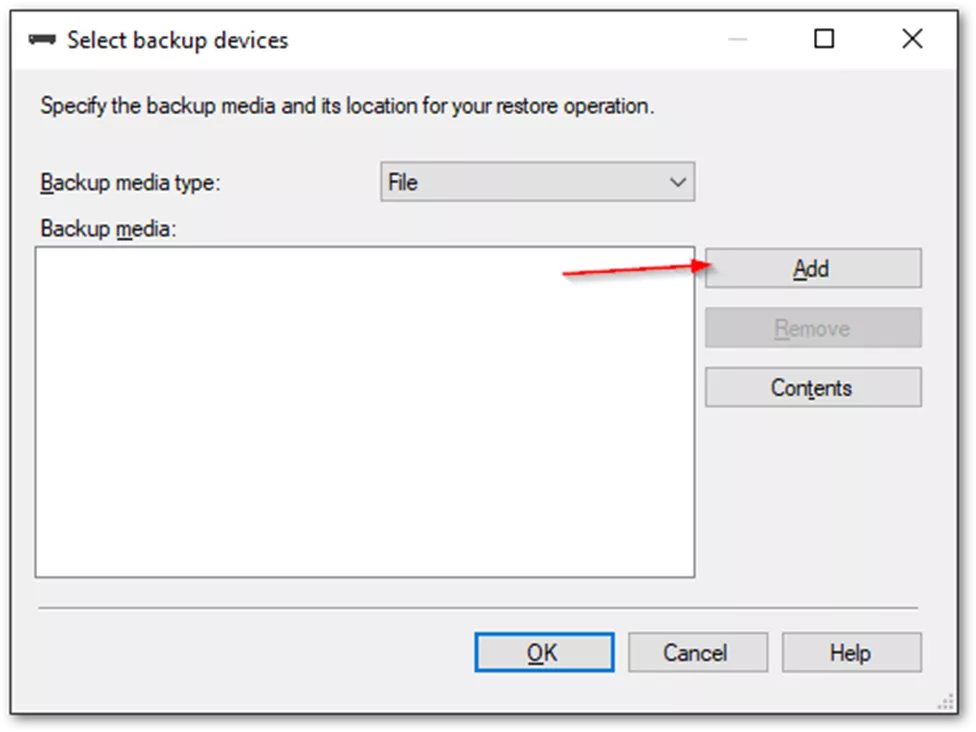
- When finished, click OK and head back to the Restore Database screen.
- Go to the Options tab from the left menu.
- Check the Overwrite the existing database (WITH REPLACE) box.
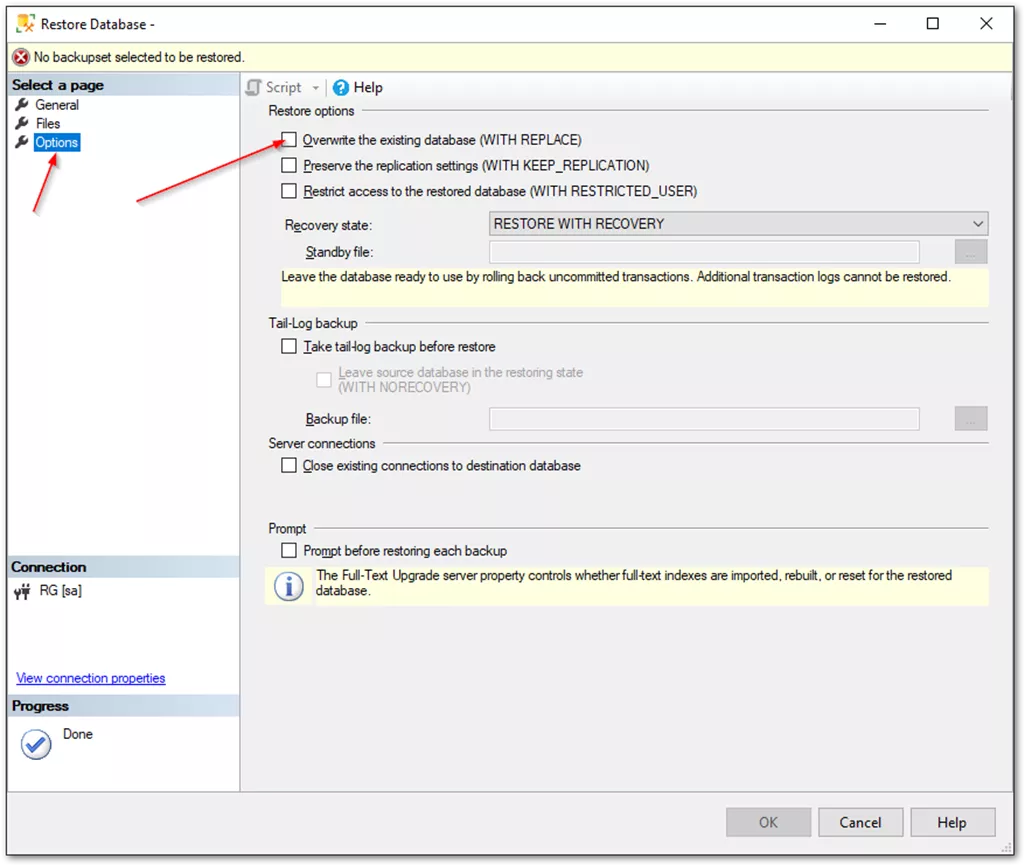
- Then click OK to complete the restore action. You should get a message saying the restore was successful.
- Using the same steps, repeat for all other databases. You should have one for the ConisioMasterDb and one for your vault.
ReCreate the Archive Registry
This step only applies if you’re missing the Archive Settings backup.dat file. If you have the file, skip to the Restore the Archive Settings section.
If you don’t have the Archive Settings backup, you’ll need to run the Create Archive from Database tool. This recreates the base registry keys and archive folder path for your vault that the backup would normally contain.
This tool comes from the SOLIDWORKS Knowledge Base. You can find this under QA00000105359, or you can download it directly from GoEngineer.
You’ll want to download the file set to the server itself and unzip the contents. There are multiple versions of the tool based on what version of SOLIDWORKS PDM you’re running. You can keep only the version that you need and discard the rest. Extract that version to an accessible spot and be sure to keep the executable and .dll files in the same parent folder.
- QA00000105359_CreateArchiveFromDb_v3.zip – You must use this file with SOLIDWORKS PDM 2020 Professional and Standard and later versions.
- QA00000105359_CreateArchiveFromDb_v2.zip – You must use this file with SOLIDWORKS PDM 2016 Professional and Standard and later versions. You can also use this file with SOLIDWORKS Enterprise PDM 2015 x64 and older versions. **RECOMMENDED VERSION**
- QA00000105359_CreateArchiveFromDb_v1_2015.zip – You can only use this file with SOLIDWORKS Enterprise PDM 2015 and older versions (including older versions that support a 32-bit archive server).
- Right-click the ArcServCreator.exe that corresponds to your version of PDM and select Run as Administrator.

- You’ll want to enter the following info:
- SQL-Server: This would be the name (and instance name if applicable) of your SQL server hosting PDM.
- SQL-Database: This would be the name of your vault database as seen in Object Explorer via SQL Server Management Studios. Be sure to match casing, spelling, and spacing exactly. It’s very important.
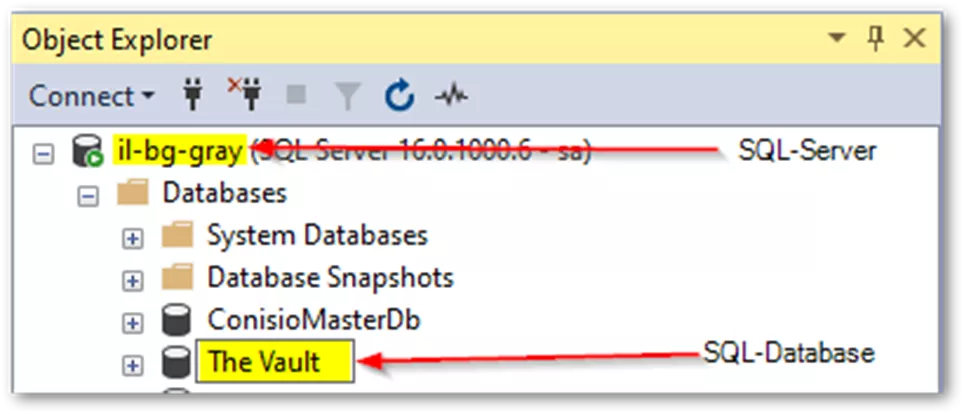
- SQL-User/Password: This will be the SA user and password you set when initially installing PDM.
- Archive root folder: This is where the archive folders will be stored. When possible, it’s good to use the same path as the original server, though this isn’t required. You’ll want to ensure this is put somewhere that has enough storage space for your vault’s data, including growth potential. The default location for the archives is under “C:\Program Files\SOLIDWORKS Corp\SOLIDWORKS PDM\Data\”.
- When ready, hit Create. You’ll get a pop-up asking if you’d like to update the SytemInfo & ArchiveServer tables. Click No.
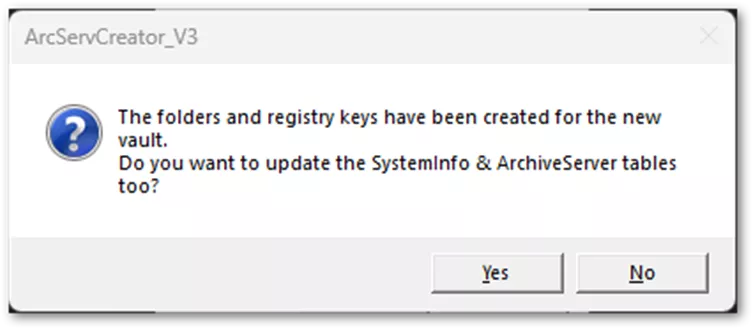
- This creates the basic foundation the archive needs to run, but you’ll still need to go into the Archive Server Configuration tool to re-configure lost settings from your original vault - like PDM vs Windows logins, Attach Access, automatic login, etc.
Now that you’re finished with this, you can move on to the Update the Database section.
Restore the Archive Server Settings
The archive server settings include all the settings entered at the Archive Server Configuration Tool - like defined login types and passwords, as well as many of the registry keys created for the archive that the vault needs to run.
- On the Archive Server, start the Archive Server Configuration Tool from Start > Programs > SOLIDWORKS PDM > Archive Server Configuration.
- If you attempt to access the tool and it fails to open, try looking in the system tray for the blueberry and manila folder icons. It may already be running in the background.
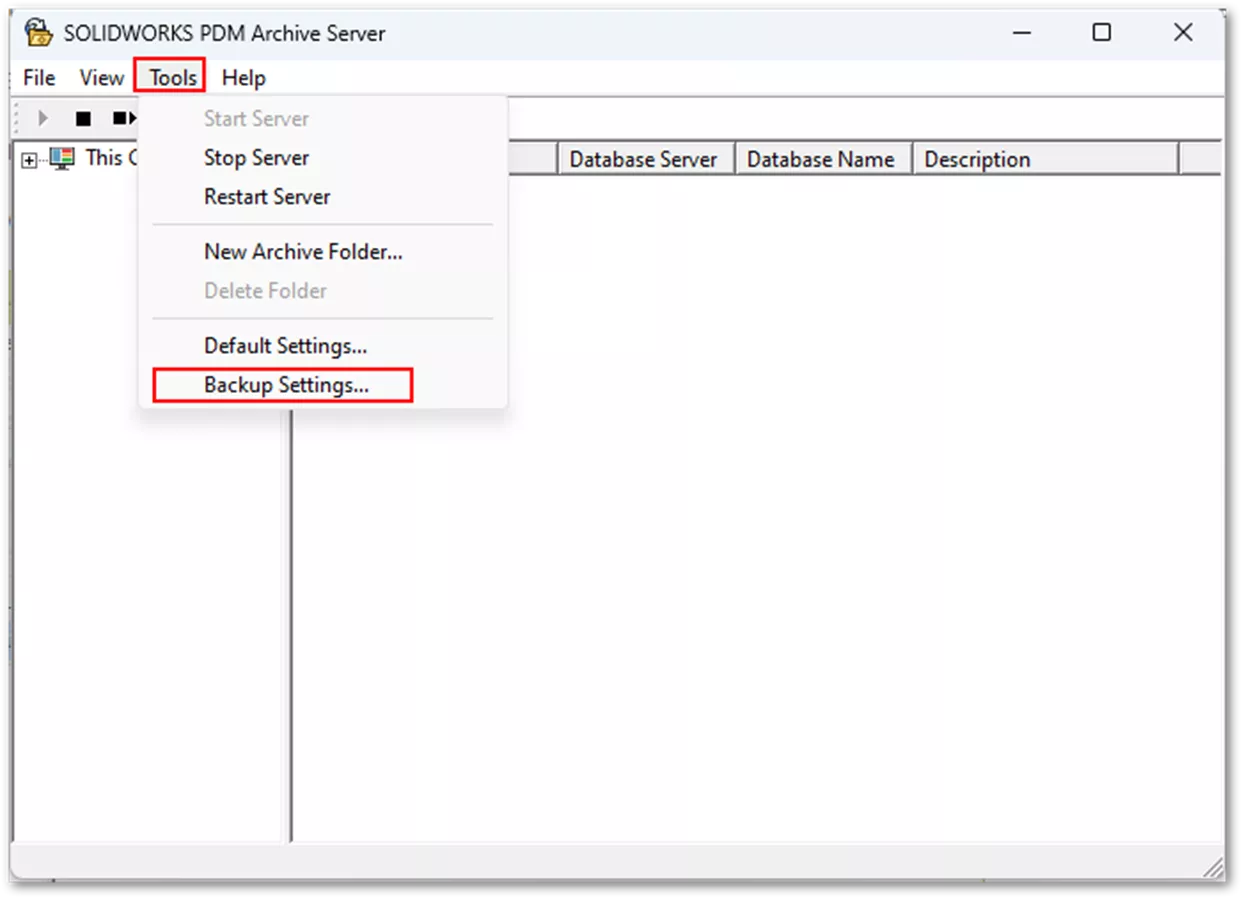
- Once in the Archive Server Configuration Tool, select Tools > Backup Settings...
- In the Backup Settings screen, select Load backup… then navigate to the location of the Backup.dat file and select it.
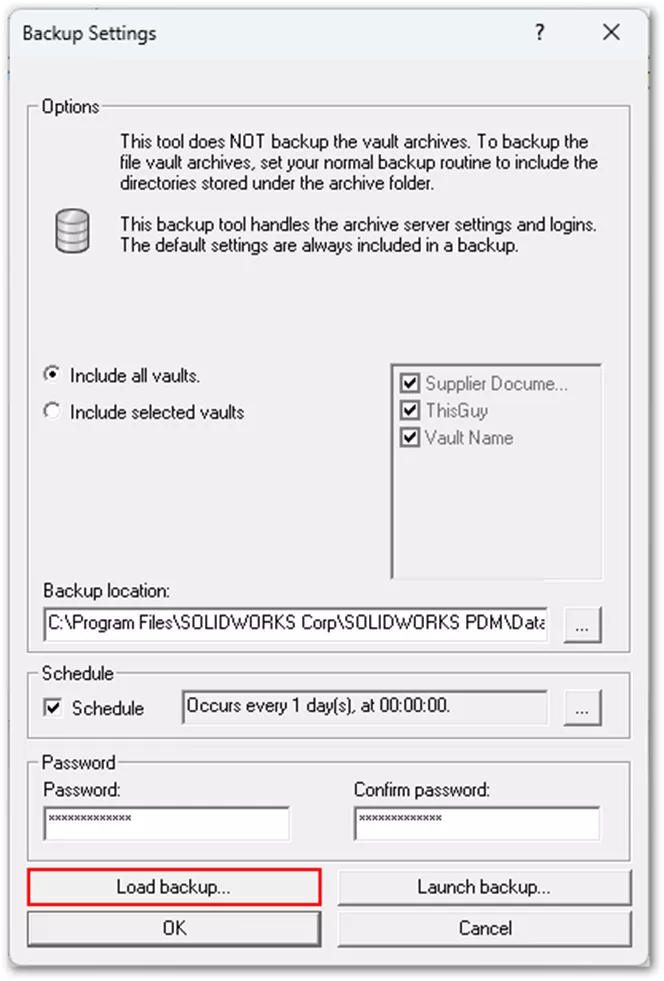
- If you’re prompted for a password, either enter the password when creating the backup originally or leave it blank if there isn’t one.
- Once it completes, you’ll get a notification saying the backup loaded successfully.
Restore the Archive Folders
Copy the 16 archive folders (0-9 and a-f) and all of their content to the path you want to store the archives on the new server. This can be done using a regular Windows drag and drop, or using something more sophisticated like a Robocopy command in the command line. The default location for the archives is under “C:\Program Files\SOLIDWORKS Corp\SOLIDWORKS PDM\Data\”, though you can store it anywhere local to the server. You’ll want to ensure this is put somewhere that has enough storage space for your vault’s data, including growth potential.
For ease of setup, it’s best to maintain the exact same file path between the older server and the new. So, if the archives were located under “C:\Program Files\SOLIDWORKS Corp\SOLIDWORKS PDM\Data\Vault Name” on the old server, then recreate that path on the new server and place the folders there. If this isn’t possible, there will be instructions on updating the archive folder paths in the registry under the Update the Registry section later on.
Update the Databases
When you restore the databases, they contain the archive server name for the original server that hosted your PDM. If your restored server has the same name as your original server, you don’t need to update these values. If you’re not 100% sure, however, it’s best to check and confirm just to be safe.
- Open SQL Server Management Studio.
- Connect to your vault’s SQL instance using the SA credentials.
- From Object Explorer, expand Databases > Your Vault Database > Tables.
- Find dbo.ArchiveServers and right-click > Edit Top 200 Rows.
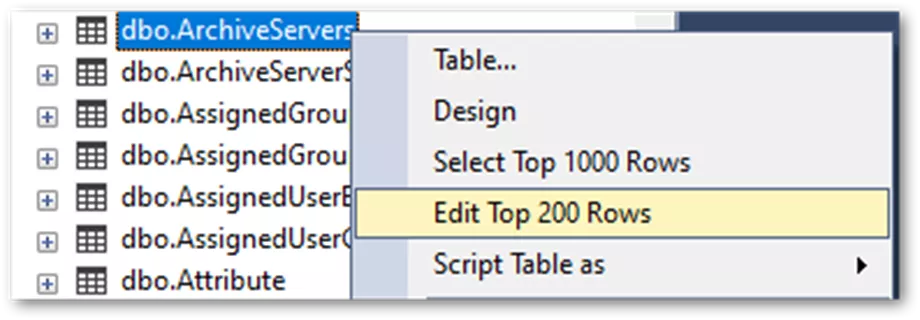
- Find the old archive server name under the ArchiveServerName column, click into it, and edit the field to reflect the new name. Hit Enter or click into another field to commit the changes.

- Locate the dbo.SystemInfo table, right-click > Edit Top 200 Rows, and update the ArchiveServerName field to reflect the new server as well. Hit Enter or click into another field to commit the changes.

- Navigate to the ConisioMasterDb and expand Tables. Right-click the dbo.LicenseServer table > Edit Top 200 Rows.
- Update the PortAtHost column where your previous license server is called out and update it with the new license server name, formatted as: 25734@servername. Hit Enter or click into another field to commit the changes.
Update the Registry
- Once the restore of your database components has been completed, you’ll need to update registry values for both the archive and database.
- Open the Windows Registry Editor by searching “regedit” in the Start menu.

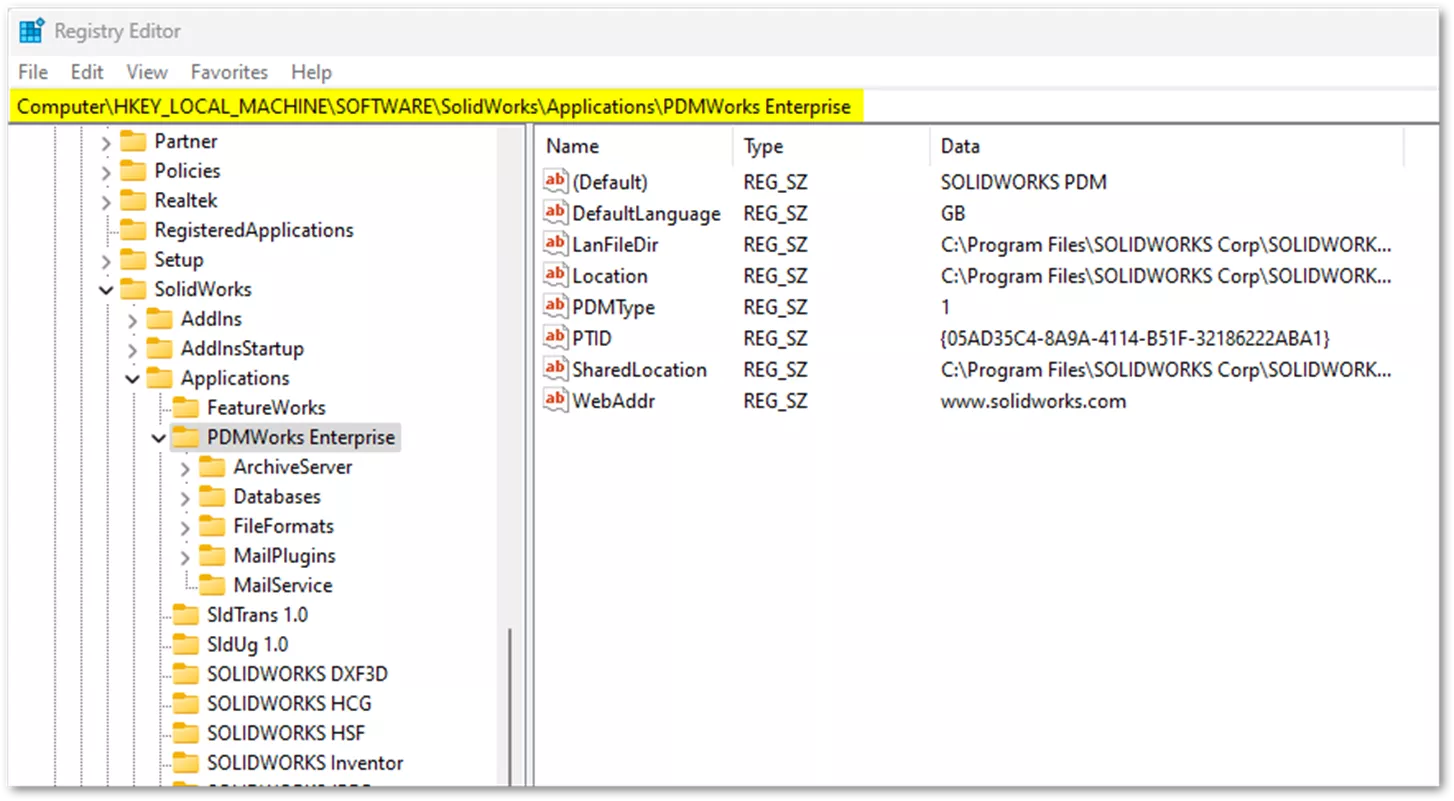
- Navigate to the following keys and update the specified values by double-clicking the name under the Name column:
- Computer\HKEY_LOCAL_MACHINE\SOFTWARE\SolidWorks\Applications\PDMWorks Enterprise\MailService\Server
- Server: SQL server name (and instance name, if applicable)
- Computer\HKEY_LOCAL_MACHINE\SOFTWARE\SolidWorks\Applications\PDMWorks Enterprise\ArchiveServer\Vaults\Vault Name
- Server: SQL server name (and instance name, if applicable)
- SQLDbName: This should match the name of the restored vault database from SQL Server Management Studio under Databases in Object Explorer (Be sure not to change DbName, only SQLDbName).
- Computer\HKEY_LOCAL_MACHINE\SOFTWARE\SolidWorks\Applications\PDMWorks Enterprise\ArchiveServer\Vaults\Vault Name\ArchiveTable
- Update each of the ArchiveTable# keys to reflect the path of the corresponding archive folder.
- If you moved the archive folders to a different path on the new server than on the old, ensure this is reflected here.
- For example, ArchiveTable0 would need to have the full path (including drive letter) to the corresponding 0 folder, like so: C:\Program Files\SOLIDWORKS Corp\SOLIDWORKS PDM\Data\Vault Name\0
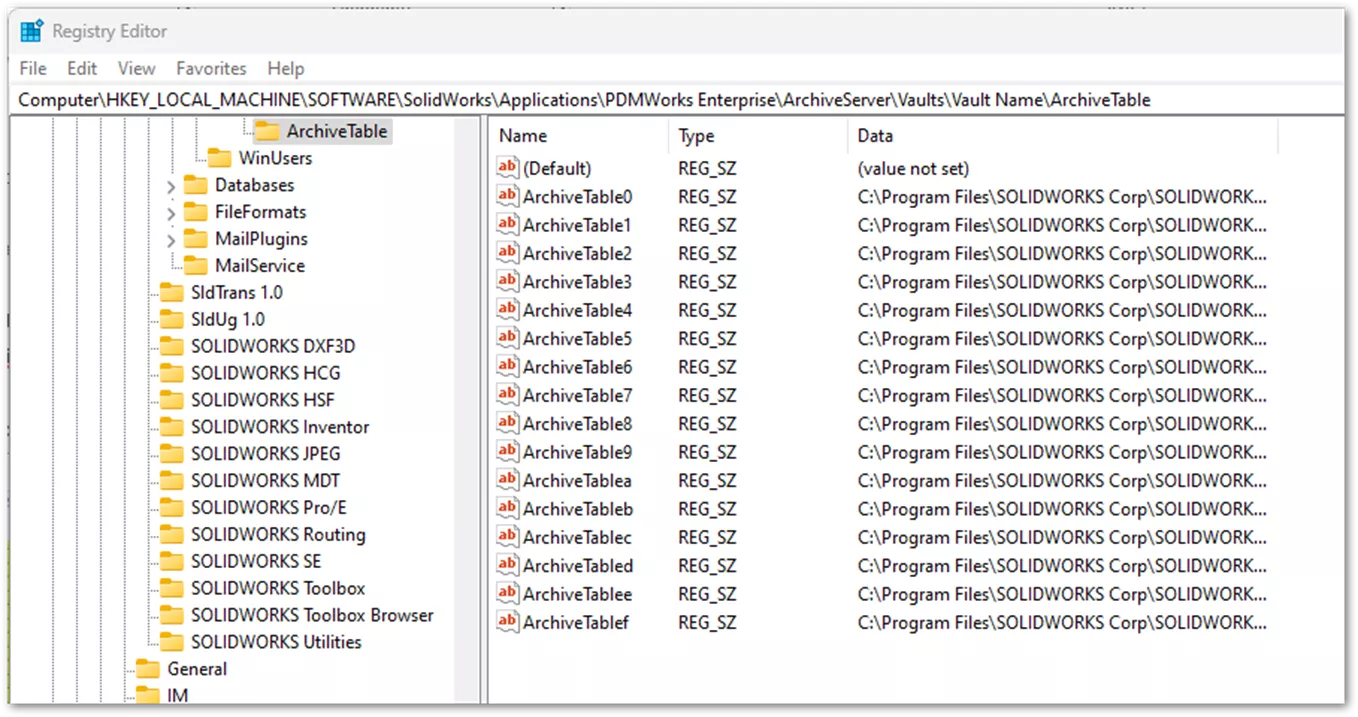
- Update each of the ArchiveTable# keys to reflect the path of the corresponding archive folder.
- Computer\HKEY_LOCAL_MACHINE\SOFTWARE\SolidWorks\Applications\PDMWorks Enterprise\MailService\Server
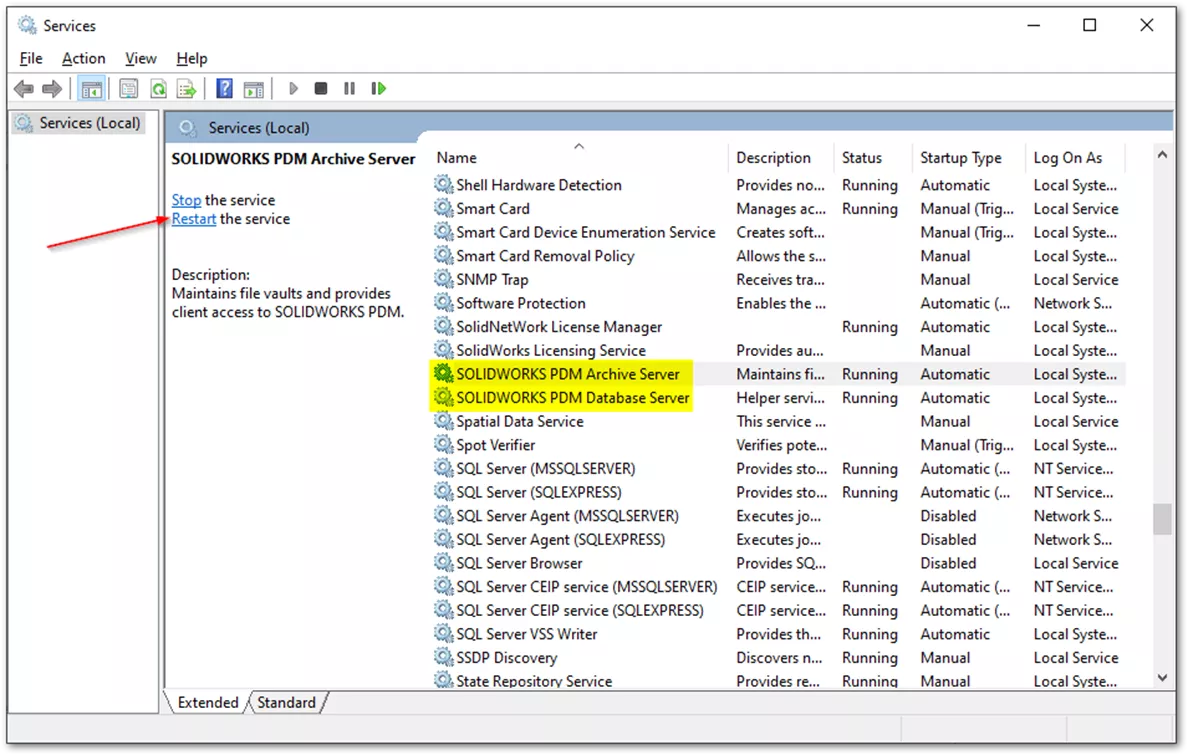
- Restart the PDM Services. You can do so by searching “Services” from the Start menu.
- Locate SOLIDWORKS PDM Archive Server and SOLIDWORKS PDM Database Server (they may be on separate machines, depending on how you installed your server components).
- Select each one and click Restart. The services can be restarted in any order.
Testing the Restore on the Server
You should have a client installed on your PDM server setup, and this allows us to log in to the Administration tool and the vault view directly on the server (which can be very useful in many troubleshooting or testing situations). We’re going to test both the administration login and the vault view login. To start, open up the Administration tool on the server and confirm your vault shows up in the list on the top left under SOLIDWORKS PDM Administration. If it doesn’t show right away, try right-clicking the server name > Refresh.
If you can successfully log in to the admin tool, go ahead and create a vault view on the server. If you aren’t sure of the steps, check out the Create Local View section of our Vault View Deletion and Creation guide. If that succeeds, then you’re ready to move on to the final step – updating the client machines to point to the new server.
Pointing the Clients to the New Server
Note: This section only applies if your server name changed from the original server. If the server name remained the same, you can skip these steps.
On each client machine, you’ll need to open the Registry Editor by searching ‘regedit’ from the Start menu. Then you’ll navigate to each key and update specific value to reflect the new server name. It’s recommended to start by updating only one client machine at first to ensure everything works before moving on to the rest.
For Shared Vault Views:
- HKEY_LOCAL_MACHINE\SOFTWARE\SOLIDWORKS\Applications\PDMWorks Enterprise\Databases\Vault Name
- ServerLoc: The new archive server name
- DbServer: The new SQL server name and instance name if applicable
- HKEY_LOCAL_MACHINE\SOFTWARE\Wow6432Node\SOLIDWORKS\Applications\PDMWorks Enterprise\Databases\Vault Name
- ServerLoc: The new archive server name
- DbServer: The new SQL server name and instance name if applicable
For Private Vault Views:
- Computer\HKEY_CURRENT_USER\SOFTWARE\SolidWorks\Applications\PDMWorks Enterprise\Vaults\Vault Name
- ServerLoc: The new archive server name
- DbServer: The new SQL server name and instance name if applicable
Delete the following key on all clients:
HKEY_CURRENT_USER\Software\SOLIDWORKS\Applications\PDMWorks Enterprise\ConisioAdmin
Always reboot client machines after registry changes are made for these updates to take effect and be sure to try logging in on both the administration tool and the vault view to ensure everything looks right.
Summary
Your vault contains your company’s intellectual property and is often vital for day-to-day operation. Restoring a PDM server can be complicated, and this guide only covers the most smooth, basic restoration process. Every environment is different, and there may be complicating variables that need to be accounted for in order for a successful move. If you don’t feel confident in any of the steps listed in this guide, we highly recommend contacting our Services Team to look into having the restore done as a paid project by GoEngineer.
Related Articles
SOLIDWORKS PDM Standard Automated SQL Backups
SOLIDWORKS PDM Professional Automated SQL Backups
SOLIDWORKS PDM 2025 - What's New
How to Install the SOLIDWORKS PDM Server

About Rowan Gray
Rowan Gray is a Technical Support Team Lead at GoEngineer with a specialty in SOLIDWORKS PDM and related data/lifecycle management. They have been with GoEngineer since 2020, and have a strong IT background that helps them more fully support customers with whatever issues may arise in their PDM environment. In their free time they enjoy playing video games, crocheting, and spoiling their pets.
Get our wide array of technical resources delivered right to your inbox.
Unsubscribe at any time.
