Global Variables in SOLIDWORKS Explained
Global variables in SOLIDWORKS are user-defined names that are assigned numeric values. These can be used directly in a dimension or used in an equation. They make it easier to understand and modify equations.
For example, in the image below, we want the bottom line to always be twice the thickness of the top portion. When you double click on the dimension for the bottom line, we can add the equation =’D1@Sketch1’*2 with D1@Sketch1 being the .50 dimension.
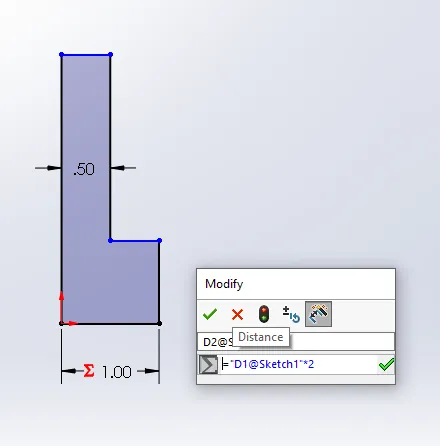
This is not confusing because so far, in this part, there are only two dimensions. But 50 or 100 dimensions later, it can cause confusion. If we use a global variable, this becomes much clearer.
In the image below, I have created a global variable called Th for the thickness of the part.
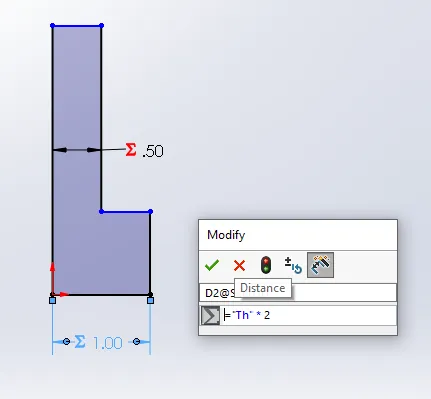
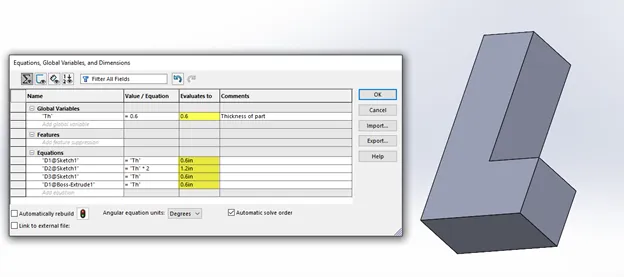
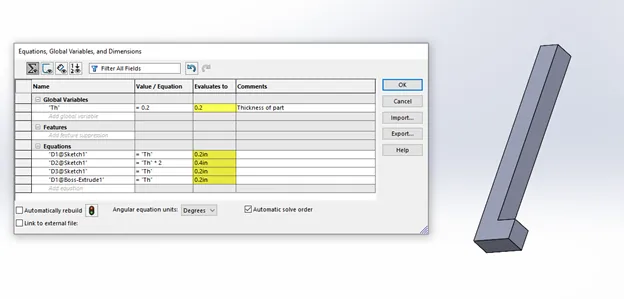
If I ever want to verify the value of Th and/or wish to change it, I can open the Equation Manager located in Tools > Equations. Here you can see and modify all the equations and global variables. Alternately you can right-click on the Equations Folder in the feature tree and select Modify equations.
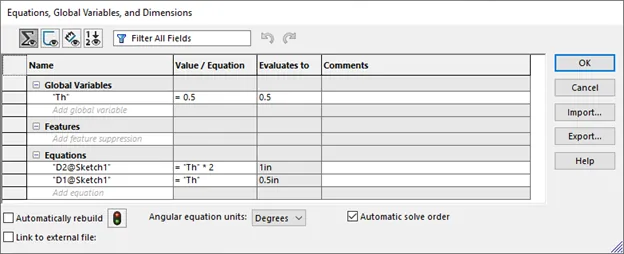
As you can see, I have one global variable and two equations. One is equal to Th, and the other is twice the size. I can easily adjust the value of Th from .5 to .6, and the values for the equations will adjust accordingly.
To create a global variable, you can use the equation manager and add a line in the global variables section of the table.
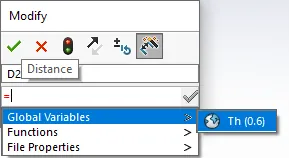
Another way is to double click on a dimension and, in the dimension field, type = followed by the variable name; the text will turn gold and there will be a globe icon that pops up. This lets you know SOLIDWORKS is going to create a global variable.
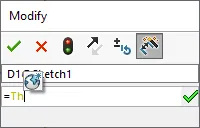
With this global variable created, you can now use it in equations by either typing it out with single quote marks, for example, ‘Th’ or if you double click a dimension you can type = and use the variable drop down menu, as seen below.
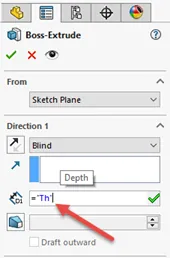
Global variables in SOLIDWORKS are not limited to one sketch but can be used through the whole part making it convenient to modify many dimensions at once. In the images below, I used our global variable to specify the depth of the extrude and then modified Th from .6 to .2.
I hope you found this tutorial helpful. Check out more SOLIDWORKS tips and tricks below.
More SOLIDWORKS Tutorials
Virtual Components: Parts that Aren't Parts
Creating Multiple Parts from One Part File in SOLIDWORKS
Save SOLIDWORKS Assembly as Part and Preserve Geometry References
How to Create an Extrude-Cut on a Curved Surface in SOLIDWORKS

About Brandon Harris
Brandon is a BYU-Idaho graduate with a Bachelor’s Degree in Mechanical Engineering. He is an avid tinkerer, and consummate rapid prototype hobbyist with prior experience designing for the Architectural/Construction industry. Brandon is part of the technical support team for GoEngineer serving as a PDM specialist since August 2018.
Get our wide array of technical resources delivered right to your inbox.
Unsubscribe at any time.