How to Use AutoStack in DraftSight
This tutorial demonstrates how to use AutoStack in a DraftSight drawing to stack text that represents fractions and tolerances in leaders, smart leaders, and notes.
AutoStack is great for converting numeric characters that are divided by a pound (#), slash (/), or carat (^) to text representing fractions and tolerances.
A pound sign (#) stacks text diagonally, separated by a diagonal line. For example, 1#2 becomes ½.
A slash (/) becomes stacked text vertically, separated by a horizontal line. For example, 1/3 becomes ![]() .
.
The carat (^) will stack text vertically, but not separated by a line. This kind of stacked text usually represents tolerance values. For example, +0.25∧–0.25becomes ![]() .
.
Using the StackOptions Command
The StackOptions command can be used to:
- Determine the vertical alignment of stacked text or fraction height relative to the normal text height.
- To set stack options:
- Enter StackOptions on the command line, then specify the Align option. You will then be prompted for the vertical alignment of stacked text:
- Top aligns the top of fractions or tolerances with the cap height.
- Center aligns fractions or tolerances in the center.
- Bottom aligns the baseline of fractions or tolerances with the text baseline.
- The next command line prompt is the Size option. Type the size of stacked text as a percentage of the size of the current TextStyle in the range of 25-125% (notice the default value is 70).
Set AutoStack Defaults for Notes
When editing a Note, enter a fraction or tolerance like "x/y", "x#y", or "x^y" (where x is the top and y is the bottom) followed by a space or character.
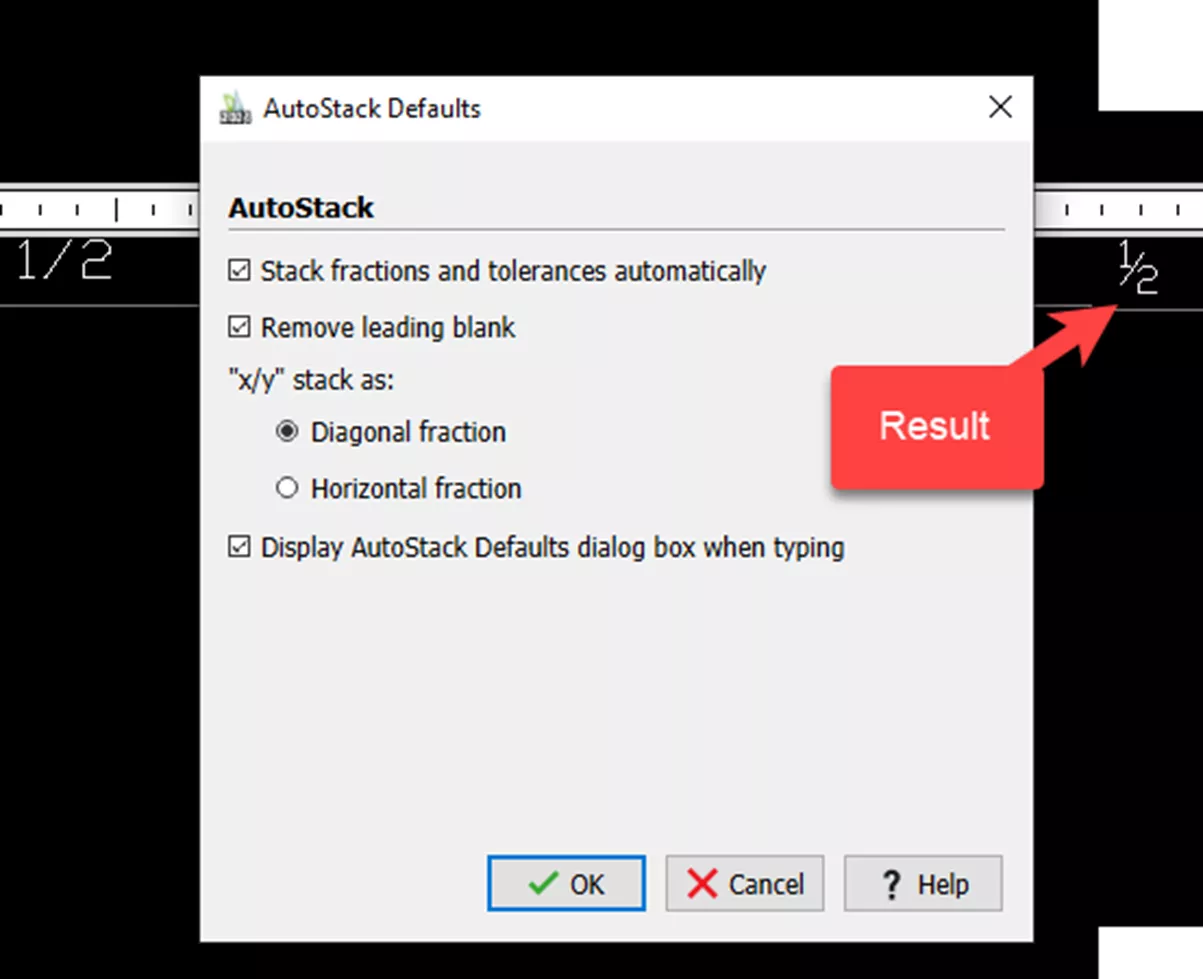
The dialog box will pop up (below), select or clear Stack fractions and tolerances automatically to specify whether to stack text automatically as you type.
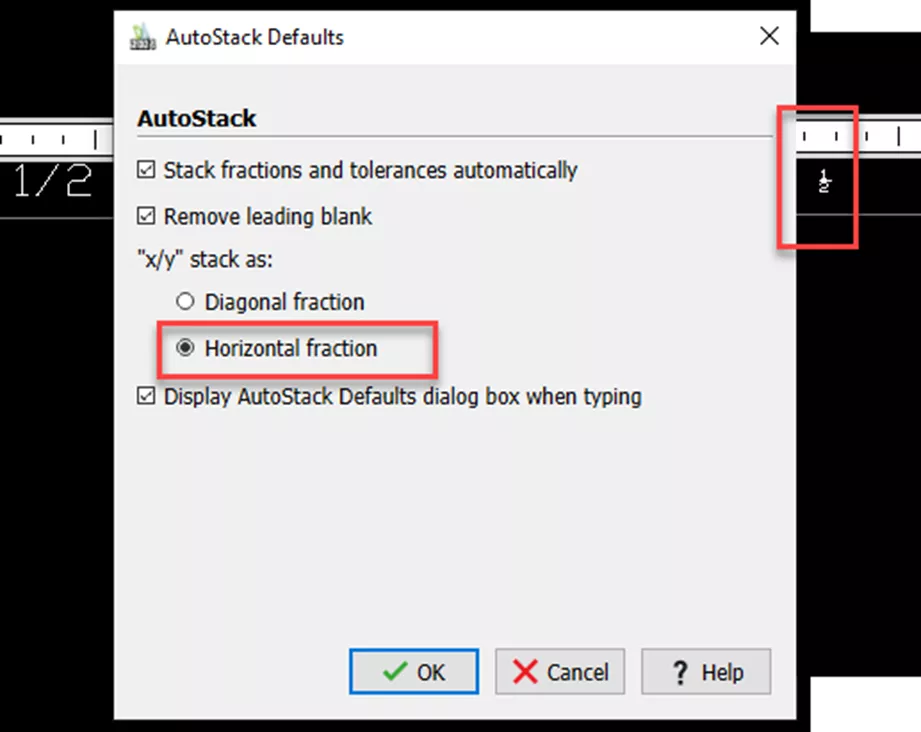
Select Remove leading blank to erase blanks between a whole number and a fraction or tolerance. For the option "x/y" stack as, specify whether to convert the stacked text in the x/y form (where a slash separates numerator and denominator) to a Decimal fraction or a Horizontal fraction.
Lastly, if you choose Display AutoStack Defaults dialog box automatically when typing, it will always display the AutoStack Default dialog box as you type stacked text. Otherwise, the dialog box does not show automatically, and the default settings are used for all subsequent stacked text. Then, just click OK.

Setting AutoStack when it has Been Disabled
Right-click an instance of stacked text and click Stack Properties.
Select AutoStack and set options as described above but change it to horizontal.

Adding a Tolerance to AutoStack Notes
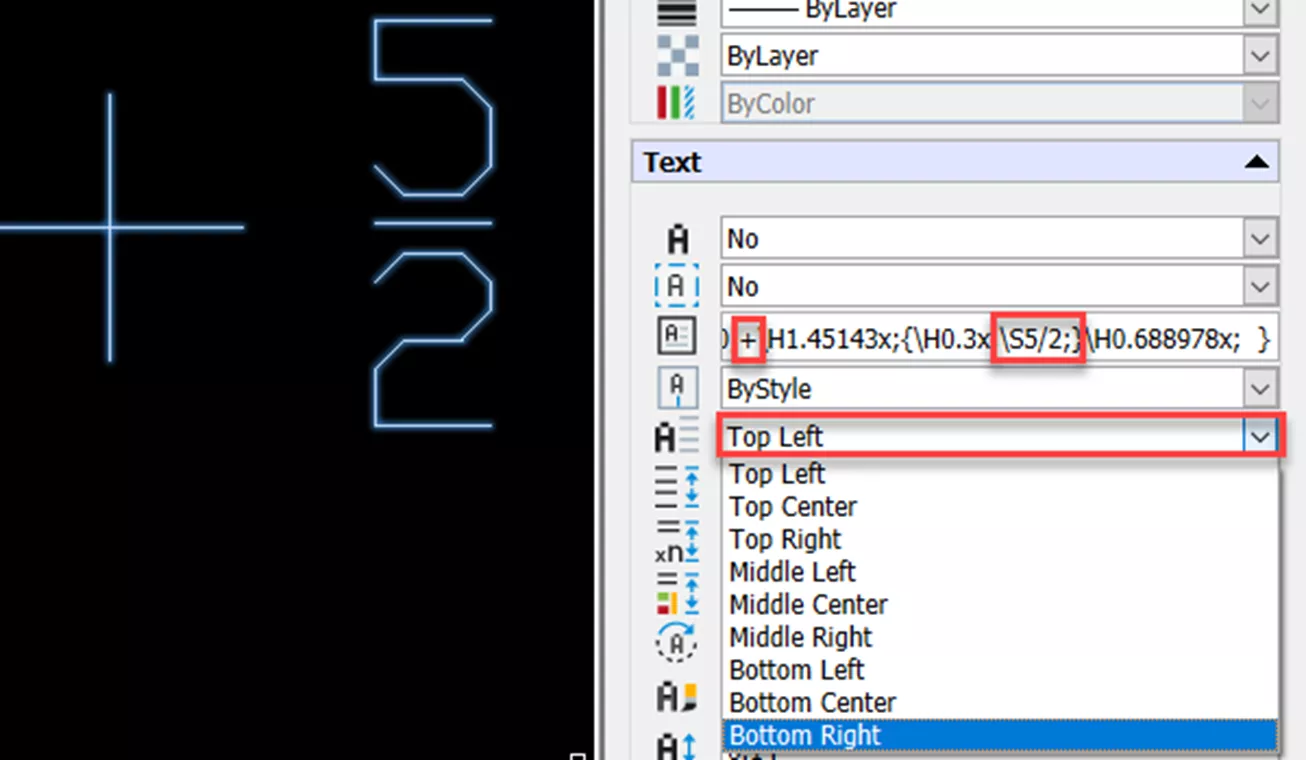
Right-click an instance of stacked text and click Stack Properties. Use the properties panel to edit Numerator and Denominator as needed, and if the stacked text represents a tolerance, enter the plus tolerance in Numerator and the minus tolerance in Denominator (shown below).
Below that, you can change the Position - three top, three middle, and three bottom.

I hope you found this DraftSight tutorial helpful. Check out more tips and tricks listed below. Additionally, join the GoEngineer Community to participate in the conversation, create forum posts, and answer questions from other DraftSight users.
Want to take your DraftSight skills to the next level? Enroll in the official DraftSight Essentials training course. This course teaches designers how to make coordinates, create drawings, and modify entities, properties, and layers.
More DraftSight Tutorials
Transfer DraftSight Workspace to New Installation
Using DraftSight Split Dimension
DraftSight Performance Troubleshooting Tips
DraftSight PrintStyle Tables Explained - Named vs Color-Dependent

About Randle Wood
Randle is a Technical Support & New Products Specialist and has been with GoEngineer since 2009. He has a Bachelors of Science in Industrial Design and has been a SOLIDWORKS user since before the turn of the century.
Get our wide array of technical resources delivered right to your inbox.
Unsubscribe at any time.
