Using Virtual Sharps in SOLIDWORKS for Dimensioning
In-process Virtual Sharps
A common method for dimensioning requires dimensioning to a point that exists where two features (e.g., edges, curves, lines, arcs, etc.) would intersect if those features were extended. In SOLIDWORKS, this is called a Virtual Sharp and it is a feature that can be utilized in sketches and drawings as a reference. Prior to the 2014 release, the user had to create these virtual points before being able to use them, and even then, the user had to know the hidden way to do this.
To do that required the following steps:
- Select two non-parallel entities (they do have to eventually intersect!)
- Select the point command from the Sketch Toolbar
- This places a point, defined by the two entities that were selected, where they would intersect.
The issue with this is that you had to preselect and create the virtual sharps before initiating the Dimension Tool. This is annoying because you have to stop and restart the dimensioning command every time you wanted to use the Virtual Sharp feature. Not exactly a smooth method of adding to the productivity level of the user.
In the 2014 release of SOLIDWORKS, they added a way to streamline this process or create the virtual points as you go. They added the Find Intersection option to a drop-down menu.
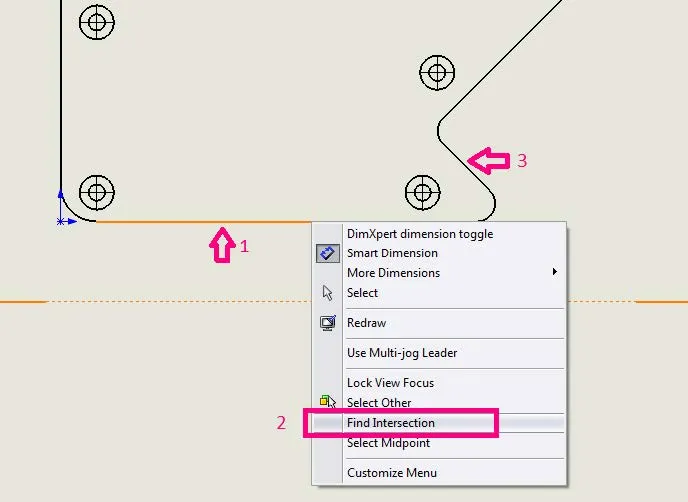
To use this new feature (see above illustration):
- With the Smart Dimension tool already active, right-click on the first of the features to be used for the dimension
- Select Find Intersection from the pop-down menu
- Click on the other feature that is used to create the intersection. The first dimension feature is now attached to that virtual point
- You can now select the second feature of the dimension or right-click on the second element as listed above to create a second virtual sharp
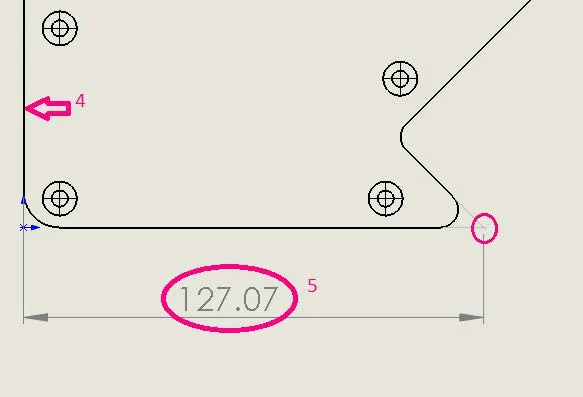
- Place the dimension.
As you can see with this process, the user doesn’t have to stop the dimension operation to place the virtual sharps. They can be done within the process. The old way still works too.
I hope you found this quick tip helpful. Check out more SOLIDWORKS tips and tricks below.
More SOLIDWORKS Tutorials
SOLIDWORKS Combine Feature Tutorial
Working with Exploded Views in SOLIDWORKS
Inserting Model Dimensions in a SOLIDWORKS Drawing
SOLIDWORKS Path Mate Explained
![]()
About GoEngineer
GoEngineer delivers software, technology, and expertise that enable companies to unlock design innovation and deliver better products faster. With more than 40 years of experience and tens of thousands of customers in high tech, medical, machine design, energy and other industries, GoEngineer provides best-in-class design solutions from SOLIDWORKS CAD, Stratasys 3D printing, Creaform & Artec 3D scanning, CAMWorks, PLM, and more
Get our wide array of technical resources delivered right to your inbox.
Unsubscribe at any time.