Upgrading SOLIDWORKS Manage
Upgrading a SOLIDWORKS Manage instance isn’t difficult if you follow the correct steps. In this guide, we walk through the process to get you moving forward. Let's get started.
Steps to Upgrade SOLIDWORKS Manage
The following steps are involved to upgrade SOLIDWORKS Manage.
- Upgrade the SolidNetWork License (SNL) Manager
- Upgrade SOLIDWORKS Manage Server
- Upgrade SOLIDWORKS PDM (if PDM Object is attached)
- Upgrade PDM Database (if PDM Object is attached)
- Upgrade SOLIDWORKS Manage Client(s)
- Upgrade SOLIDWORKS Manage Database
Before the Upgrade
Before starting any major change to the environment, all files should be checked into Manage and PDM. No users should be attempting to work in PDM nor Manage until the server upgrade has been completed.
Once all files are checked-in, a full backup of the environment should be made.
Upgrading the Server Components
For this article, we will assume that each of these components is on the same server. If they are not, then for each of the server components this process must be completed separately on their respective servers.
Start the upgrade process by launching the SOLIDWORKS Installation Manager. On the first page, we select server products and check the box for the products we are upgrading. This will include the SOLIDWORKS Manage Server, SOLIDWORKS PDM Server, and SolidNetWorks License Manager.
With these checked, click Next.
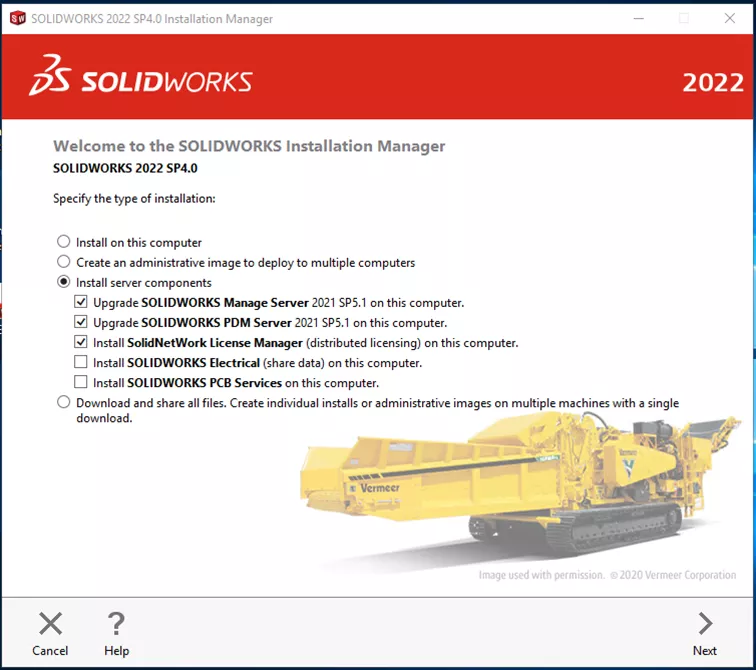
The Installation Manager should detect the already existing serial numbers and enter them into the dialog for the SNL automatically.
It will also check the system and then move to the Summary screen, where we will confirm the Manage settings for the upgrade.
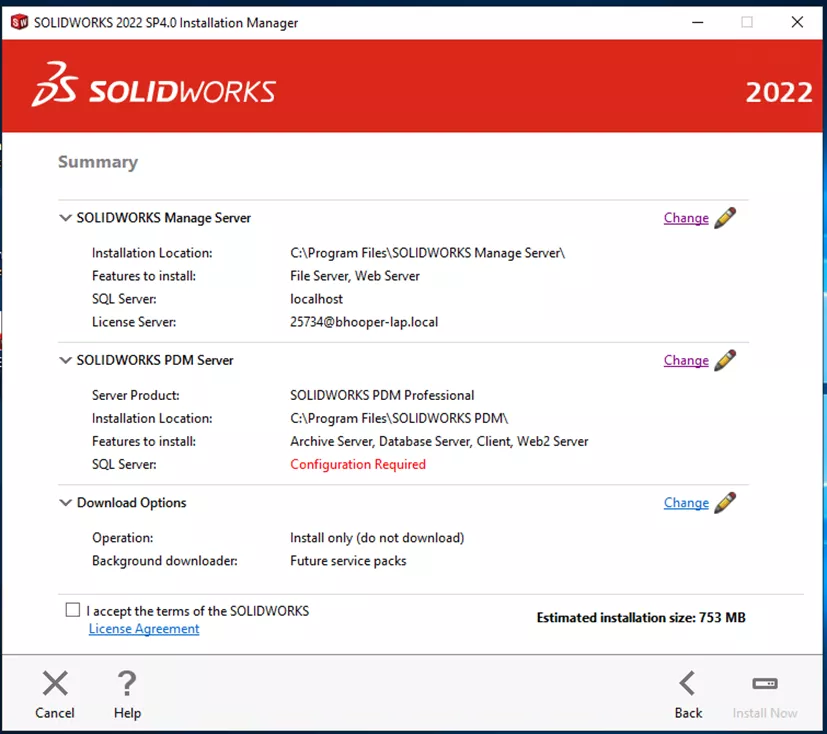
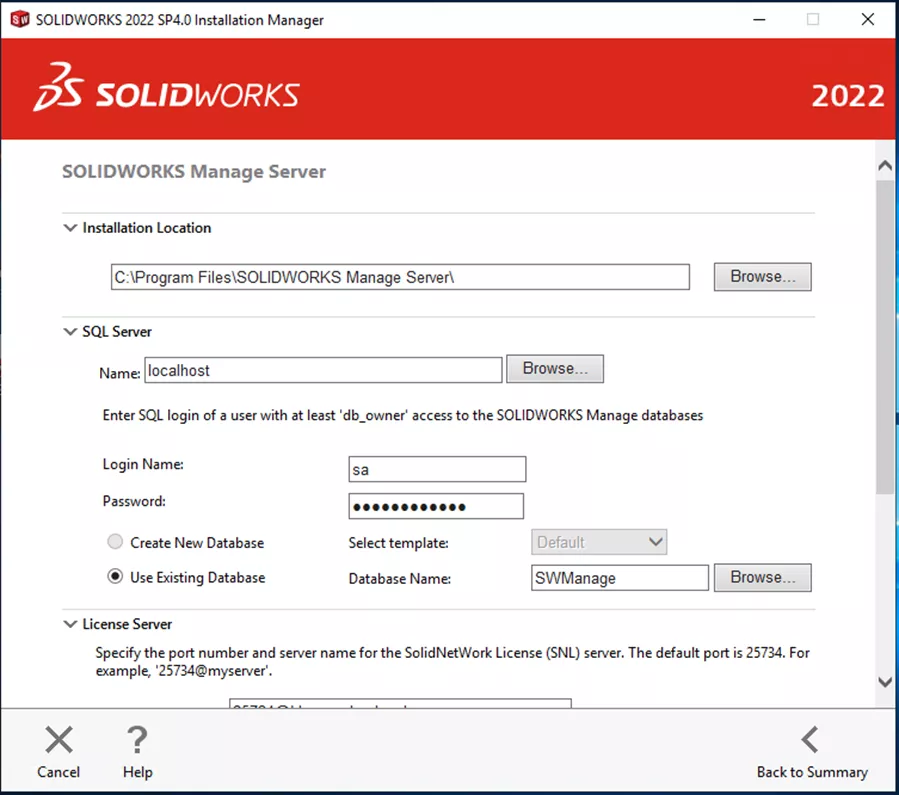
Click the Change link for SOLIDWORKS Manage Server to change the settings. It is possible that much of this does not need to be changed.
On this page, confirm that the SQL Server and credentials are correct. Note that the installer will use an existing database - not create a new one.
At the bottom of this screen, specify the license server location and what features to install. With an upgrade, these should already be automatically selected for the parts that are already installed.
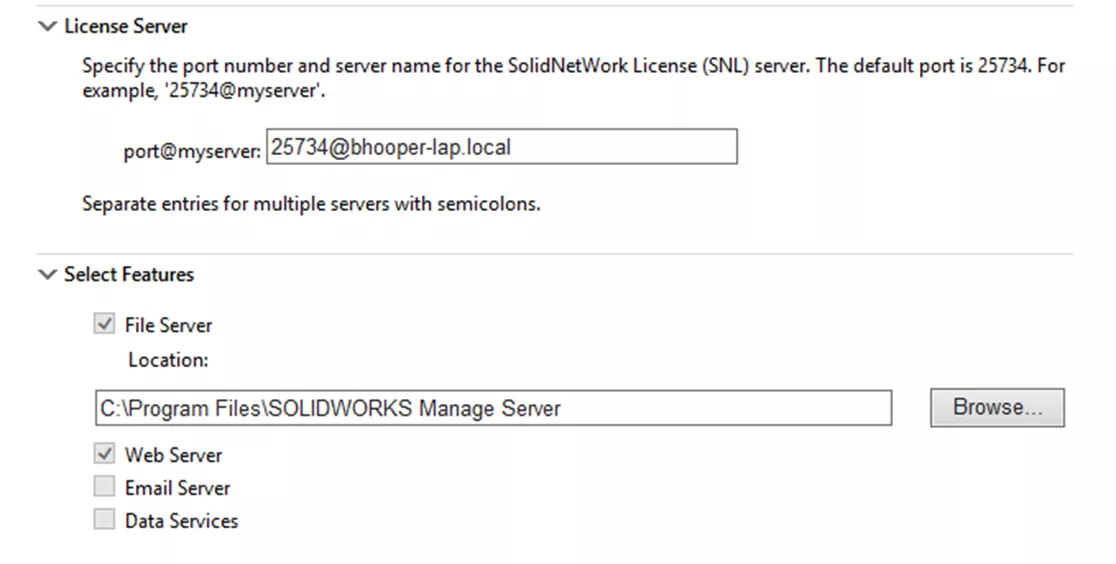
Once complete, click Back to Summary. If upgrading SOLIDWORKS PDM, click the change button and select the SQL server. Input your credentials and click Back to Summary again.
Accept the terms and conditions and click Install now.
Upgrading PDM Database
After upgrading the server application, we need to update the SOLIDWORKS PDM database. We can do this by navigating to the installation media folder and then SWPDMServer\Upgrade. Run the Upgrade.exe to begin the upgrade.
In the wizard that shows the first page, will be a list of steps that should have already been completed during the upgrade. Verify these steps and click Next.
On this page, either type in the SQL server name/instance or select it from the drop-down.
Clicking Next will prompt for SQL credentials. Once validated, the wizard will show us what PDM databases are available to upgrade.
Check the box for all that should be upgraded, then click Next.
Click Next, then Next again to begin the upgrade. Once complete, a confirmation of the results will be shown. Clicking Finish will exit the wizard.
More detail on the full upgrade of SOLIDWORKS PDM can be found in the SOLIDWORKS PDM Installation Guide.
Upgrading Manage Clients
SOLIDWORKS Manage clients can be upgraded using the Installation Manager. Launch the Installation Manager in the same fashion as before.
However, on the initial screen, select Individual and click Next.
Proceed through the installation until the Summary screen. On this screen, click Change for products to ensure that the Manage Client is being installed/upgraded. Once this is verified, click Back to Summary. Accept the license agreement and click Install now to proceed.
Upgrading SOLIDWORKS Manage Database
Once the client is installed, launch SOLIDWORKS Manage. The client application will now upgrade the database with the newest changes. This may take some time, but must only be done once, and any client can do it.
SOLIDWORKS Manage will open once finished. It is important to have all clients on the same version of SOLIDWORKS Manage to avoid having an older service pack ‘update’ the database by mistake.
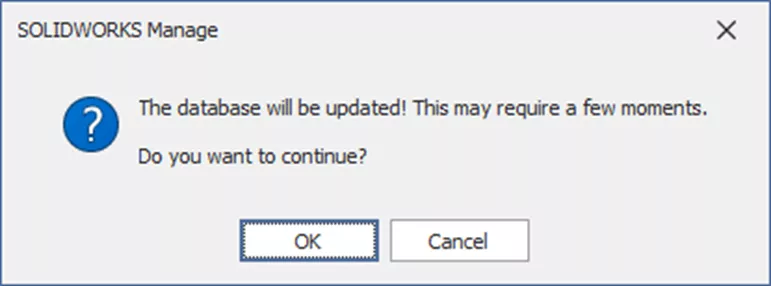
Once this is complete, the SOLIDWORKS Manage instance is fully upgraded and ready to use.
Learn More About SOLIDWORKS Manage
Restoring SOLIDWORKS Manage from Backups
Creating Reports for Records in SOLIDWORKS Manage
Exporting Record Data as XML from SOLIDWORKS Manage
SOLIDWORKS Manage: Linking External Data Sources and Importing

About Bryce Hooper
Bryce has been using SOLIDWORKS since 2008 in multiple roles across multiple industries from industrial vacuum to RV frame design. He spent many of those years spent as a PDM administrator, implementing 3 PDM vaults along the way. He earned his CSWP in 2019, followed by his CSWE in 2013. Programming is a passion that has followed Bryce through his various positions, writing custom business applications to improve design processes. In his spare time Bryce is a gamer, a maker, and a brewer.
Get our wide array of technical resources delivered right to your inbox.
Unsubscribe at any time.