Solving Mesh Failures in SOLIDWORKS Simulation with Mesh Controls
When experiencing mesh failures in SOLIDWORKS Simulation, we can resolve mesh errors using the Mesh Failure Diagnostics tool and Mesh Controls. Typically, if a study is not meshing, we need to refine the mesh by reducing the element size.
However, if we do this indiscriminately to the whole model, the mesh will take much longer to generate and the study much longer to solve. To optimize performance, we can instead apply Mesh Controls to reduce the element size just on the geometry that is failing to mesh.
![]() This article is a companion to this Quick Tip video.
This article is a companion to this Quick Tip video.
Find Geometry that is Failing to Mesh
The Mesh Failure Diagnostics button can be accessed directly from the mesh creation failed error popup dialog box.
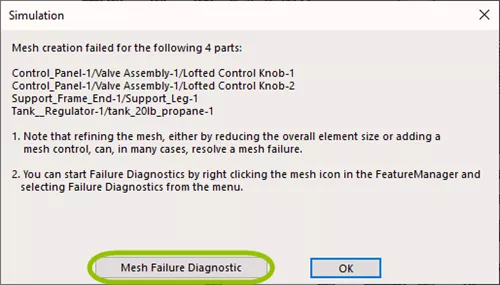
Figure 1. Mesh creation failed error dialog
If you exited out of this dialog without clicking on Mesh Failure Diagnostic, you can also get to it by right-clicking the mesh and selecting Failure Diagnostics.
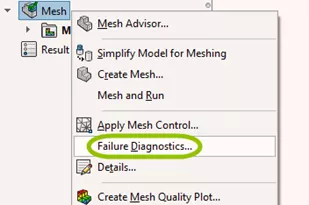
Figure 2. Failure Diagnostic option in the in-context menu
Doing so activates the Simulation Advisor tab in the Task Pane which contains a list of the components that failed to mesh. The first two links below this list change how your model is being displayed.
Show bodies which failed to mesh (pictured below) displays all the bodies that failed to mesh in the Shaded display style, while the rest of the model is set to wireframe.
Show mesh for all bodies hides the bodies that didn't mesh and displays all other components with their mesh.
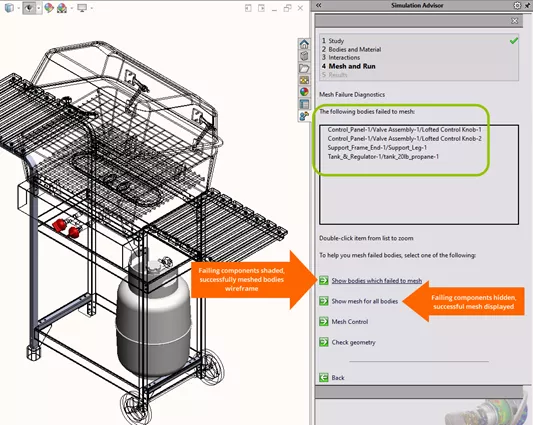
Figure 3. Mesh Failure Diagnostic user interface
Apply Mesh Controls
The Mesh Control option allows us to set a specific element size at specific geometry in your model. We can apply mesh controls to vertices, points, edges, faces, and components.
There are two parameters: Element size and Element growth ratio.
When a selected entity is meshed, the Element size is used. The Element growth ratio determines how quickly the mesh returns to the global settings as it radiates away from the geometry to which the Mesh control is applied.
We can open the Mesh Control PropertyManager directly from Mesh Failure Diagnostics. Conveniently, this allows us to populate the Selected Entities selection box by clicking items listed under The following bodies failed to mesh.
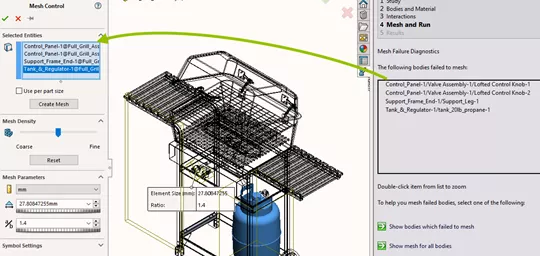
Figure 4. Mesh Control PropertyManager with Mesh Failure Diagnostic Task Pane tab
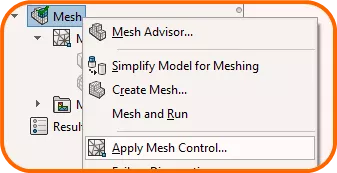
Note: You can also activate the Mesh Control PropertyManager by right clicking Mesh in the Simulation tree and selecting Apply Mesh Control.
If a whole single body part is failing to mesh and you're uncertain what element size to assign in the Mesh Control, open the part in its own window, create a new Simulation study, and mesh it.
If the mesh is generated successfully, check the mesh parameters in the Mesh PropertyManager. Take note of the global element size and return to the main study. Apply that global size as a Mesh Control to that body/component.
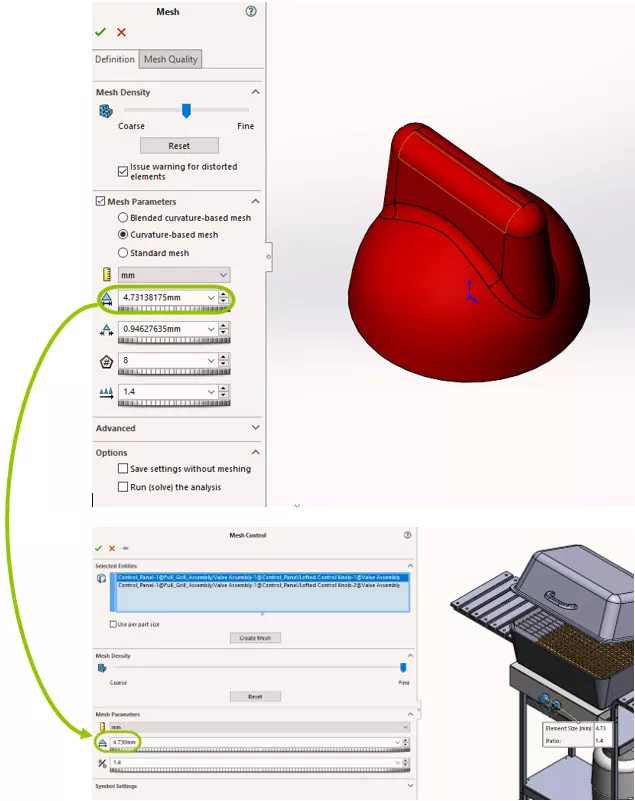
Figure 5. Part-level Mesh PropertyManager (above) and assembly-level Mesh Control PropertyManager for that same component (below)
That concludes tips for solving mesh failures in SOLIDWORKS Simulation using Mesh Controls. Check out more tips and tricks listed below.
More SOLIDWORKS Simulation Tutorials
How Do I Know My Mesh is Good Enough?
SOLIDWORKS Simulation Solution Adaptive Mesh Refinement

About Lauren McGarry
Lauren McGarry is a Certified SOLIDWORKS Expert based out of San Diego, California. She earned her Bachelor of Science degree from Case Western Reserve University and has been with GoEngineer as a Technical Support Engineer since 2016.
Get our wide array of technical resources delivered right to your inbox.
Unsubscribe at any time.