CATIA V5 to 3DEXPERIENCE CATIA: Tips for a Successful Transition
Many companies move from CATIA V5 to 3DEXPERIENCE CATIA because of its powerful collaborative features, cloud database, and live updates. In this article, we review some helpful tips when transitioning to the 3DEXPERIENCE platform and highlight features that will make your life as a designer easier.
Table of Contents
Accessing Applications/Workbenches
Adding Part Bodies and Geosets Using Context Menu
Miscellaneous Functions & Reporting Tools
Accessing Applications/Workbenches
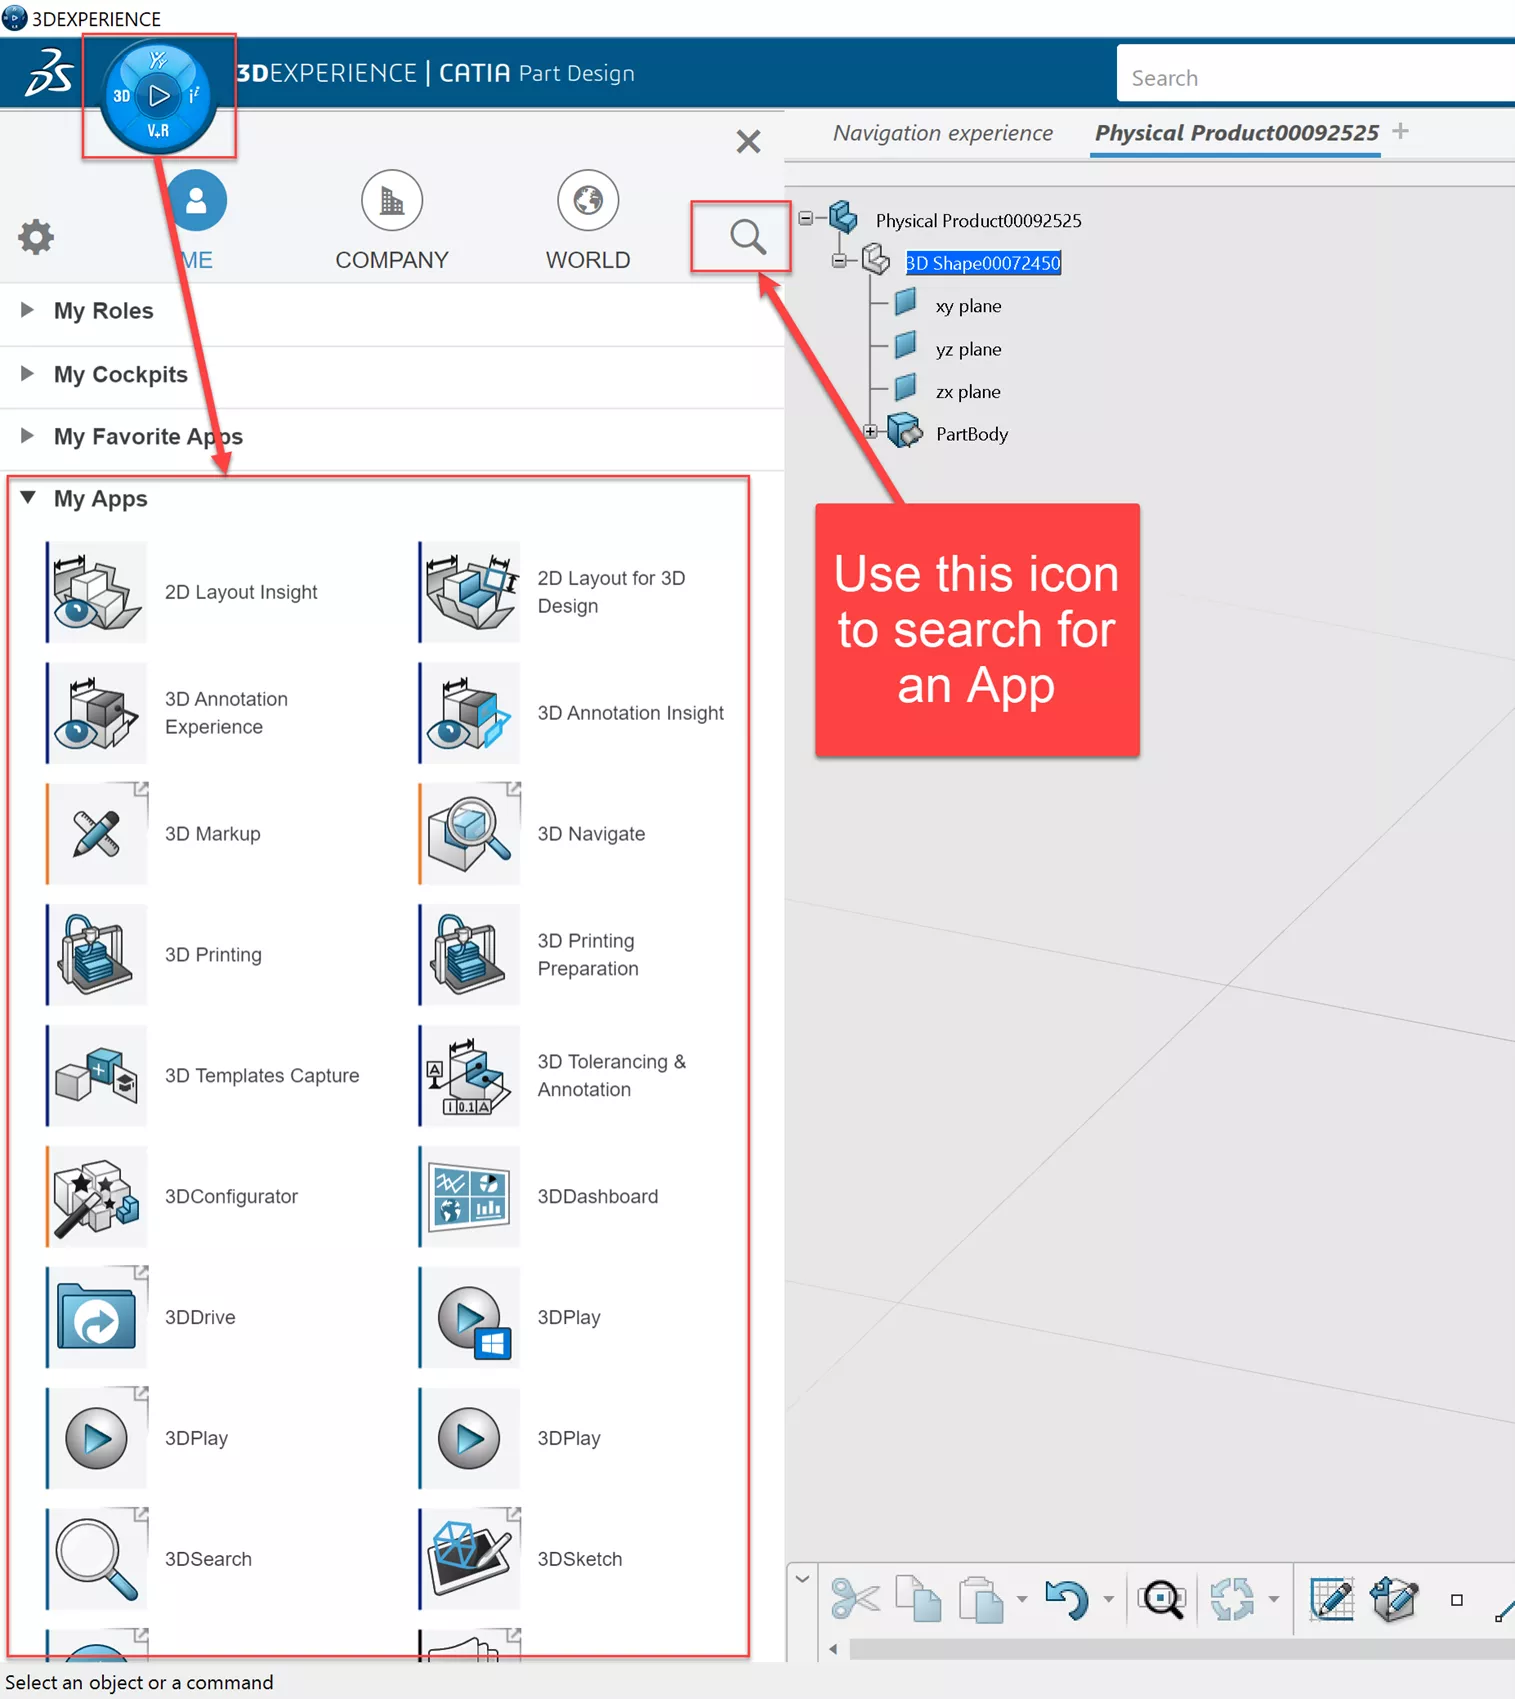
CATIA V5 Workbenches are called Applications (or Apps) within 3DEXPERIENCE. To access these apps, open the Compass (the blue circular icon on the top-left of the interface) and scroll to the app or search for it from the menu.
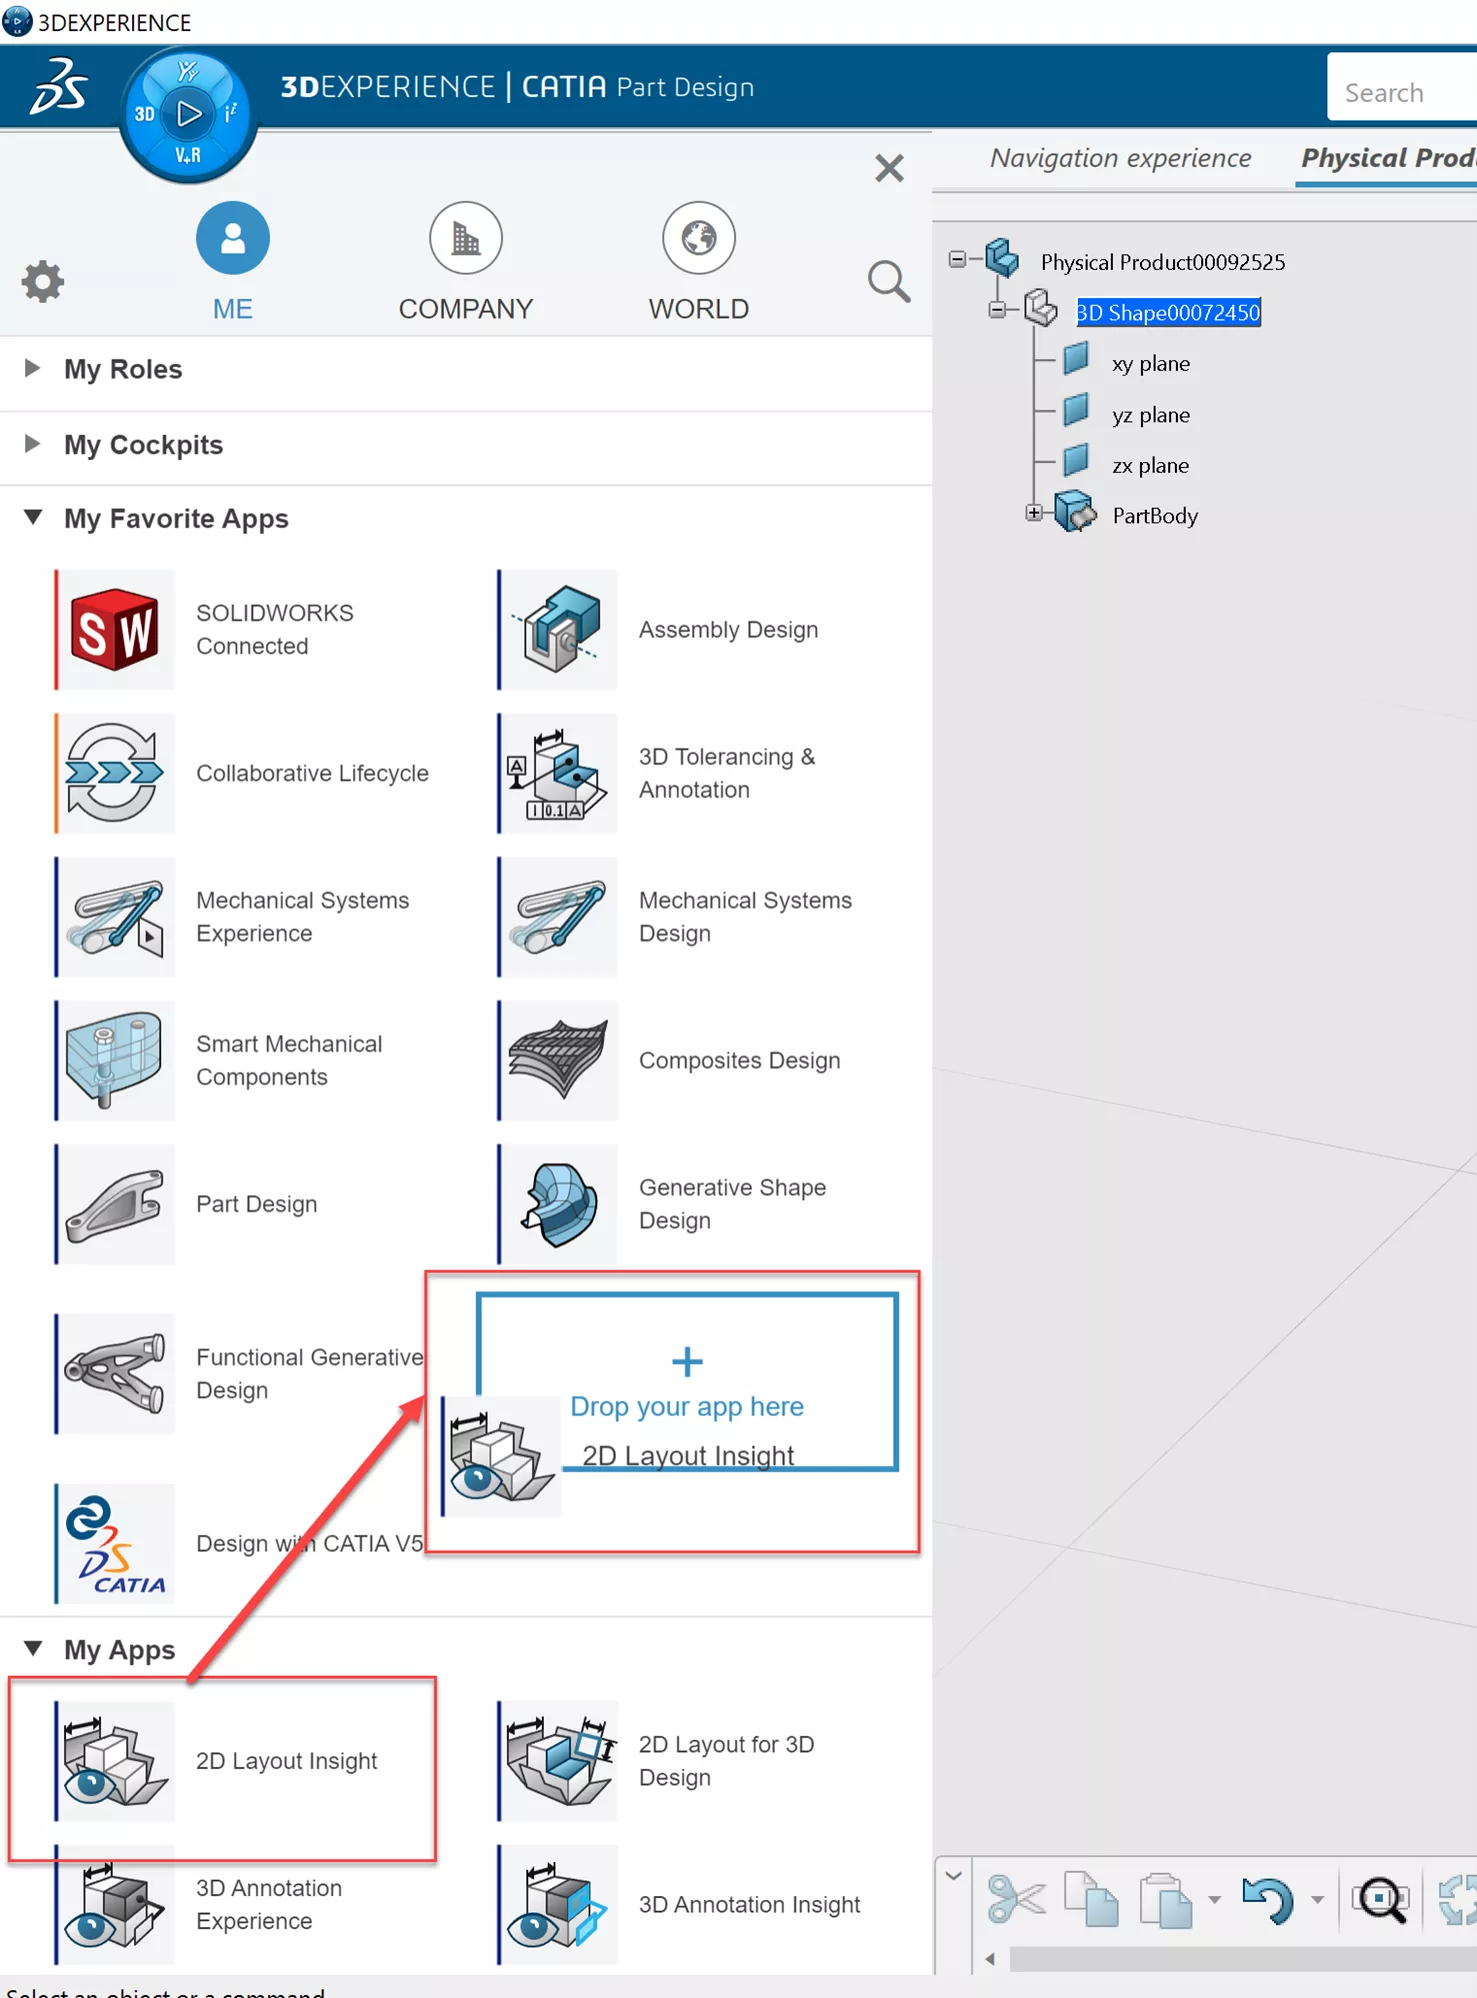
Frequently used apps can be set as a Favorite by selecting them from the Compass > Apps menu and then dragging/dropping within the Favorites portion of the Compass menu.
While selecting an app, make sure you can differentiate it from a browser-based app, as it will open within your web browser (referred to as WebApps) instead of your locally installed software (NativeApps).
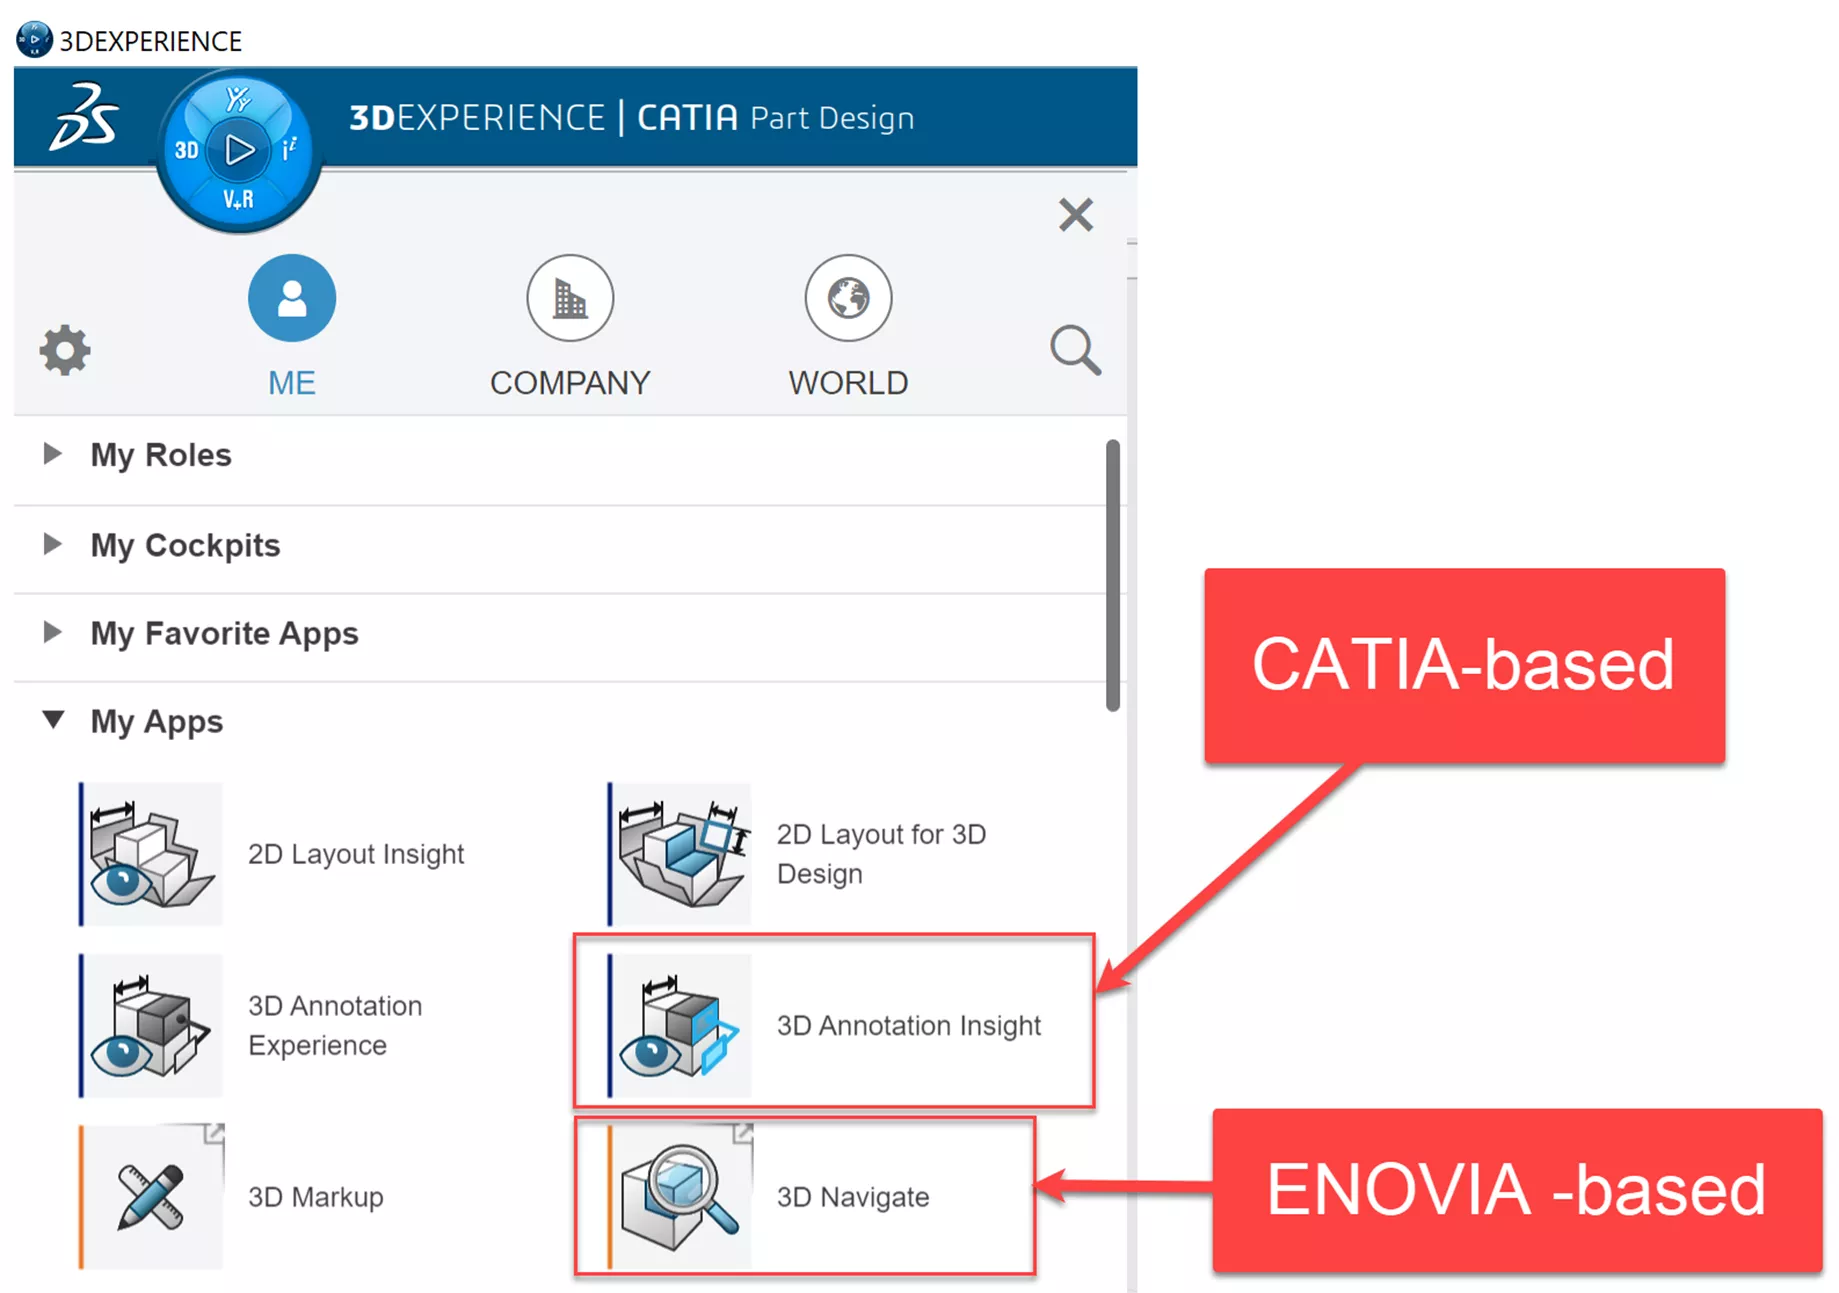
CATIA-based apps (color-coded in blue) will open within your NativeApps versus ENOVIA-based apps (color-coded in orange), which will open the WebApps. Note: There are some exceptions to this. For example, Collaborative Lifecycle is an ENOVIA app that can be opened in NativeApps.
Some CATIA-based apps will prompt your browser to open as well. Therefore, it is important to make note of the icon overlay that accompanies widgets, which will, without a doubt, open in your browser.
Widgets are apps that are used in the browser. They are called widgets because they can be “pinned” to the user’s custom page, known as the Dashboard.
- Suggested Article >> Creating a 3DEXPERIENCE Dashboard: Step-by-Step Guide
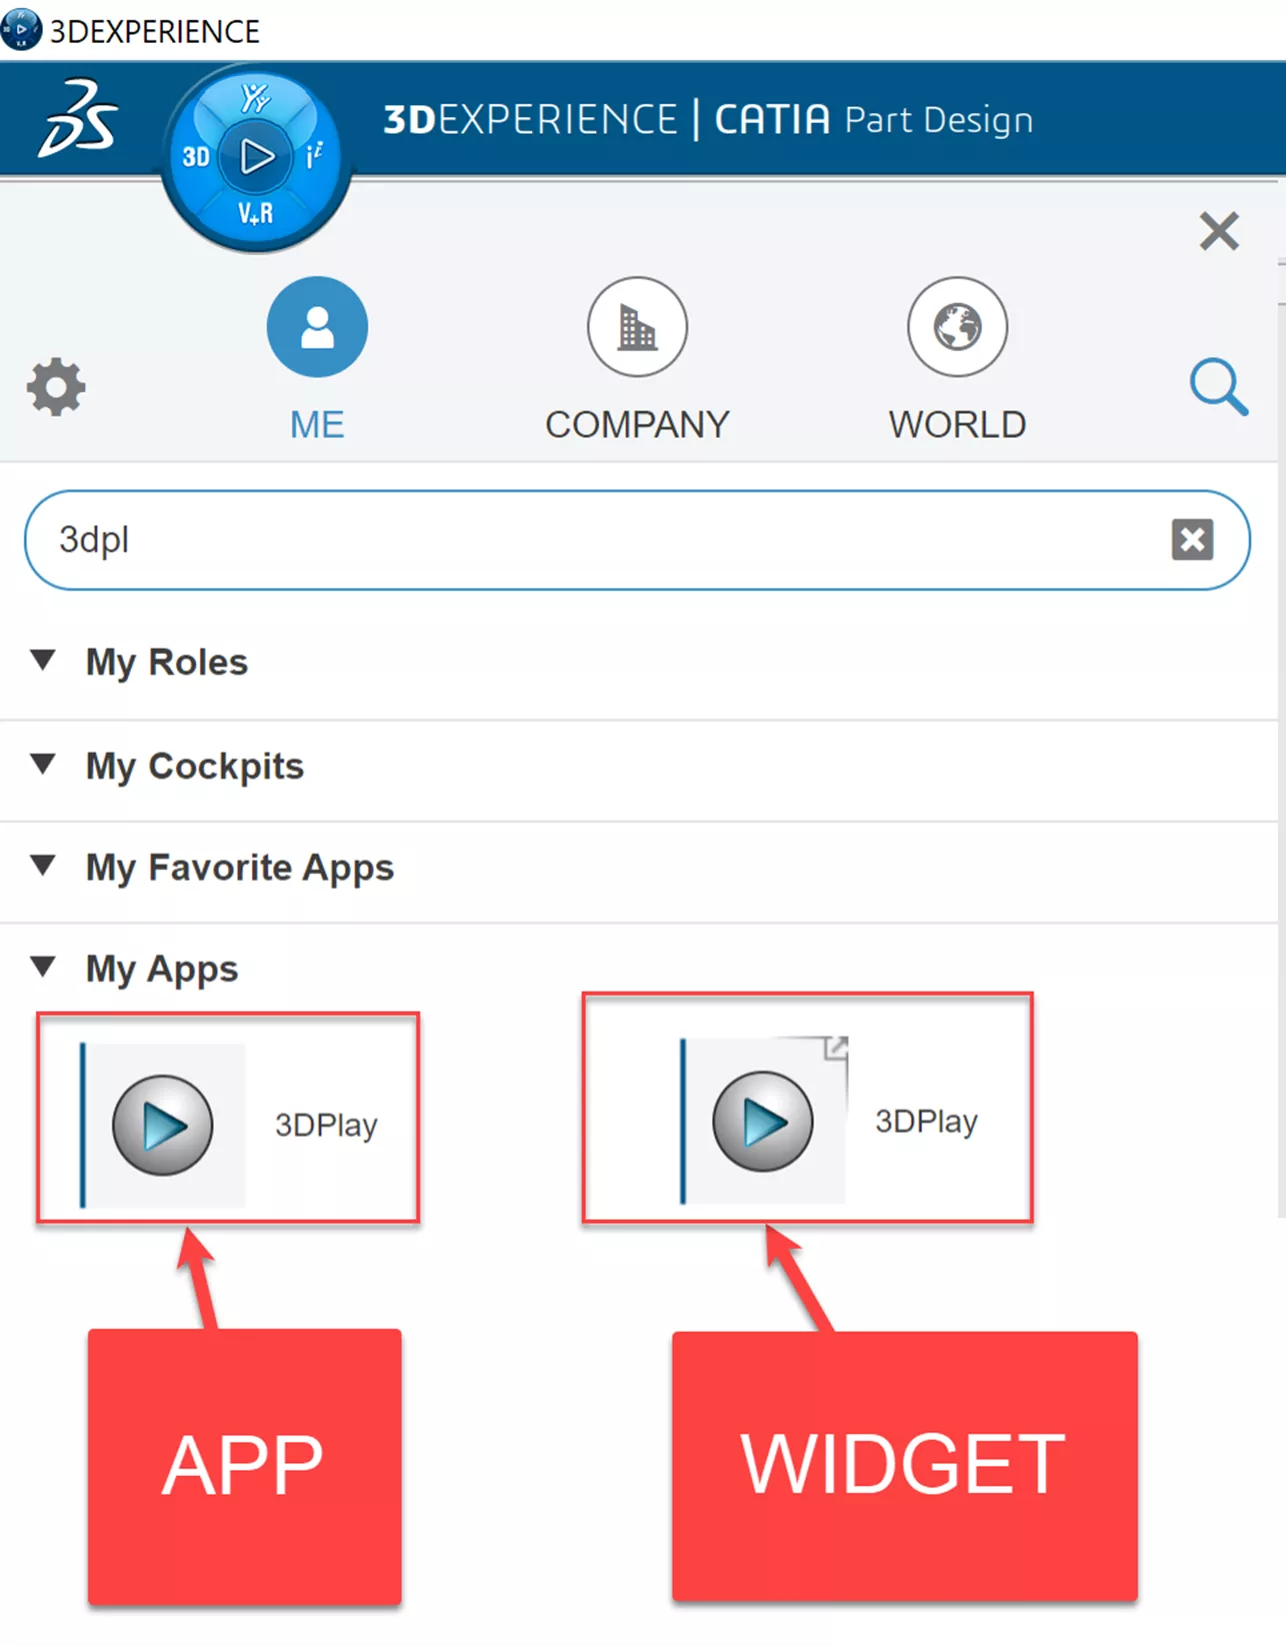
Widget icons have a small box-and-arrow overlay on the upper right corner of the icon. For example, below are two different versions of the 3DPlay app.
The icon with the overlay will open 3DPlay in the browser.
The one without the overlay will open 3DPlay in NativeApps (your locally installed software).
3DEXPERIENCE User Interface
Compared to CATIA V5's top bar menu that contains Start, File, Edit, View, Insert, Analyze, Windows, and Help, the 3DEXPERIENCE user interface includes icons, a search bar, and the ultra-handy Compass. Let's break down what each of these icons is used for and the options within them.
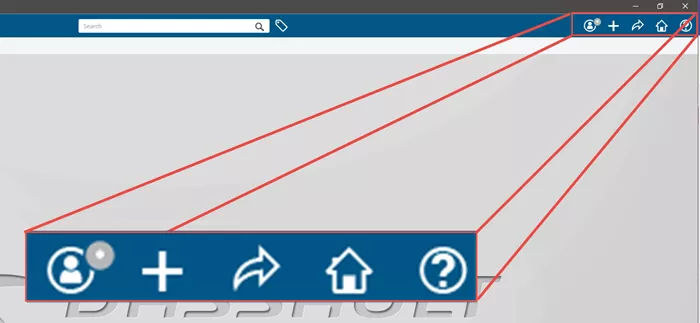
Me Menu - All information related to you.
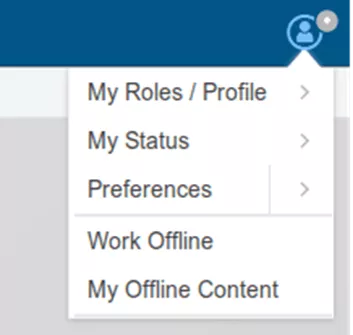
- My Roles/Profile - Activate or deactivate roles. This will enable and disable certain features and accessibilities for the user. An Admin or Project Manager will assign these roles to each user profile.
- My Status - Denotes the user’s communication status for collaborative instant messaging inside of 3DEXPERIENCE. Statuses can be Online, Busy, Do Not Disturb, Be Right Back, or Away.
- Preferences - Gives users the ability to customize actions, commands, toolbars, and standards as well as access to the Preferences menu that is familiar to the V5 platforms.
- Work Offline - Allows users to complete work without being connected to the Cloud or Internet. This will limit the user to the 3D Modeling Apps.
- My Offline Content - View and manage offline content.
Add Menu - Create and add content
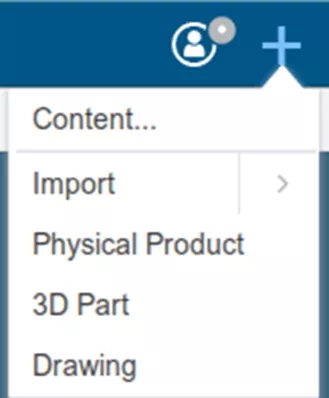
- Import - Import 3D XML 3DEXPERIENCE Native Files, CATIA files, and Non-CATIA-Native files (STEP, IGES, STL, x_t, etc.).
- Physical Product/3D Part/Drawings - Creates a new file of the type chosen.
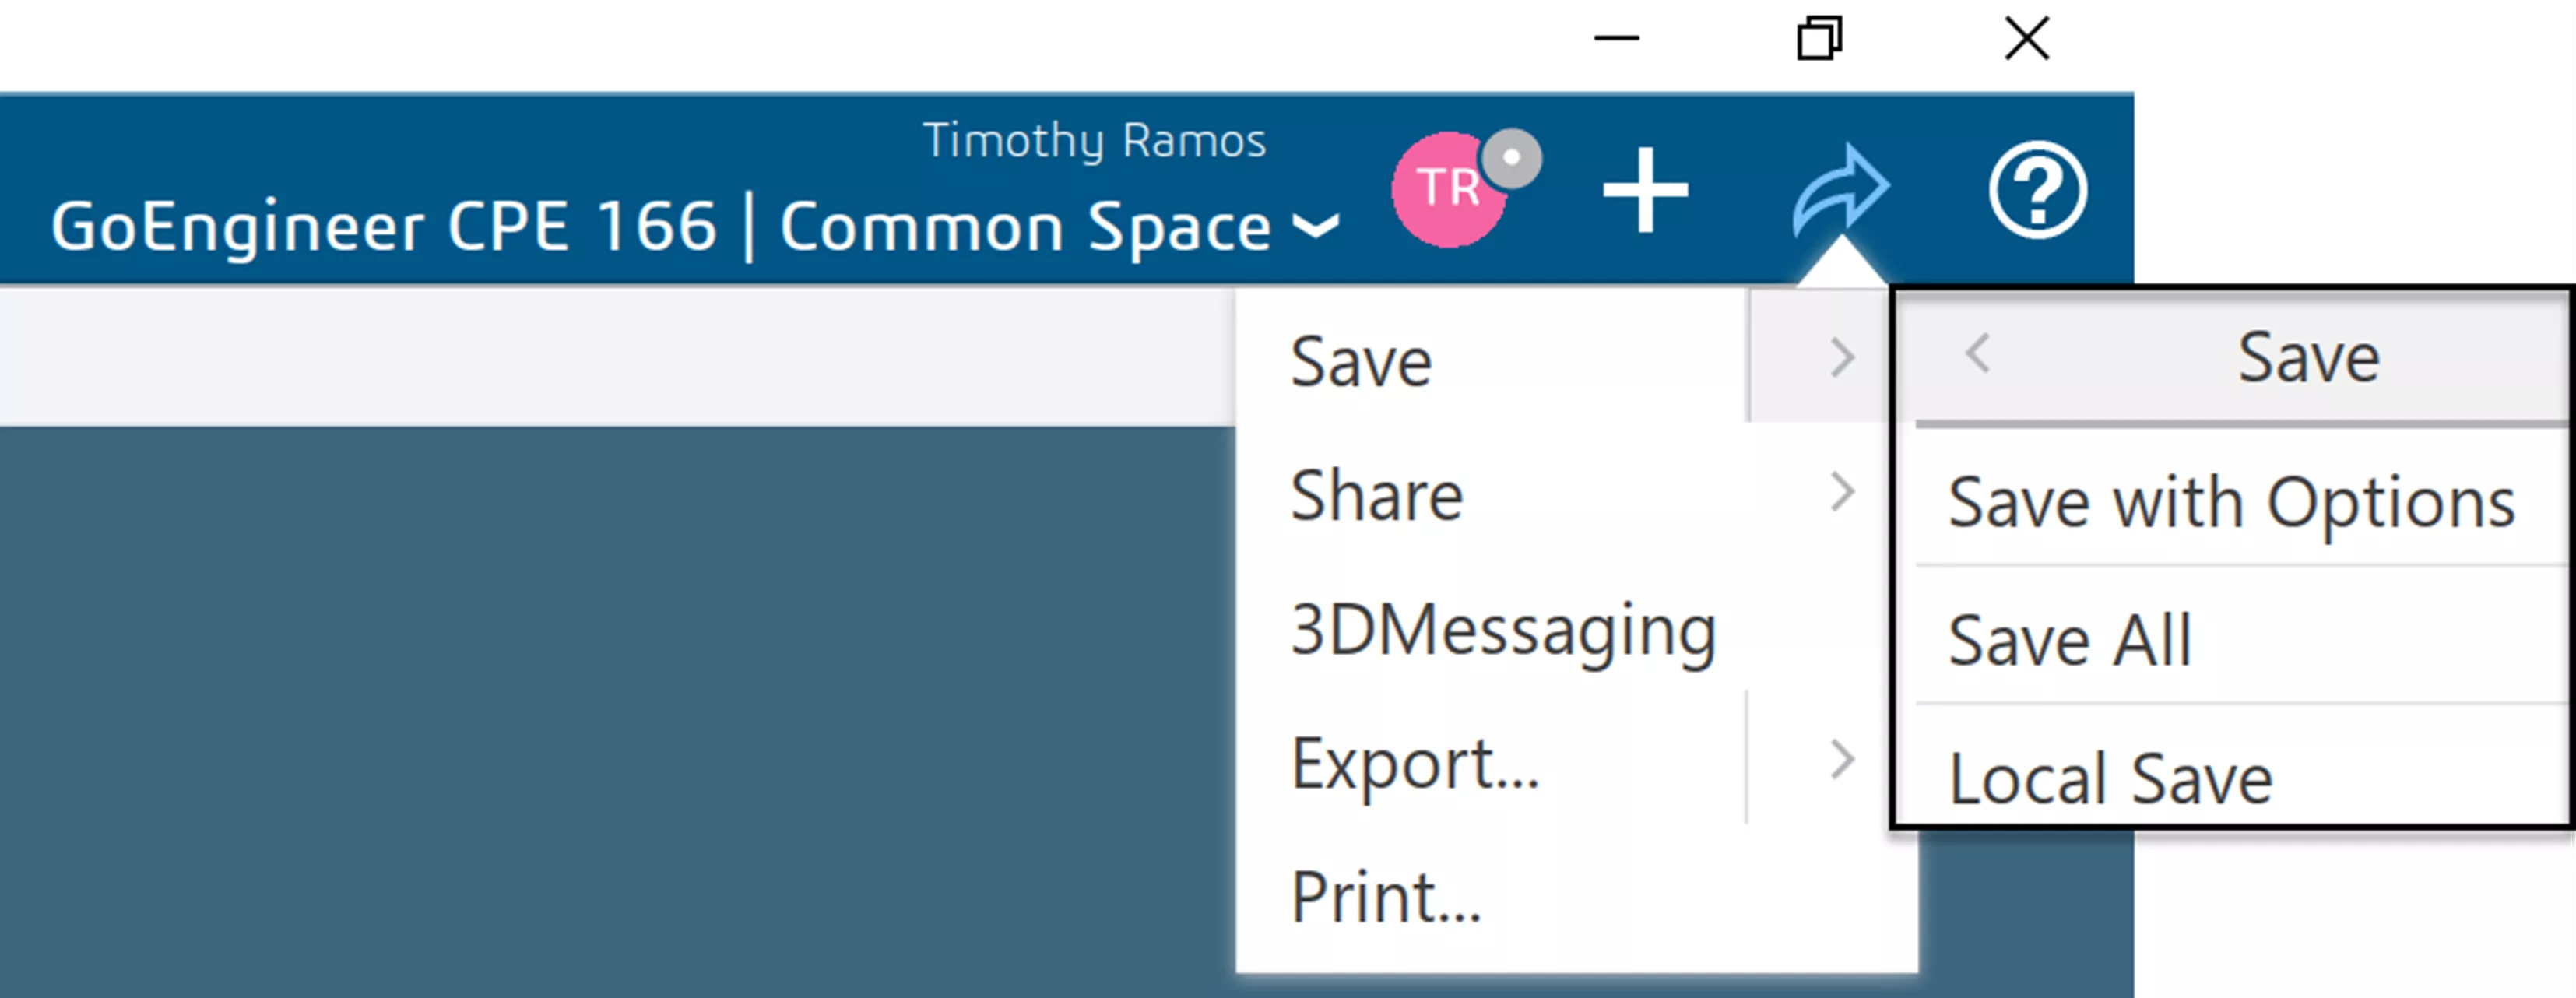
Share Menu - Share, save, and collaborate.
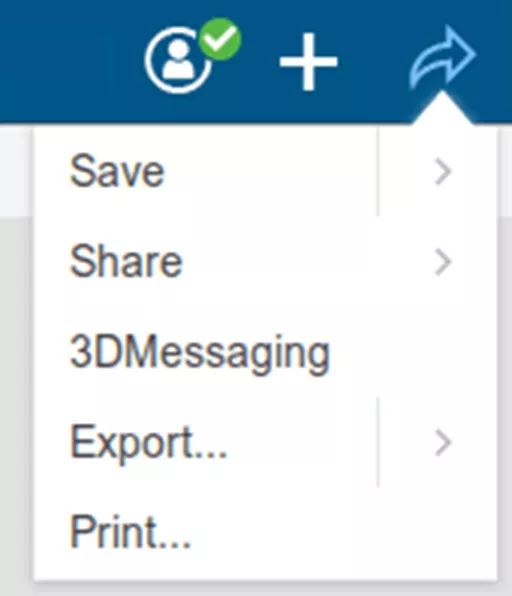
- Save - Save, Save with Options, Save All, Local Save.
- Share - Share data to Collaborative Spaces or to the Community.
- 3DMessaging - Instant message with others on 3DEXPERIENCE.
- Export - Export to 3D XML, STEP, IGES, X-PDM, and CATIA V5.
- Print - Print items.
Home Menu - Switch to another Collaborative Space.
- Collaborative Space - Switch to the desired Collaborative Space and Role within that Space.
- Manage - Opens the 3DSpace App.
Help Menu - User assistance and support community.
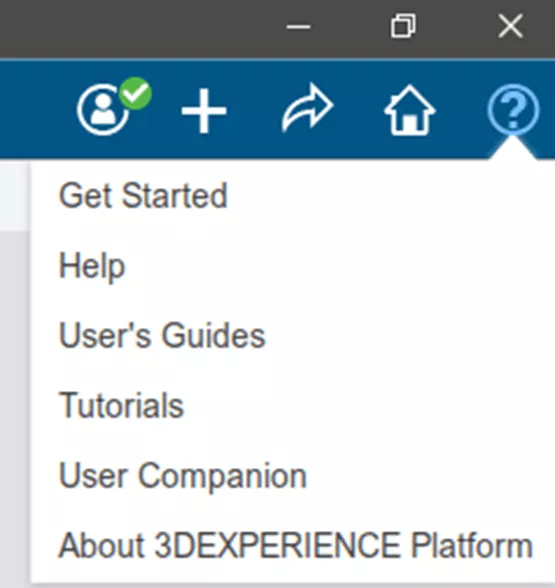
- Get Started - Opens a welcome window giving a brief overview of the Platform.
- Help - Redirects to a web browser that will provide help on the current command.
- User’s Guides - Grants access to online or installed user assistance.
- Tutorials - Provides various tutorials embedded within the client.
- User Companion - Starts User Companion (if Computer-Based Training module and Companion have been installed), or routes to 3DS eLearning solutions page.
- About 3DEXPERIENCE Platform - Shows 3DEXPERIENCE background information.
Searching for Your Data
As part of your 3DEXPERIENCE platform, all data is stored within a database. Because of this, you will be accessing your data differently than what you’re used to with CATIA V5.
The 3DEXPERIENCE platform provides a full-text search functionality (located at the top-center of the interface), so you can search the Title, Name, or other properties of your data without the need for wildcard search modifiers.
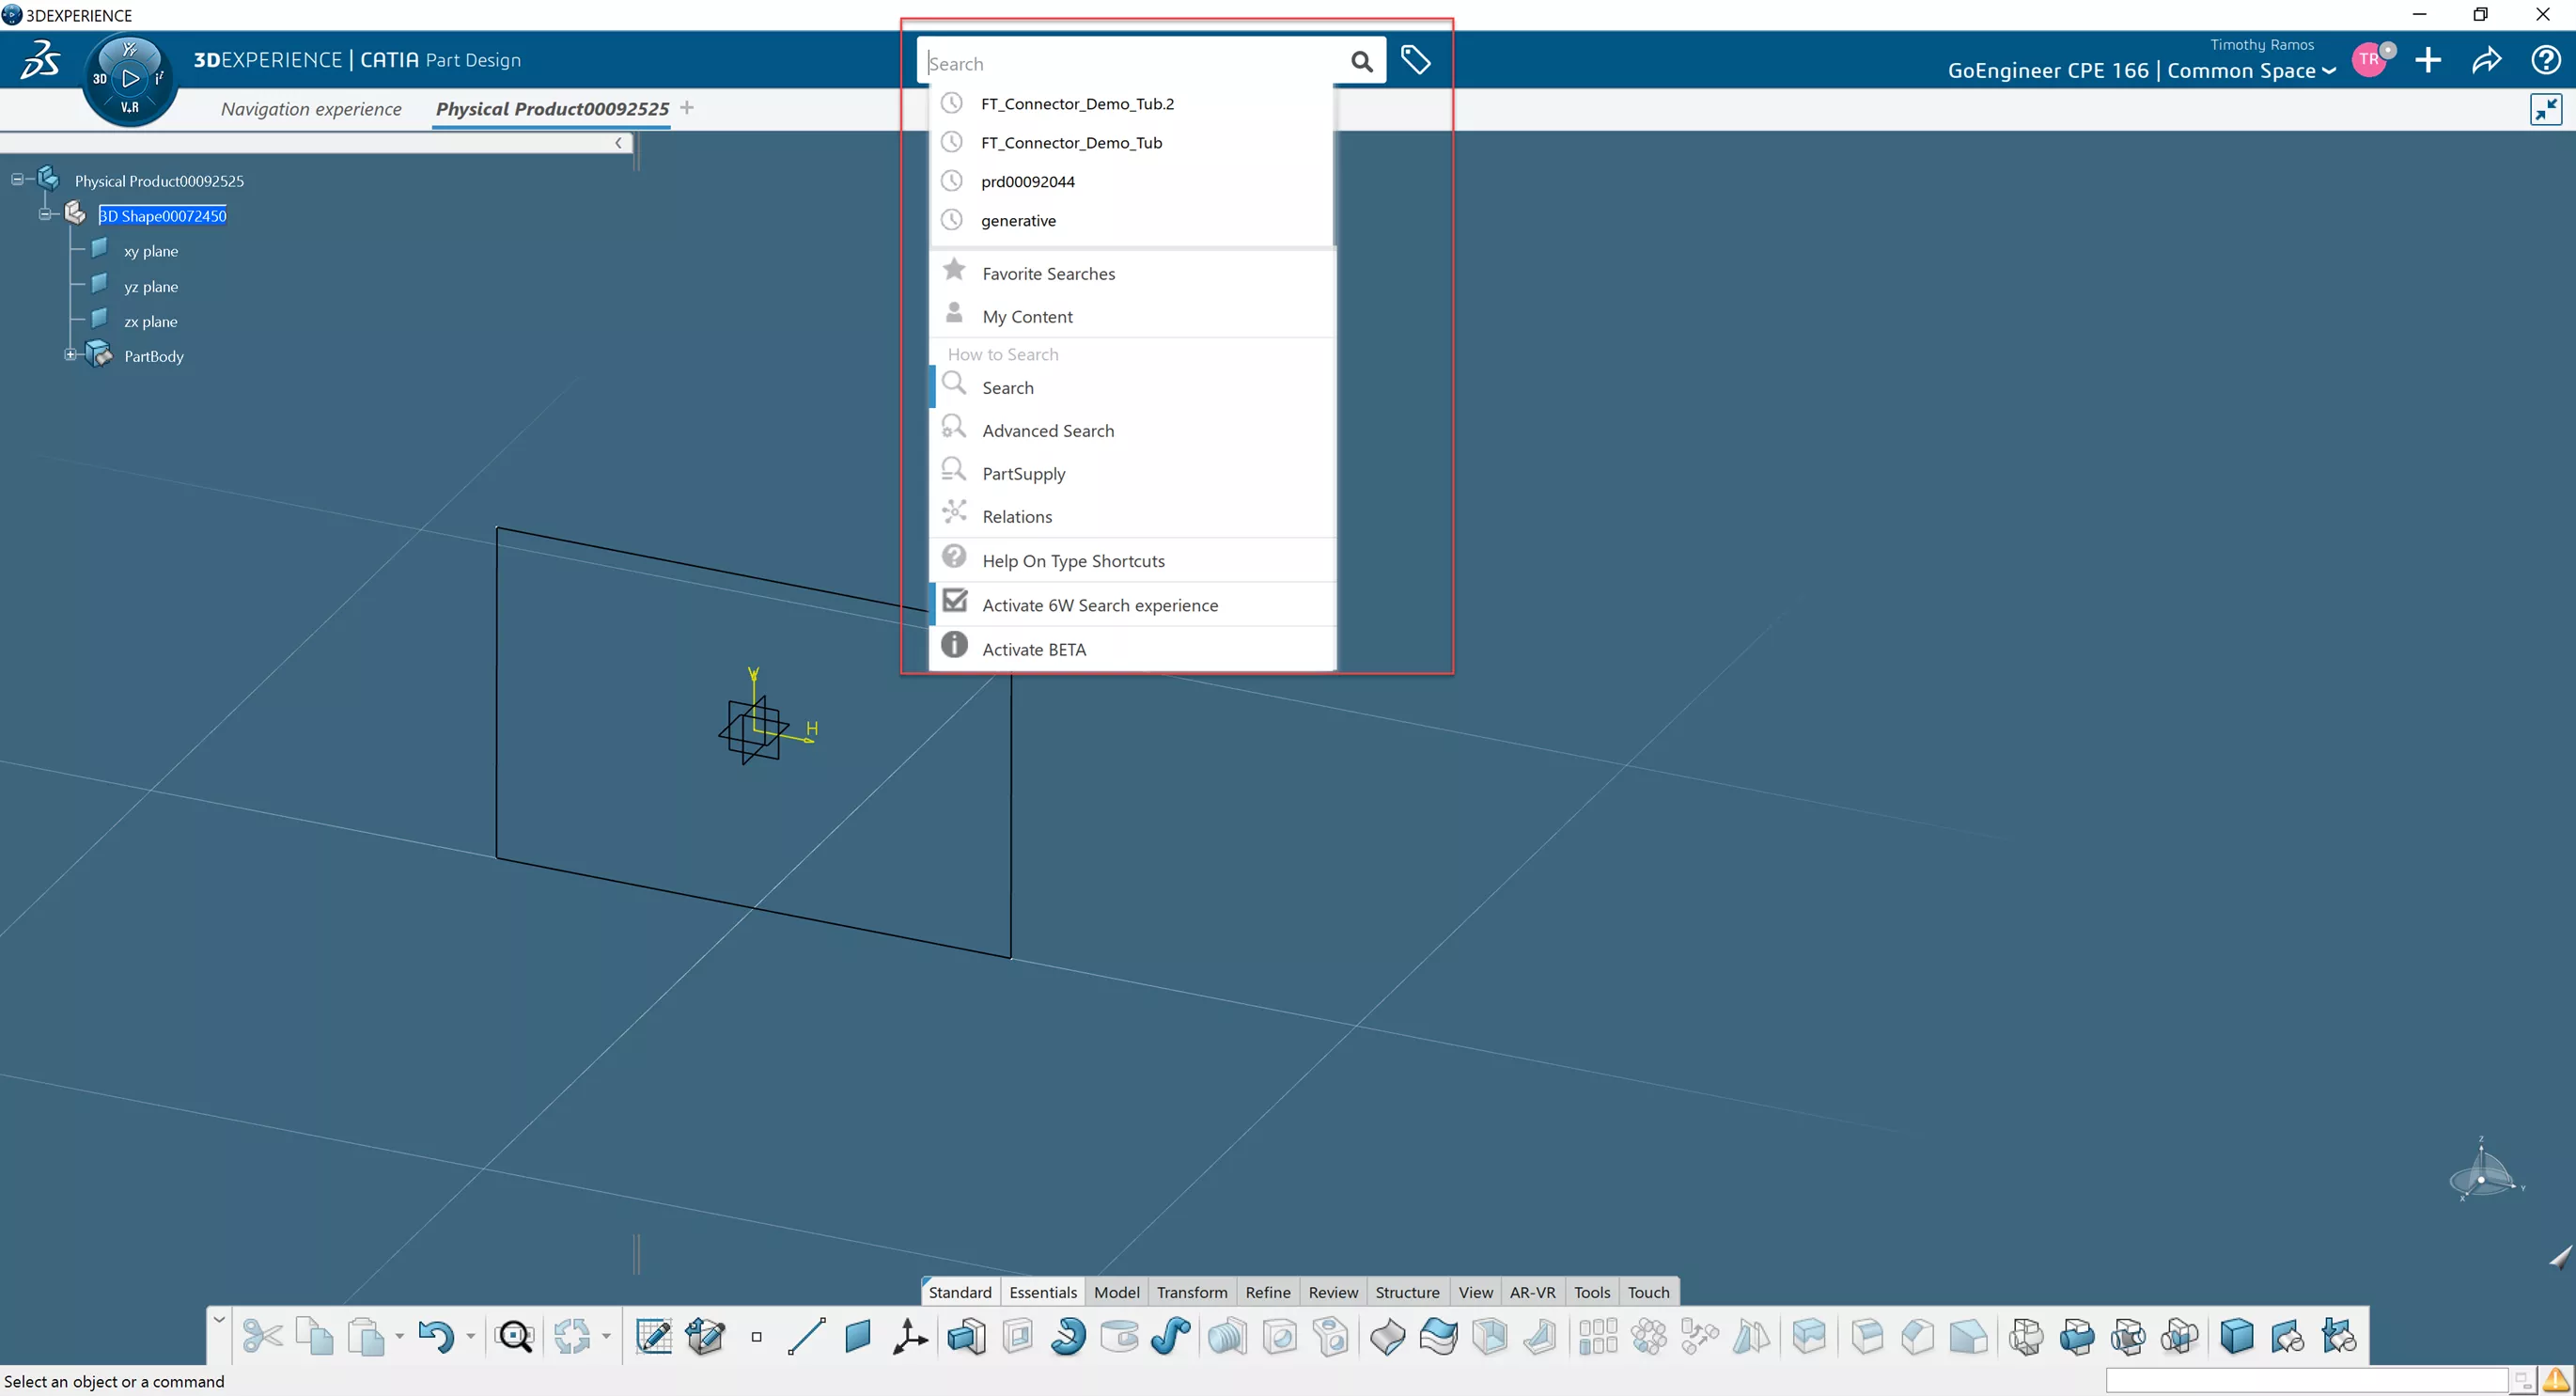
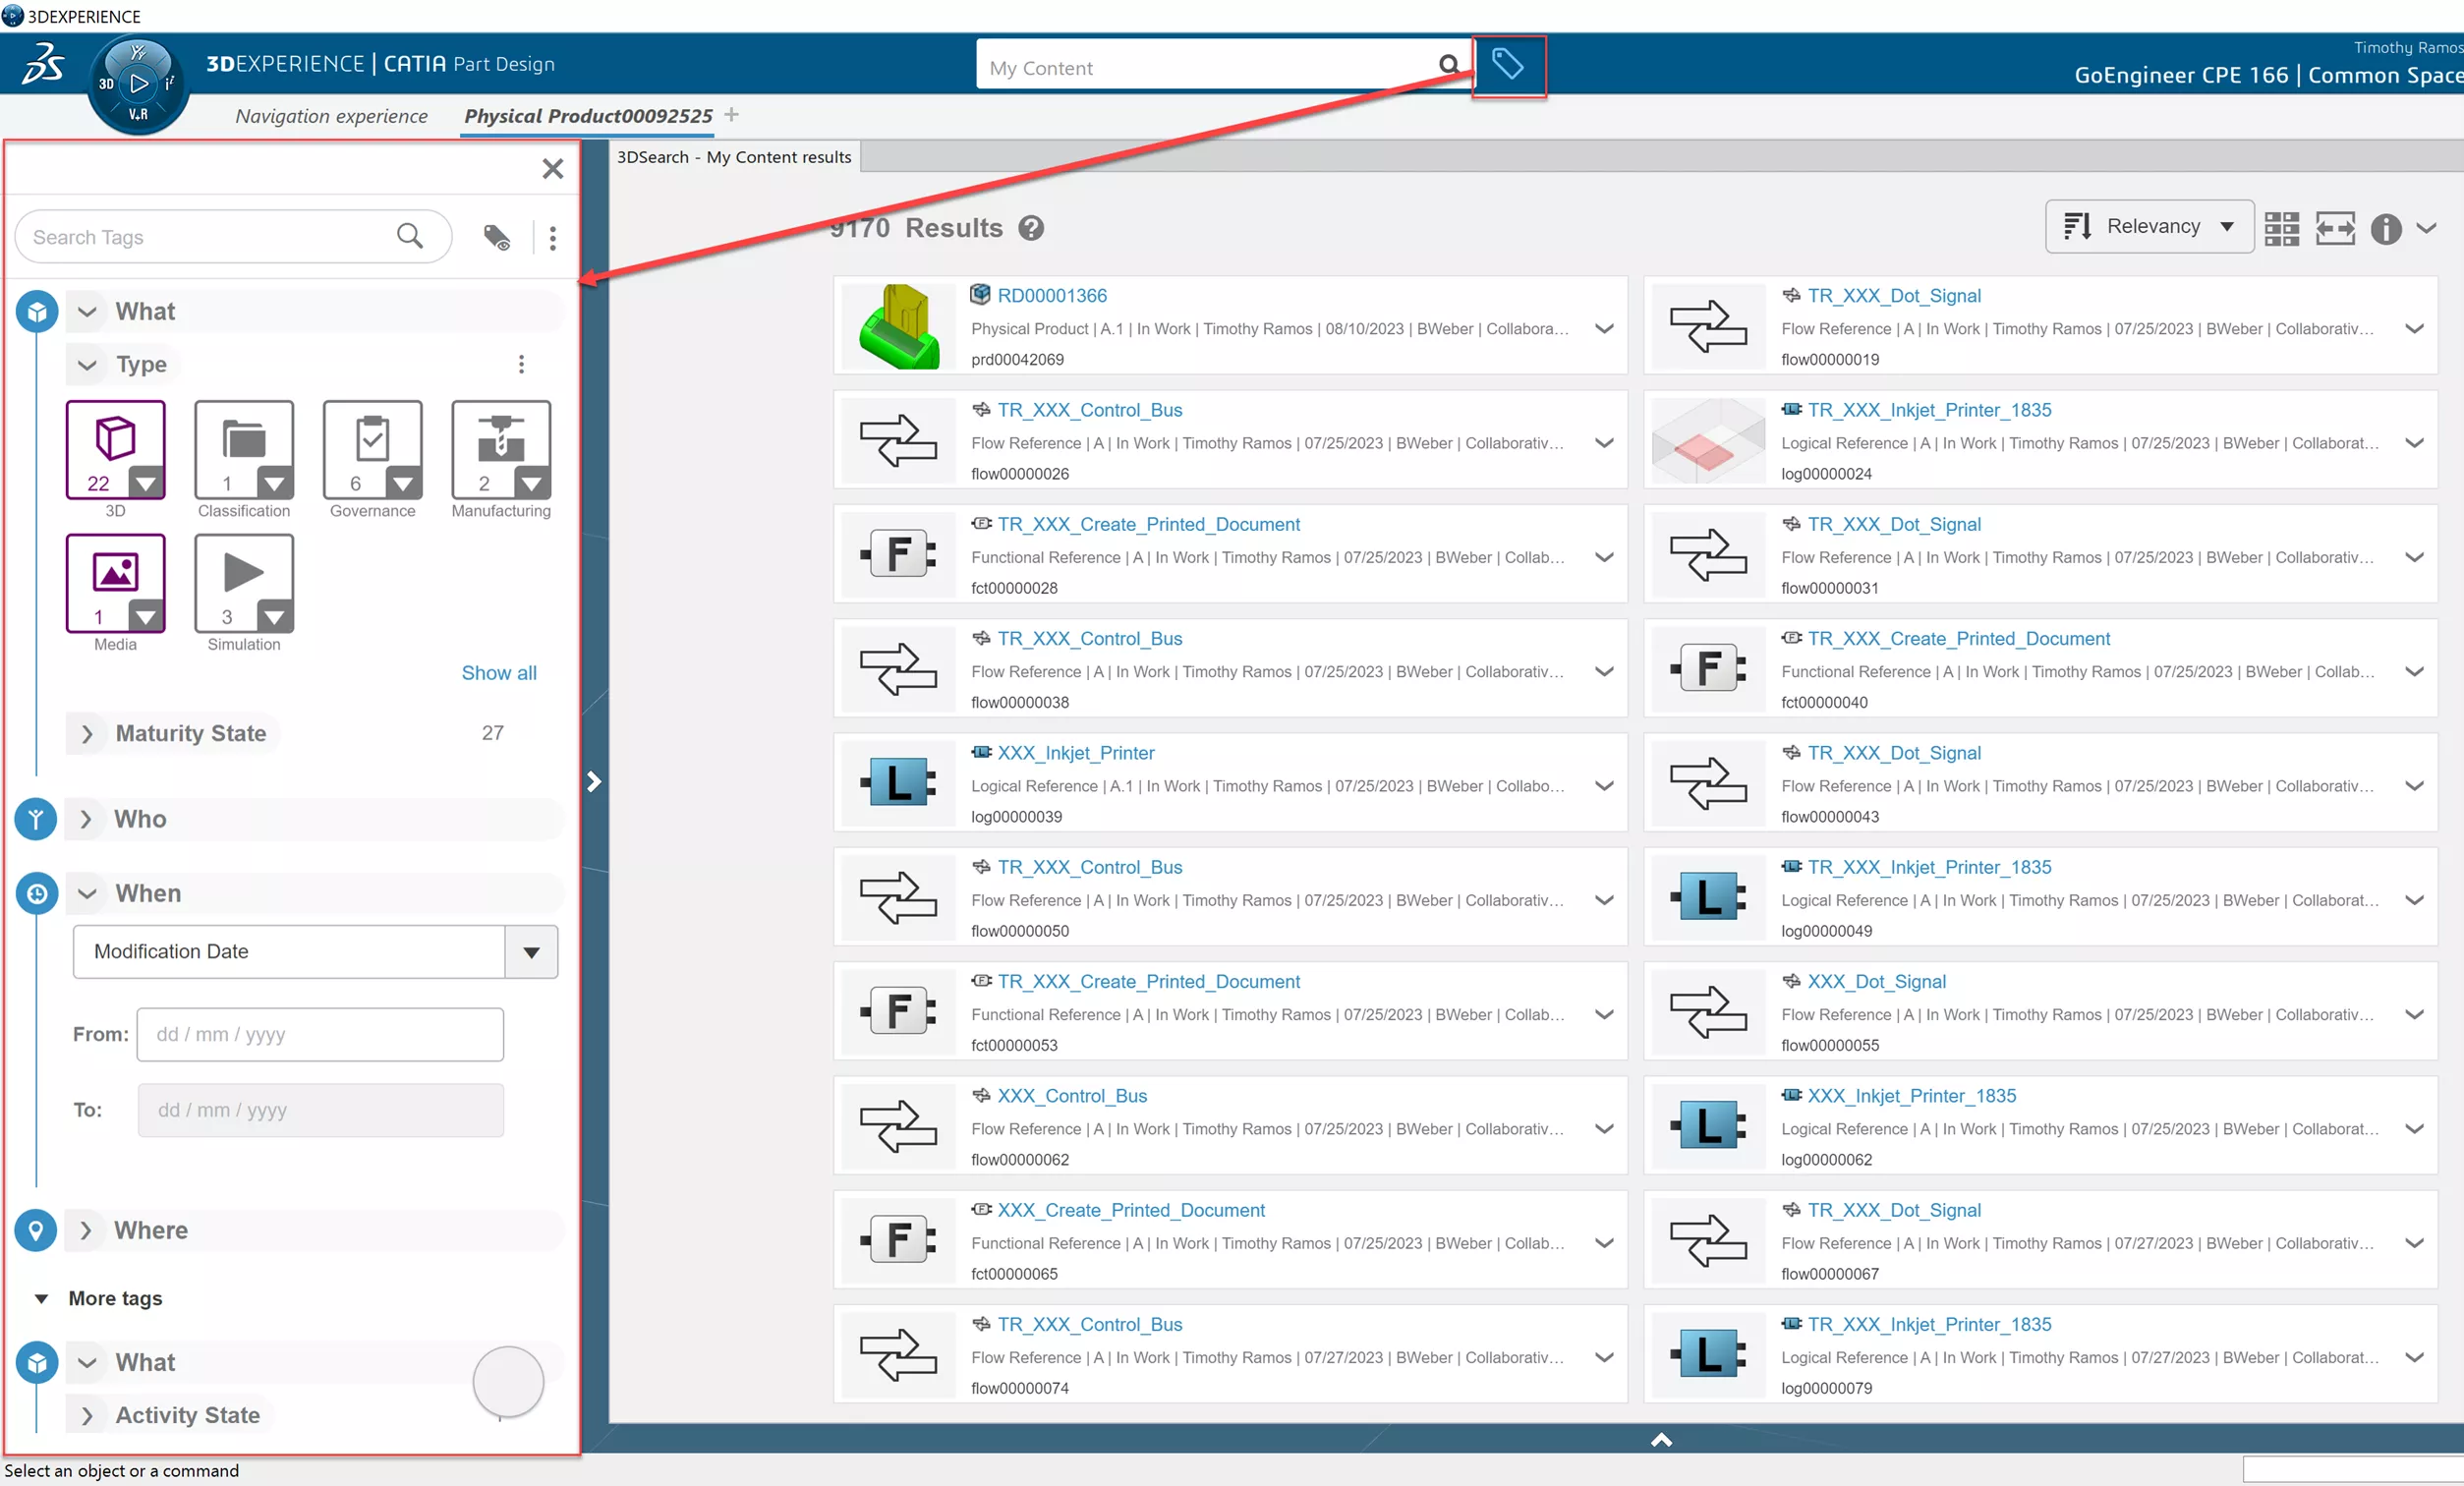
This search function will search all data you have access to in your database, which can be a lot of results to sort through! Fortunately, 3DEXPERIENCE includes tools to help narrow down search results with 6W Tags, Advanced Search, and My Content.
6W Tags grant the ability to filter search results based on who, what, when, where, etc., criteria.
- Suggested Video >> 3DEXPERIENCE Tutorials - Platform UI Tips: 6W Tags
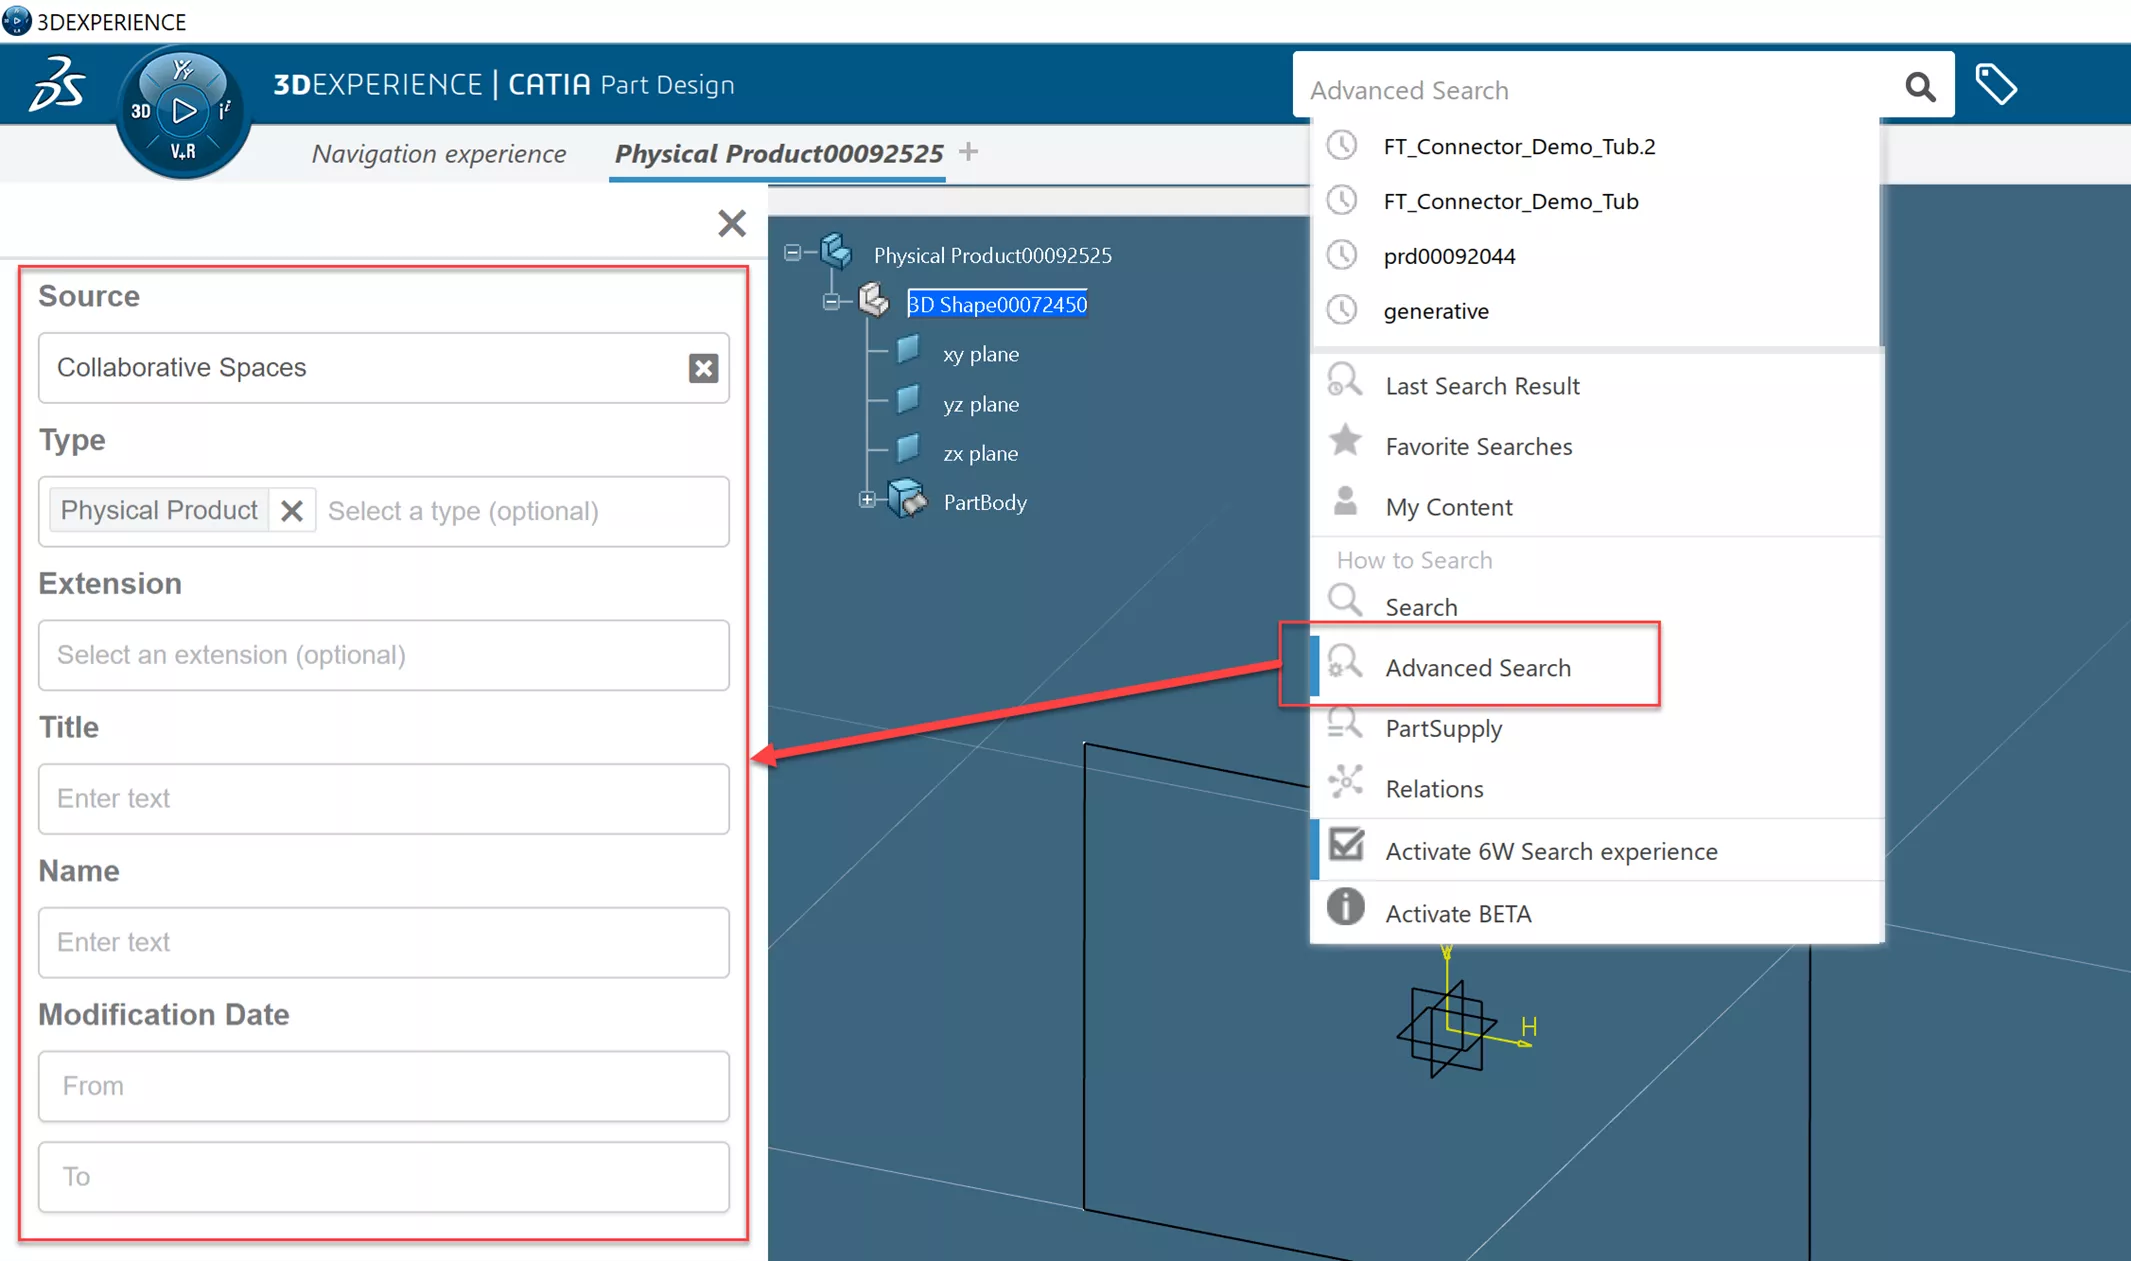
The Advanced Search option allows you to start with a data type and then refine the search afterward by applying optional criteria such as Title, Name, and Modification Date.
The My Content option provides search results pertaining only to the data you own or have created.
Both My Content and Advanced Search can be refined using 6W Tags. Search query and filtering combinations can be saved and used again later.
6W Tag
Advanced Search
Explore Mode
One of the main attractors for CATIA is its ability to handle large assemblies with a high quantity of parts. 3DEXPERIENCE has doubled down on this functionality by providing Explore Mode tools to assist in navigating these large datasets.
Explore Mode tools let you open data in a “lightweight” environment where the visual representation of the model is available, but commands located within the 3DShape are not accessible or loaded - much like the CATIA Graphical Representations (CGRs) in CATIA V5.
The intent is to let you see and navigate entire assemblies seamlessly, making it easier to open data and surrounding data in a “heavy” environment where you can proceed to make edits.
Data opened from Explore Mode is opened in the context of the root assembly, providing the ability to open subsequent data from Explore Mode within the same context of parts that were opened prior.
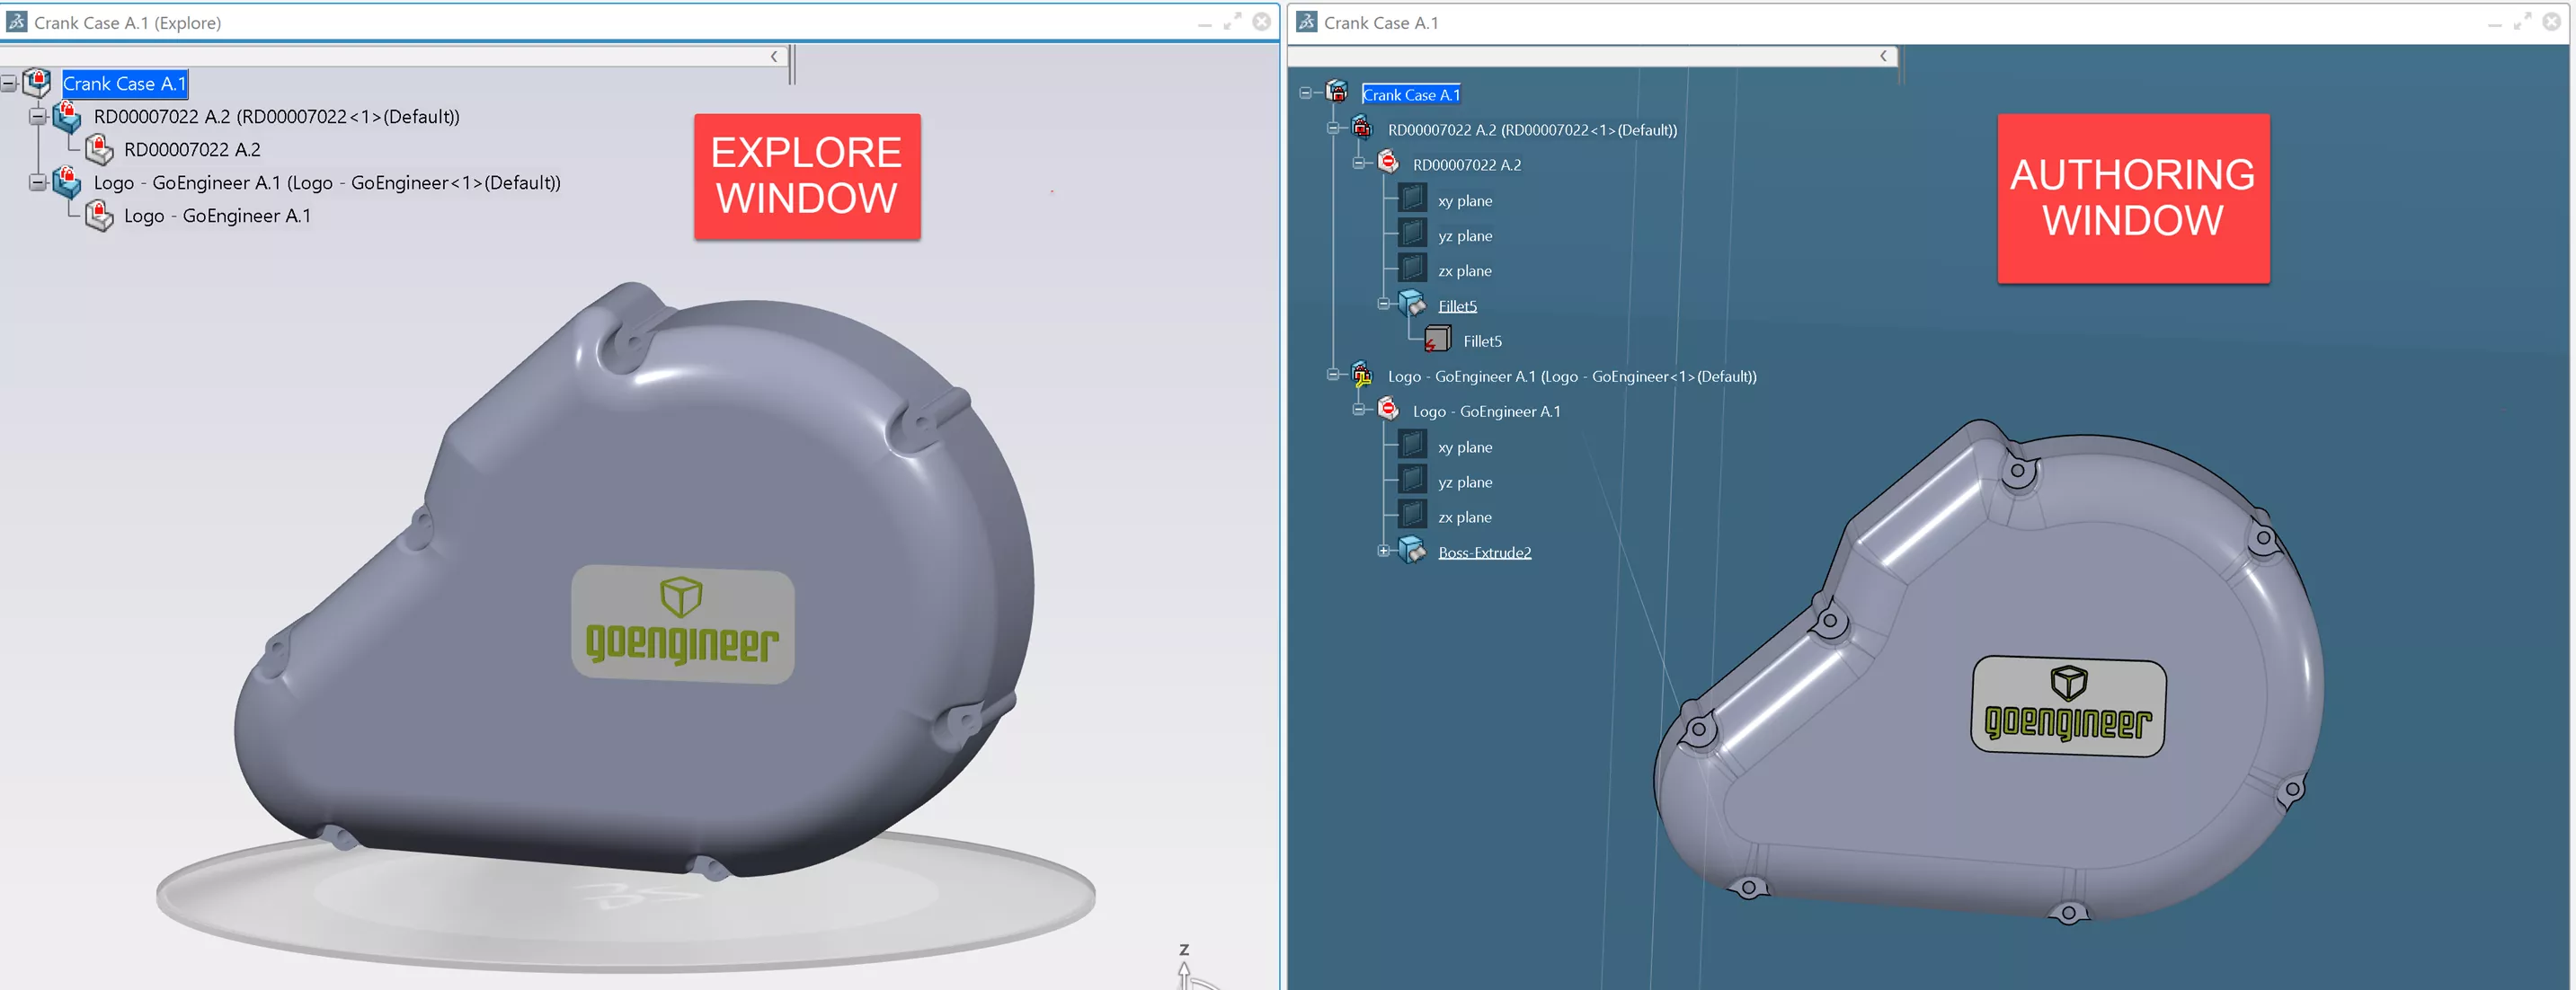
Beyond visually interacting with your data, the Explore Mode tools provide extra functionality to assist in navigation with Turntables and Filtering.
Turntable functionality lets you sort data by sub-assembly. When active, the function will take each sub-assembly and place it onto its own “disc” with each child part on the edge of that disc.
The Filtering function will sort data based on criteria such as Selection, Part and Assembly Attributes, active instances, and volumes, which allow the capture or exclusion of data surrounding a specific part or sub-assembly. The filter can then be saved and reused later.
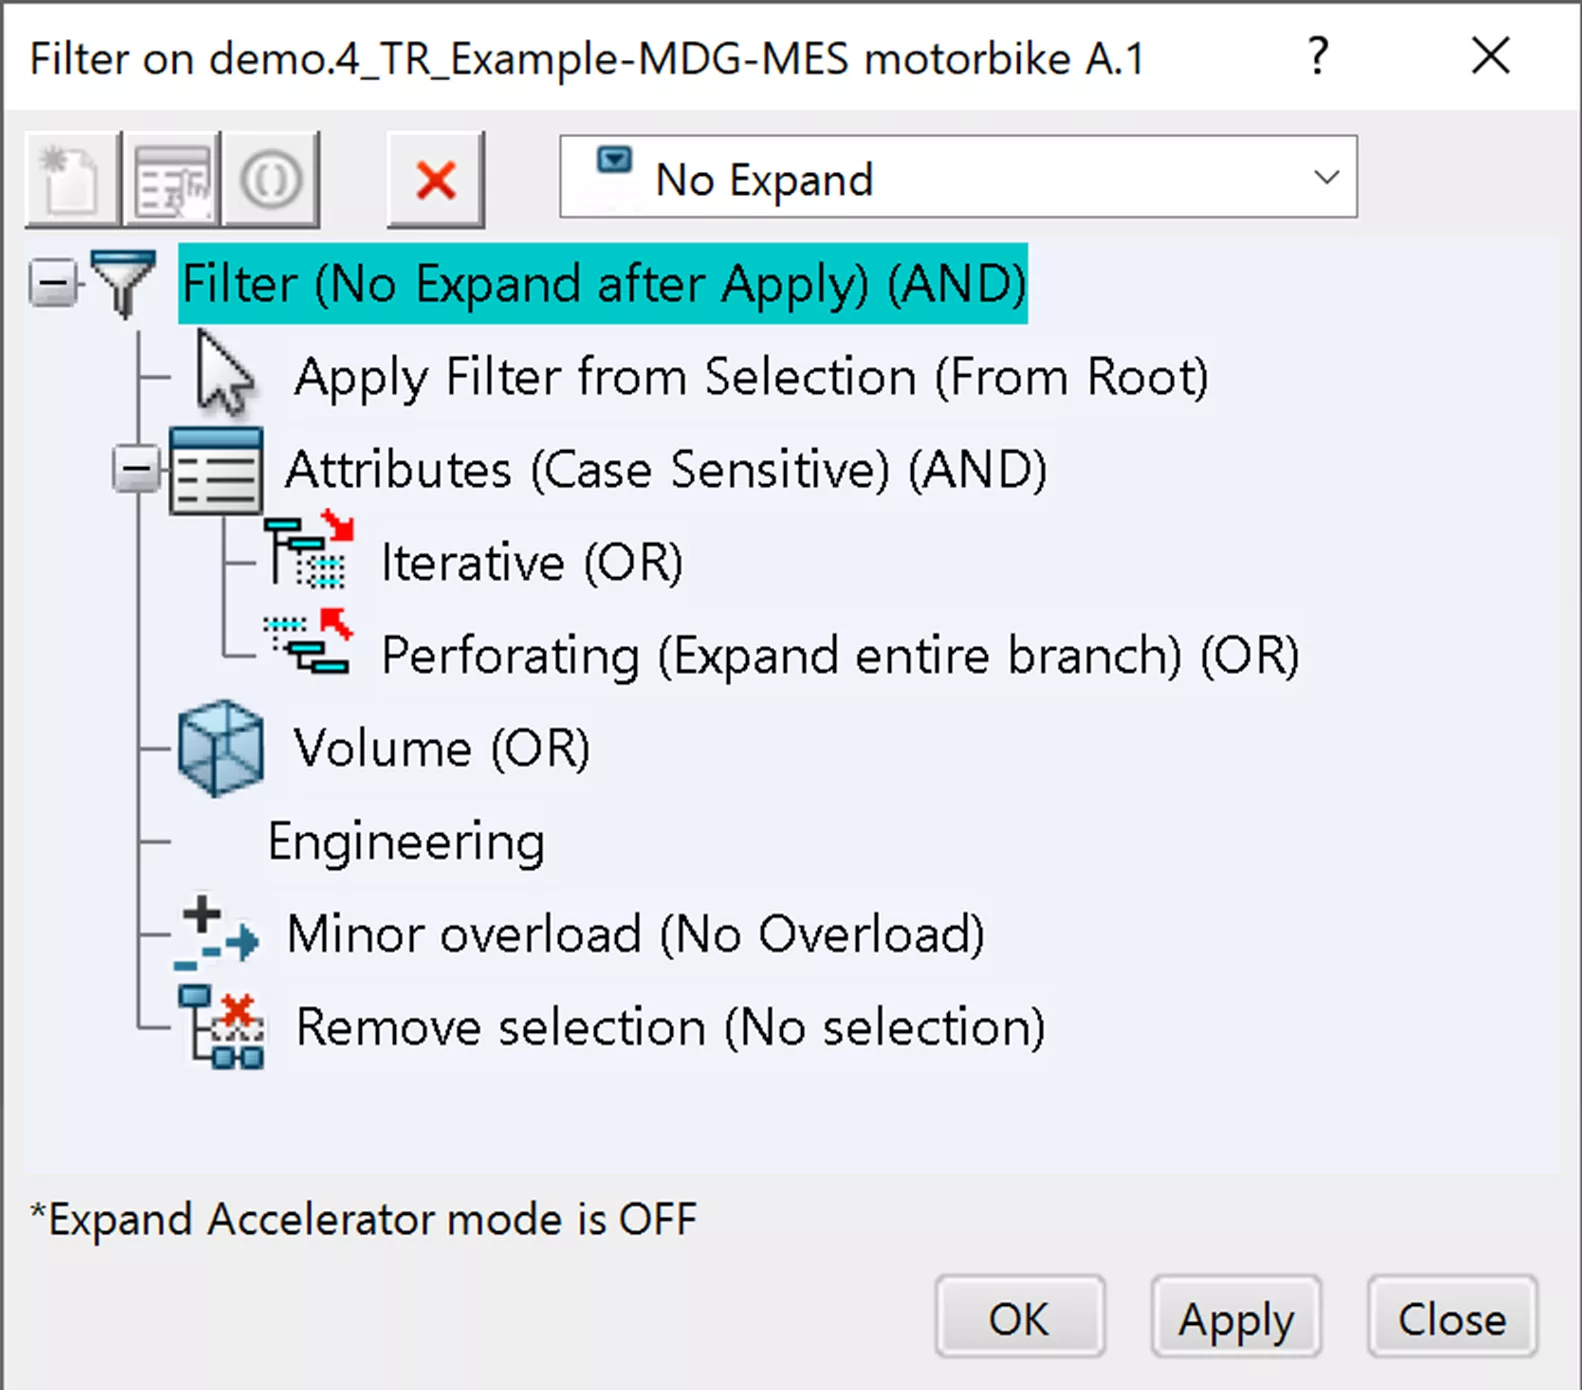
Restore Session
Software crashes are bound to happen from time to time. 3DEXPERIENCE has a Restore Session feature, that will recover unsaved data. The way it works is periodically, 3DEXPERIENCE will perform a “Local Save” in the background, caching your session. If 3DEXPERIENCE crashes, or you close without saving your modifications, upon logging back in, a Restore Session window will appear with the following options:
- Restore Session - Recover any unsaved data up until the last Local Save performed by either the user or 3DEXPERIENCE.
- New Session - Clear your cache from the previous session and start a new one.
- Cancel - This will cancel the opening of 3DEXPERIENCE but will keep your cached session available to Restore upon the next login.
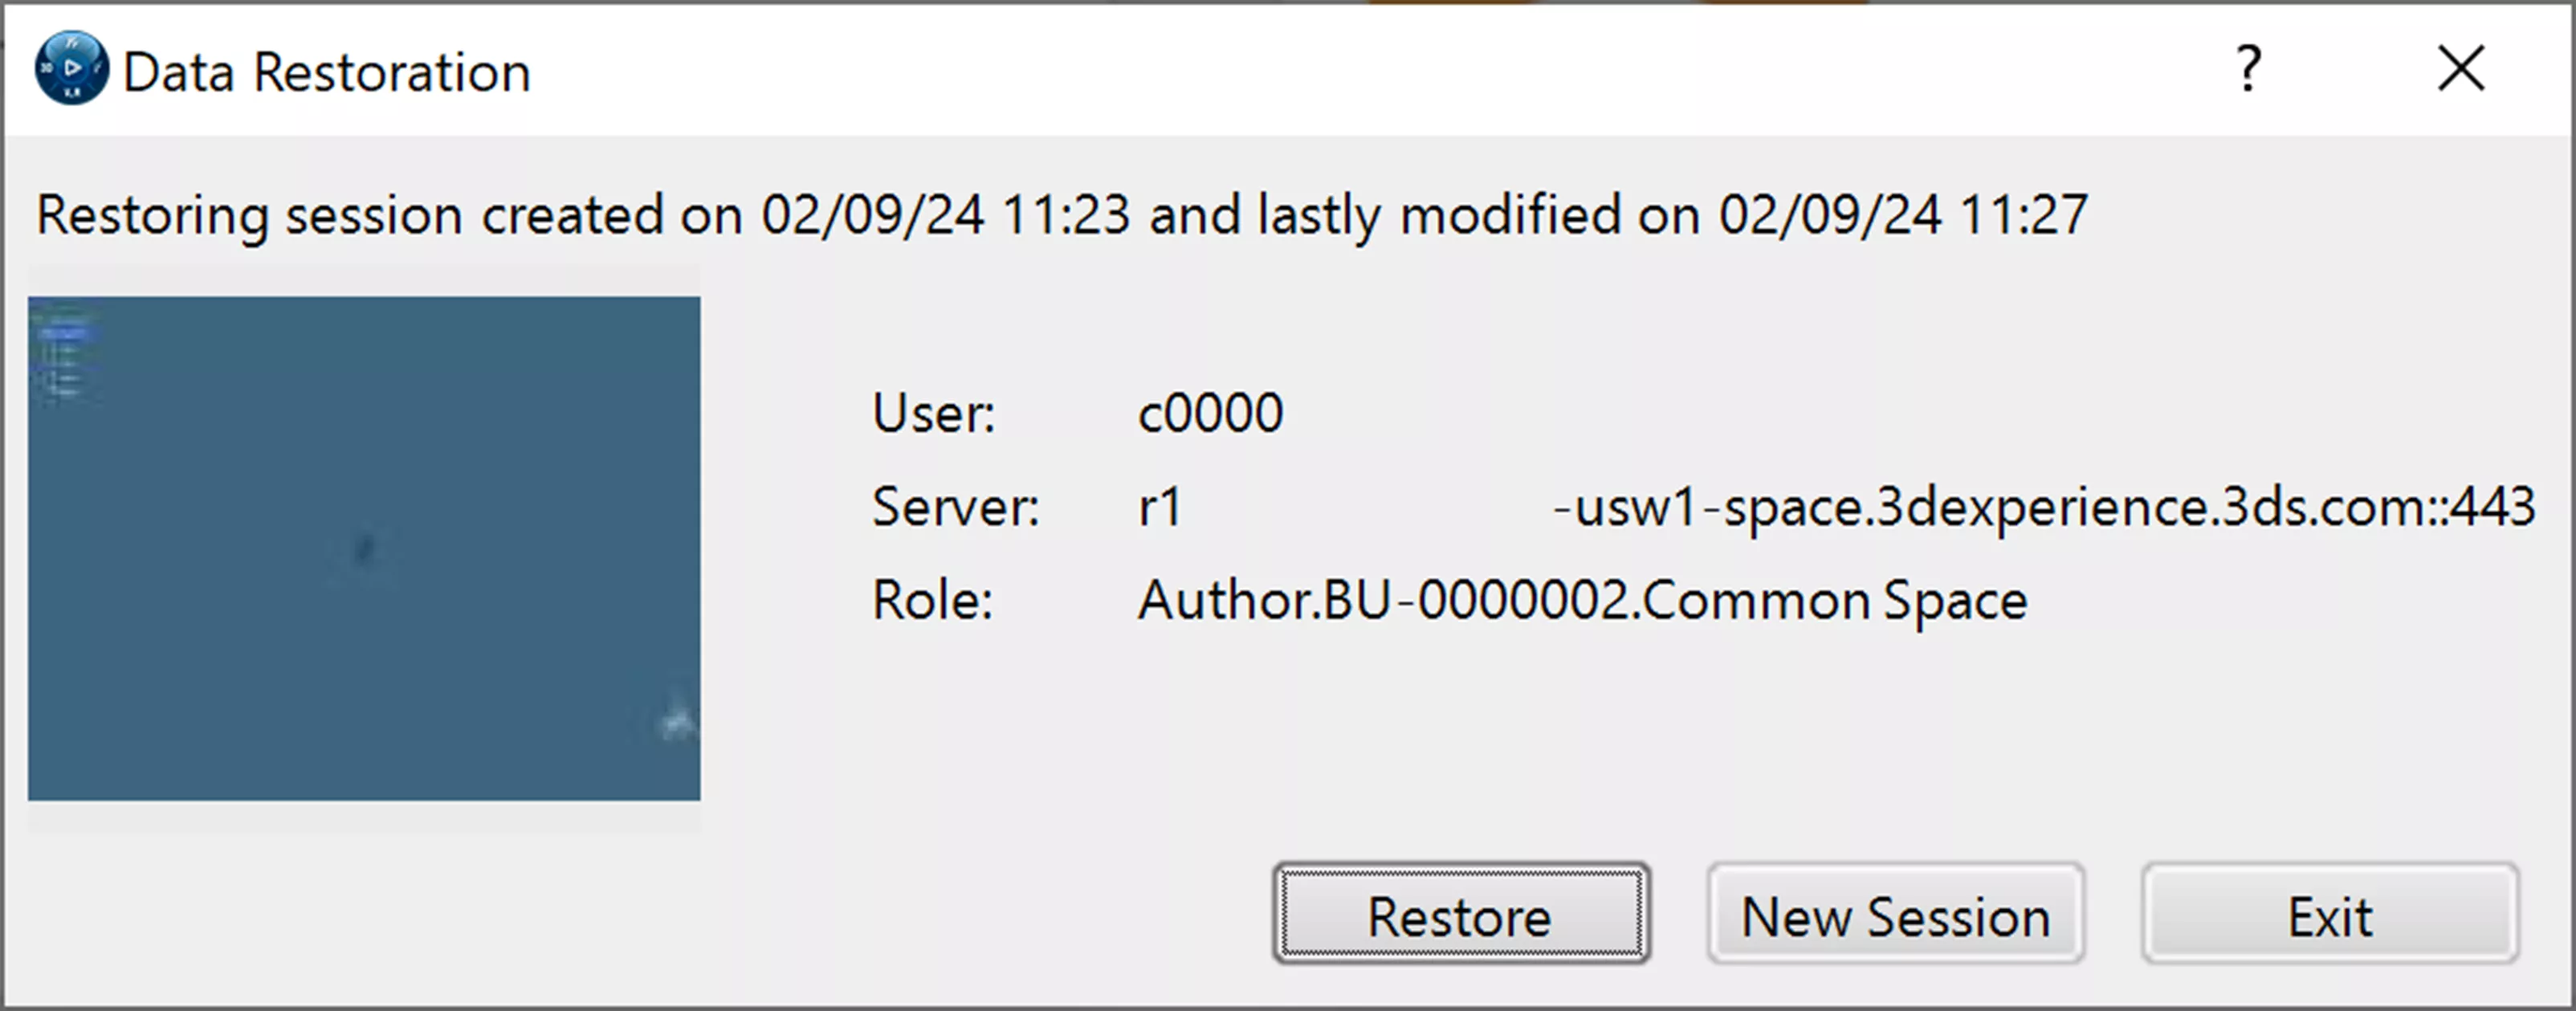
Local Save vs Export
In 3DEXPERIENCE, there are two options: Local Save and Export. These are not the same function.
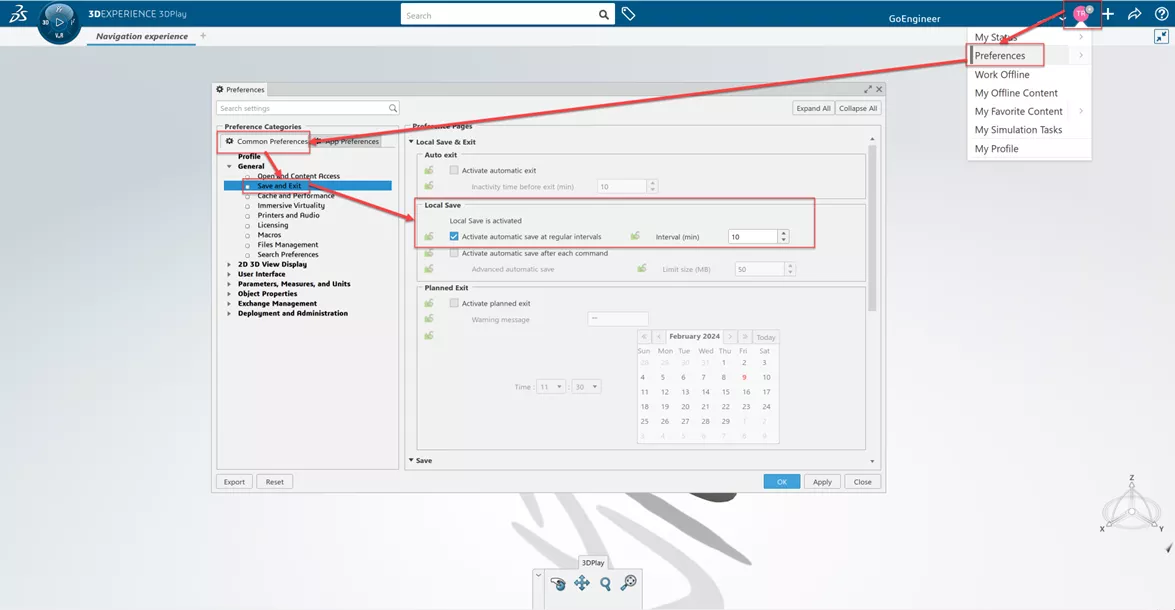
Local save is an operation that caches your session locally only for the purpose of restoring it. No pertinent data (such as parts, assemblies, drawings, etc.), can be pulled from this local cache or shared. To save data locally, that can be used outside of your 3DEXPERIENCE platform, you must use the Export tool instead.
The Local Save interval can be set within the Preferences window by navigating to My Menu > Preferences > Common Preferences > General > Save and Exit > Local Save & Exit > Local Save.
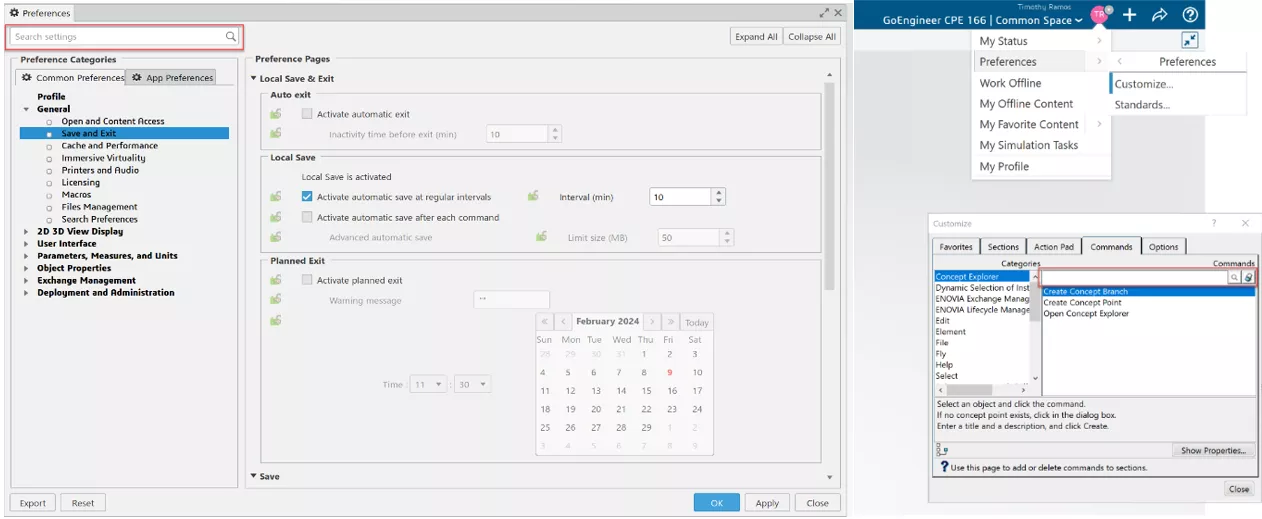
Searchable Menus
In 3DEXPERIENCE, you can search both in Preferences and the Customization menu.
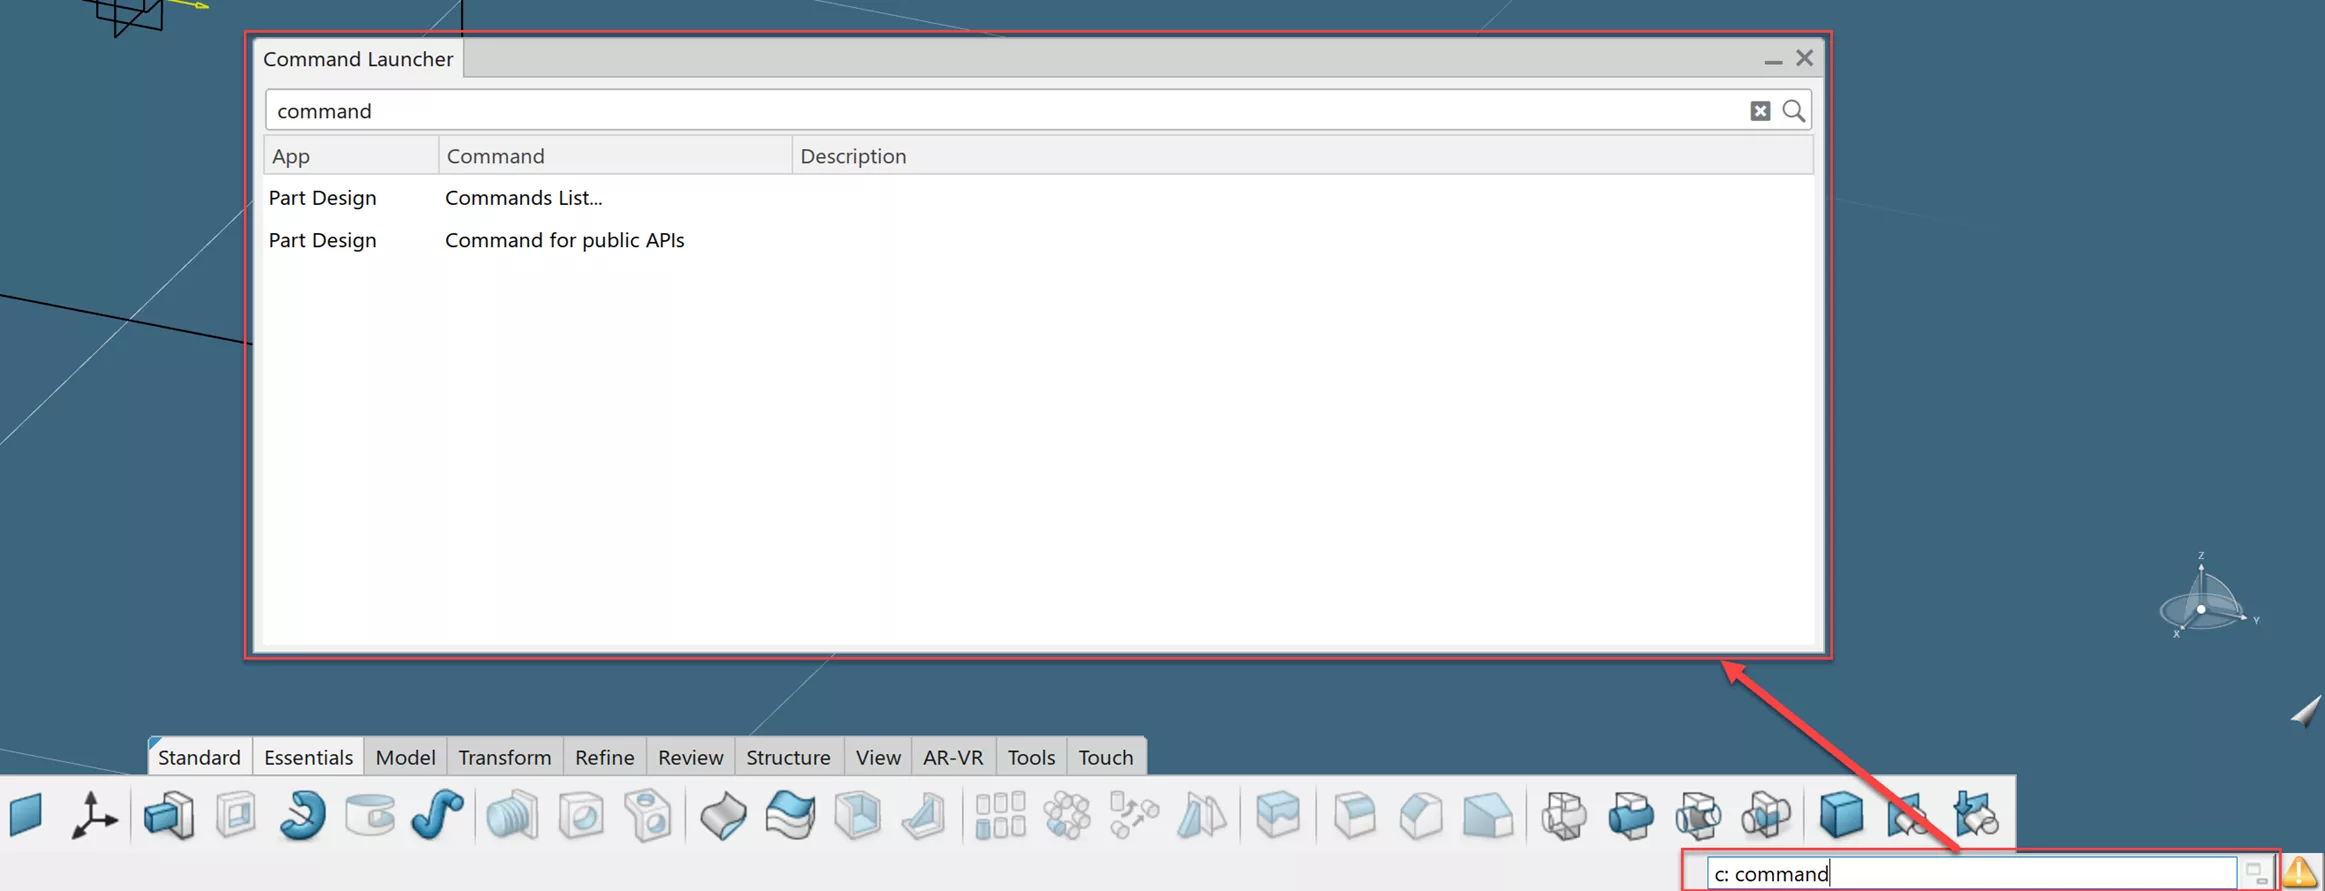
Additionally, the command input line within the status bar provides a list of similar commands when an unknown prompt is entered. Whereas in CATIA V5, you were required to input the exact syntax to activate it.
Context Menus
3DEXPERIENCE has introduced the Context Menu functionality to the CATIA interface, allowing for more streamlined workflows while authoring CAD data. As you click on a feature, a menu will appear next to the cursor containing suggestions for the next command to be used.
For example, clicking on a sketch will provide the options to either apply the Robot (Compass, as it was known in CATIA V5), Quick Select, create a Pad/Extrude, create a Plane on Curve, or create a Point on Curve.
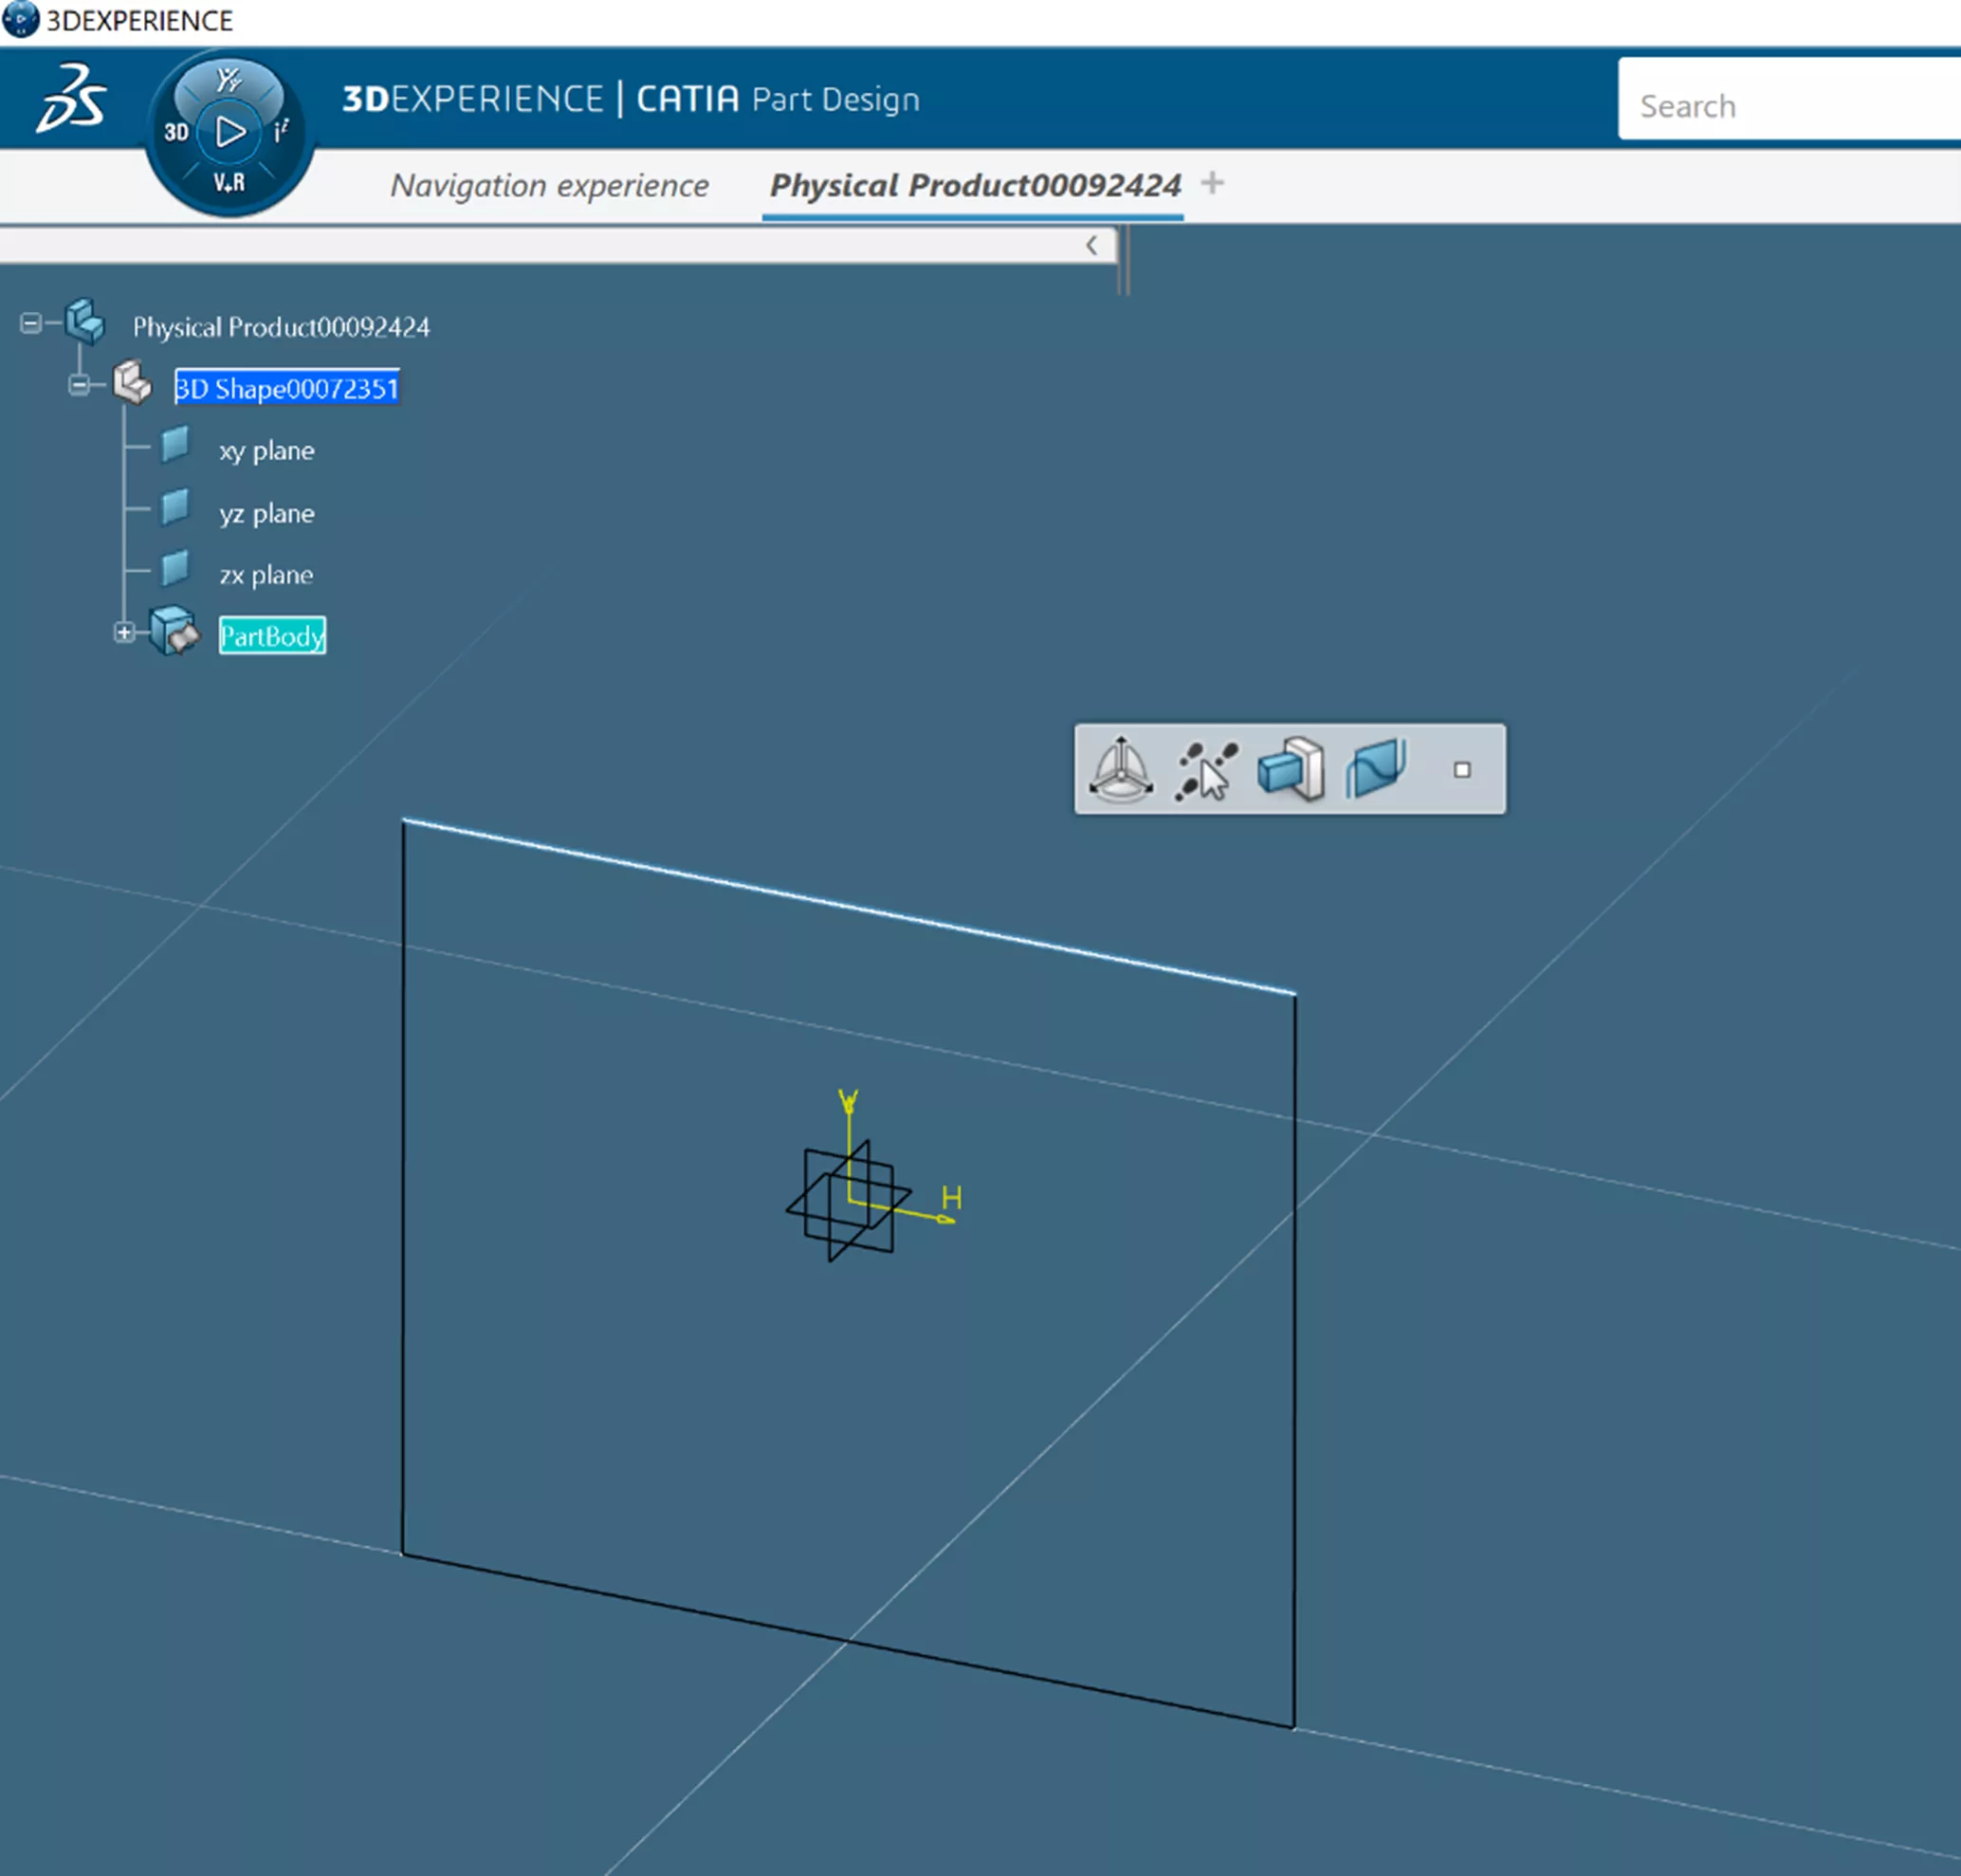
Context menus are a convenient option for choosing downstream commands in a workflow, however, Dassault Systèmes has placed some important features in these context menus that we will highlight here.
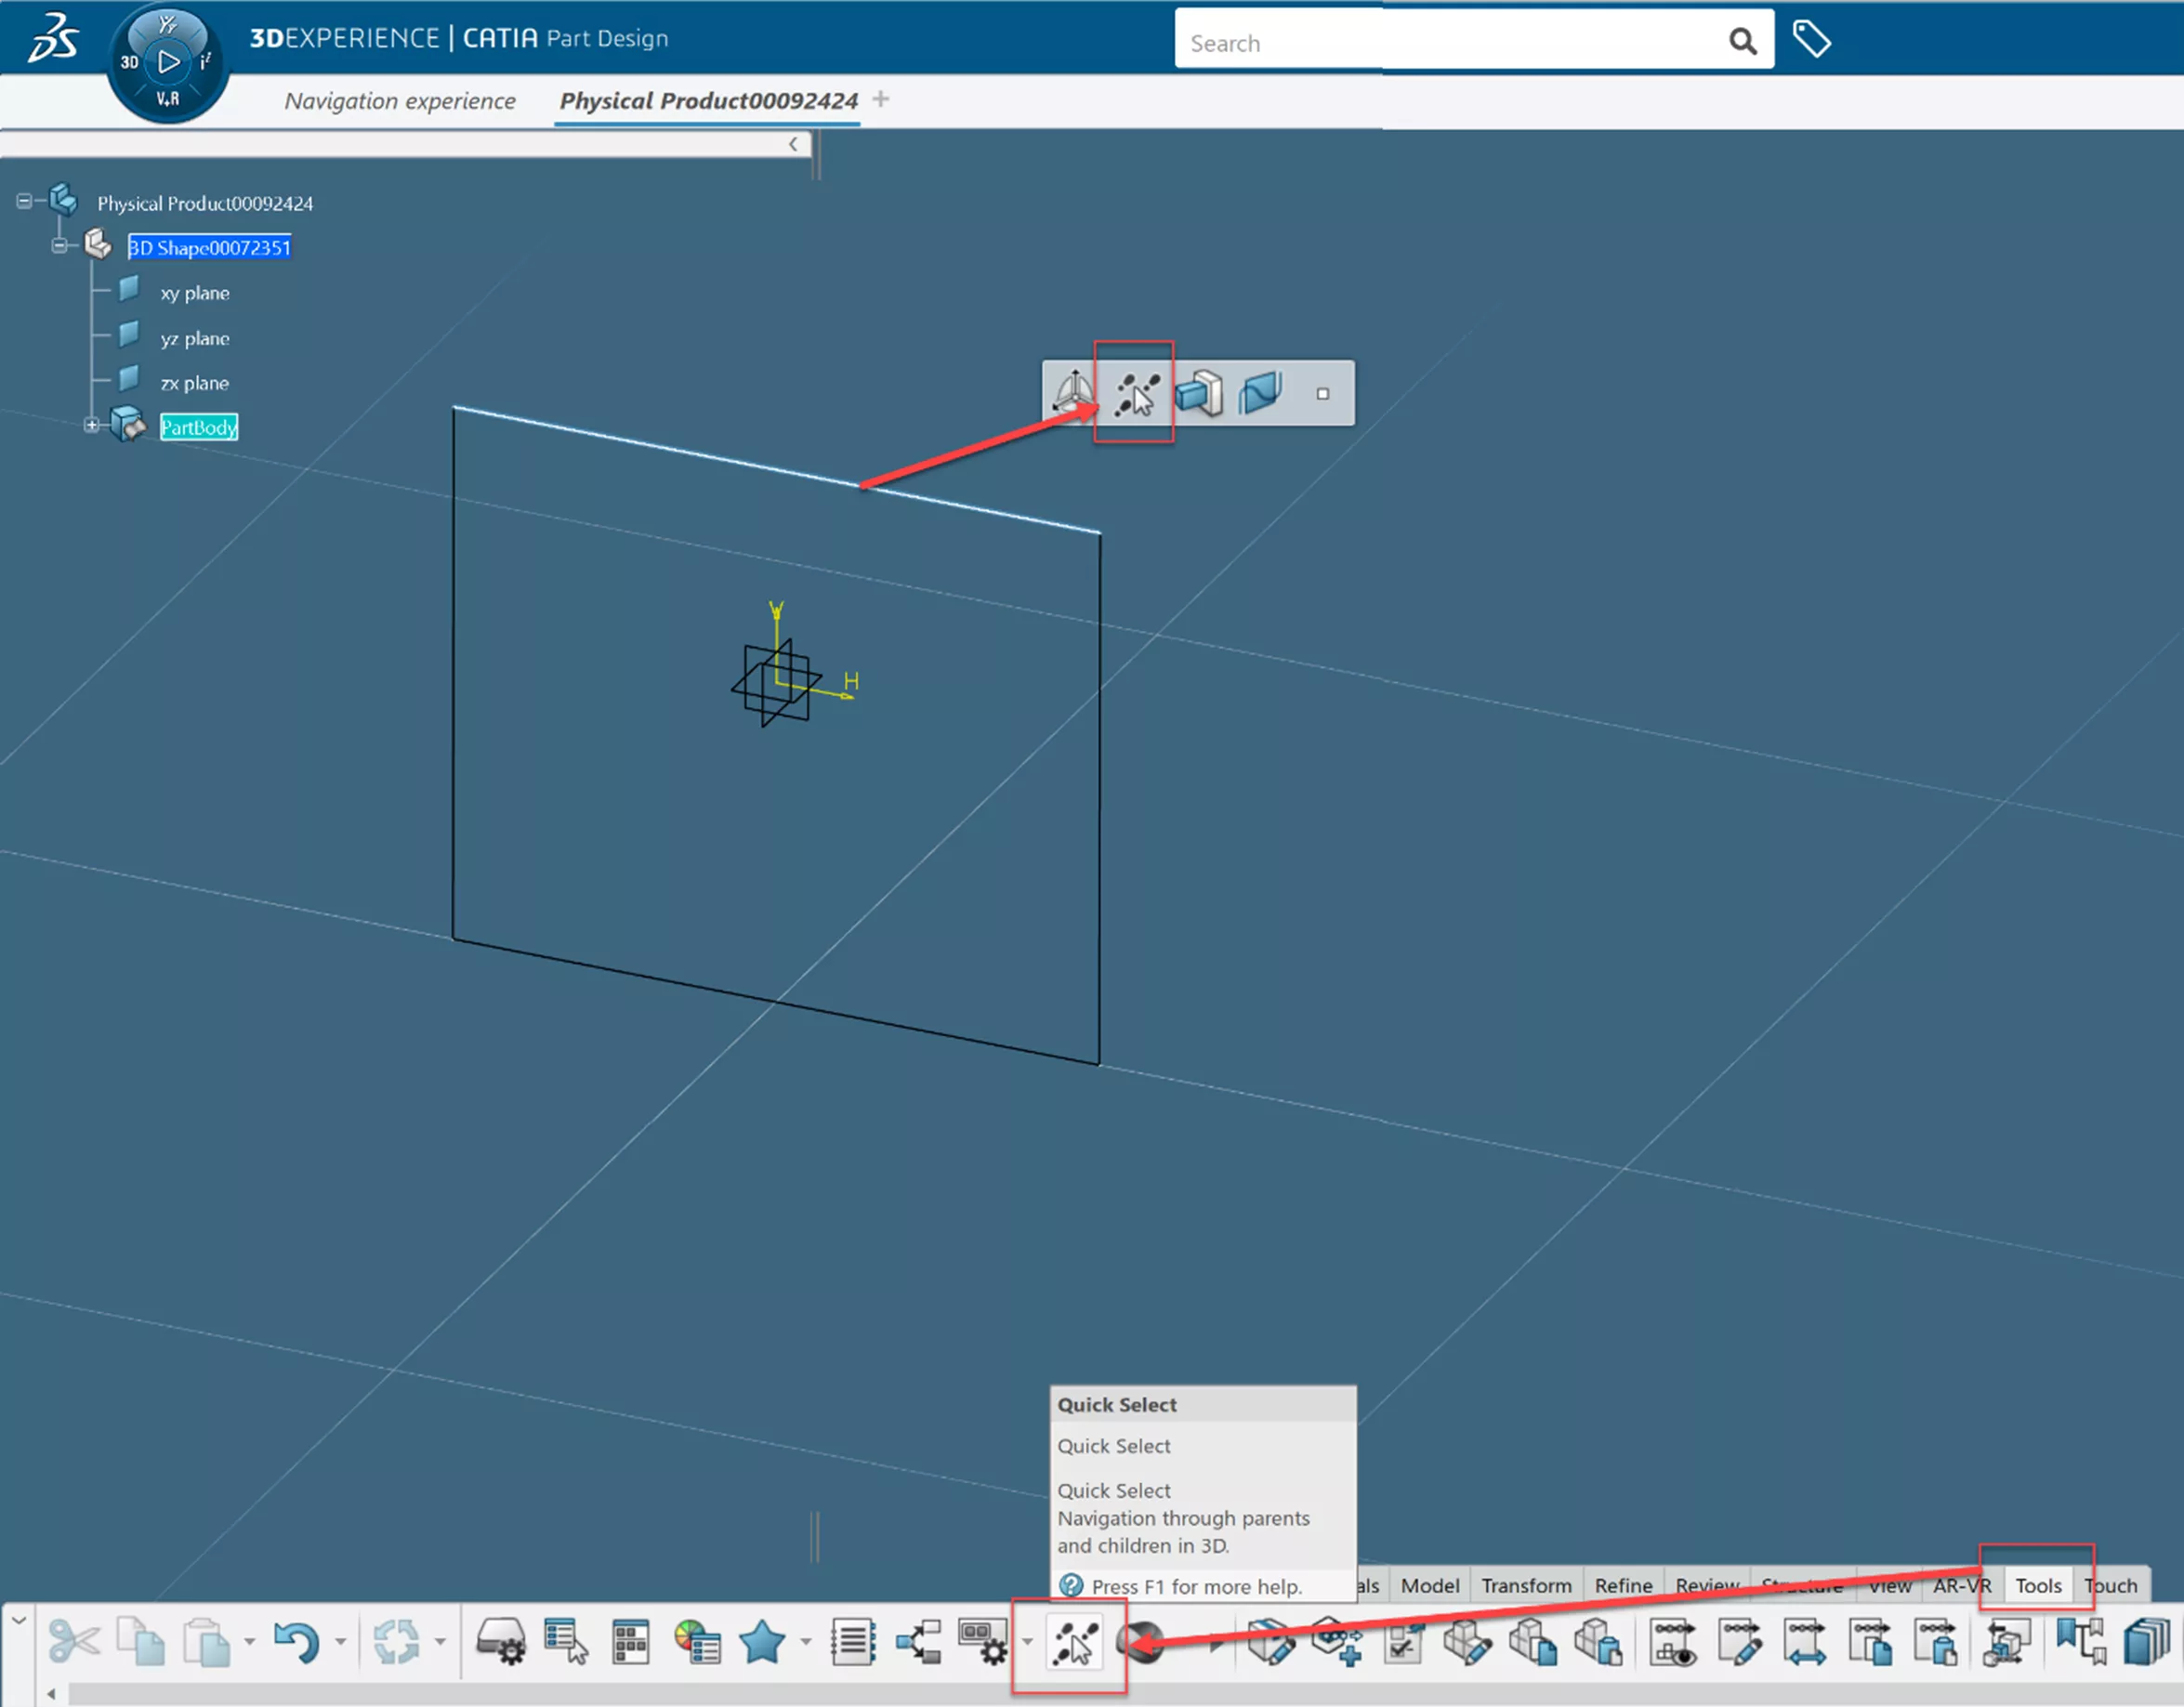
While working in most design-based apps, you can activate the Quick Select feature by clicking on any geometry-based object in 3D. Otherwise, this feature can be found in the Tools toolbar while using the same apps.
Adding Part Bodies and Geosets Using Context Menu
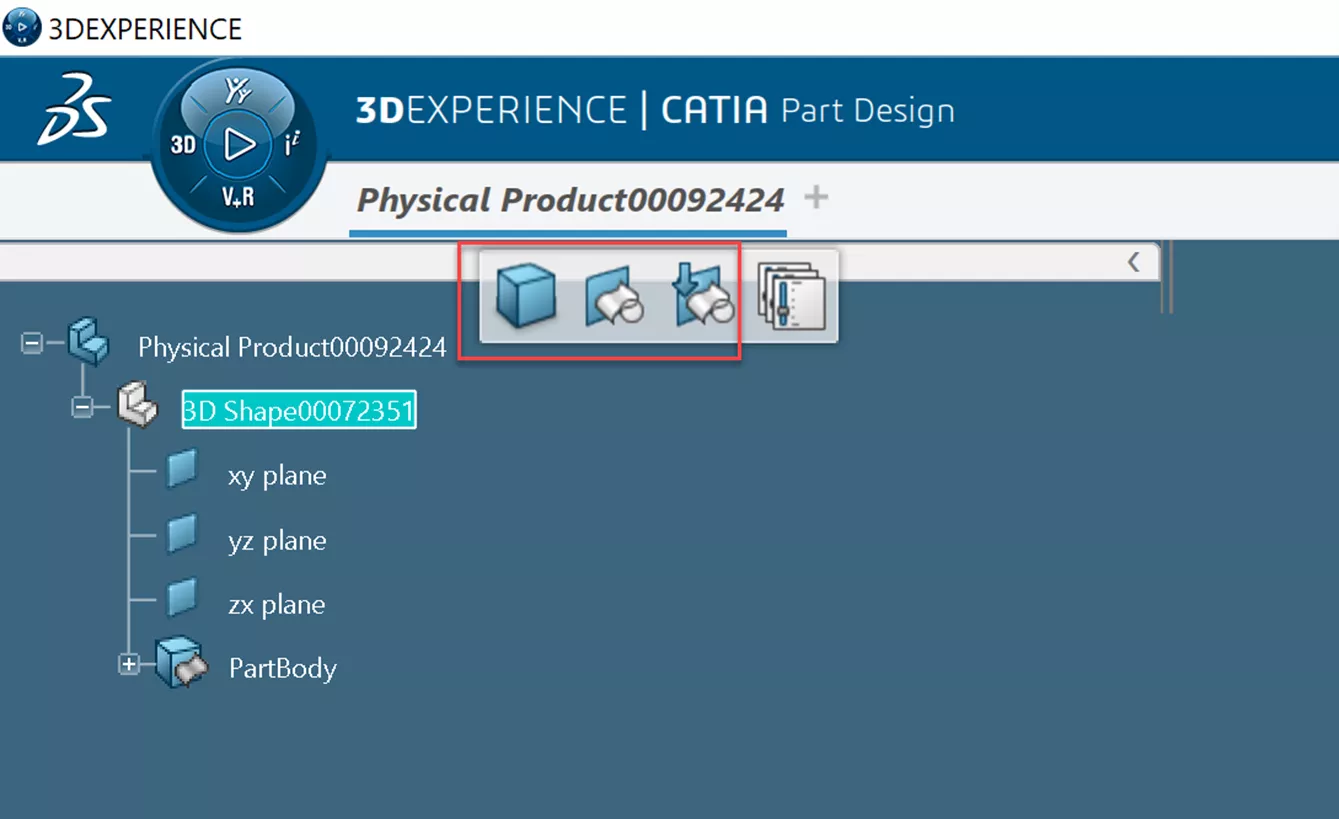
The command for adding Part Bodies, Geosets, and Ordered Geosets is located in the Essentials toolbar for most CATIA-based apps. However, it is much easier to add these by clicking on the relevant 3DShape and using the context menu to add the geometry body.

Key Settings
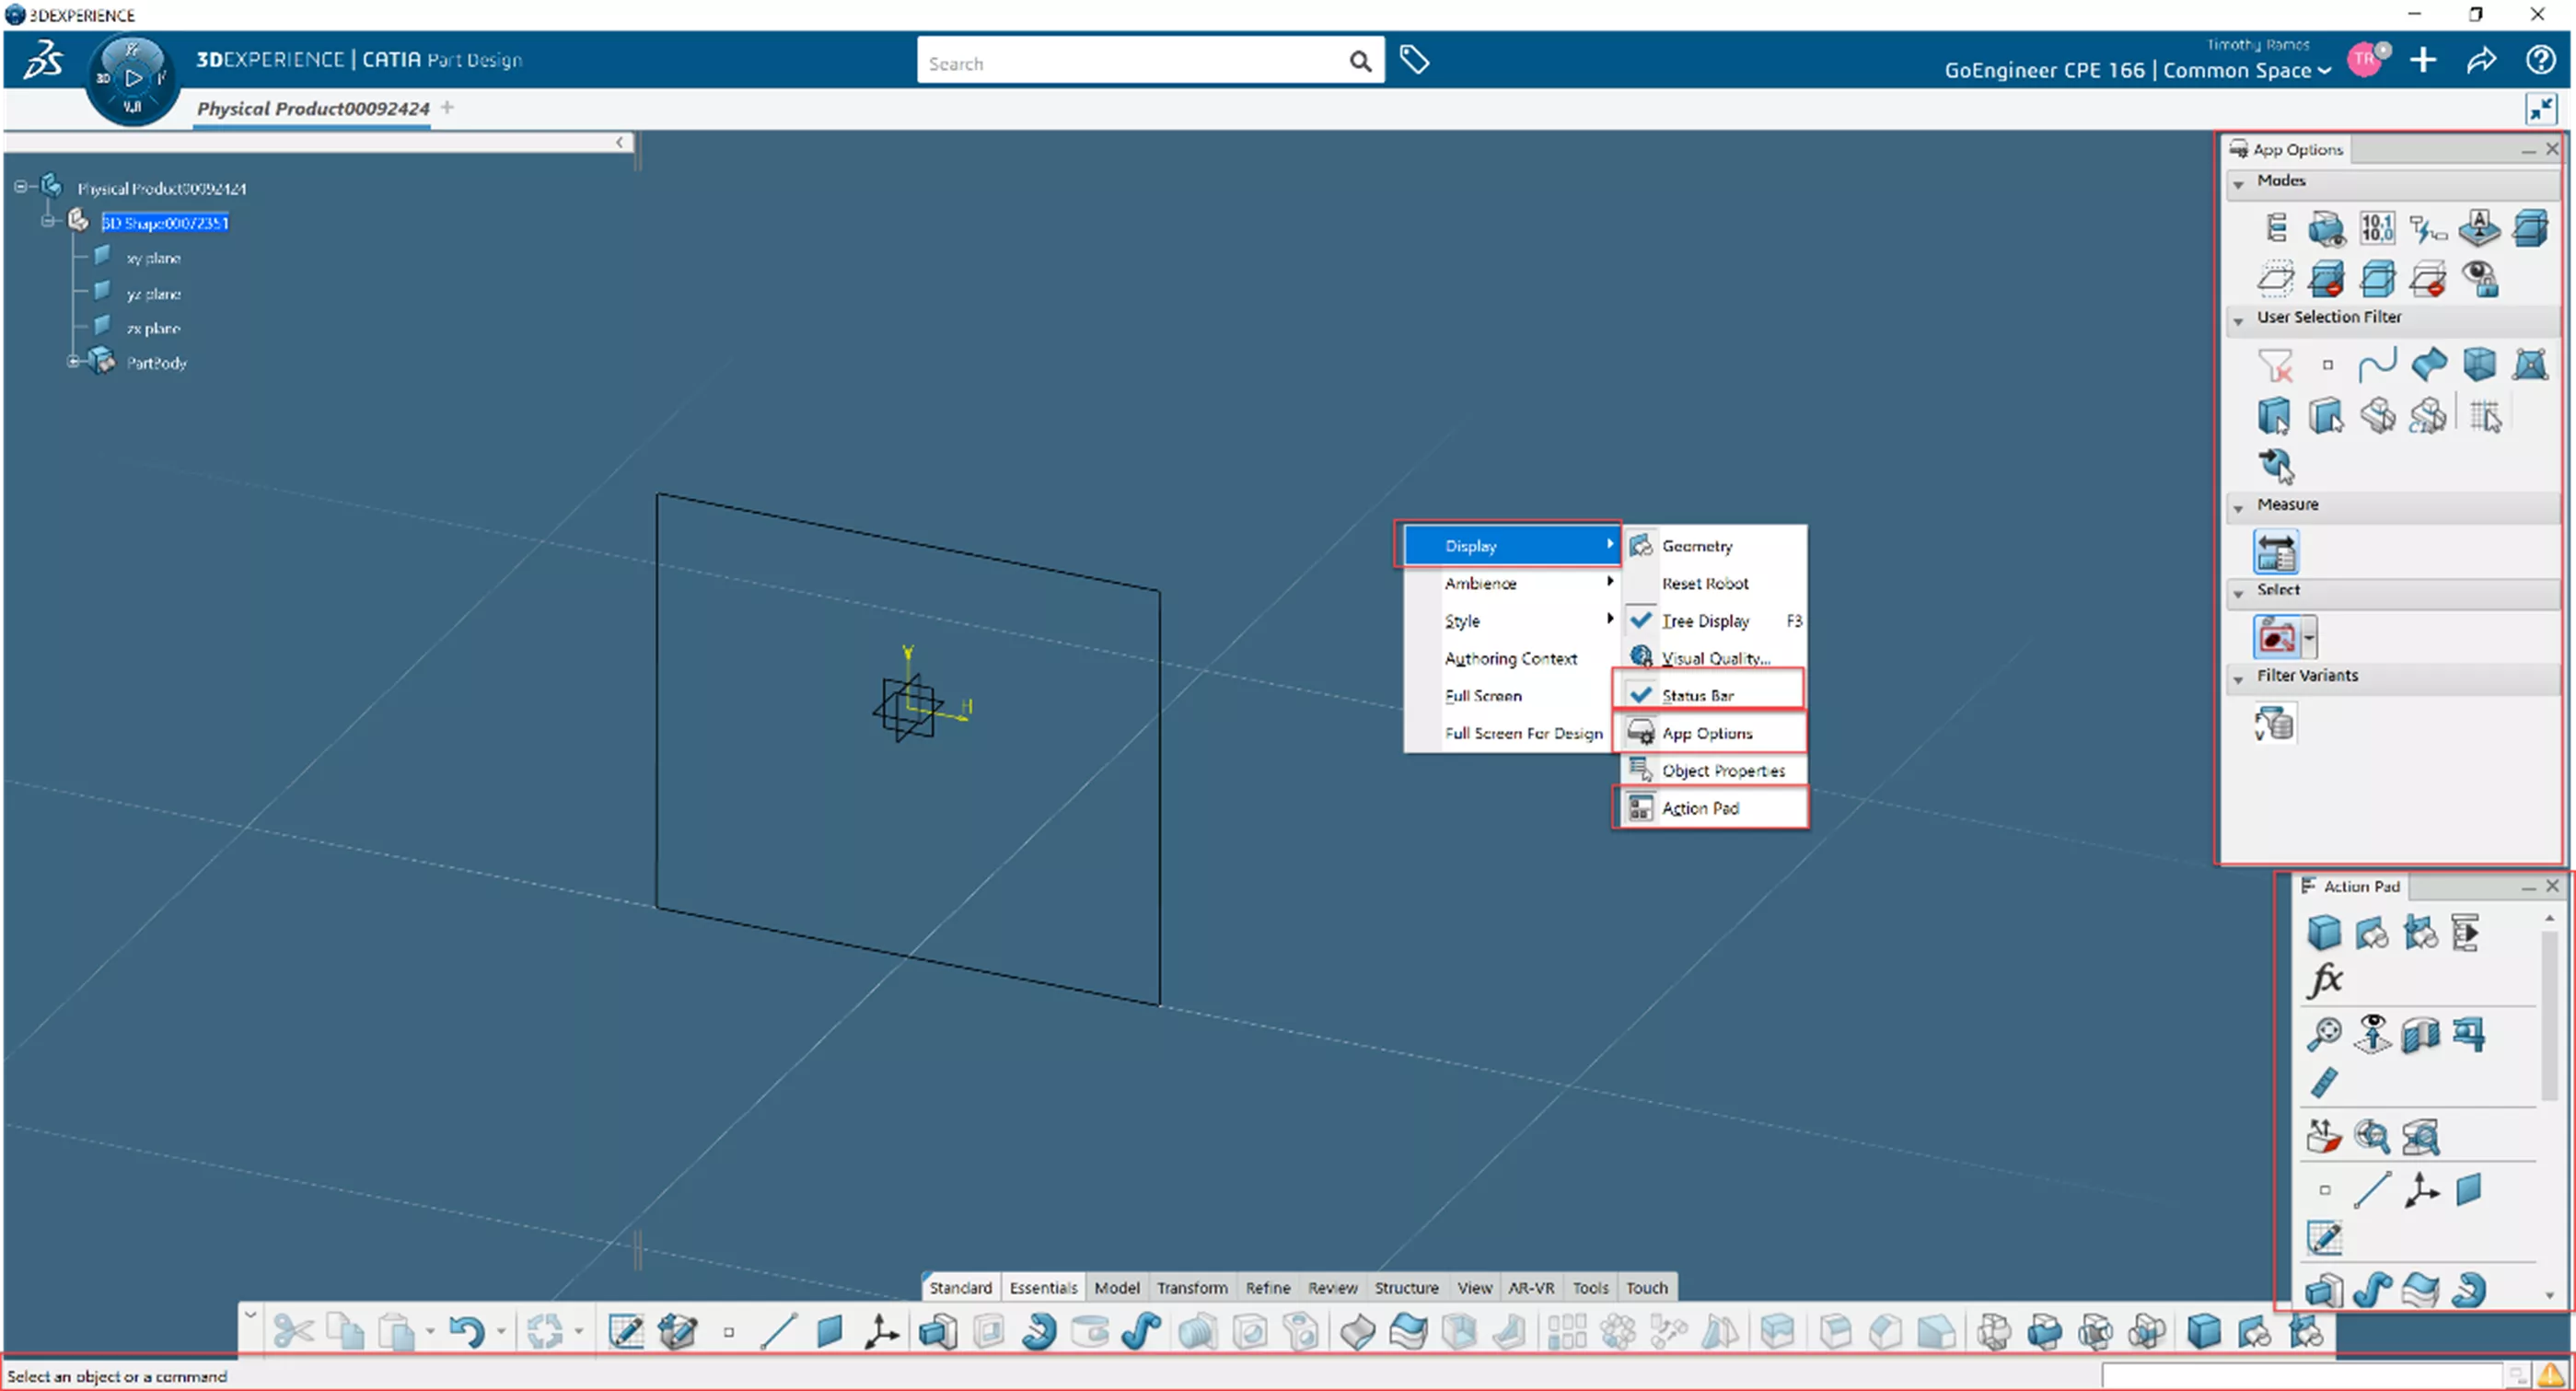
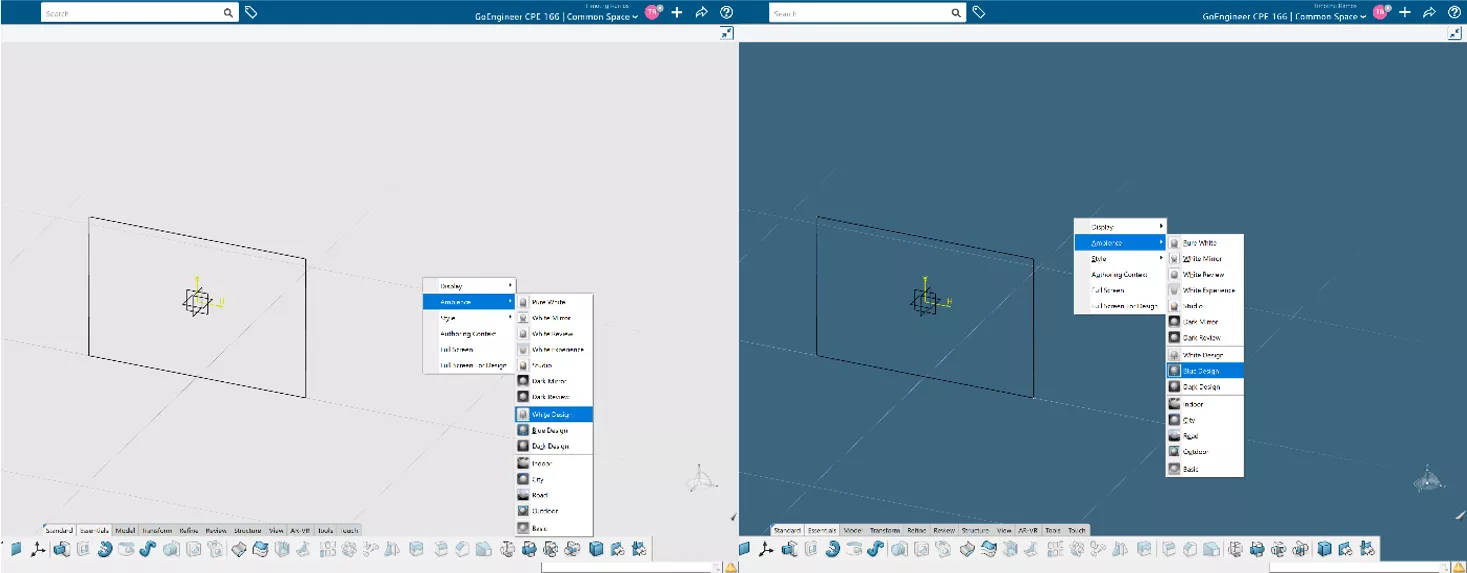
The menu that appears when right-clicking in empty 3D space can be used to access key settings such as displaying the Status Bar/Command Input, activating the Action Pad, toggling the App Options menu, or adjusting the Ambience/background color.
Miscellaneous Functions & Reporting Tools
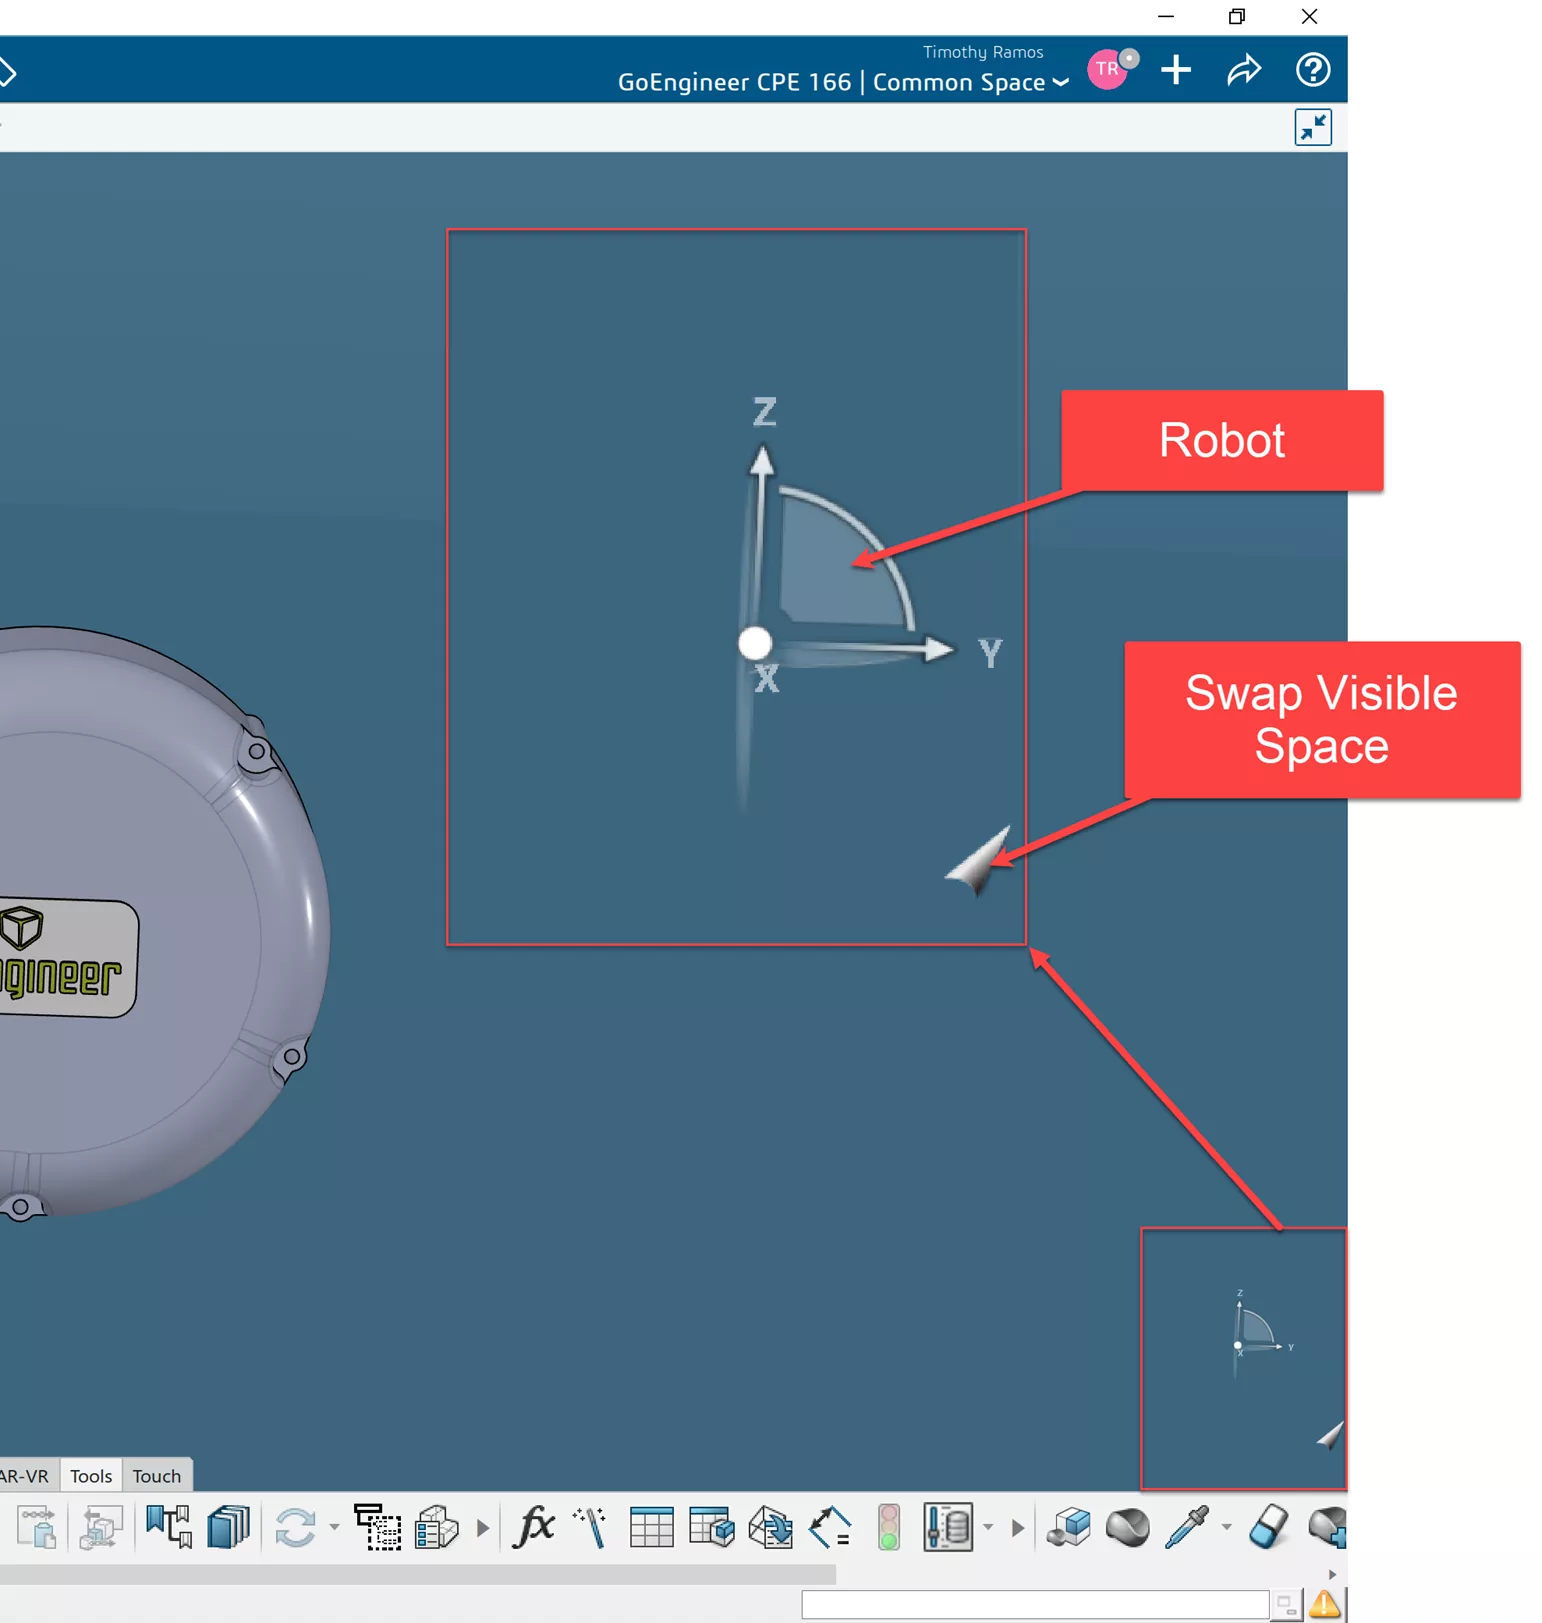
The button for Swap Visible Space has been moved from a toolbar in CATIA V5 to the 3D interface in 3DEXPERIENCE. On the bottom right corner of the interface, there is a small arrow-like icon next to the Robot. Clicking this icon will toggle the visible space views just like the tool in CATIA V5.
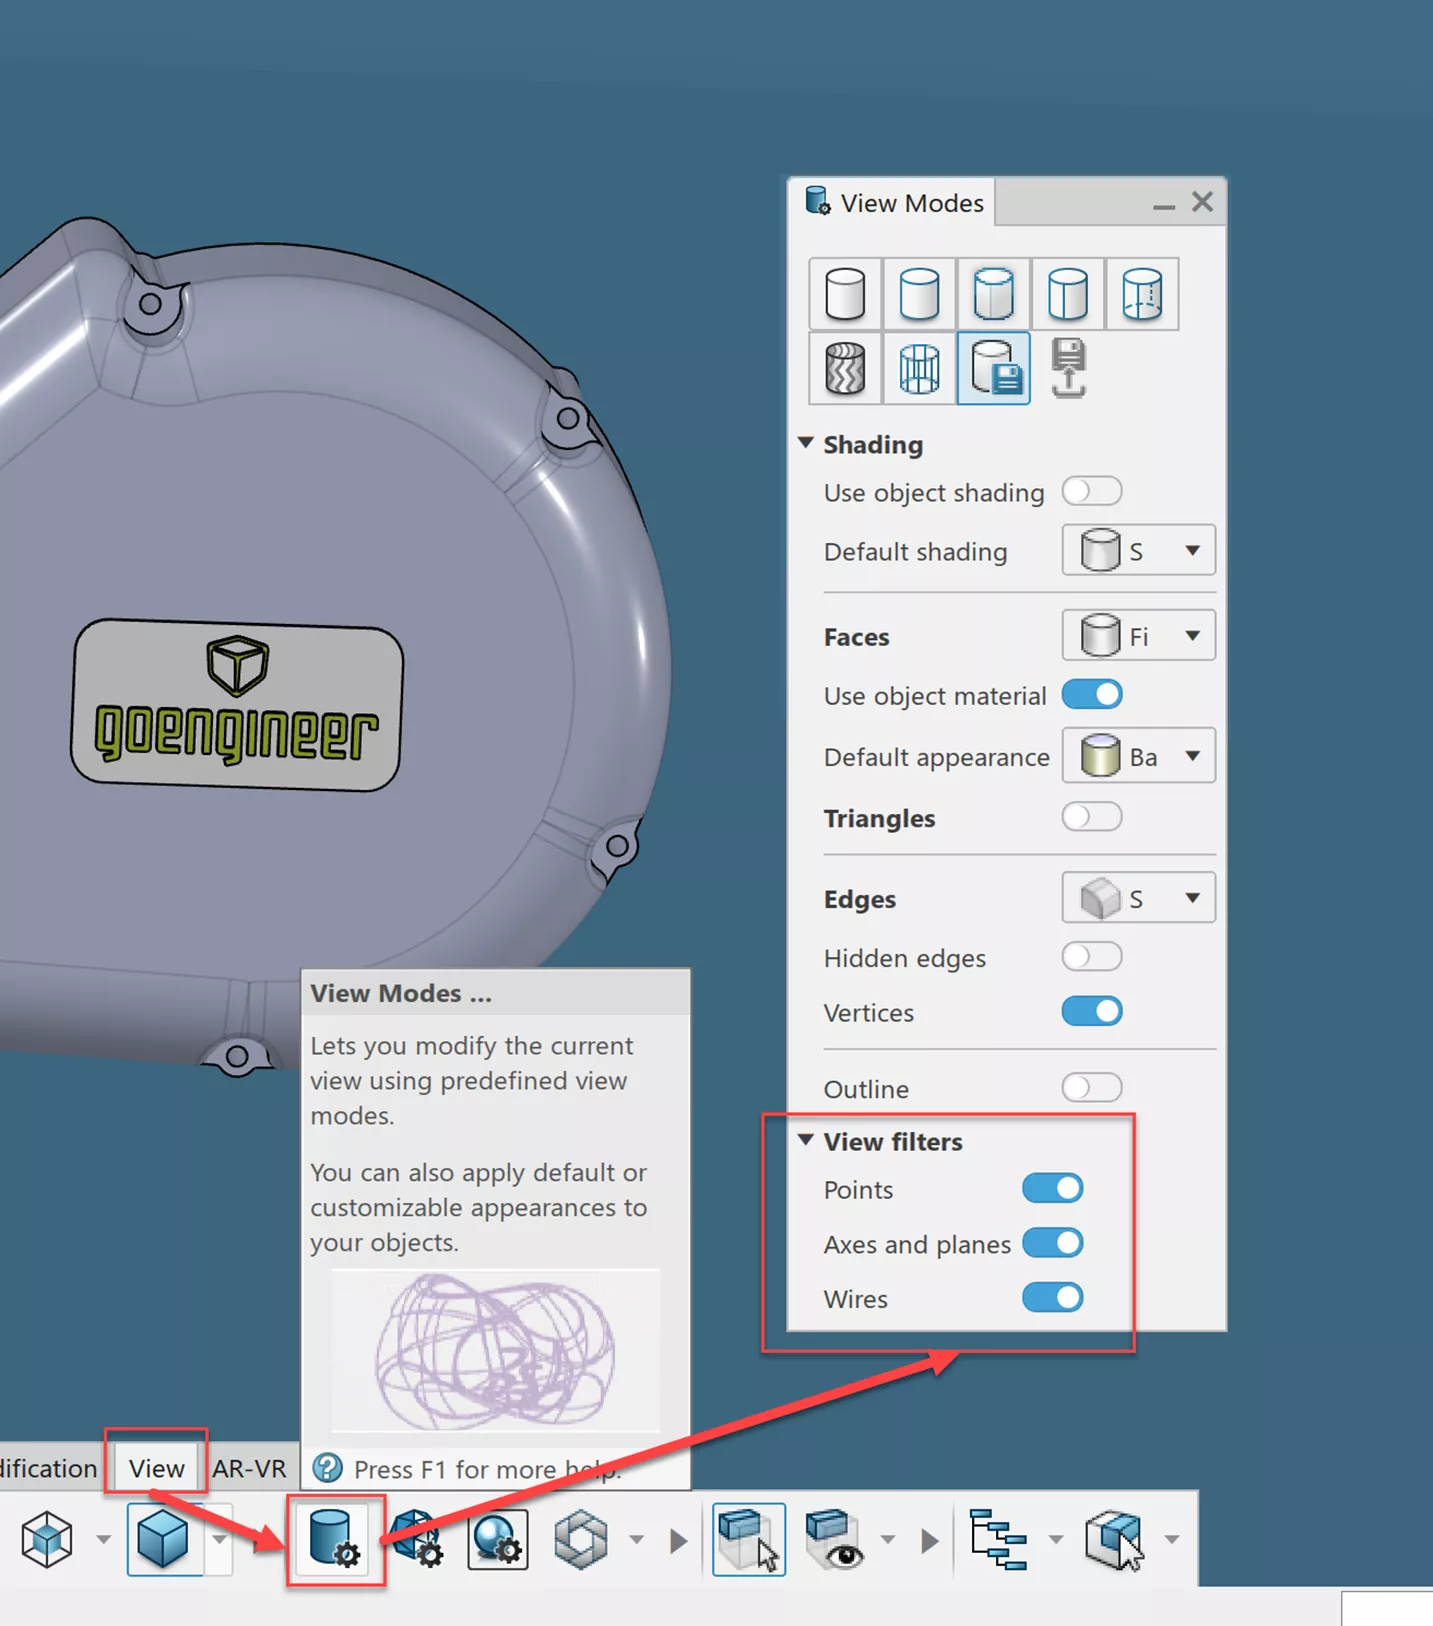
In 3DEXPERIENCE, toggle the visibility of Points, Planes, and Wireframes in your model without prompting a modification. This functionality is available within the View Modes command from the Tools toolbar/tab.
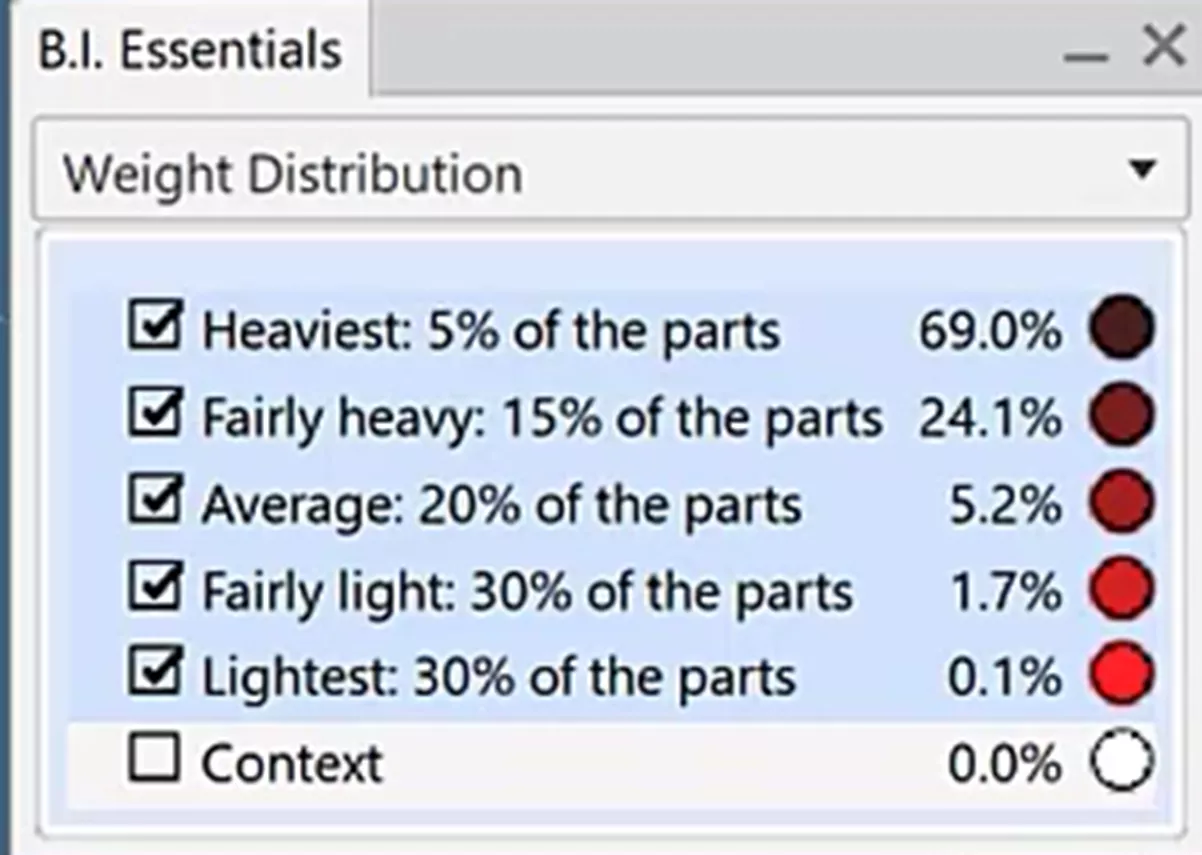
The Business Intelligence (or B.I.) Essentials tool within the 3DEXPERIENCE platform provides reporting statistics against certain attributes of your data, which are not readily visible from the CAD geometry alone. The color-coded interface is easy to use and understand as both the 3D and tree are highlighted.
This tool is accessible from many different apps within the platform and can be used to show a vast amount of metrics.
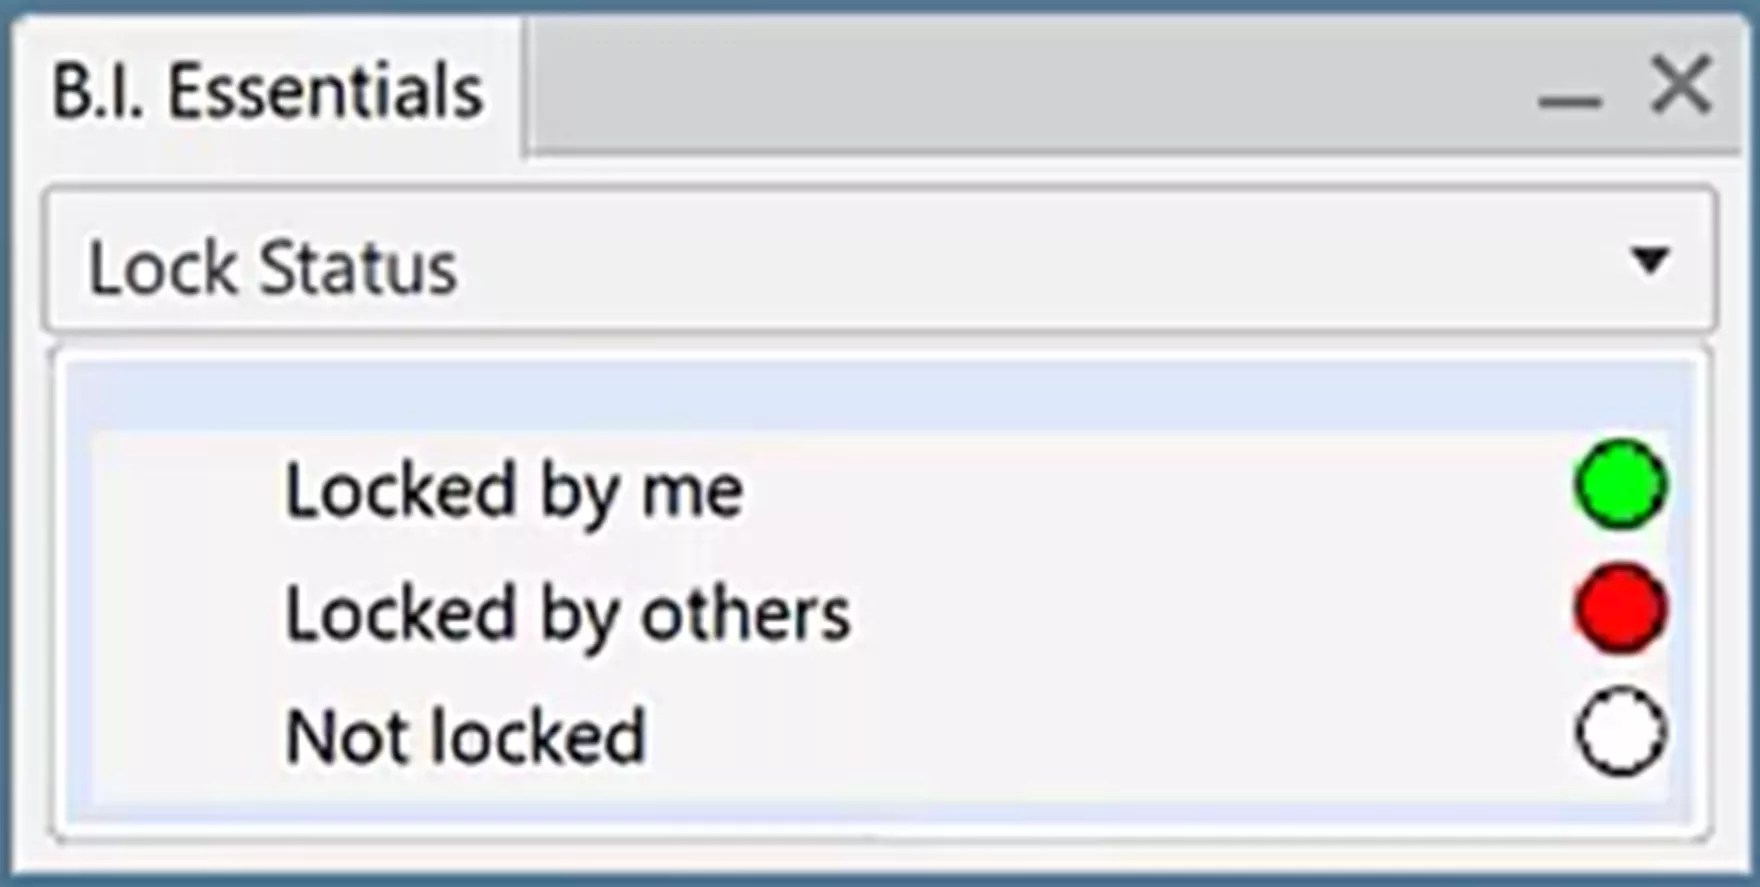
A few examples include the Lock Status, which shows whether the data is locked by you or another user, or is unlocked.
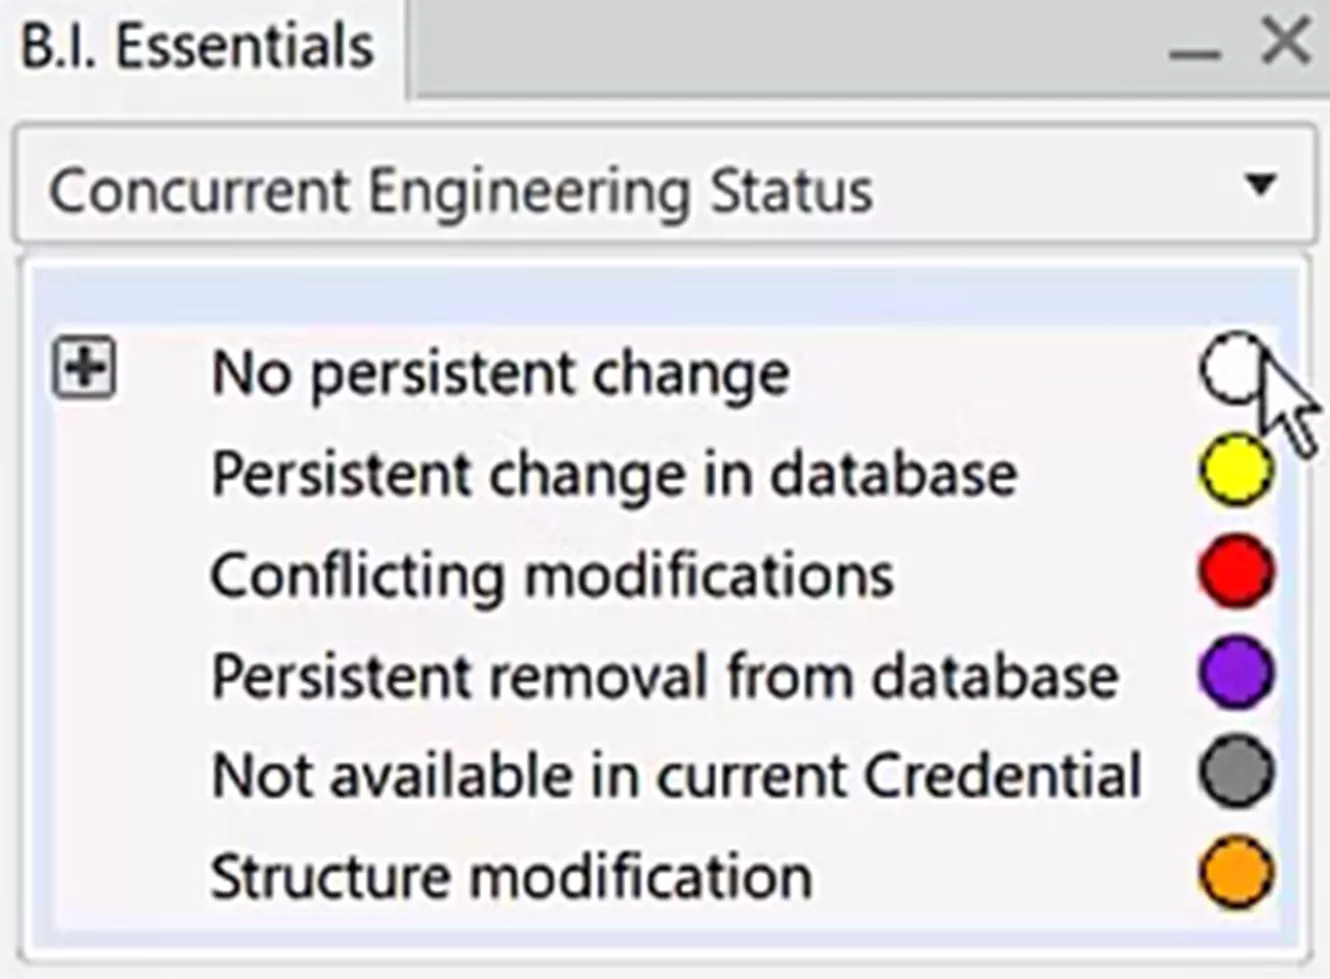
Concurrent Engineering Status reports whether someone has modified data in the background while you were working on it and if it conflicts with your modifications.
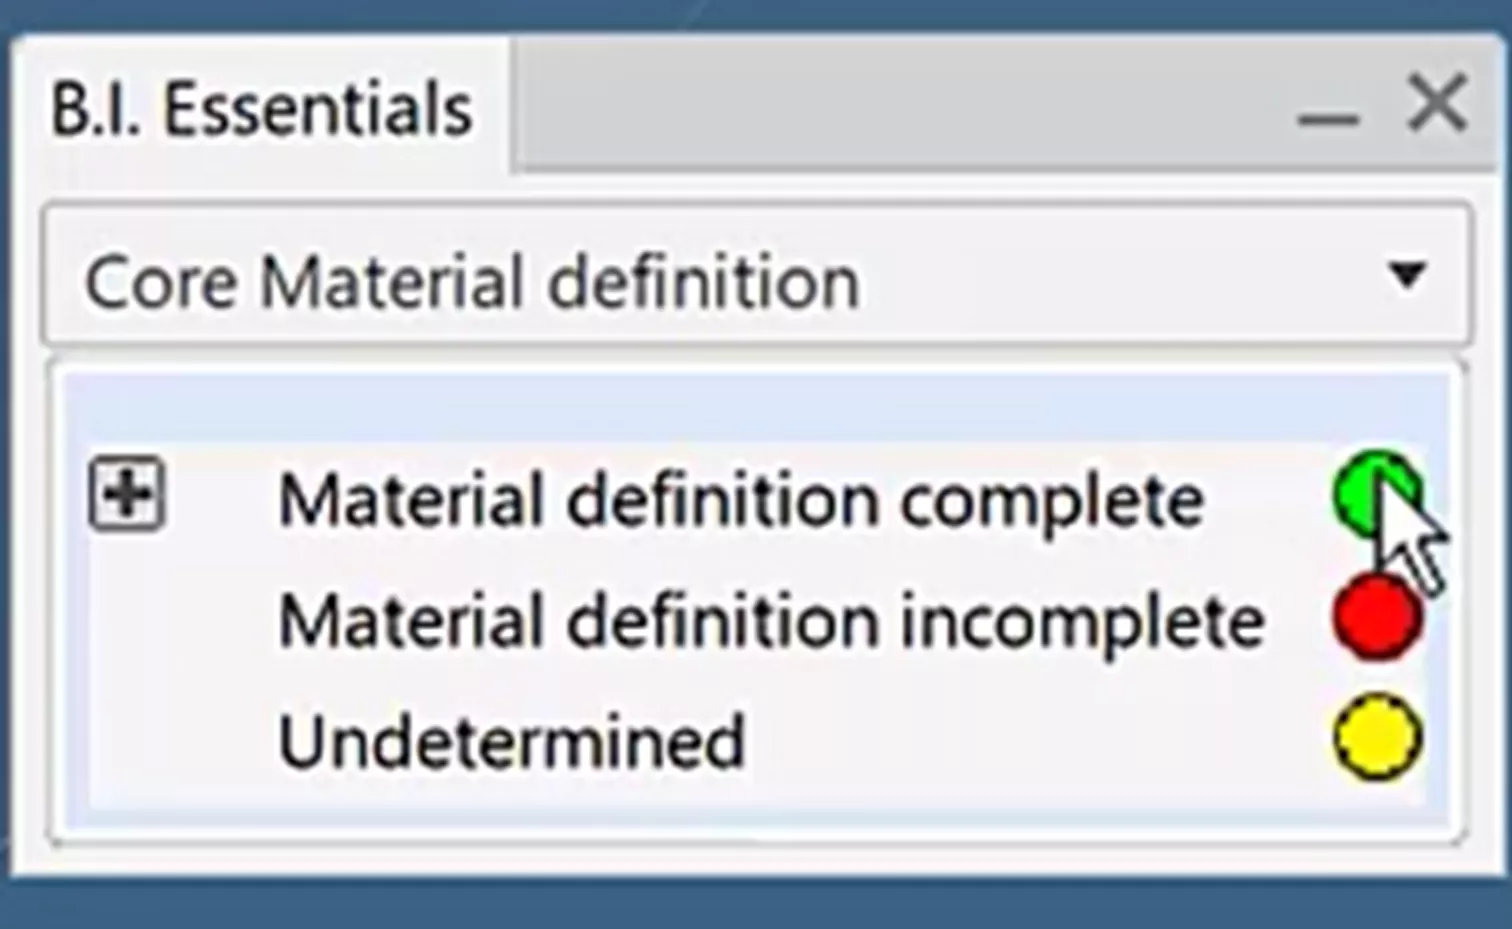
Core Material definition will report whether a material has sufficiently been applied and what material it is.
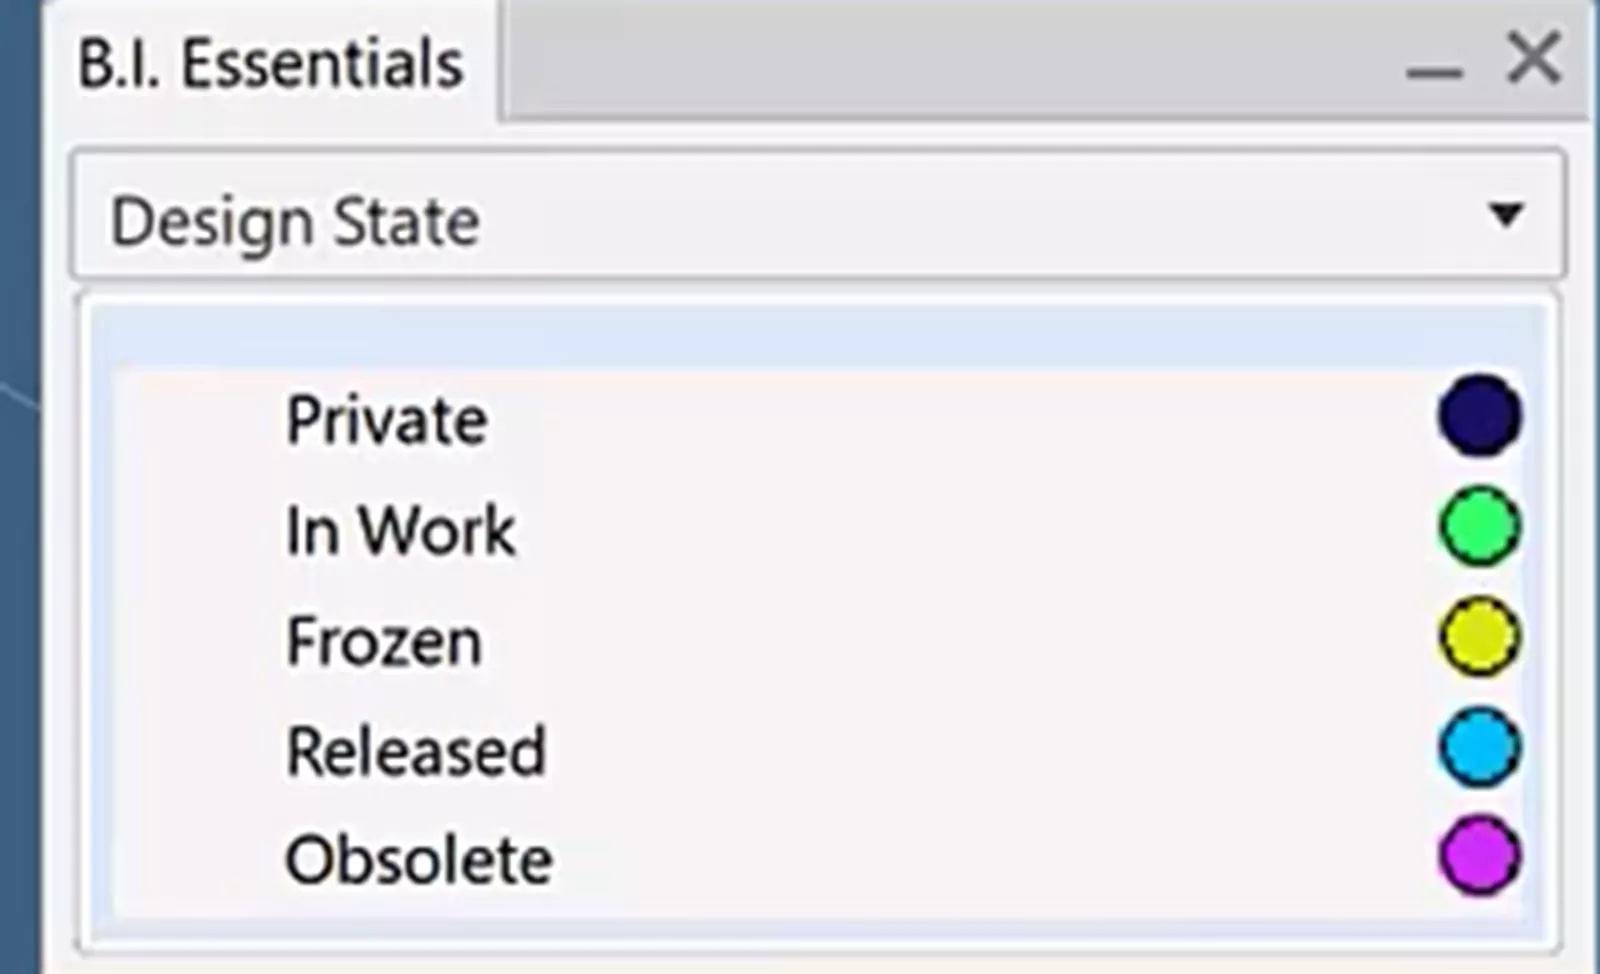
Design State delivers the Maturity of the data, filtering between Private, In Work, Frozen, Released, and Obsolete.
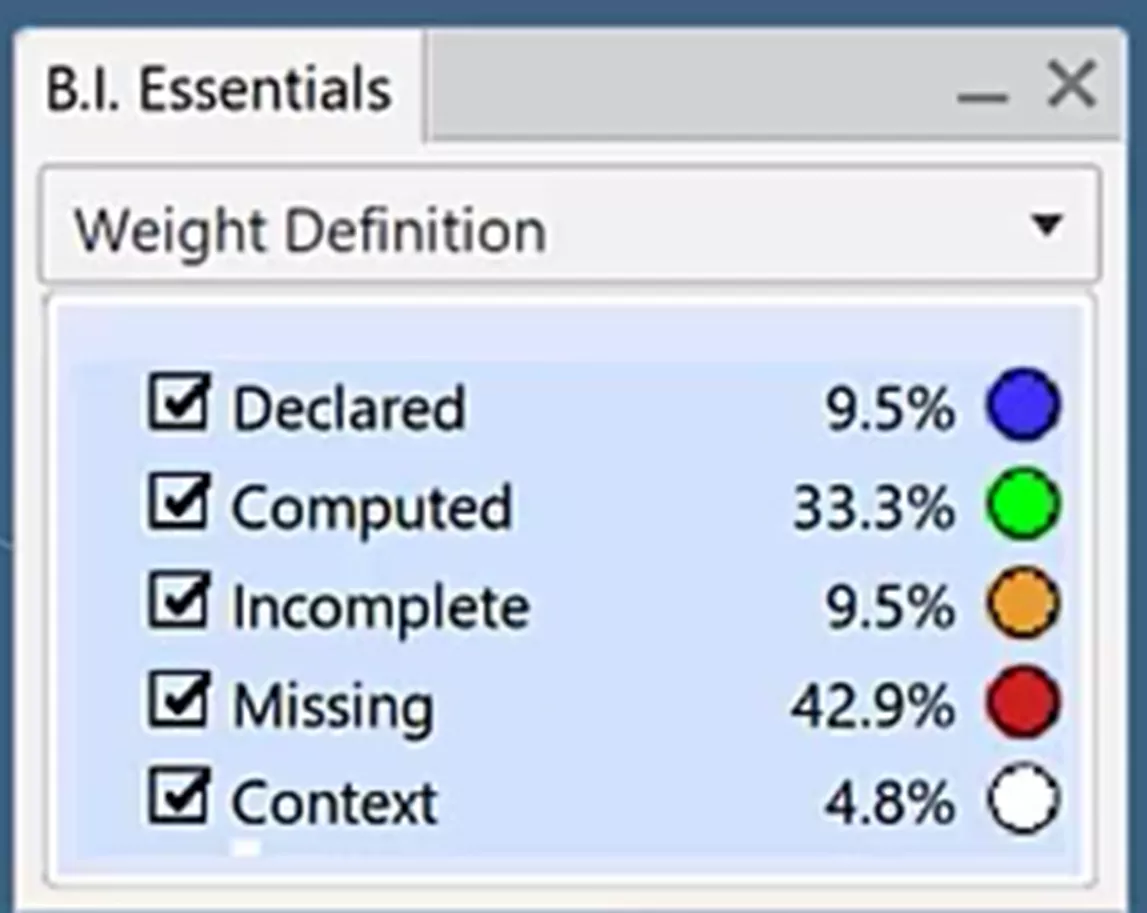
Weight Definition reports whether the weight has been computed, declared, or if more information is needed to gather the weight. You can also compute or declare the weight within the same tool.
Finally, the Weight Distribution function will filter parts based on the percentage of weight they contribute to the overall assembly. Thus, making it easier to determine which parts to focus on when conducting weight reduction efforts.
I hope you find these tips useful as you begin your journey transitioning from CATIA V5 to 3DEXPERIENCE CATIA. If you need more assistance or prefer a structured and guided jumpstart, GoEngineer offers 3DEXPERIENCE CATIA training in both online and in-classroom settings.
Editor's Note: This article was originally published in May 2024 and has been updated for accuracy and comprehensiveness.
Related Articles
How to View File History in 3DEXPERIENCE
3DEXPERIENCE CATIA Tools for Assembly Design, Drawings, Sheet Metal, & More
Composites in 3DEXPERIENCE CATIA Overview
CATIA V5 vs 3DEXPERIENCE CATIA: Interface, Licensing, Installation, & Setup

About Tim Ramos
Tim Ramos is a Senior Specialist with GoEngineer based out of Denver, Colorado. He graduated from Rensselaer Polytechnic Institute in 2014 with a degree in Mechanical Engineering and Material Science. After graduation, Tim worked with Honda R&D designing the body/frame structures of their vehicles. He designed sheet metal parts using advanced surface design and plastic injection molded parts using solid part design in CATIA V5. In 2018, Tim transferred over to his CATIA Specialist career path and has been focusing on all things related to CATIA V5-6 and 3DEXPERIENCE CATIA ever since.
Get our wide array of technical resources delivered right to your inbox.
Unsubscribe at any time.