Using the SOLIDWORKS Simulation Cleaning Utility
After installing SOLIDWORKS on a new computer, there are a lot of unknown files and tools that come as part of the installation package that can be handy in certain situations. The SOLIDWORKS Simulation Cleaning utility is one of these. You can find this utility in the following file directory:
- C:\Program Files\SOLIDWORKS Corp\SOLIDWORKS\Simulation\Utilities

What does the SOLIDWORKS Simulation Cleaning Utility do?
The Cleaning Utility permanently deletes simulation data connected to a SOLIDWORKS file while leaving the SOLIDWORKS file intact. The reasons you would want to do that are listed below.
- Let’s say you want to share the SOLIDWORKS file with another person, but not the simulation data that is connected to it. Just copy the file and wipe out the simulation data using this tool.
- Every so often, Simulation might crash SOLIDWORKS because of file corruption in the simulation file, or Simulation will cause performance issues that interrupt workflow. To figure out if it is the simulation data causing the crash/performance problems or something else, just copy the file or files using Pack and Go. Make sure the issue is still happening in the copied file, then use this tool on the copied file and see if that helps with the crashing or performance issues. If it does, then you know for sure that your simulation data is corrupt and the original files will need to be cleaned as well.
To run this tool, make sure the file or files to be cleaned are no longer open, then double left-click the simulation cleaning utility.
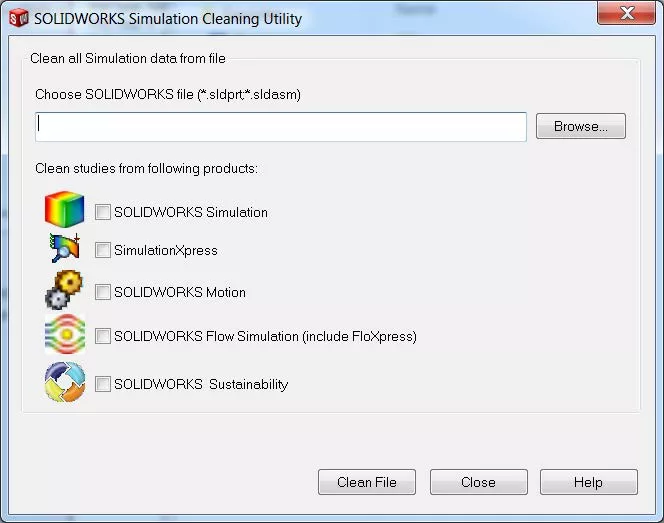
The SOLIDWORKS Simulation Cleaning Utility CommandManager will open where you can choose what type of simulation data you want to clean. Then browse to the file you would like to clean and press Clean File.
After going through these operations, the selected file has been wiped of whatever simulation data was checked by the user and is now a clean slate.
Unfortunately, this tool leaves nothing behind so all the work put into the simulation up to this point will need to be redone, but in the situations mentioned above, this is a necessary evil.
More SOLIDWORKS Simulation Tutorials
SOLIDWORKS Motion Analysis Motor Torque & Power
SOLIDWORKS Simulation Natural Frequencies, Mode Shapes, and Vibration Explained
How to Set Up a Thermal Study in SOLIDWORKS Simulation Professional

About Taran Packer
Taran is a SOLIDWORKS Simulation Technical Support Specialist at GoEngineer. He has a Bachelor’s degree in Biomedical Engineering from the University of Utah. Taran enjoys learning about different tools in SOLIDWORKS Simulation, Flow Simulation, and Plastics.
Get our wide array of technical resources delivered right to your inbox.
Unsubscribe at any time.