CAMWorks: Best Practices for Updating Your Installation
When updating CAMWorks, a few key steps can get overlooked when upgrading to a newer version. This article covers best practices and steps to upgrade your CAMWorks installation to a newer version without losing or leaving data behind.
CAMWorks, unlike SOLIDWORKS, does not give the option to update a prior installation to the latest version. When installing CAMWorks between year versions, the installer will create a new installation folder with a new default set of files. These files are Post-processors, Tools, Technology Databases, and Templates. These files store a lot of custom data and aren’t brought forward to the new version automatically.
It is important to note that if you are upgrading your CAMWorks installation between service packs, the installer will not create a new installation folder. The installer will instead patch any files missing between the existing install and the new version, bringing them up to date. During this update, the installer will overwrite the Technology Database unless the TechDB.cwdb file is renamed, so it is very important to create a backup copy.
The first steps that should be taken when starting this process are to back up the Technology Database file, custom posts, and any custom tool data. To back up these files, simply copy and paste the files into a new directory separate from the CAMWorks directories.
File locations:
Technology Database
"C:\CAMWorksData\CAMWorks20XXx64\TechDB\Techdb.cwdb"
Post Processors
"C:\CAMWorksData\CAMWorks20XXx64\Posts"
Tools
"C:\CAMWorksData\CAMWorks20XXx64\Tooling"
(Only required to back up if this contains custom tool data)
Templates
"C:\CAMWorksData\CAMWorks20XXx64\Lang\English"
(Only required to backup if this contains customized templates)
Once you have backed up the files, you can run the installer for the new version. After extracting the .zip that the installation files downloaded in, right-click on the setup executable and run it as administrator. Run through the installation as normal.
Once the installation is complete, you can start importing your previous data back into CAMWorks. If you need access to download the installation files, view the information below.
Download CAMWorks License Activation Guide
We suggest reading the Activation document before proceeding.
Complete the quick login information, and the download will be available. For software downloads, go to www.camworks.com and use your existing CAMWorks account or, if you have no account, you will need to register for a new account. You must register to create your own company account. Save this information as you will use this account for future downloads of the software. It may take up to 48 hours to activate the new account.
Note: Please ensure you have the latest version of the CAMWorks License Manager. If you have not installed this update, please download it from www.camworks.com.
Contact your Technical Support for assistance if needed.
Import Technology Database Data
With the installation now complete, the first step will be to import the old Technology Database into the newly installed version. The Technology database contains your custom machines, tool cribs, and strategies and needs to be imported to be made available in the new version.
To launch the Technology Database utility, we have a couple of options. The first option is to run the TechDB app from the CommandManager within SOLIDWORKS. With the CAMWorks add-in enabled, select the CAMWorks tab on the CommandManager. On the far right of the CommandManager select the TechDB button.
Note: Depending on the size of your screen, this button may collapse under the double chevron at the end of the CommandManager. It is recommended that you close SOLIDWORKS before making changes to the TechDB.

The second option is to run the TechDB app from the program files directory. The default directory for the TechDB app is "C:\Program Files\CAMWorks20XXx64\TechDBApp\TechDB-App.exe". Double-click to launch the executable.
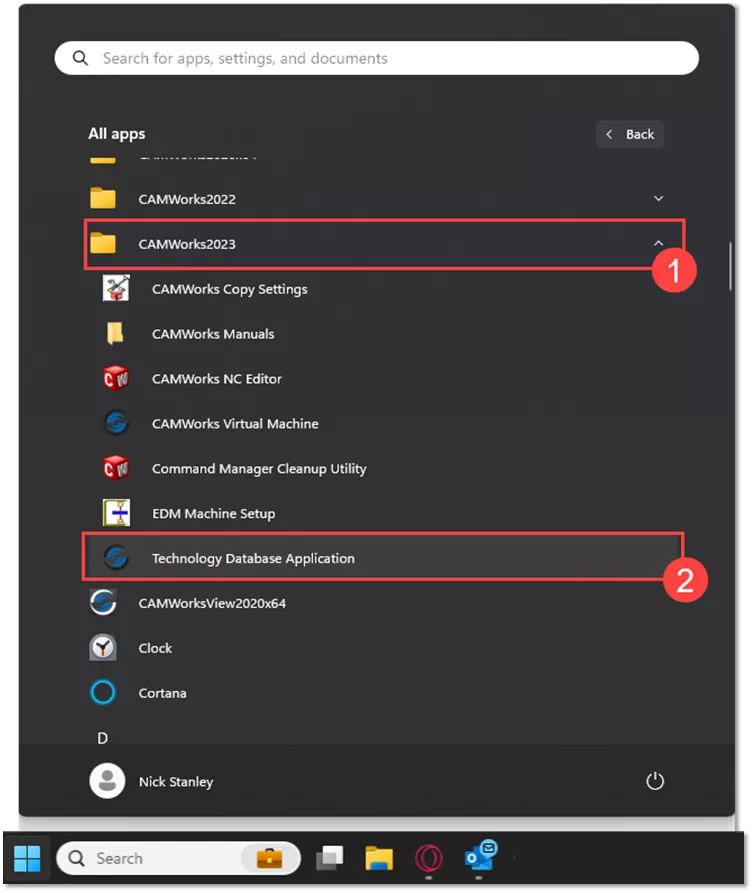
Once the Tech DB application is launched, select the Settings tab. In the Settings tab, we can define the file path to the TechDB file or browse a previous TechDB file and convert it to the new version.
Import a Previous Version
Select the Import Database button. If you are importing a database from 2018 and later, make sure the SQLite option is selected. If importing a database from 2017 or older, select the MS-Access option.
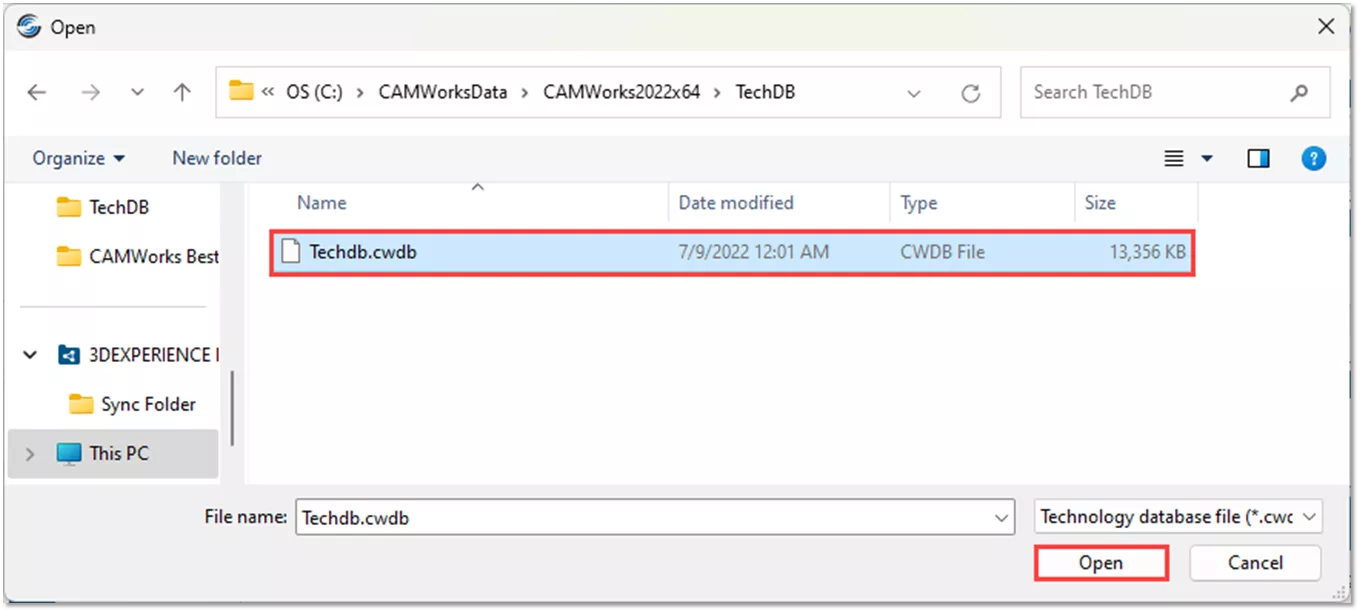
Next, select the Browse button, and using File Explorer, find your previous version database, whether in your backup location or the default location of the previous version. Select the TechDB.cwdb file and click Open.
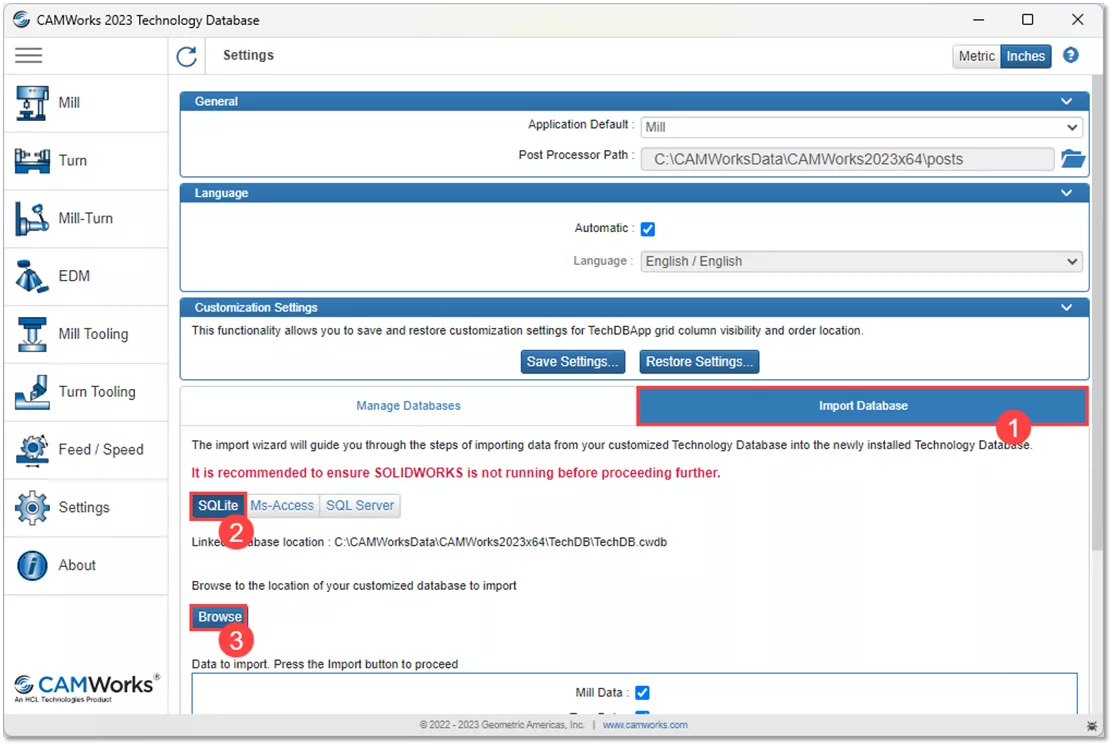
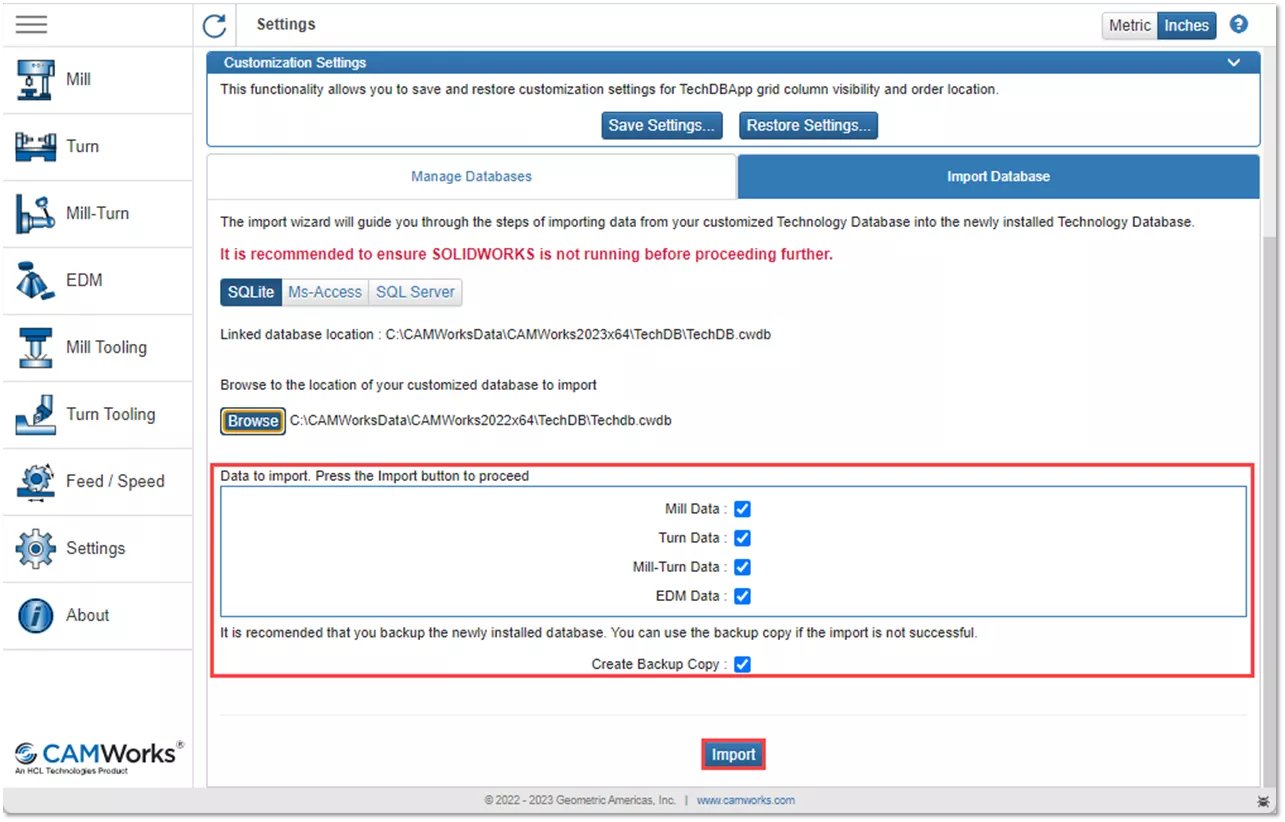
Below the Browse button are options for what data to be imported to the new version. It’s recommended to leave all options on unless you are trying to avoid bringing specific data forward. There is an additional Create Backup Copy check box that will save out the current TechDB.cwdb file into a folder in the default directory, this is optional.
Once all is set, click the Import button. The import will begin, creating a new TechDB.cwdb file for this year's version with your data. This process can take several minutes.
After importing, click into the other tabs with custom data, such as the Mill tab if you have custom machines, and check that your Data made it in.
Link to an Older Service Pack of the Same Year
The Link/ Manage Databases option does not convert the TechDB.cwdb file like the import option and instead sets the TechDB.cwdb file active. When upgrading service packs, the TechDB.cwdb file will still be valid for that version and doesn’t need to be converted.
In the Settings tab, select the Manage Databases option. To browse to the file you want to link, press the Plus icon. A small dialogue will appear. Make sure you have the SQLite option selected.
Optionally, check the Set as Active box to automatically set the TechDB active upon opening it however, the active database can’t be changed while CAMWorks is running. Select the Browse button, use File Explorer to find the backed-up TechDB.cwdb file, select it, and press Open. Then, click the check mark to add the path.

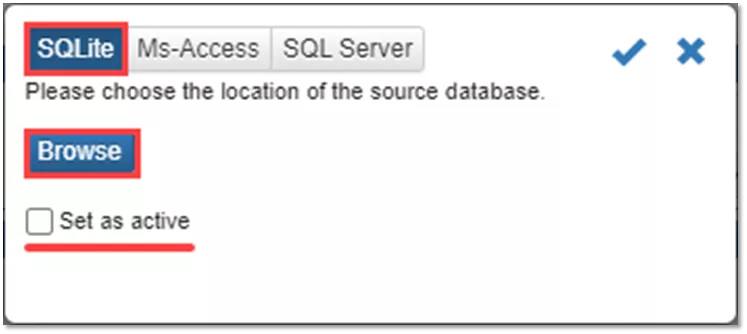
If you didn’t check the Set as Active box, the path will be added to the list, but the TechDB will not be linked. You can select the check to the right of the Plus button with the desired path highlighted to set the TechDB active. After setting the TechDB active, click into the other tabs with custom data, such as the Mill tab if you have custom machines, and check that your Data made it in.
Import Post Processors
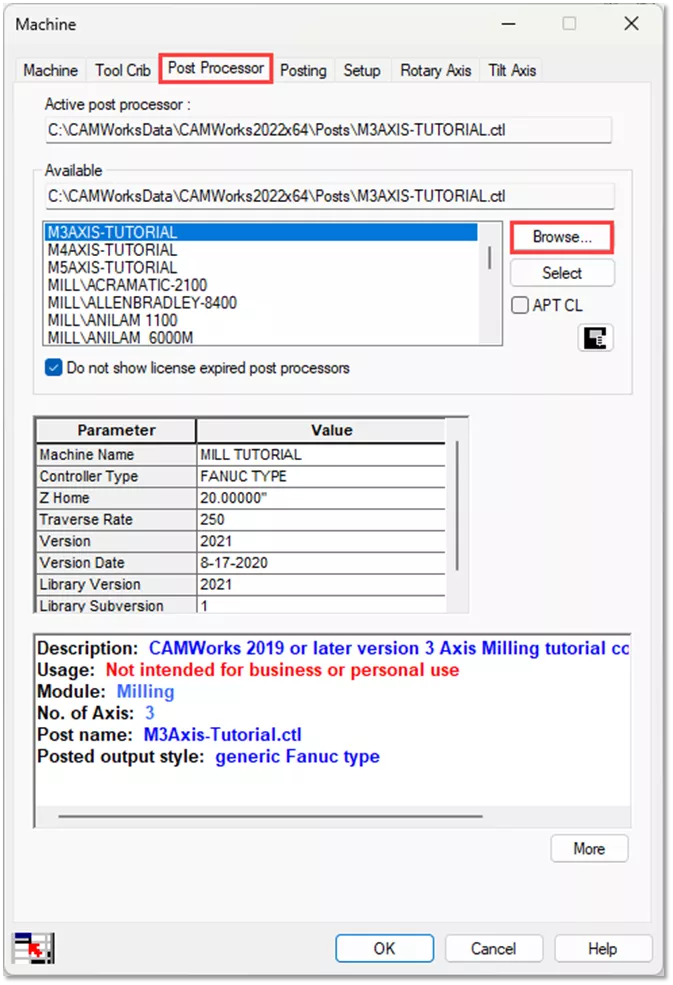
Post Processor files can be brought forward to the newer version by simply pasting them into the new version’s directory for posts. Once you copy them, set the path for the post processors as active. To do so, select the Define Machine button on the CAMWorks tab in the CommandManager.

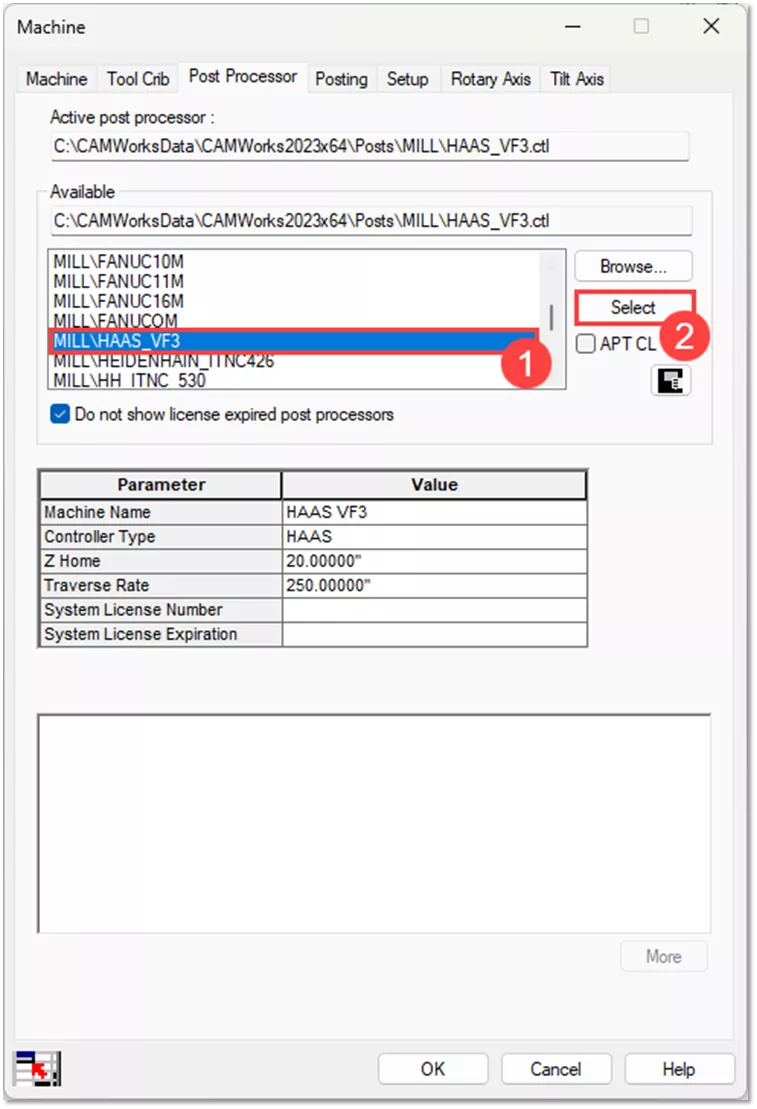
Select the Post Processor tab, select the Browse button, and go to the directory which you copied the Post Processor files into. Select a post in the directory, this will only be setting the directory path, the Post Processor will not be active yet.
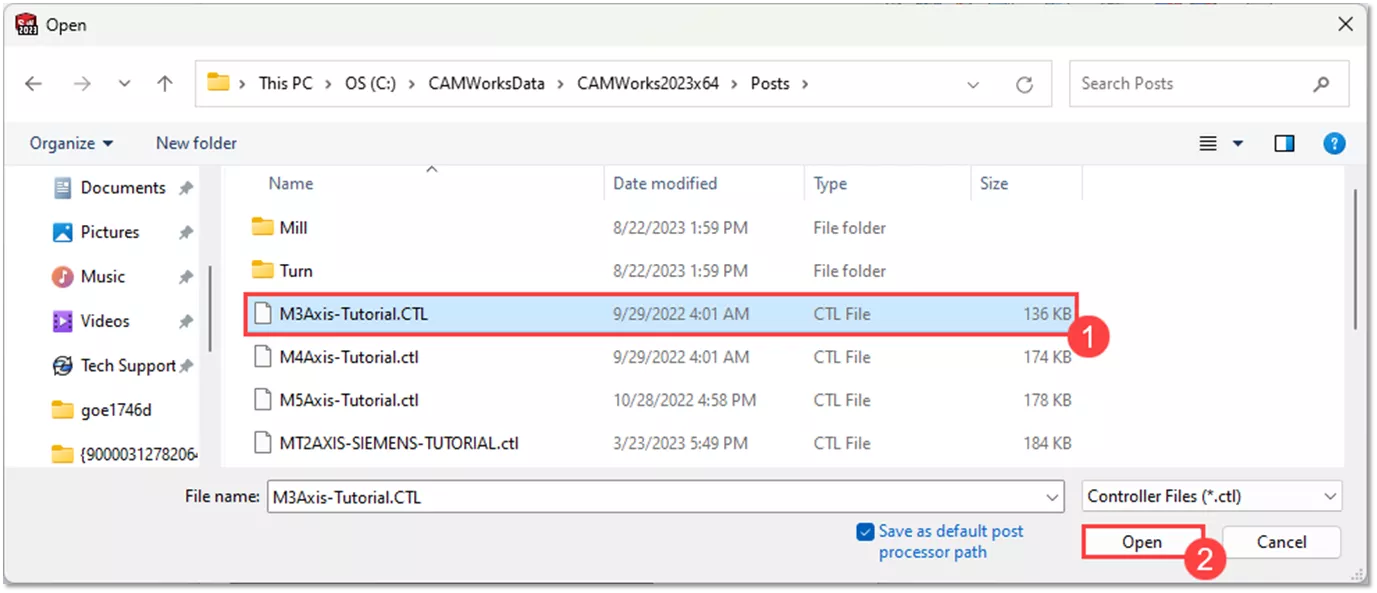
Once you set the directory, the list of posts in the directory will populate, and you can choose the post from the list you want to set active. In this example, I’m using a HAAS VF3 Post. Once you pick the post from the list, click the Select button to set the path active.
Import Templates and Tools
Template and tool files can be brought forward to the new version by simply copying them from their current directory into the default directory of the new version. CAMWorks has default paths for these files, adding them to the default directory will make them available when using the template selection drop-down menus, or when adding new tools to the Technology Database. If you haven’t customized these files, this step can be skipped.
That’s it! Your old machines, tool cribs, strategies, post processors, and tools will now be available in the latest CAMWorks update.
Editor's Note: This article was originally published in February 2013 and has been updated for accuracy and comprehensiveness.
Related CAMWorks Content
![]() Add Your Machine to Your Tech DB
Add Your Machine to Your Tech DB
Backup and Restore Your SOLIDWORKS CAM & CAMWorks TechDB
About Nick Stanley
Nick Stanley is a SOLIDWORKS Technical Support Specialist at GoEngineer.
Get our wide array of technical resources delivered right to your inbox.
Unsubscribe at any time.