Fig. 3: Maximum Solid Temperature for First Analysis (auto time step)

Fig. 4: Maximum Solid Temperature for Second Analysis (flow freezing enabled)
SOLIDWORKS Flow Simulation allows for the simulation of steady-state and transient heat transfer problems. A steady-state analysis is run to determine how the heat transfer of a system stabilizes (i.e. becomes unchanging). A steady-state solution does not inform the analyst as to how much time it takes for the system to stabilize. However, a transient heat transfer analysis can be run to determine the amount of time for the system to reach steady-state. The drawback with running a transient heat transfer problem is that the calculation can take a long time to complete. This is due to the SOLIDWORKS Flow Simulation solver using very small time steps to march through the calculation.
The time step used by the solver can be adjusted manually, but specifying too large of a time step can cause solver stability problems during the calculation. One potential issue with using a manual time step is that the solution may march along with no problems and then all of a sudden the system temperatures spike to unreasonably high values and the solver terminates with a “Solver Abnormally Terminated” error message. This is the main reason why the solver automatically uses small time steps to help ensure solution stability. There is a SOLIDWORKS Flow Simulation solver option which can be enabled called Flow Freezing. This option can be used to help speed up both steady-state and transient heat transfer calculations.
Flow freezing allows for the specification of parameters to minimize the CPU time needed for the solution. This is done by freezing values of all flow parameters, with the exception of fluid and solid temperatures and fluid substances concentrations (if multiple substances are considered in the analysis). These parameters usually converge more slowly as compared to other flow parameters. So when flow freezing is active, the solid and fluid temperatures as well as substance concentrations are calculated at each iteration. The other flow parameters are assumed static or unchanging when flow freezing is active.
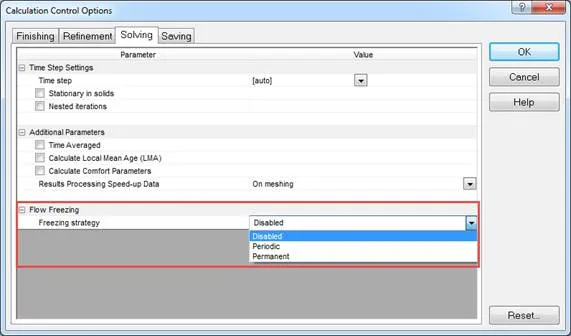
Flow freezing can be enabled from within the Calculation Control Options dialogue window.

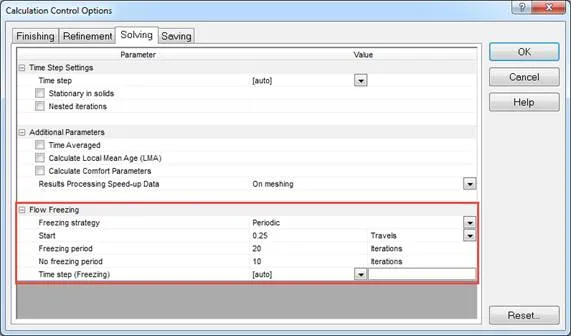
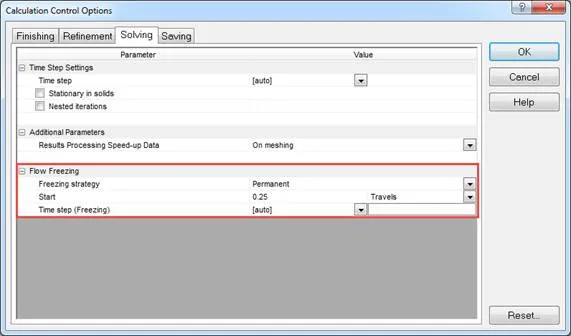
There are two strategies that can be used – Periodic and Permanent.
The periodic strategy allows the user to configure when flow freezing starts, the period it is active, the period it is inactive and optionally the specification of a manual time step to use when flow freezing is active. The start value can be set to use a unit of travel, iteration or physical time (if time-dependent is enabled in the General Settings dialogue window). The freezing period and no freezing period value use iteration as the unit. Beginning from the Start moment, the calculation is performed with freezing enabled for the interval specified in Freezing period. Then freezing is disabled for the interval specified in No freezing period. After this the flow freezing is enabled again and so on until the calculation finishes.

The permanent strategy includes settings to denote when flow freezing starts (unit of travel, iteration, or physical time) and optionally the specification of a manual time step to use when flow freezing is active. Beginning from the Start moment, the calculation is performed with freezing enabled until the calculation finishes.

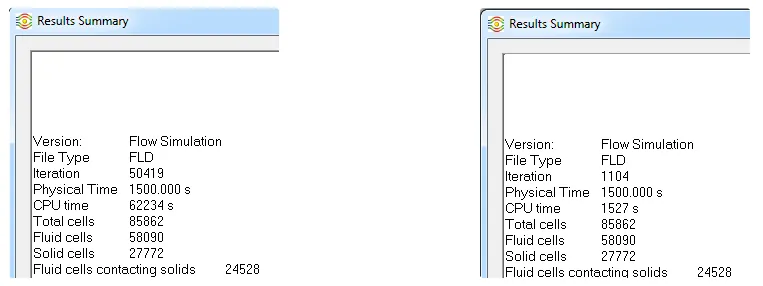
I ran two natural convection transient analyses of a heat sink with an applied heat source to the bottom surface. The first analysis was run without flow freezing enabled and using the auto time step setting. The second analysis was run using the same base setup but with flow freezing enabled. I set the physical time setting for both analyses to 1,500 seconds. The first analysis took over 17 hours to run and more than 50,000 iterations (Fig. 1). The second analysis took a little over 25 minutes to run and just over 1,100 iterations (Fig. 2). This equates to the first analysis taking over 40 times longer to complete.

Fig. 1: First Analysis (auto time step) Fig. 2: Second Analysis (flow freezing enabled)
The maximum solid temperature of the heat sink obtained was very close to each other between the two different analyses. The maximum solid temperature obtained for the first analysis was 119.65 °F (Fig. 3) and 119.72 °F for the second analysis (Fig. 4).

Fig. 3: Maximum Solid Temperature for First Analysis (auto time step)

Fig. 4: Maximum Solid Temperature for Second Analysis (flow freezing enabled)

About GoEngineer
GoEngineer delivers software, technology, and expertise that enable companies to unlock design innovation and deliver better products faster. With more than 40 years of experience and tens of thousands of customers in high tech, medical, machine design, energy and other industries, GoEngineer provides best-in-class design solutions from SOLIDWORKS CAD, Stratasys 3D printing, Creaform & Artec 3D scanning, CAMWorks, PLM, and more
Get our wide array of technical resources delivered right to your inbox.
Unsubscribe at any time.