Importing Files into SOLIDWORKS Manage from a Folder
Creating records for files in SOLIDWORKS Manage can be tedious if there is a large number of files. Here we’ll explore importing files as records and attaching files to other records as related files.
SOLIDWORKS Manage Excel Importer tool
A hidden gem in SOLIDWORKS Manage is the Files and Excel Importer tool. This tool resides in the Manage Client installation folder under the name swm.excelimportwizard.exe.
Launching this application will first prompt with a login to the Manage instance. Once logged in, a dialog will give us some options for importing files. In this example, I will be using the Import Files tab.
To import files we first need to give SOLIDWORKS Manage a table where import information is stored.
This won’t create a database table in our scenario but will provide a label for the data being imported. Enter a value in the field for Create New Table and click Create Table. It will populate in the list of Existing Tables.
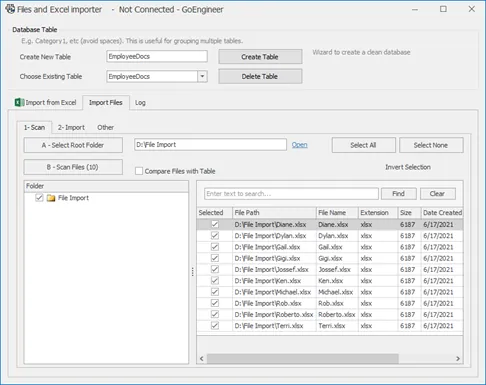
Select the Root Folder to locate the folder to scan. Here I’ve selected a folder on my D drive that I know contains all of the files I want to import.
Hitting Scan files will scan the directory and list all files found. We can check the boxes to include them in the import individually or hit Select All for all files found.
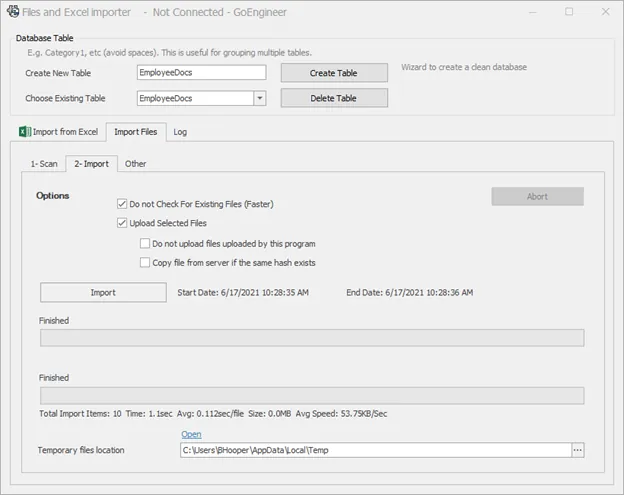
On the Import tab, we only need to click the Import button. This will process all of the files selected on the previous tab and upload them to the Manage File Server.
Configuring the Import Destination
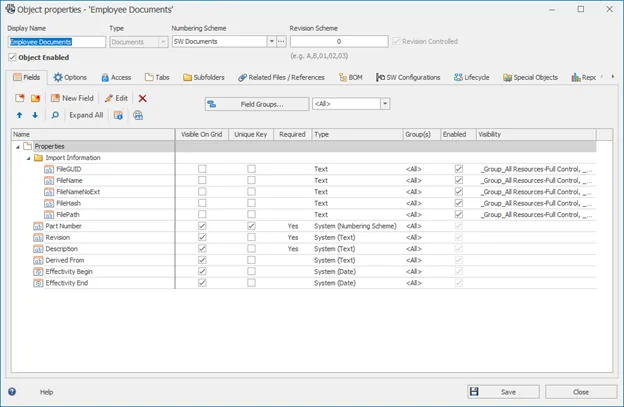
Importing files requires that we have fields for specific information in our destination object.
Here I have added five fields for the import information. When we are done, we can remove them but, they need to be present for the import process. Properties from the import will be mapped to these fields on the document records or the parent records they are attached to. The names do not need to be specific, but a text type field for File Name, File Name without Extension, File Hash, File GUID, and File Path.
Configuring the Import Source for Import
Importing the files as records requires that we configure an import source. We’ll do this in the Administration dialog under Import/Export and Data Sources.
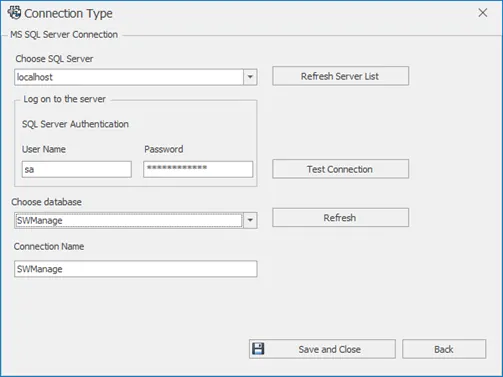
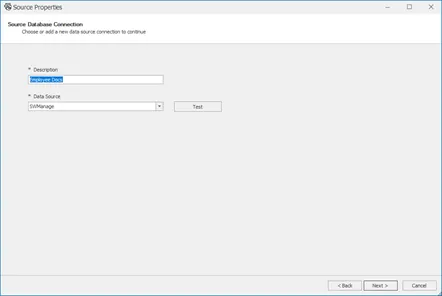
First, we’ll need to create a data source connection to the Manage database. To do this, create a new connection to an SQL database and choose the Manage database for the current instance. Save and close this for the next step.
Next, we'll create our Import source under Import/Export. Click New and fill in a Description and the Destination for the information.
This is the same location that we created fields for earlier.
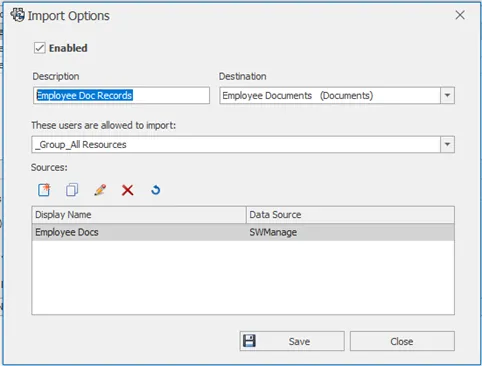
In the bottom portion under sources, click New. A wizard will appear to walk us through the next steps.
On the second page, give the connection a name and pick the data source. This will be the Manage database connection we created.
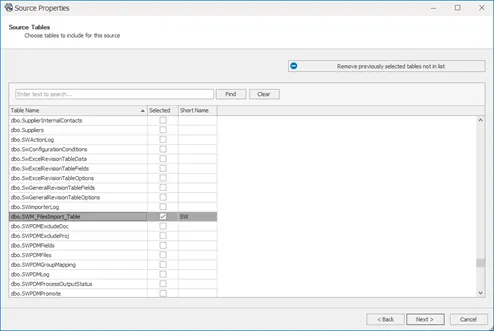
Click Next to select the database that is housing the file information. The database we are looking for is SWM_FilesImport_Table.
Check the box for the database and hit Next. If necessary, we can add filters. This can be based on the name we provided during the import or any part of the file name or path or information gathered during import.
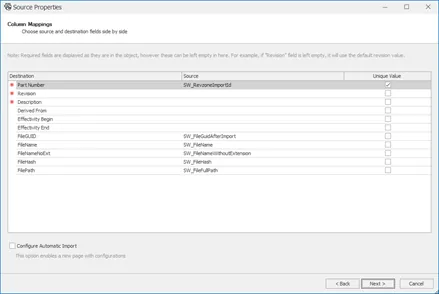
Clicking Next brings up the Column Mappings page. Map the appropriate source columns to the matching fields in the destination object, picking a unique key from one of these.
If the goal is to update existing records and add the files to the Related Files page, the unique key should match an identifier on the records being updated.
When complete, click Next and finish the wizard.
Importing Records Using Source
To import the records using the source that we configured, go to the object location that we set as our import location. Under the Tools menu, click the Import button. The dialog that shows will walk us through the records we are adding or updating.
To import files, we need to enable an option to Configure the file import. Check the box Options and then the box for Configure file import options. This will enable an extra page in the dialog for file import. If we are updating records to add to the related files tab, check the box to Ignore Types. This will disable the ability to create new records, limiting us to updating existing records.
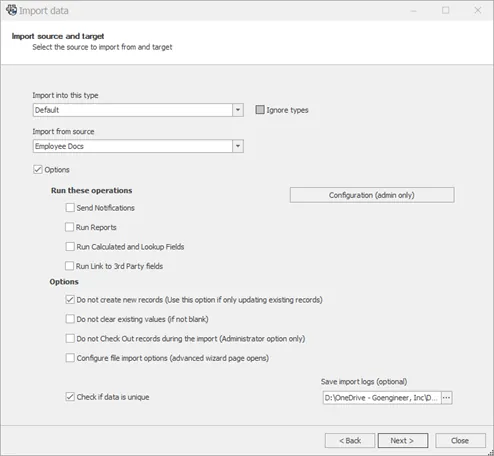
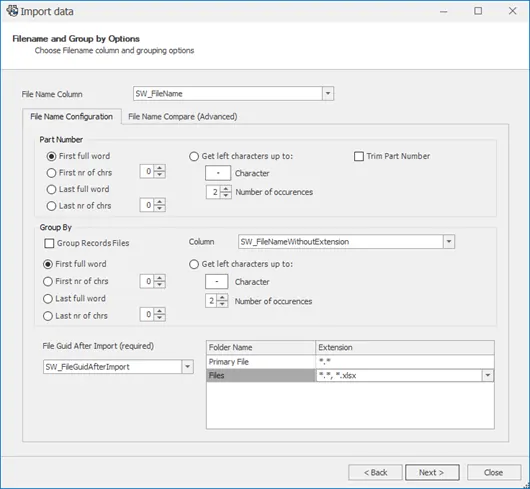
Clicking Next brings us to the file import screen. It is recommended that we turn off Trim Part Number and Group Records Files options.
Under Folder Name / Files, click the extension to filter the files by type. Click Next to get a preview of the records being created, then Next again for the records being updated.
Hit Next one more time. Click the Import button to begin the import. Be aware that the larger the dataset, the longer this will take. When it completes, click Finish to close the dialog.
With this method, large sums of files can be imported or attached to records in SOLIDWORKS Manage. This is not limited to records but processes as well. Doing this can easily bring in legacy data that otherwise would not have been worth the manual entry process.
I hope you found this article helpful. Learn more about data management in SOLIDWORKS below.
Want to Learn More?
What's New in SOLIDWORKS Manage 2020 (Part 1)
What's New in SOLIDWORKS Manage 2020 (Part 2)
![]() SOLIDWORKS Manage Tutorial - Going Beyond PDM Professional
SOLIDWORKS Manage Tutorial - Going Beyond PDM Professional

About Bryce Hooper
Bryce has been using SOLIDWORKS since 2008 in multiple roles across multiple industries from industrial vacuum to RV frame design. He spent many of those years spent as a PDM administrator, implementing 3 PDM vaults along the way. He earned his CSWP in 2019, followed by his CSWE in 2013. Programming is a passion that has followed Bryce through his various positions, writing custom business applications to improve design processes. In his spare time Bryce is a gamer, a maker, and a brewer.
Get our wide array of technical resources delivered right to your inbox.
Unsubscribe at any time.