How to Remove the SOLIDWORKS Toolbox Flag
Want to create a custom part from a Toolbox item, but SOLIDWORKS is still showing the toolbox flag in the Feature Tree? That’s because it’s still linked to the Toolbox part! Here’s how to permanently break that link and dissociate it from the original file.

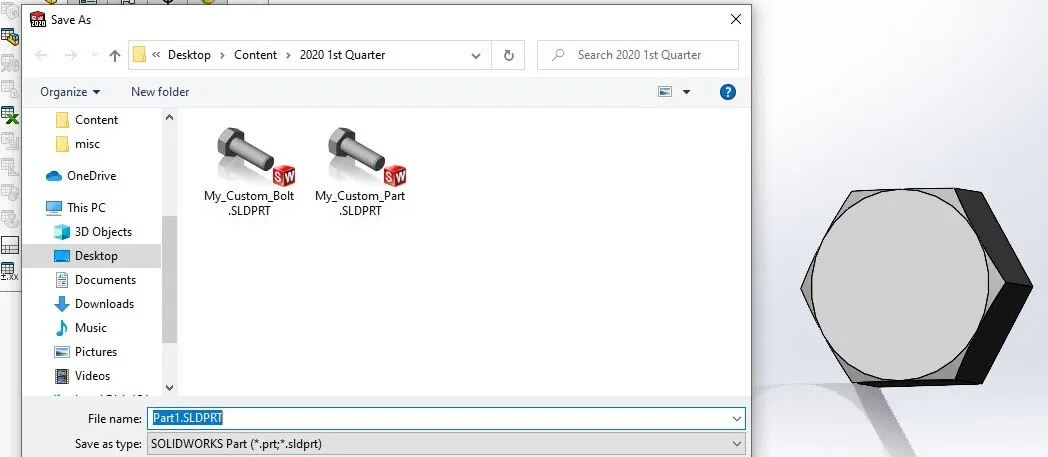
Save Your Part
Before making any changes to the part, we need to save it. This way, we have a distinct part file that we can divorce from the original part.

Run the SOLIDWORKS Executable “sldsetdocprop.exe”
Browse to the <install directory>\toolbox\data utilities folder and locate the executable file “sldsetdocprop.exe”. A typical file path will look something like this: “C:\Program Files\SOLIDWORKS Corp 2020\SOLIDWORKS\Toolbox\data utilities.” When you find it, right-click on it and select “Run as administrator.”

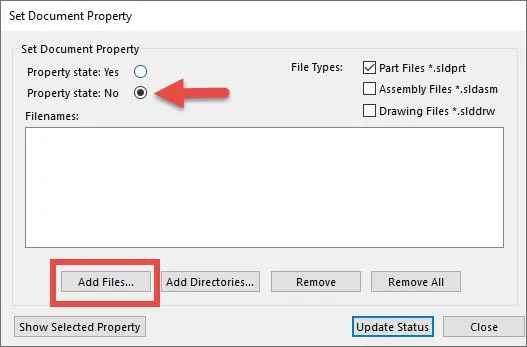
Change the Property State to “No”
Now we need to tell SOLIDWORKS that this is OUR part. In the dialog box that’s opened, set “Property state” to “No.” Now, select “Add Files…” and browse to the part file you created. This is the setting that breaks the link.

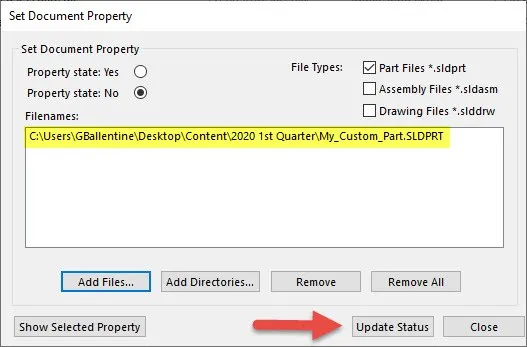
Update the Status
Now that we have the right file and setting selected, we need to click “Update Status” to make the changes permanent.

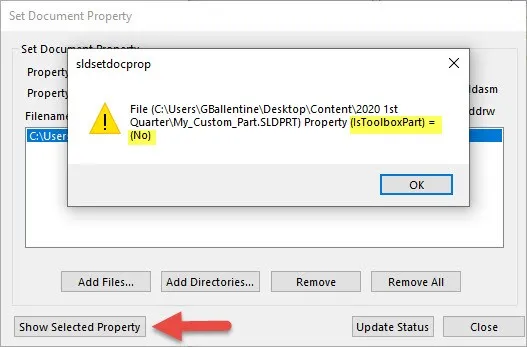
Verify That it Worked
You should be all set, but if you want to make sure it worked, just select the file in the same dialog box and click “Show Selected Property.”

You’re All Set! The feature tree should now show a part icon as opposed to the toolbox icon.
![]()
more SOLIDWORKS tips & tricks
SOLIDWORKS Pack and Go and Copy Tree Tool Comparison

About Gary Ballentine
Gary Ballentine is a Mechanical Engineer based out of our Headquarters in Salt Lake City, Utah. He earned a Bachelor’s degree from the University of California, Davis, a certification in Technical Writing from San Francisco State University, and a Bachelor’s degree in Mechanical Engineering from the University of Utah. Gary has been part of the GoEngineer family since April 2019 as a Support Engineer and Certified SOLIDWORKS Instructor.
Get our wide array of technical resources delivered right to your inbox.
Unsubscribe at any time.
